

Tagged Under
The Performance Recorder has added a Loop Record capable “Pattern” Function. This includes many real-time and offline adjustments you can make to your recorded MIDI data. We must stress, there is no one-way to utilize this new feature. It is designed to be extremely flexible. What we will attempt to show here is a few of the possible ways you can approach this new powerful feature. And point out some of the skills you will need in order to take full advantage of what is on offer. As you’ll see, it can be used in a variety of ways, for a variety of purposes — we recommend that you take your time and go through this article thoroughly:
Background: What is the Performance Recorder
The PLAY/REC FEATURE: In previous OS versions, the Performance Recorder could be used to record MIDI data in linear fashion to what are called, “Songs”. Or you could record your interaction with the synth as a 24-bit/44.1kHz Stereo .wav Audio File directly to a USB flash memory device connected to the instruments “To Device” port.
The MIDI Song recorder could be set to LOOP playback or play as a linear structure. The Audio File playback is always linear. With the addition of the “Pattern” function, you can now record in Loop fashion. Patterns are MIDI data and can be used to construct tracks for a Song; They can be used in a variety of ways – you are invited to find your favorite use. You can move data in either direction between the linear Song and the looping Pattern. If you have recorded a long jam to a linear Song, you might use the Pattern feature to work on specific areas of your performance. You might build your Song by creating several musical Pattern sections, then chaining them in a specific play order. How you use the Performance Recorder is really up to you. It is a creative tool.
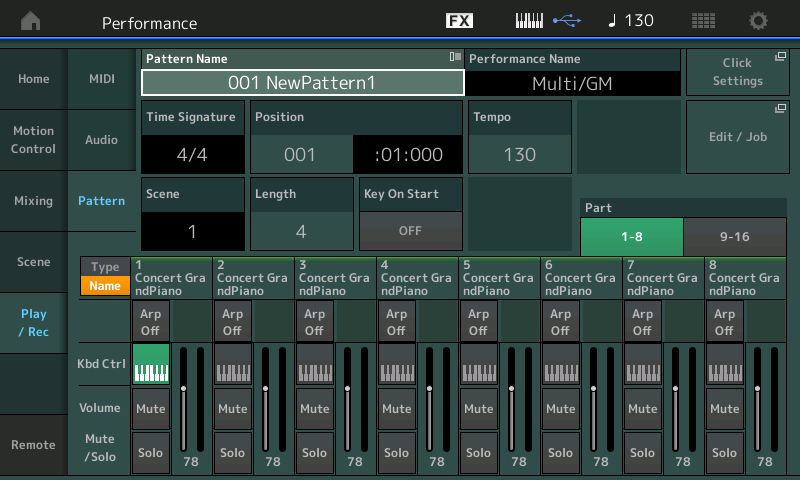
The Patterns are assembled on the 8 SCENE buttons. Each of the eight SCENEs can be a different section of a composition or you can use each as a complete composition. That is for you to decide. All of the 8 Pattern SCENEs will share the same Tempo, however. Tempo is stored in the Performance.
- Each of the 128 Patterns offers loop-based recording that contains 8 segments (Scenes) that can be from 1 to 256 Measures in length.
- “Loop” Record can be set to OFF; “Key On Start” is available; Useful for when recording with Arpeggio Phrases.
- The “Length” and “Time Signature” are set prior to record – these determine when the Pattern cycles to the top and/or when recording will stop.
- Each of the eight SCENE buttons house a set of 16 MIDI Tracks.
- Each of the possible 128 Patterns can be created and linked to a specific Performance and/or to a Performance in a LIVE SET.
Implications: The Length setting (1-256 measures) means that these Pattern Scenes can be musical sections, or entire compositions, as you may require. Arpeggio data can be recorded to a Pattern Track allowing you to then “Append”, or otherwise change it to suit your needs. Data recorded to a Pattern Track can be used to create your own custom Arpeggio data.
Accessing the Pattern Sequencer: Navigation
To access the feature from the [PERFORMANCE (HOME)] screen you can either touch “Play/Rec” in the screen or you can press the front panel [•] Record button.
- Use the touch screen “Play/Rec” approach when you want to return to the current Sequencer data associated with this Performance, if any.
- Use the hardware [•] Record button approach when you want to initiate a new recording for the current Performance.
Alternatively, you could hit the [>] Play button – this will also take you to the Play/Rec Function and select the last accessed item in the Recorder.
Similar to how the linear MIDI Song function works, a Pattern can be linked with a particular Performance. This means you can, once this link has been established, scrolling through the Pattern Name/numbers will automatically recall the Performance you used to create the data. Once linked, you can LOAD “Pattern&Perf”, in a similar fashion to how you can load “Song&Perf”.
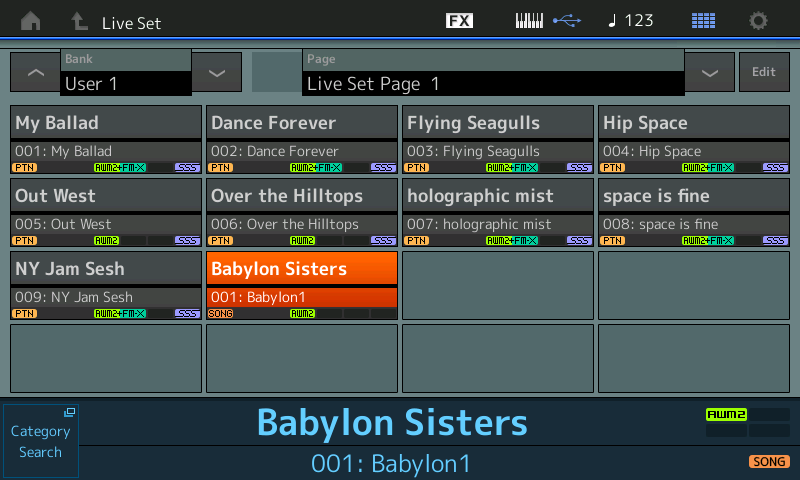
You can access “linked” Pattern&Perf and/or Song&Perf directly from a User LIVE SET:

Before moving on with a more detailed tour of the Pattern Sequencer, let’s take a look at each of the ways you can record in MONTAGE and MODX.
3 Powerful Functions: MIDI, AUDIO and PATTERN
MIDI Record (Song): From the “Play/Rec” > “MIDI” display option, shown below, you can record and/or playback using the currently selected Performance. You can record knob operations, controller operations and Arpeggio output, along with your keyboard playing to the specified Track or Tracks that the Performance is set to trigger/control, as MIDI events. You can record single or multiple tracks, simultaneously. Being a “Performance Recorder” – what you hear, when you interact with the Keyboard, is what gets recorded. You do not have to ‘Put a Track in Record’, as you may be used to with other traditional Sequencers. The Performance Recorder documents what you do – automatically, the Parts you are playing each have a Track dedicated to record your interaction with them:
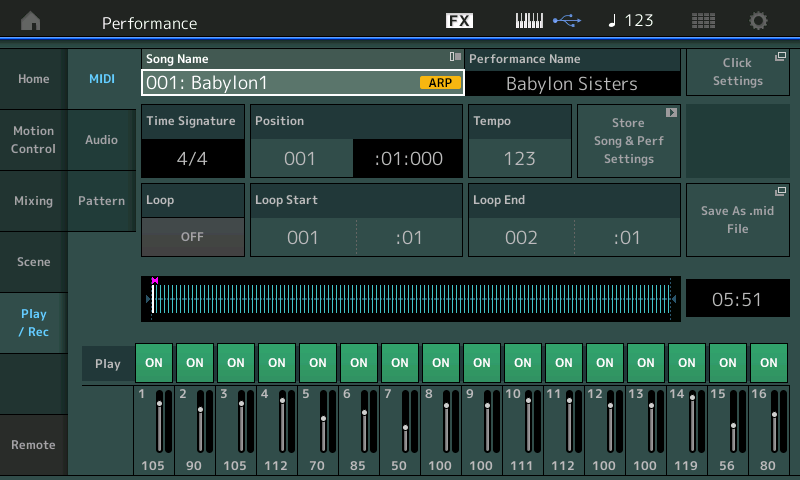
MIDI data recorded here is automatically placed in the Internal memory [UTILITY] > “Contents” > “Data Utility” > “SONG” Folder. The SONG Folder is available to your computer via the USB connection using the MONTAGE/MODX CONNECT utility program. You can import any data from the Song Folder by dragging and dropping it directly into your DAW. You can, for example, drop the Song data directly into a blank Cubase Project, where you can have Cubase split the data to separate MIDI Tracks:
The screenshot above shows a Song occupying Song 001. Each Song is given a number 001-128 and can be directly accessed from the screen above by incrementing the number – you can still tap the “Song Name” box and then Load a Song from the SONG Folder.
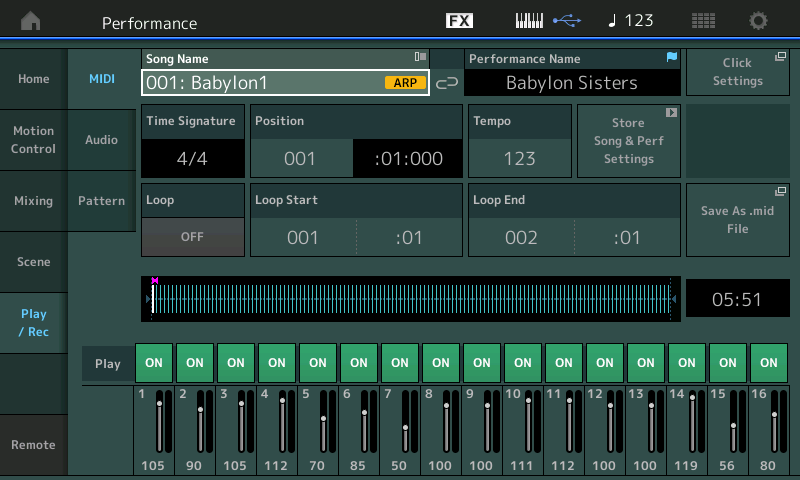
The currently loaded Song can be associated (linked) with the Performance, so that when you recall the Song Name, the appropriate Performance used to create it is recalled, as well. Under the Performance Name touch the box “Store Song & Perf Settings” to establish this link:
The chain links turn blue and interlock, shown above. This indicates that the association has been established. On the right side of the screen you can see a shortcut box to facilitate “Save As .mid File”. Useful for exporting it for individual backup. It is recommended that you keep a copy of each composition as a .mid (Standard MIDI File) – this will facilitate moving them when necessary. More on that later.
You can place this linked Song & Performance directly into a User Live Set:
- From the MIDI Song screen, press [SHIFT] + [LIVE SET]
- Tap the location you wish to place it:
Once placed in a Live Set, you can begin playback immediately by pressing the [PLAY] button or using a Foot Switch assigned to that function (FS = Play/Stop)
Audio Record (direct to USB drive): From the “Play/Rec” > “Audio” display, shown below, you can record yourself as a WAV format (44.1kHz, 24-bit, stereo) audio file to a USB flash memory device connected to the “To Device” port. It is possible to record continuously for up to 74 minutes. You can record what you play on the Keyboard, along with whatever you have connected to the A/D In, directly to an attached USB drive. Useful for sharing with friends and getting ideas down quickly:
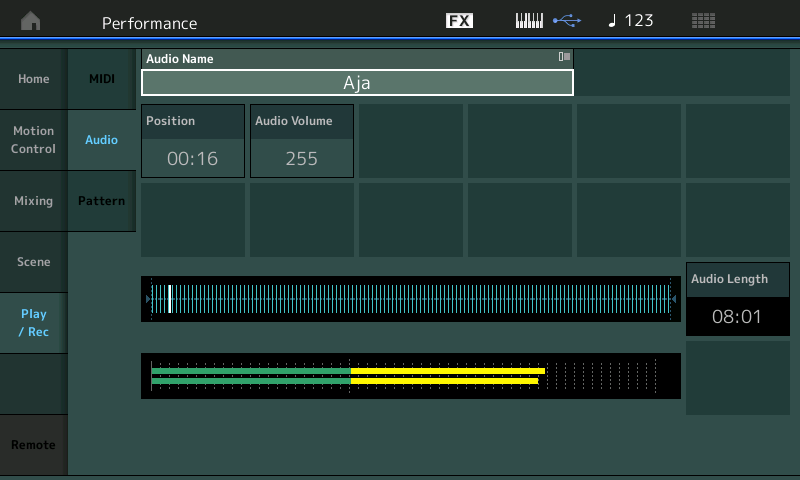
Audio Record Tip: If you place the “CLICK Mode = Always”, you can reference your Audio recording to a specific Tempo. This will facilitate placing the resulting wave file in a DAW and facilitate quickly matching it with a given tempo. Tap the Quarter Note icon on the top line of the screen to see the TEMPO SETTINGS page, and the Click Mode setting.
Pattern Record: With MONTAGE OS v3.0 and the MODX OS v2.0 the Performance Recorder now has a third function: “PATTERN” (shown below):
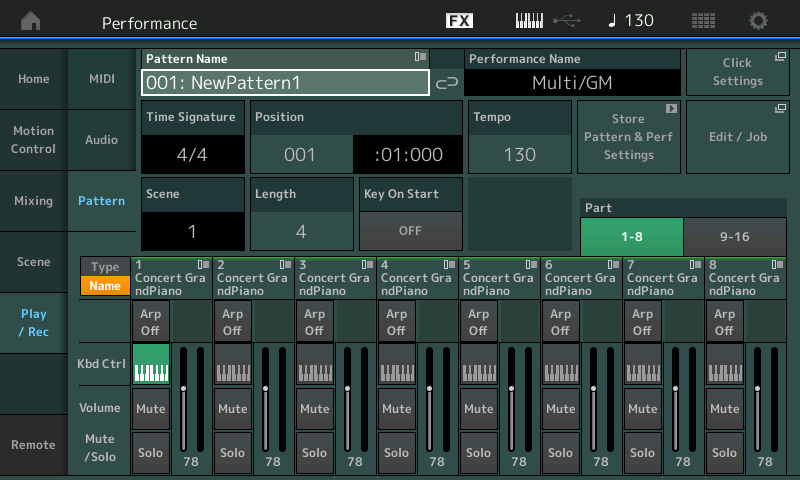
The “Pattern” display gives access to a Loop-based MIDI Recorder with 16 Tracks and 8 sections accessible via the 8 Scene buttons. Pattern data can be manipulated non-destructively, with “Swing Quantize” features and other real-time “Play FX” (offsets). These are found under the “EDIT/JOB” option box. These offsets can later be written, permanently, into the Track data using a “Normalize Play FX” feature. (Please see separate article on “Swing Quantize and Play FX” for more details).
The Record “Length” is set prior to recording a Track – this establishes how many measures will be recorded before the recording cycles back to the top. The Length can be dynamically adjusted during playback, however.
If you set the Record Length = 4 Measures, it will cycle four measures while you are recording. Each Track can have a unique “Length” – this means you can record your Drums, Bass, and Chordal instrument doing an 8-measure Loop and then add a 32-measure Synth Lead Track.
You can change the “Length” setting during playback. The data recorded to all Tracks will only play the specified number of measures before cycling to the top. If you change the current “Length” setting during playback, the recorded data will begin cycling at the recorded Length setting.
For example, say you create a 4-Measure recording. When you play it back, setting the Length to 1, will cause it to simply play Measure 1 over and over again. However, if you set the playback LENGTH to 6 Measures, it would then play recorded measures 1, 2, 3, 4, 1, 2 and then begin again: 1, 2, 3, 4, 1, 2 and so on. It does not put any empty measures into play, it simply plays the set Length and returns to the top to begin again.
The Pattern Playback Length is dynamic and can be used to adjust the LOOP during real-time playback. You may set it to Loop just 8 measures, then dynamically change it to 32-measures to reveal your Lead part, which was recorded in measures 9 through 32.
Moving between Linear and Loop: Data can be moved back and forth between the linear MIDI Song and the looping Pattern functions. This facilitates getting data from a linear recording: using the “Get Phrase” Job – bringing in a set number of measures from any Track – then using the Pattern function’s EDIT/JOB tool set, you can affect changes to the data before putting it back into the linear structure: using the “Put Phrase” Job. Again, there is no one way to approach using this tool. But this suggests several workflows:
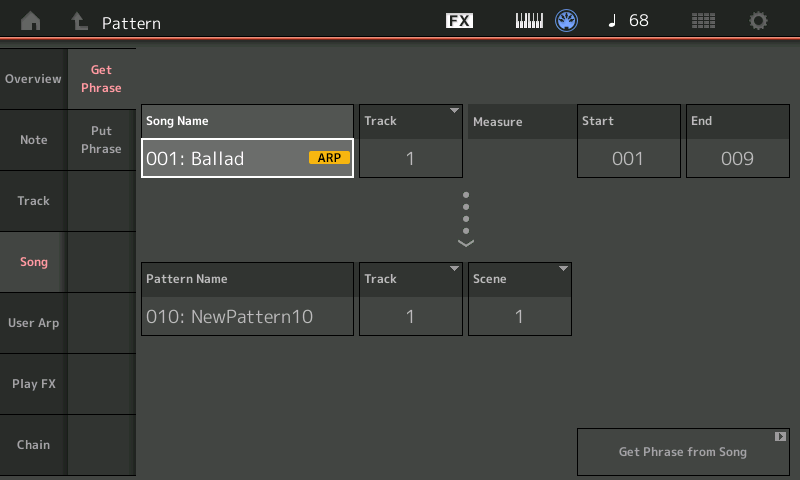
Example: When constructing Drums you can use the PATTERN function to work on placing fill-ins, giving the drum part a different ‘feel’, etc. If you’ve recorded a long jam in a linear Song, using a fairly generic Drum Arp as a timing reference, you may opt to use the Pattern function’s “EDIT/JOB”: “Song” > “Get Phrase” to grab data to work on. Bring the Drum Track into the Pattern area, where you can select what you’d like to use. You can selectively Erase or remove drum sounds, add fill-ins, replace the entire recorded Arp with your own creation, etc. That is, use the Pattern area as a workbench. Then using “Put Phrase”, you can place the corrected/updated data back into the linear Song at a specific Measure. When you define the Measure Start and End works so that if Start = 001 and End = 009, you have defined 8 complete measures. The distance is from “TOP OF” the Start measure to “TOP OF” the End measure.
Advanced “Edit/Job” tools, like “Divide Drum Track” (covered in a separate article) will let you isolate Drums by instrument group, and work on everything concerning that Track; Changing everything from the Drum sound that was used to the overall feel of your MIDI performance.
Example: When constructing your composition, you might record a long jam to the MIDI Song area, then grab the best measures and construct musical Sections, using the Pattern function. Replacing parts that you wish to change, adding new Parts, etc. These Get/Put Phrase Jobs can be used on any (and all) Tracks that you desire allowing very flexible applications.
Pattern Chain: The musical sections stored as SCENES can be “Chained” and then converted to a linear Song. The act of Chaining is simply creating a ‘Play Order’ for the different Scenes. You can specify on a timeline at what measure each SCENE is recalled.
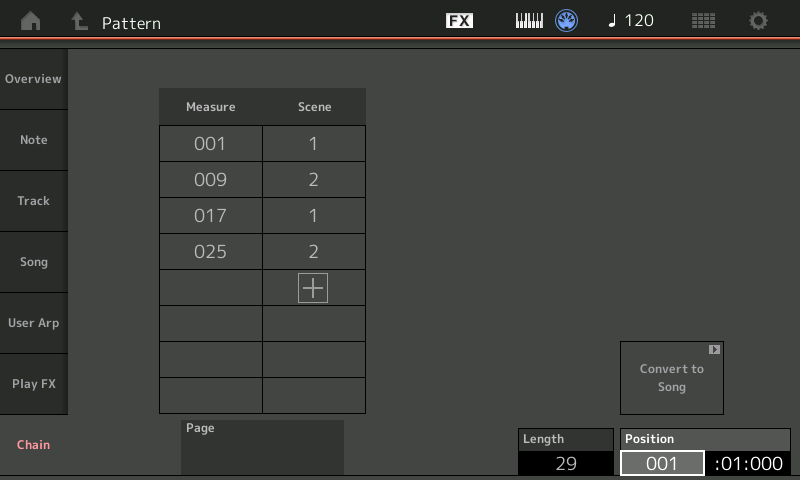
Important Note: Added in the new version, is the ability to remember KBD CTRL active status on a per SCENE basis, so it is possible to preset which PARTS will be available via the Keyboard with each SCENE change (musical Section). This new feature adds yet another method to seamlessly transition what is sounded by the keyboard interaction (and unlike MUTEs there is no cut off of the sound). More on this later.
Record Setup: When you press the [RECORD] button, you arrive at the Record Setup screen. If a brand-new recording, you will be given an opportunity to set the “Time Signature”. Both the Time Signature and the Length must be set prior to the original recording. You can also set “Tempo”, “Record Quantize” value, “Loop” On/Off. “Key On Start” is also available.
Important Note: (Key On Start = ON, Loop = Off would be the setting when recording ARP Phrases to the Pattern Sequencer. This will ensure a clean automatic start and finish to the Recording – especially useful with Arp Recording. “Key On Start” can also be used for normal recording instead of using the Count-in. This will guarantee your first note is placed at the very top of the section (Scene).
Shown below is the Record Setup screen (the RECORD button will be flashing red): Items in black background cannot be changed on this screen:
- The “Performance Name” – you select the Performance prior to going to the Pattern sequencer
- The “Beat/Clock counter” – all recording must start at a Measure line using the “Position” box.
- The “Scene” – you select the Scene you are recording into using the dedicated eight [SCENE] buttons; You record one Scene at a time.
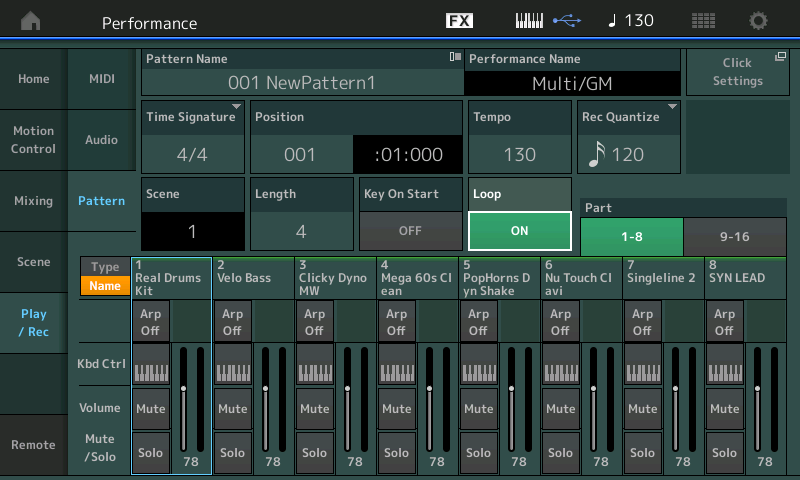
While in the PATTERN area, you will also notice the lower half of the screen shows an abbreviated Channel strip mixer from the HOME screen. You can change the view to see PARTs “1-8” (currently selected) or PARTs “9-16”.
Part 1 “Real Drums Kit” is the currently *selected* Part – you can see a blue highlight surrounding the Part 1 area. Slightly different from the options shown on the HOME screen, you are shown only the “Type/Name”, “ARP Off/On/Hold” option, “KBD CTRL” (for Parts 1-8 only), Mute/Solo status, Volume slider/value and an activity meter.
Functions concerning the NOTE RANGE are not shown in this view and are not accessible during the time the Sequencer is running. This is an important point when in the “PLAY/REC” area: In general, any edit functions that require reconstructing the Performance cannot be executed while the Sequencer is running. More on this fact below… See “Warning Message”
Touching the screen *selects* the PART for triggering via the Keyboard or you can use your favorite PART SELECT method.
MONTAGE you can use the right front panel [PART SELECT] buttons.
MODX you can use the dedicated [PART SELECT_MUTE/SOLO] button and then the screen options.
Do’s and Don’ts and Do Overs
No traditional event list editing is available on the instrument, instead a series of “EDIT/JOB” functions allow you to creatively sculpt your recorded performance into a finished form. If in depth Event Editing is required, export your work to your computer DAW. You can connect the instrument to your computer via USB and open MONTAGE/MODX CONNECT… you can drag your work from the Data Utility SONG Folder directly to your computer DAW. (As another option you can export data from the Pattern Sequencer to a .mid and transfer your data in this fashion). Each SCENE must be exported as a separate .MID File to a USB stick.
EDIT/JOB Functions: A set functions that allow you to alter the data you have recorded. They are as follows:
- NOTE: Quantize, Velocity, Gate Time, Crescendo (velocity-based), Transpose, Roll
- TRACK: Copy, Exchange, Mix, Append, Split, Clear, Divide Drum Track
- SONG: Get Phrase, Put Phrase
- USER ARP: Create User Arpeggios
- PLAY FX: Play FX 1 (Swing Quantize), Play FX 2 (data offsets)
- CHAIN: Create linear structure > Convert to Song
Warning message: “Please stop sequencer”: When using the Play/Rec function, you have restricted access to certain areas of the architecture. You will receive a “Please stop sequencer” warning message when you attempt to select functions outside of the access area. This simply means the area or function you are attempting to access cannot be used while the Sequencer transport is running. We will take a close look at what you can access in real time (during playback and recording functions).
Extra Credit: In general, any function where you are rerouting signal flow, or making a fundamental change to the structure of the Performance itself, will be restricted (off limits). If you wish to add Parts, or reconstruct your Performance data (change controller assignments, effect routing, etc., etc.), you can, but you must temporarily stop the Sequencer, return to the [PERFORMANCE (HOME)] screen, then make your additions and changes.
Pressing [EDIT] while in the Sequencer area reveals Sequencer EDIT functions; Please return the HOME screen, then press [EDIT] to make changes to the Performance structure.
This does not mean you cannot freely tour around, and change the values to the settings already in place. You will find the selection of functions to which you have real time access lean toward those you use during ‘performing’, over those you use for construction. Those that reconstruct routing are restricted. Once you see it from that view, you can proceed. It is, after all, a Performance Recorder. You create your Performance (put together the band) prior to going to the Studio. Once things are in place, you have a myriad of knobbed functions that you can access, immediately, while the Sequencer is running (playback).
MONTAGE and MODX Knobs
The MONTAGE KNOBS:
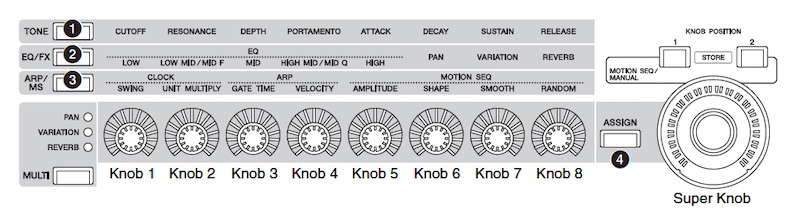
The (1) TONE, (2) EQ/FX, and (3) ARP/MS functions are accessible, when you press the associated button for that row. The eight Knobs can be set to their Assignable Knob functions, when the dedicated [ASSIGN] button (4) lit. The Knobs can behave as both PART (individual) or COMMON (overall) “Quick Edit” controls. When the [MULTI] button is used, the Knobs can be used as side-by-side PAN, VARIATION SEND and REVERB SEND for Parts 1-8 or 9-16, as you may require.
The MODX KNOBS:
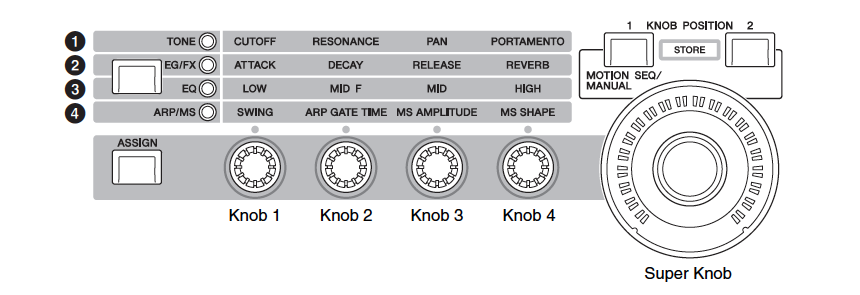
The (1) TONE, (2) EG/FX, (3) EQ, and (4) ARP/MS functions when you press the associated select button to activate the labeled row of four items. On the MODX to access the eight Assign Knobs: Press the [ASSIGN] button, the four physical Knobs that can be flipped from 1-4 to 5-8 by pressing the [ASSIGN] button again (flashes when 5-8 are selected). The Knobs can behave as both PART (individual) or COMMON (overall) “Quick Edit” controls.
The SUPER KNOB: Is ‘super’! It is always available to do what it is assigned to control within the Performance – no special button need be selected or lit for the Super Knob to do its thing, as with the other Knob functions. Added with the new version, you can now store which Parts are linked to the Super Knob on a per Scene basis, greatly expanding the possibilities. More on this later…
The CONTROLLERS: Ribbon (MONTAGE Only), Aftertouch (MONTAGE Only), PB, MW, Assign 1/Assign 2 Switches, Motion Seq Hold and Motion Seq Trigger buttons, are all accessible during play/record.
Front Panel REAL-TIME ACCESS: It is a Performance Recorder – assumes you have constructed the Performance and are now performing it.
Each PART, individually, can be accessed via the “Quick Edit” Knob Functions: “Quick Edit” screen example below shows Part 3, “Upright Bass AF1” selected during Pattern Play:
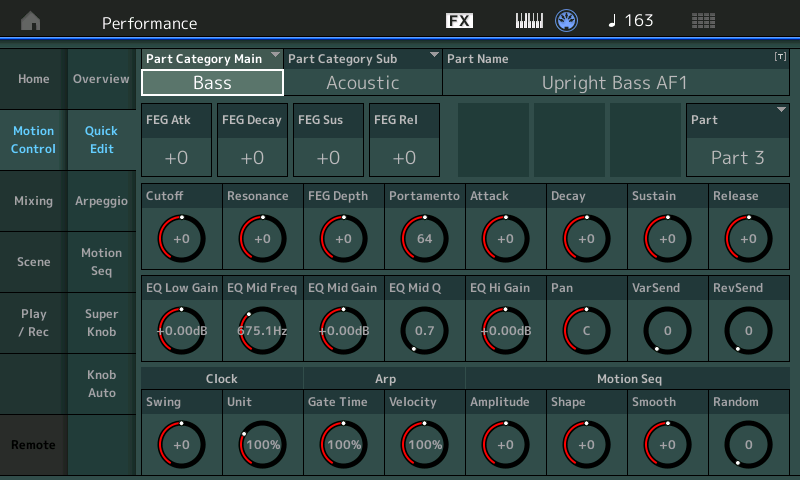
This is very much like having access to a full channel strip for each PART, or if Part = COMMON, the overall Performance.
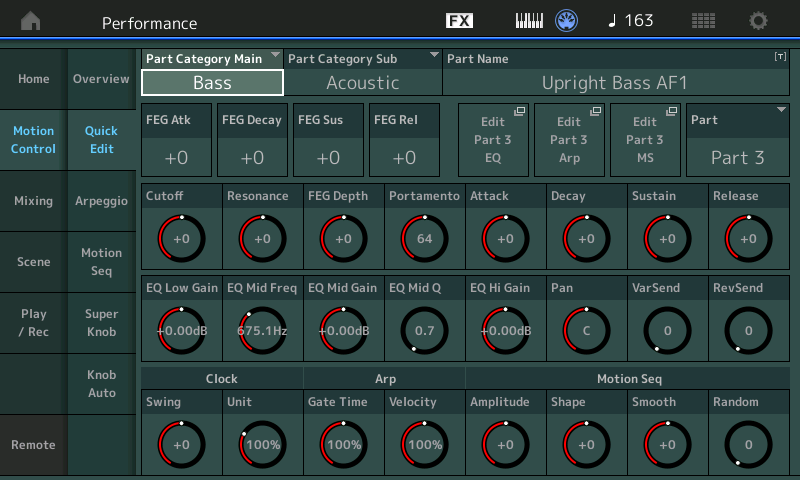
As shown, you have access to the Filter Envelope Generator’s Attack, Decay, Sustain*, Release; Cutoff, Resonance, FEG Depth; Portamento; The Amplitude Envelope Generator’s Attack, Decay, Sustain, Release; the Part 3-Band EQ with sweep-able Mid Frequency; Pan position, Variation Send, Reverb Send; as well as Offsets to both Arpeggio Phrases and Motion Sequences. (Greyed out/unavailable: are the 3 shortcut boxes to “Edit EQ”, “Edit Arp” and “Edit MS” which will reappear when the transport is stopped (shown below):
FEG Sustain – is only available when a single Part is selected (it will disappear when COMMON is selected).
Again: Deeper editing, that is, changing/reconstructing what is available, will not be possible while the transport is running. The 28 parameters shown on the “Motion Control” > “Quick Edit” screen are available during Pattern playback. Deeper editing to the EQ, Arps or Motion Sequences will need to occur after stopping playback.
Because the Pattern function has uses as a real-time performing tool, you will want to get comfortable with the front panel navigation. Your access to what is happening depends on an understanding of this navigation.
In the next article I’ll cover more of the Pattern Sequencer functions. Stay tuned!
Want to share your questions/comments? Join the conversation on the Forumhere.