

Tagged Under
You will need to have the following software components installed and the latest version of the MONTAGE firmware installed (The version available at the time of this writing is in listed in parentheses below):
• The latest firmware version for MONTAGE is available here. Update your MONTAGE before starting this tutorial (Version v1.20).
• Install latest version of the Yamaha Steinberg USB Driver.(Version 1.9.10).
• Install latest version of the MONTAGE Connect for Mac OS X plug-in. (Version 1.0.0).
• The version of Logic Pro X used in the tutorial is 10.2.4.
Audio MIDI Setup Utility
Before diving into Logic Pro X, you can check to see that your Mac and MONTAGE are connected with a useful application called “Audio MIDI Setup”. Once all the software components are properly installed and MONTAGE is connected to the Mac, open the Audio MIDI Setup application that resides in the Utilities folder (located inside the Applications folder). Open the Audio MIDI Setup application choose “Show Audio Devices” under the “Window” Menu. Below is what it should look like when MONTAGE is connected at the default 44.1 kHz/24-bit setting: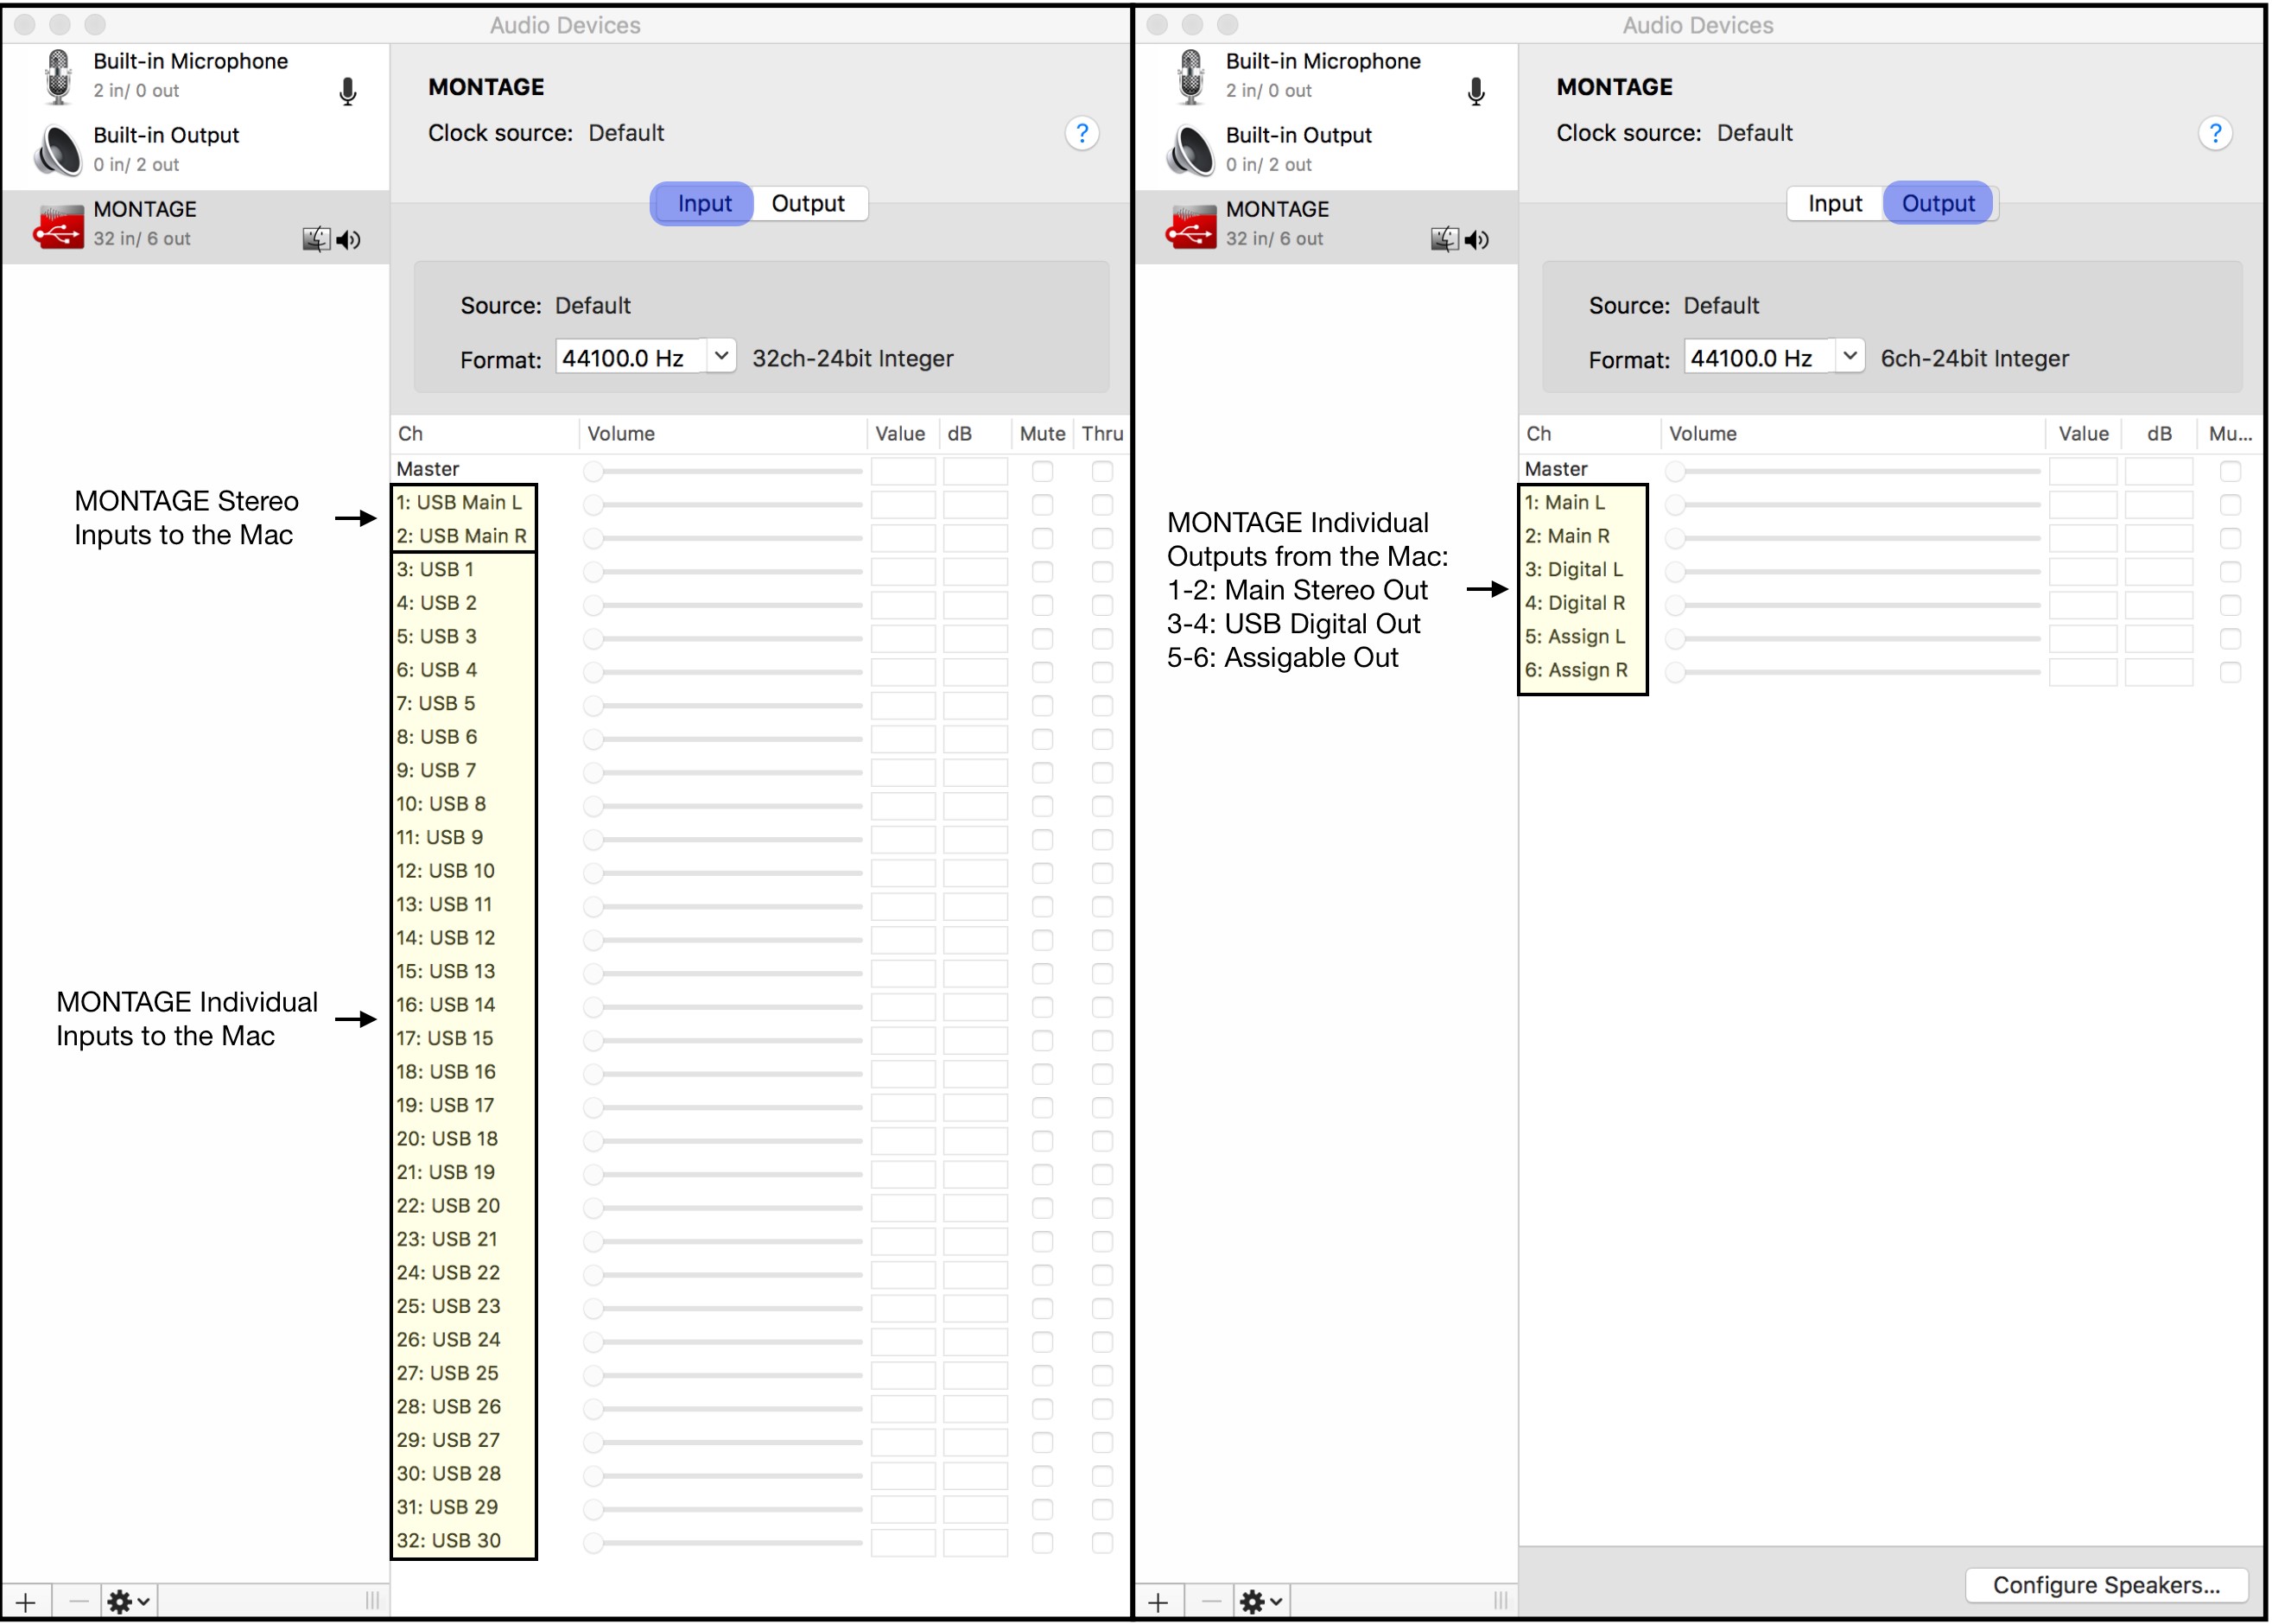
The audio setting above on the left shows the 32 digital inputs from MONTAGE to the Mac, with USB 1-2 being the main stereo out. USB 3-32 are each of the individual inputs. These can be configured as stereo pairs or as separate mono inputs to the Mac within each MONTAGE Performance. On the right are the 3 pairs of outputs from the Mac back to the MONTAGE. 1-2 is the physical main stereo out, 3-4 is the USB digital out from the computer and 5-6 are the physical assignable outputs. All of these digital inputs and outputs will appear in Logic in the same configuration. This is what you should be seeing if the Yamaha Steinberg USB driver has been installed.
Next, open the MIDI Studio view by selecting “Window” from the menu and “Show MIDI Studio”. Any device that is connected to the Mac will appear here. Devices that have been previously connected will also appear but will be grayed out if they are not currently connected:
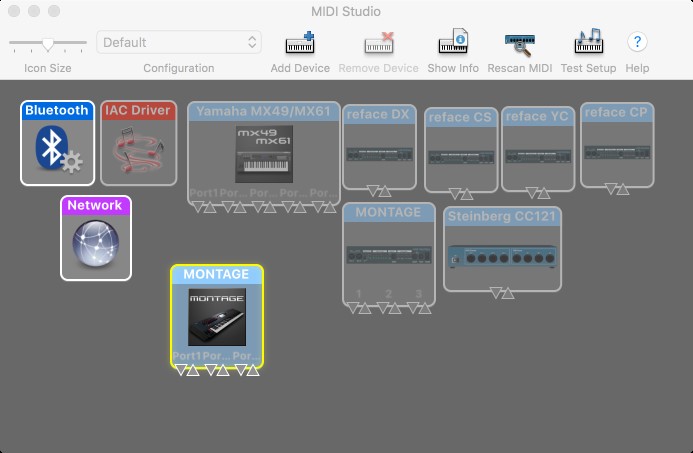
This shows that the MONTAGE is currently connected. The second MONTAGE, along with the other products that are grayed out are all instruments that were previously connected to my computer, so it will look different than yours. What should be the same is the active MONTAGE icon. If you double-click on that icon the screen below appears:
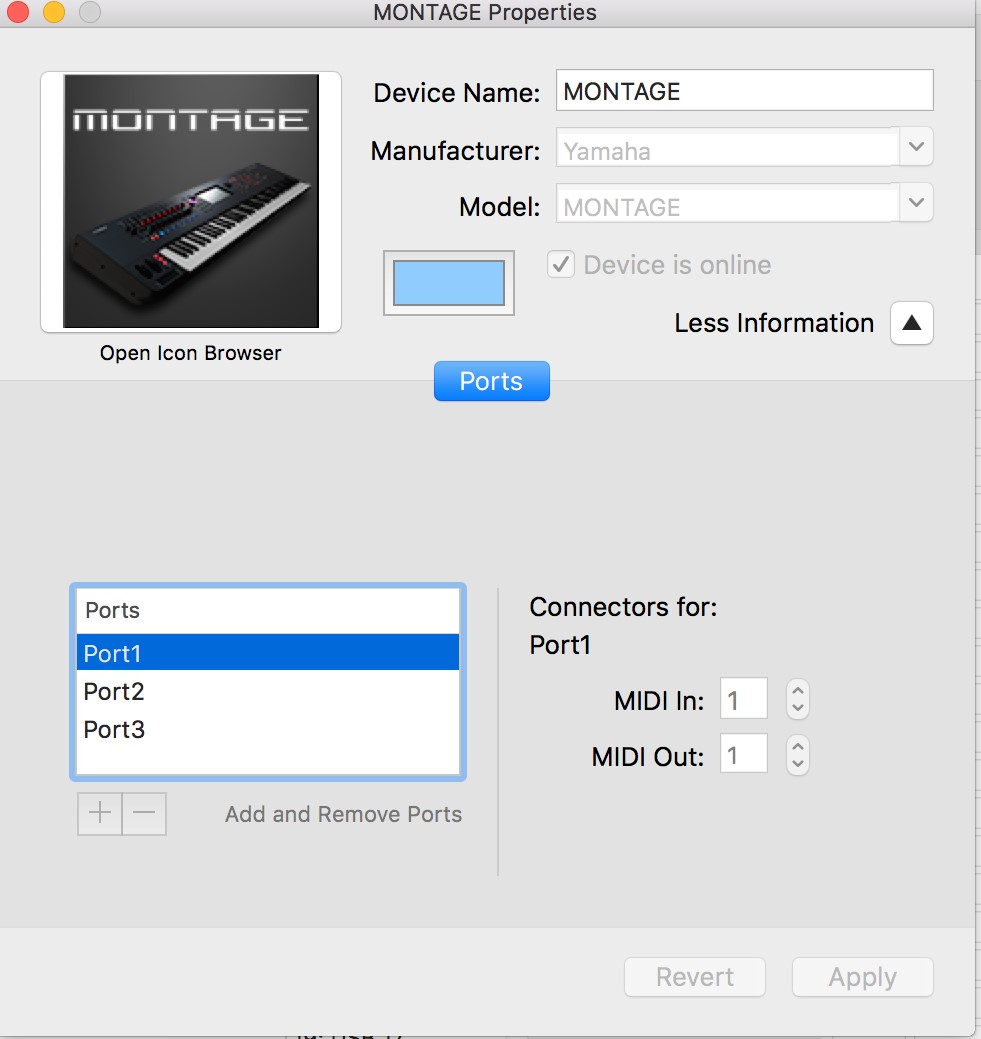
This window shows that MONTAGE is active and has 3 Ports:
• Port1: This is the connection to the 16 channels of the MONTAGE tone generator
• Port2: This port is currently not enabled.
• Port3: Data transmitted on Port3 is re-transmitted to the physical MIDI [OUT] jack on the back of the MONTAGE. This means you can connect a second MIDI device to the MIDI out jack on MONTAGE and when the MIDI output of a track in Logic to is set to Port2 data will transmit to that connected device. That is a cool feature!
After you have verified that the Mac and MONTAGE are connected, close Audio MIDI Setup and launch Logic Pro X.
MONTAGE, MONTAGE Connect and Logic Pro X: Basic Setup
Open Logic and start a new Project using the “Software Instrument” Set Up. The window you should see looks like this:
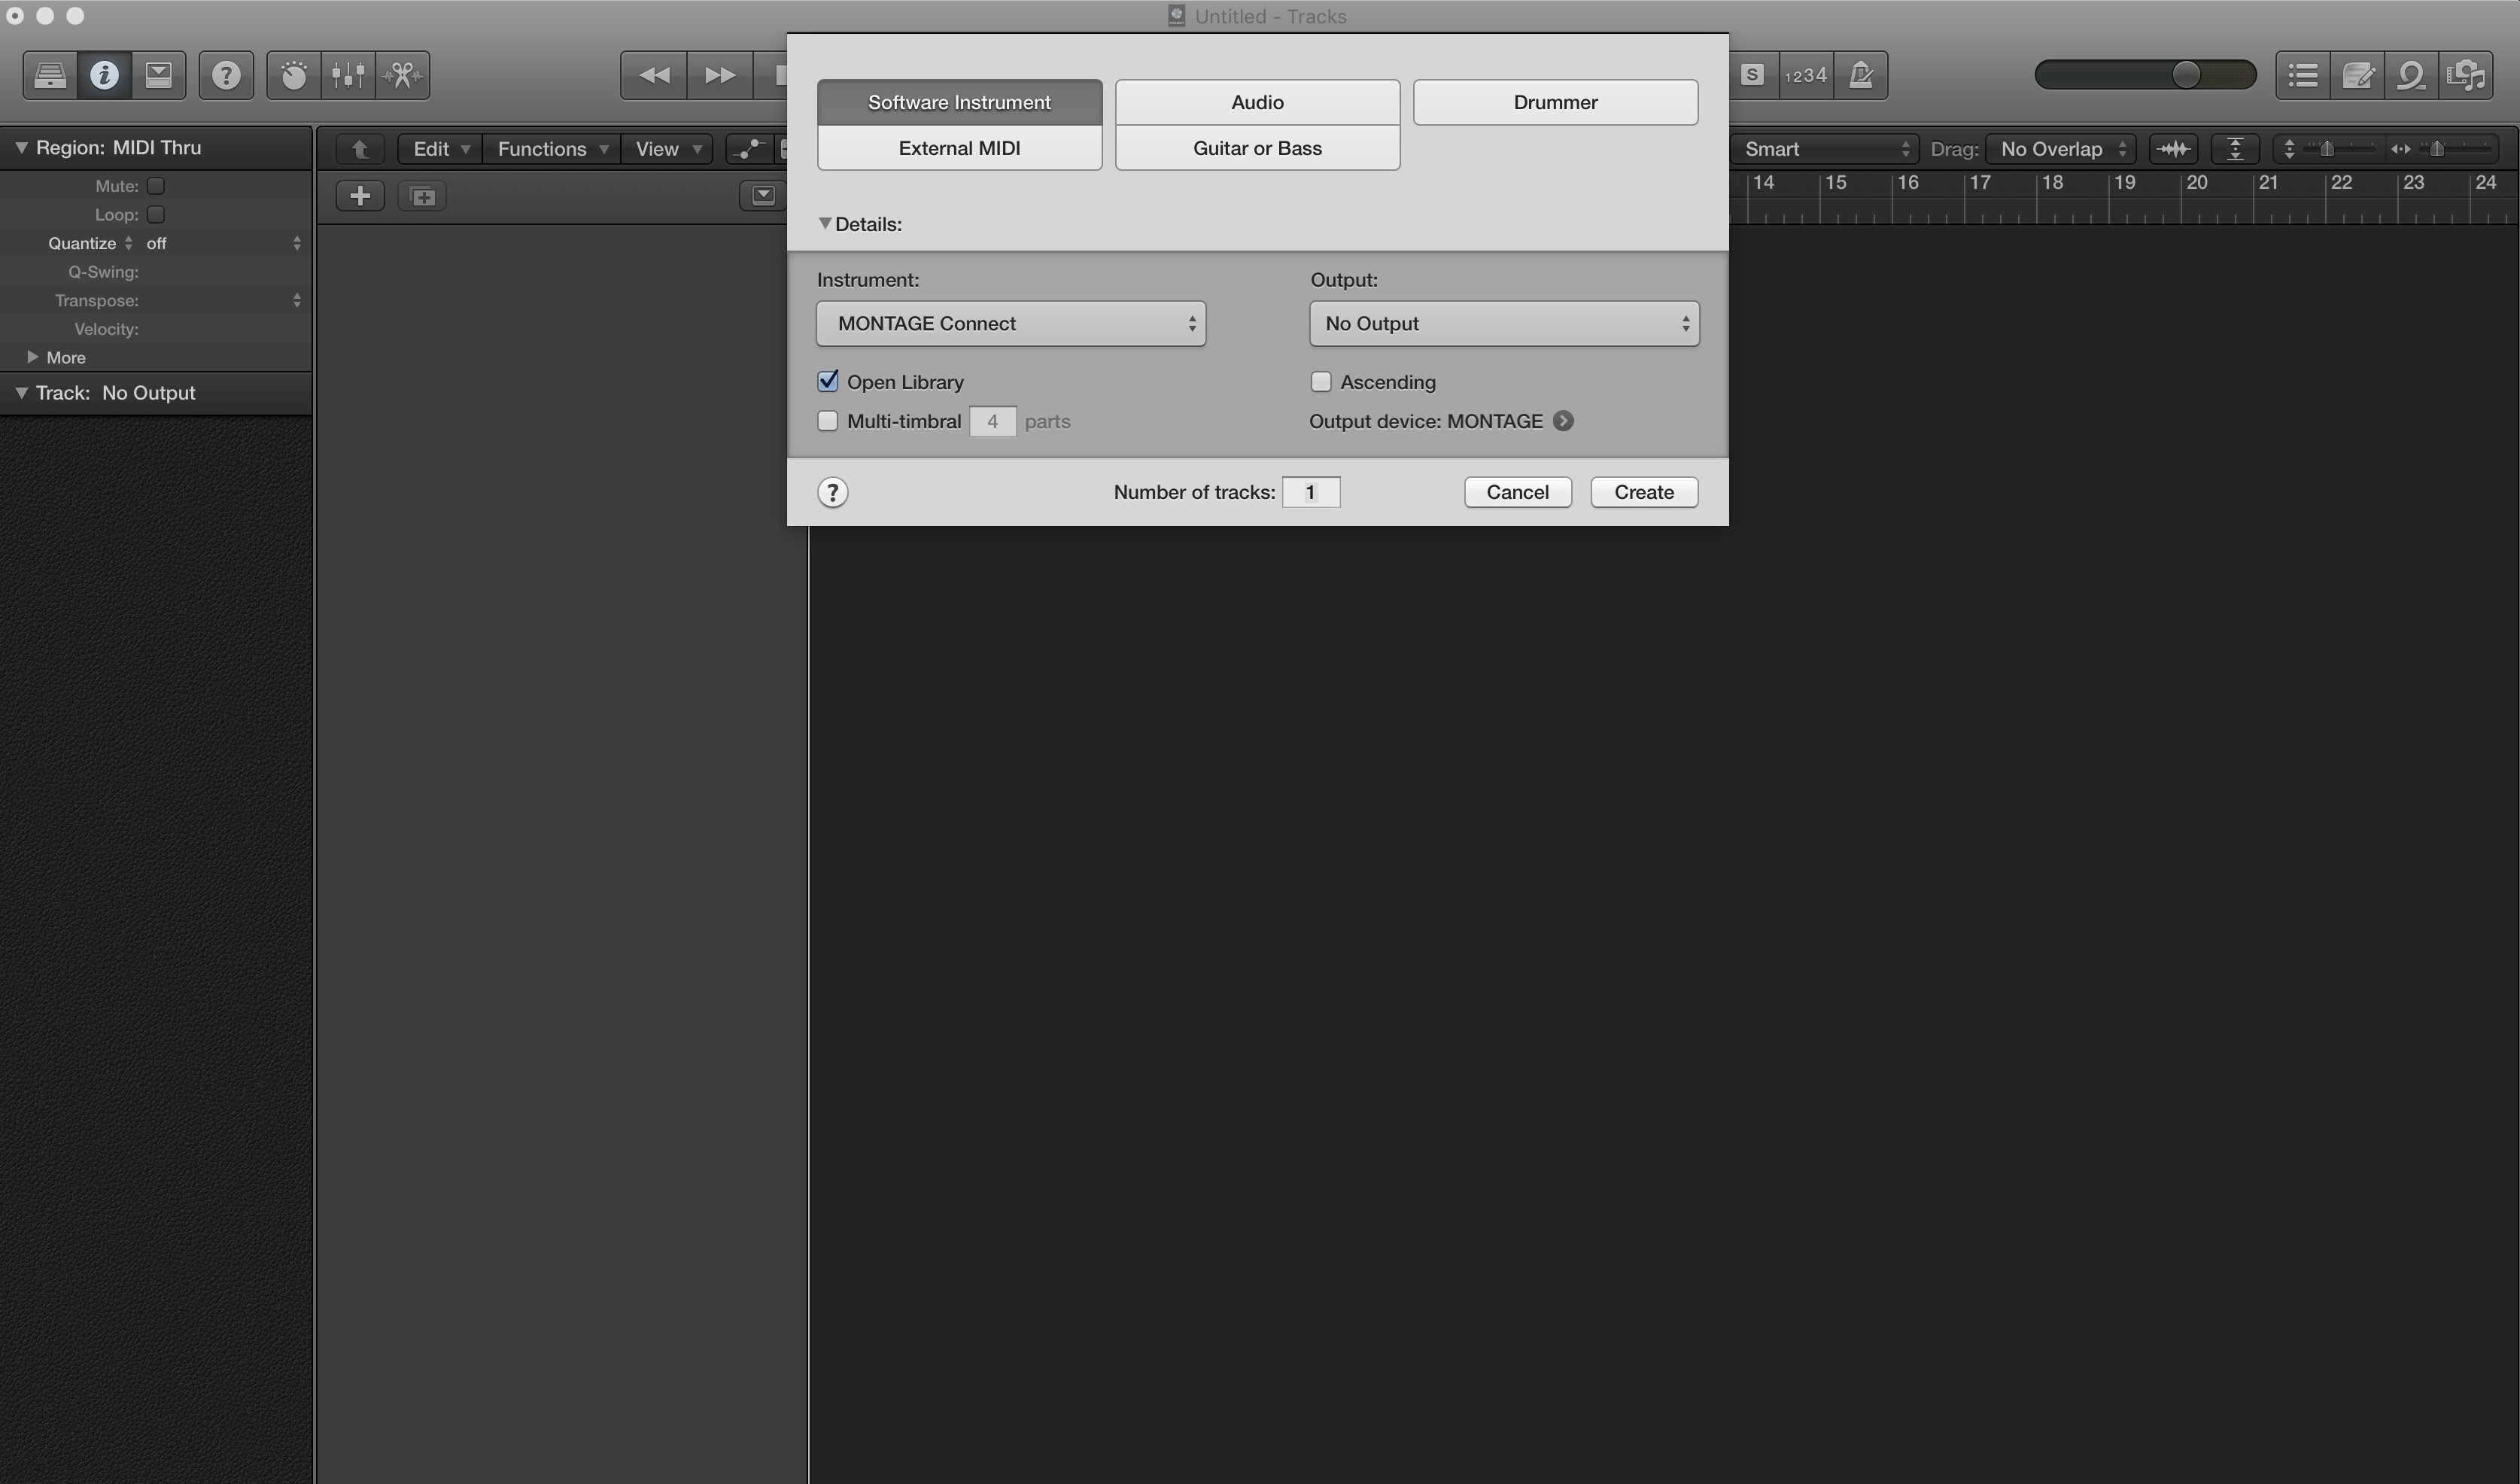
Select “MONTAGE Connect” as the Instrument and set the Output as “No Output”. Since MONTAGE Connect is an AU plug-in that communicates with the physical instrument via MIDI, the audio output does not need to be connected because the audio comes from MONTAGE. You will create external MIDI tracks when recording MIDI data and audio tracks when the time comes to render MIDI tracks to audio. Once you create your new project with the MONTAGE Connect, “plug-in a new track” will appear. I named the plug-in track “MONTAGE Connect”: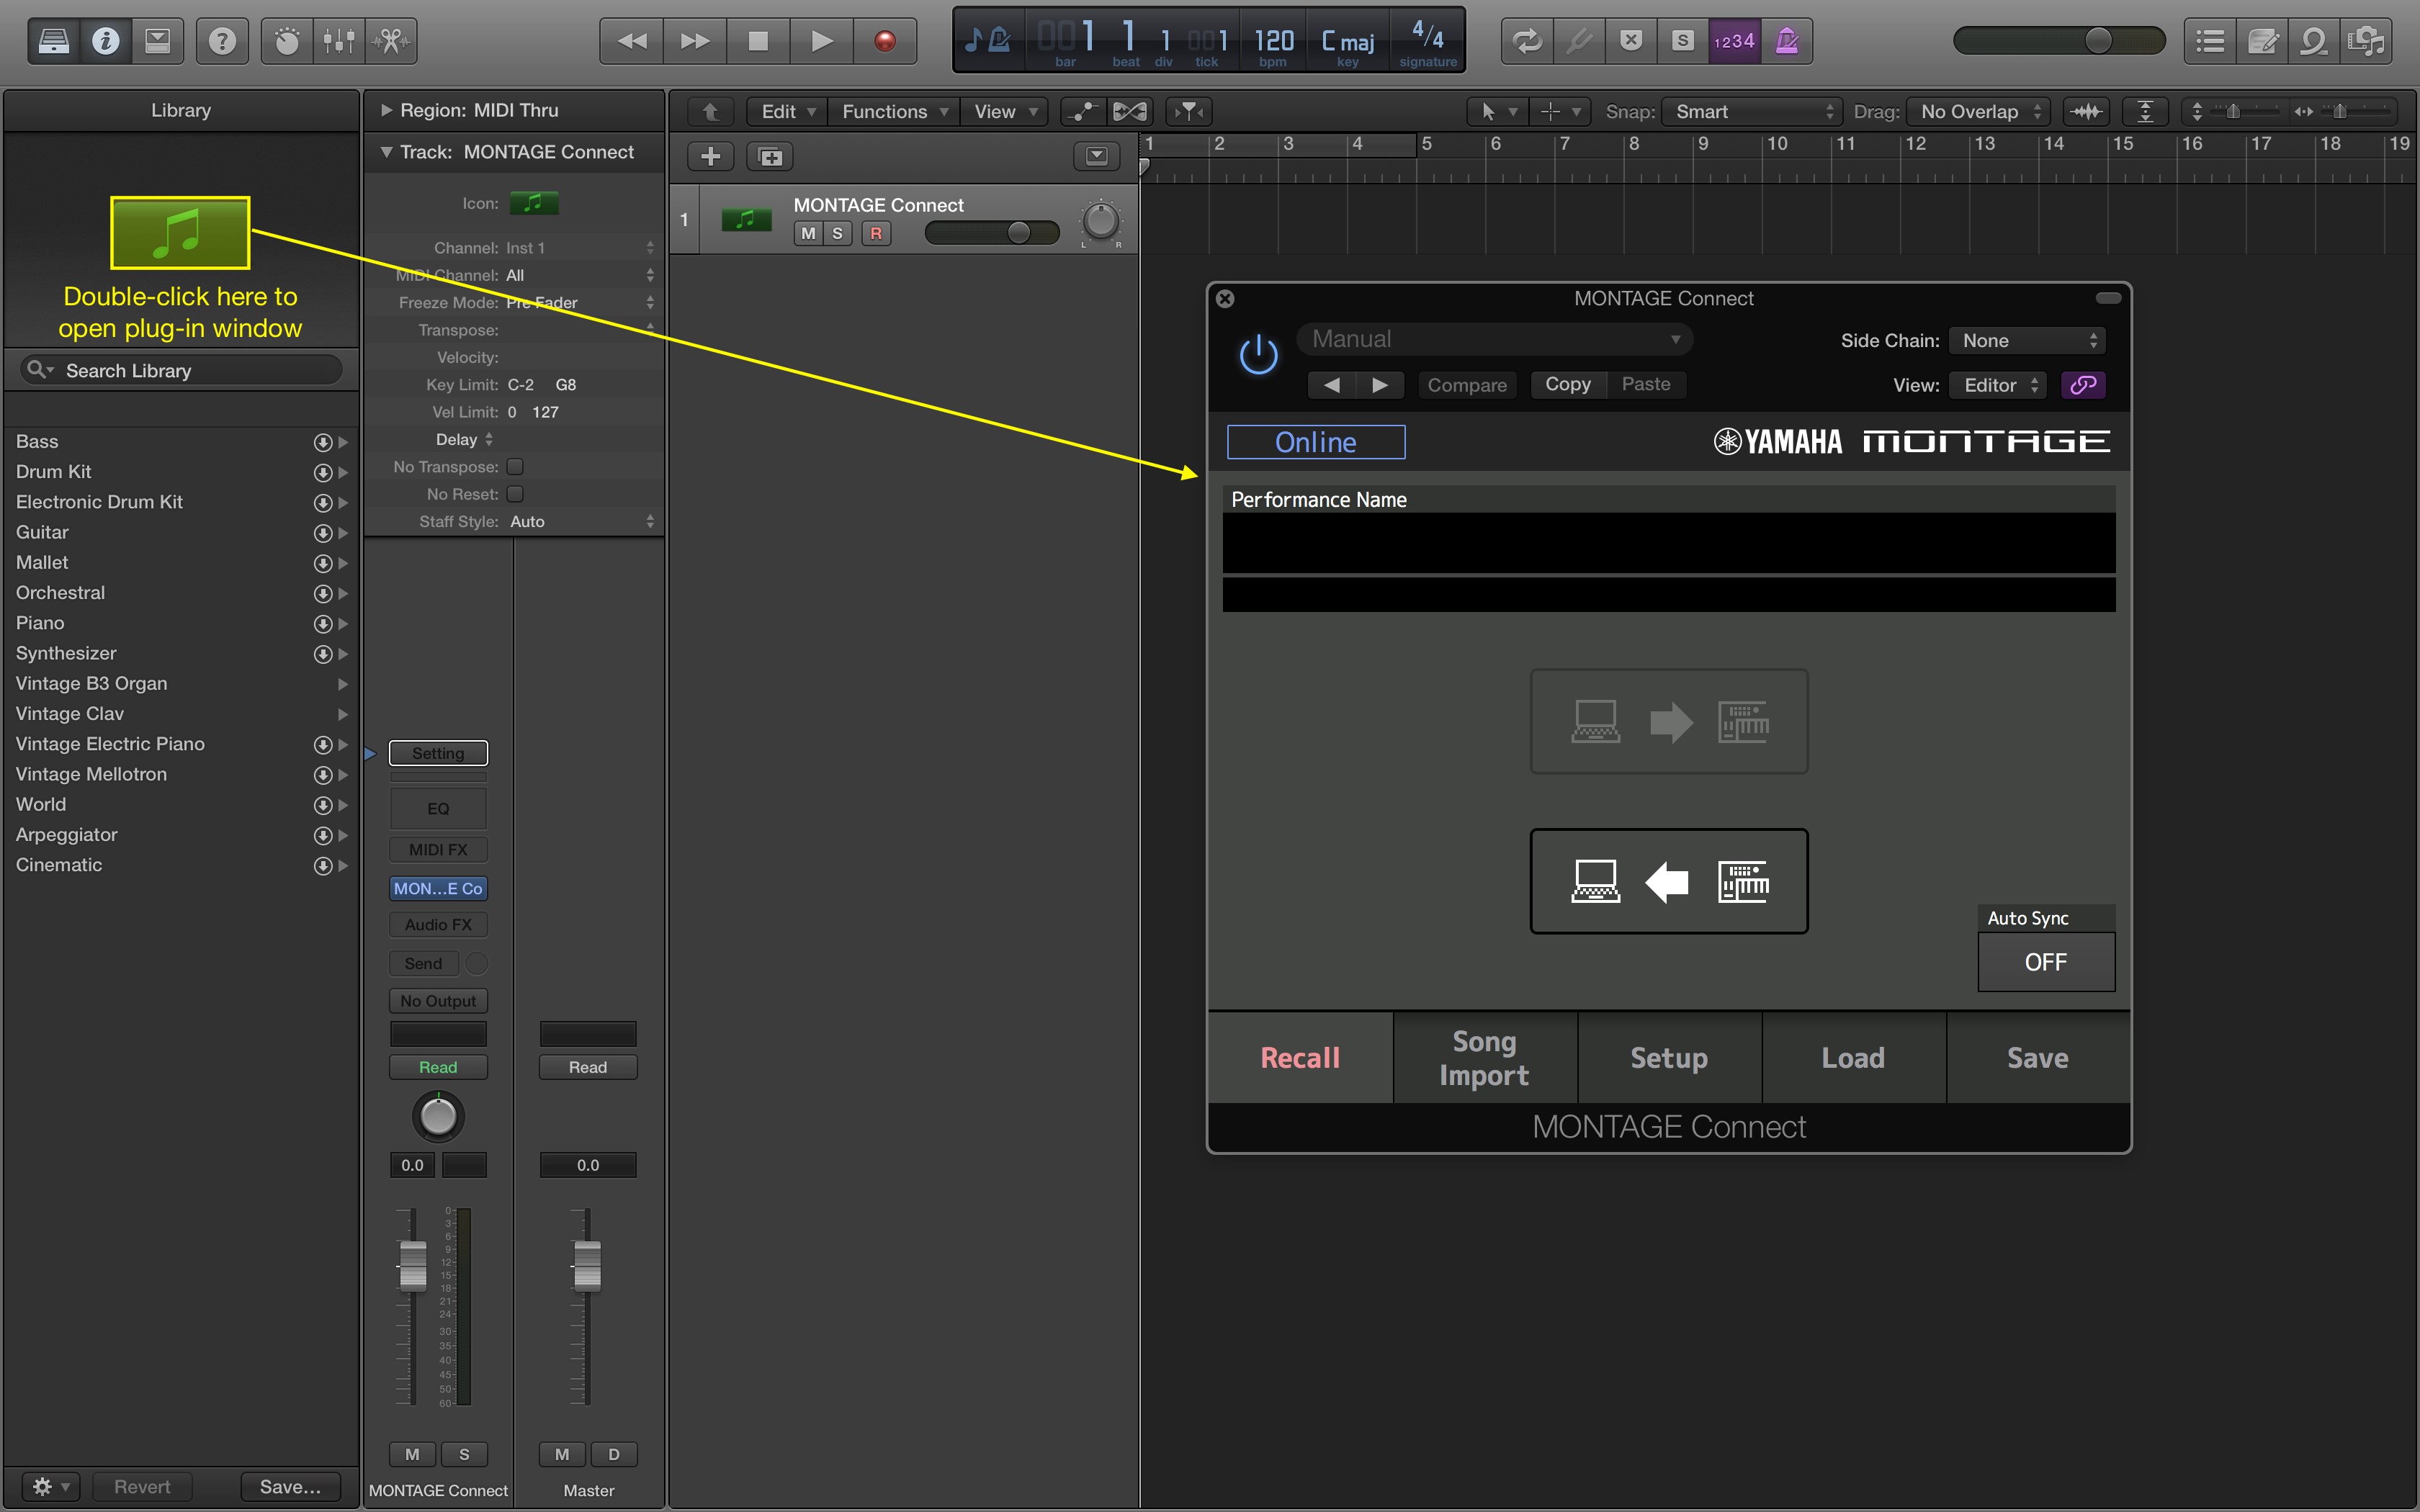
The MONTAGE Connect plug-in allows you to store and recall Performances within Logic. You can store your favorites within Logic in essentially the same manner as you can with virtual instruments. Below is a closer look at the plug-in: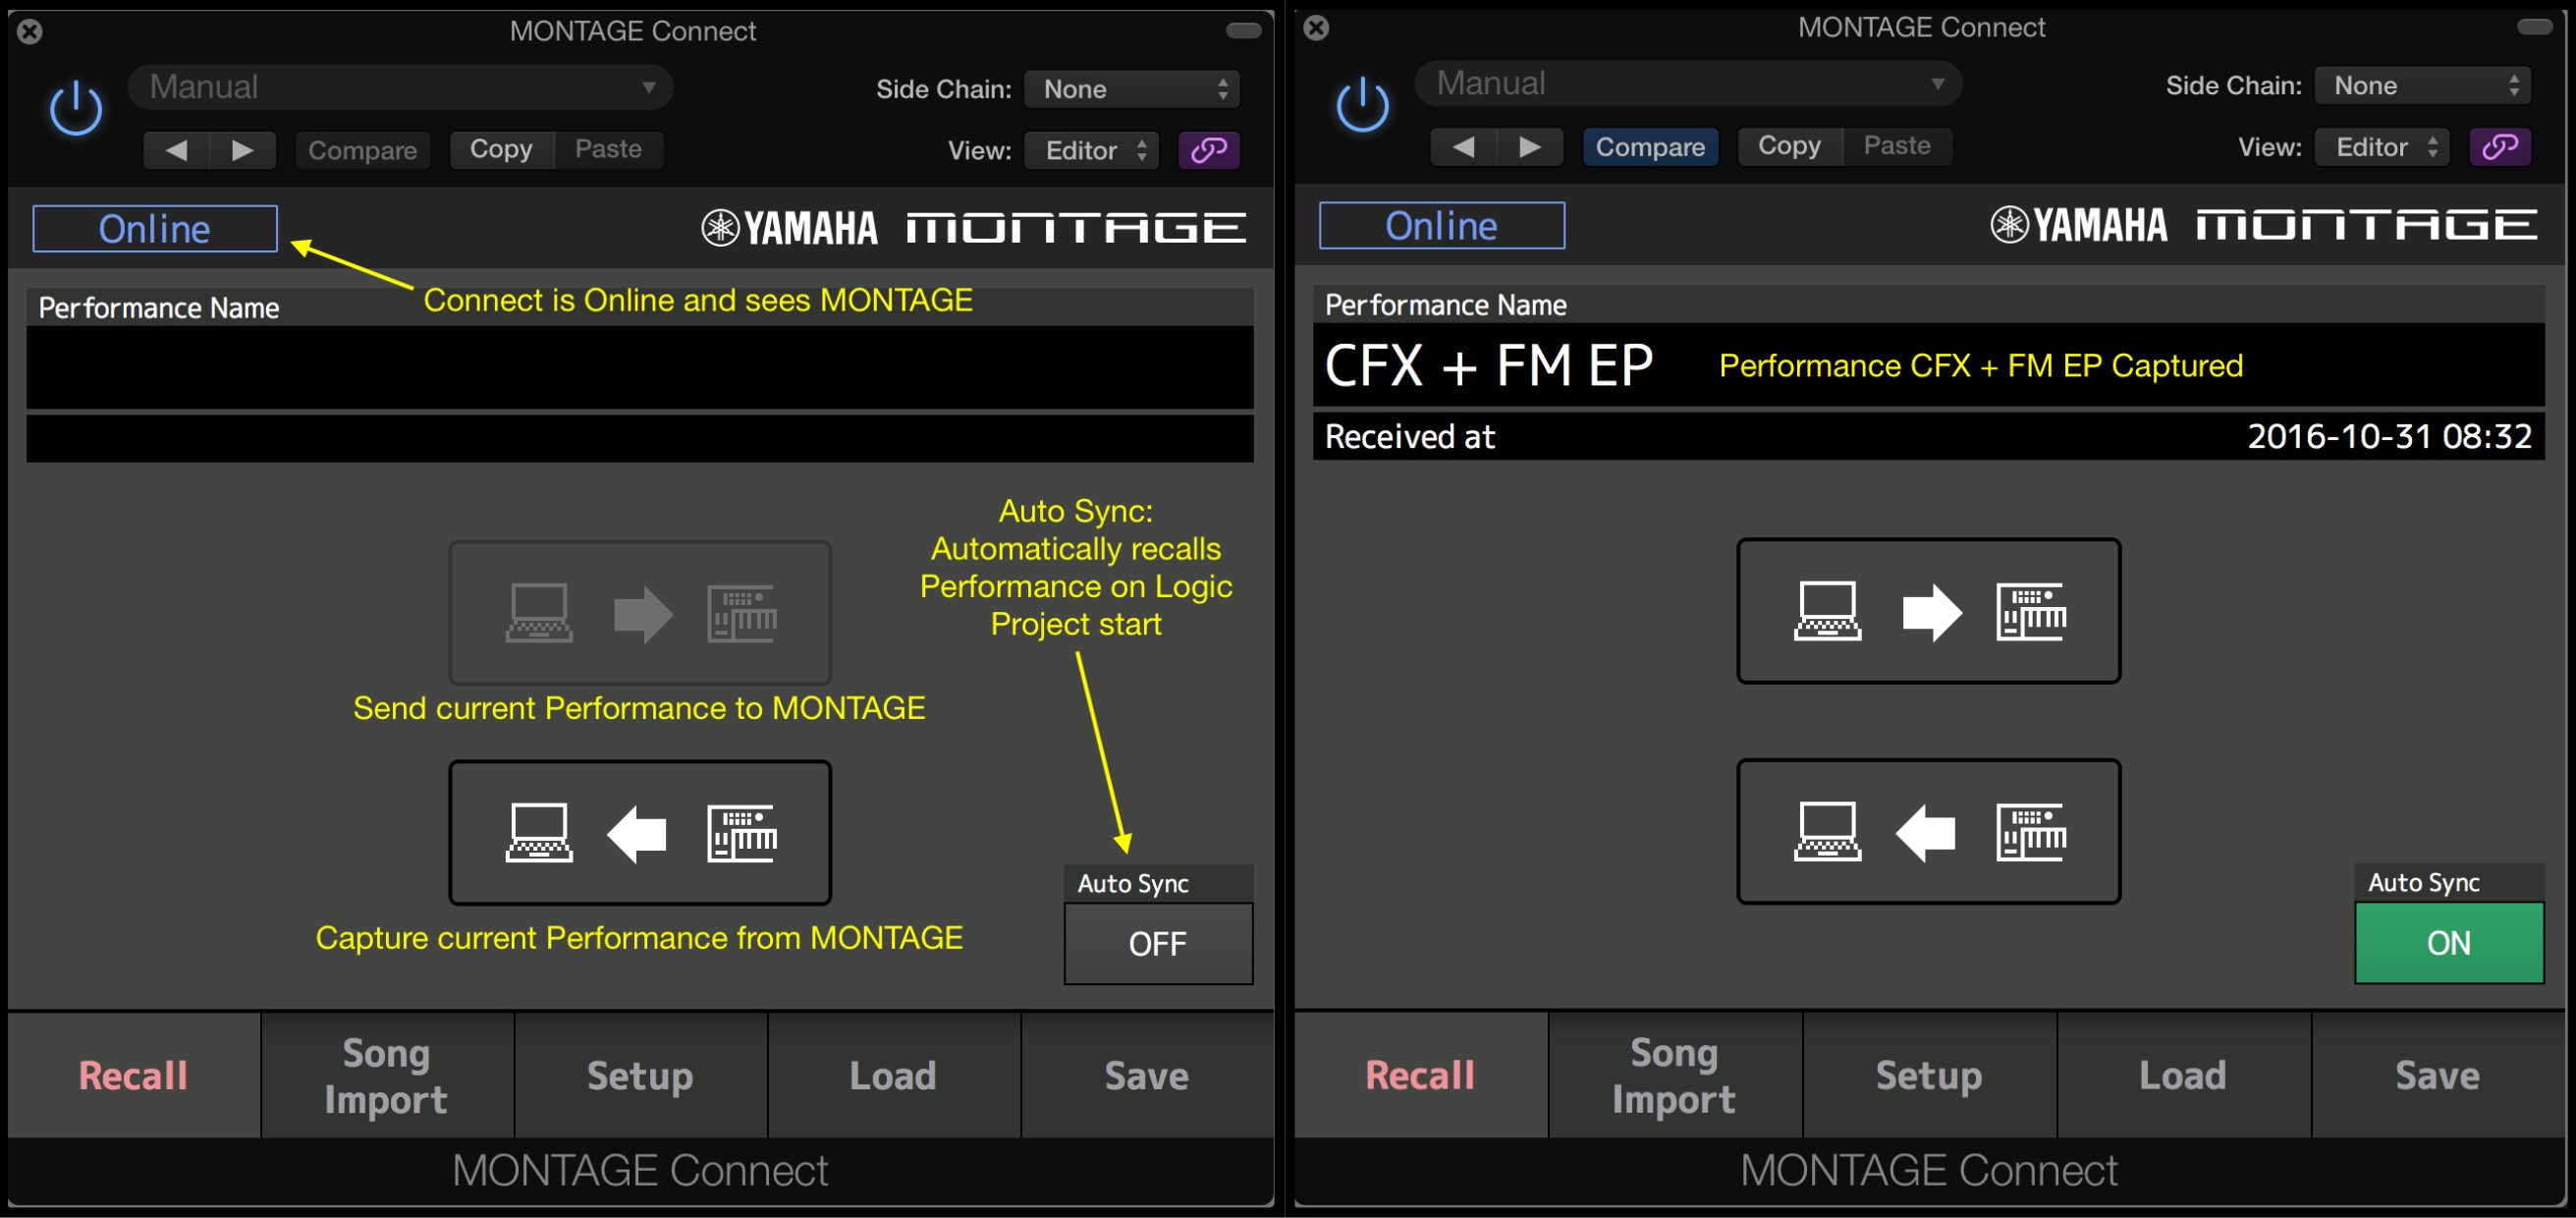
On the left side is how it looks when the plug-in opens for the first time with descriptions in yellow added by me. Clicking on the bottom icon in the center of the plug-in window allows me to “capture” the current Performance in MONTAGE. Now I can recall that Performance from Logic. On the right side is how it looks after a Performance has been captured from MONTAGE (CFX + FM EP). Note the “Auto Sync” button on the right is now set to “ON” and is green now. If I save this Project as is and close Logic, the next time I launch the Performance “CFX + FM EP” will be recalled automatically. You can save the Performance as one of your favorites in the MONTAGE Connect plug-in in the same way you would a virtual instrument (see below):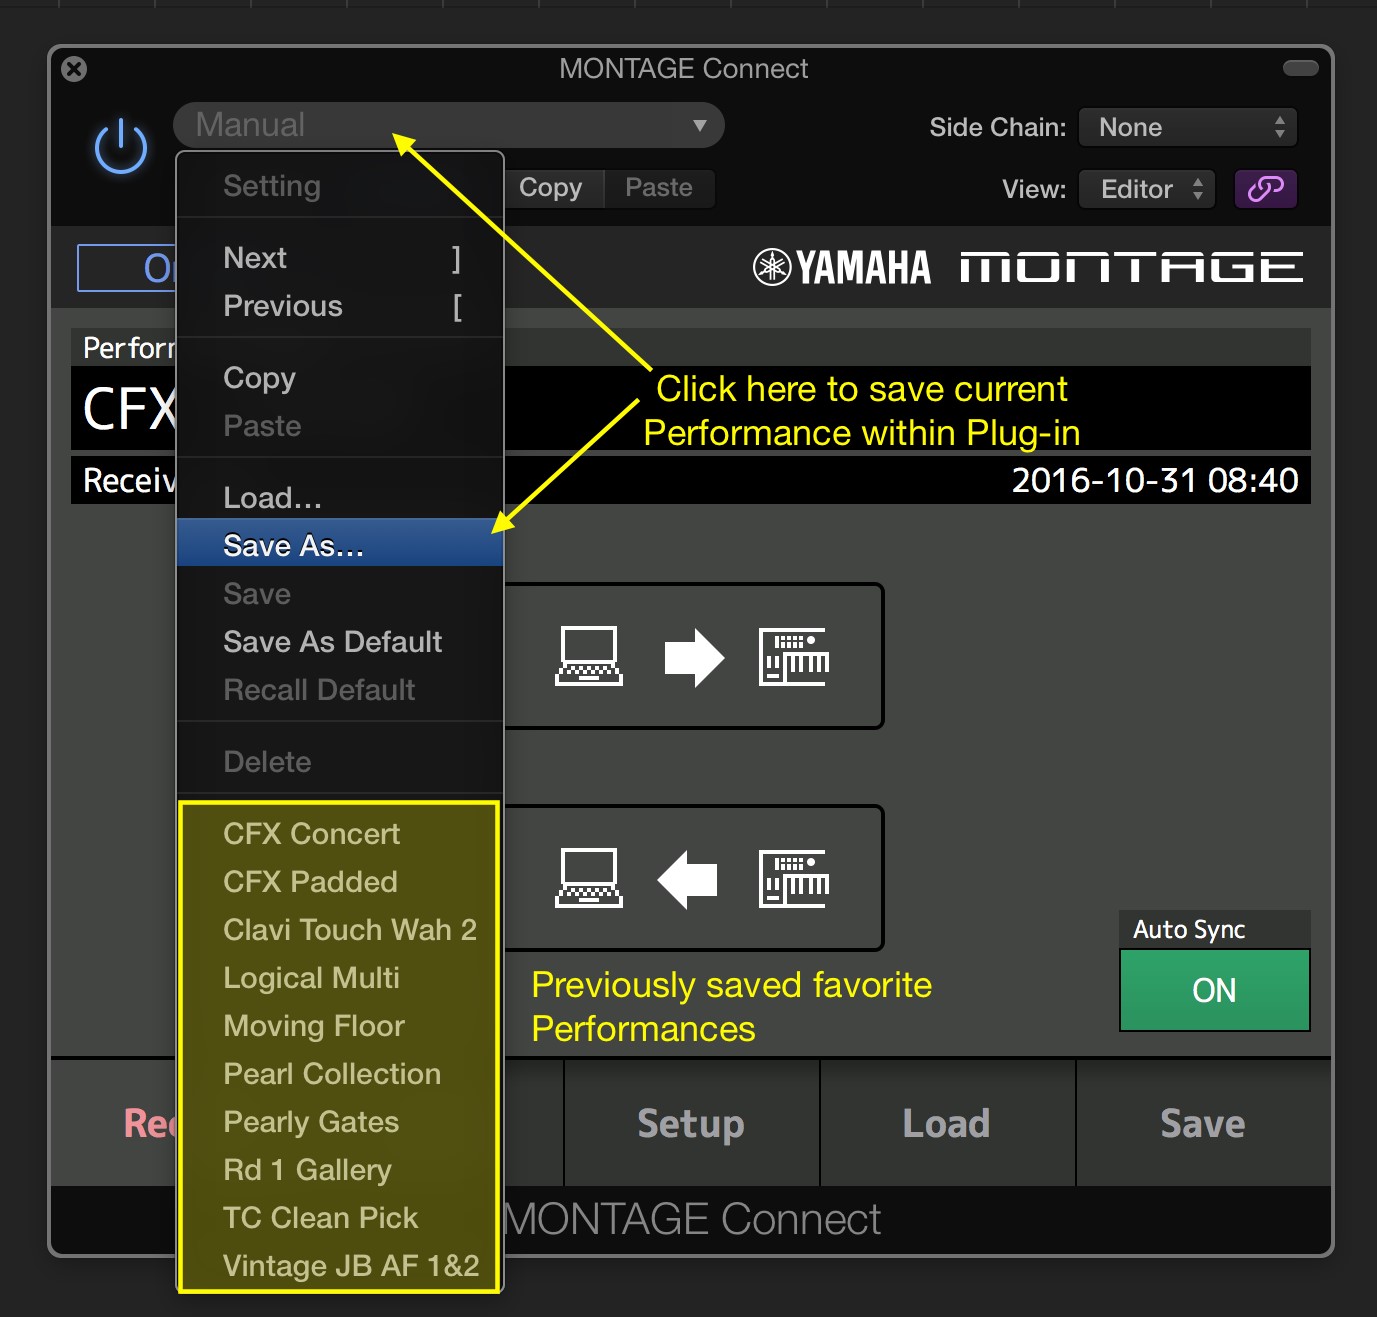
The MONTAGE Connect plug-in has a very simple and easy to use interface. At the bottom is a series of tabs that allow you to capture and recall your Performances, import Songs from MONTAGE, view basic Setup information and Load and Save MONTAGE bulk files (.X7B). I’ll cover more about workflow and ways to use MONTAGE Performances with Connect in Part II.
MIDI and Audio Track Setup
MIDI Tracks: I created a single MIDI track within Logic (Under the “Track” menu, “New External MIDI Track”). As we saw in the Audio MIDI Setup utility, MONTAGE is a 3 Port MIDI interface with Port 1 being the communication with the MONTAGE internal tone generator. In the screen shot below I have only the Inspector view enabled in Logic and the external MIDI track selected: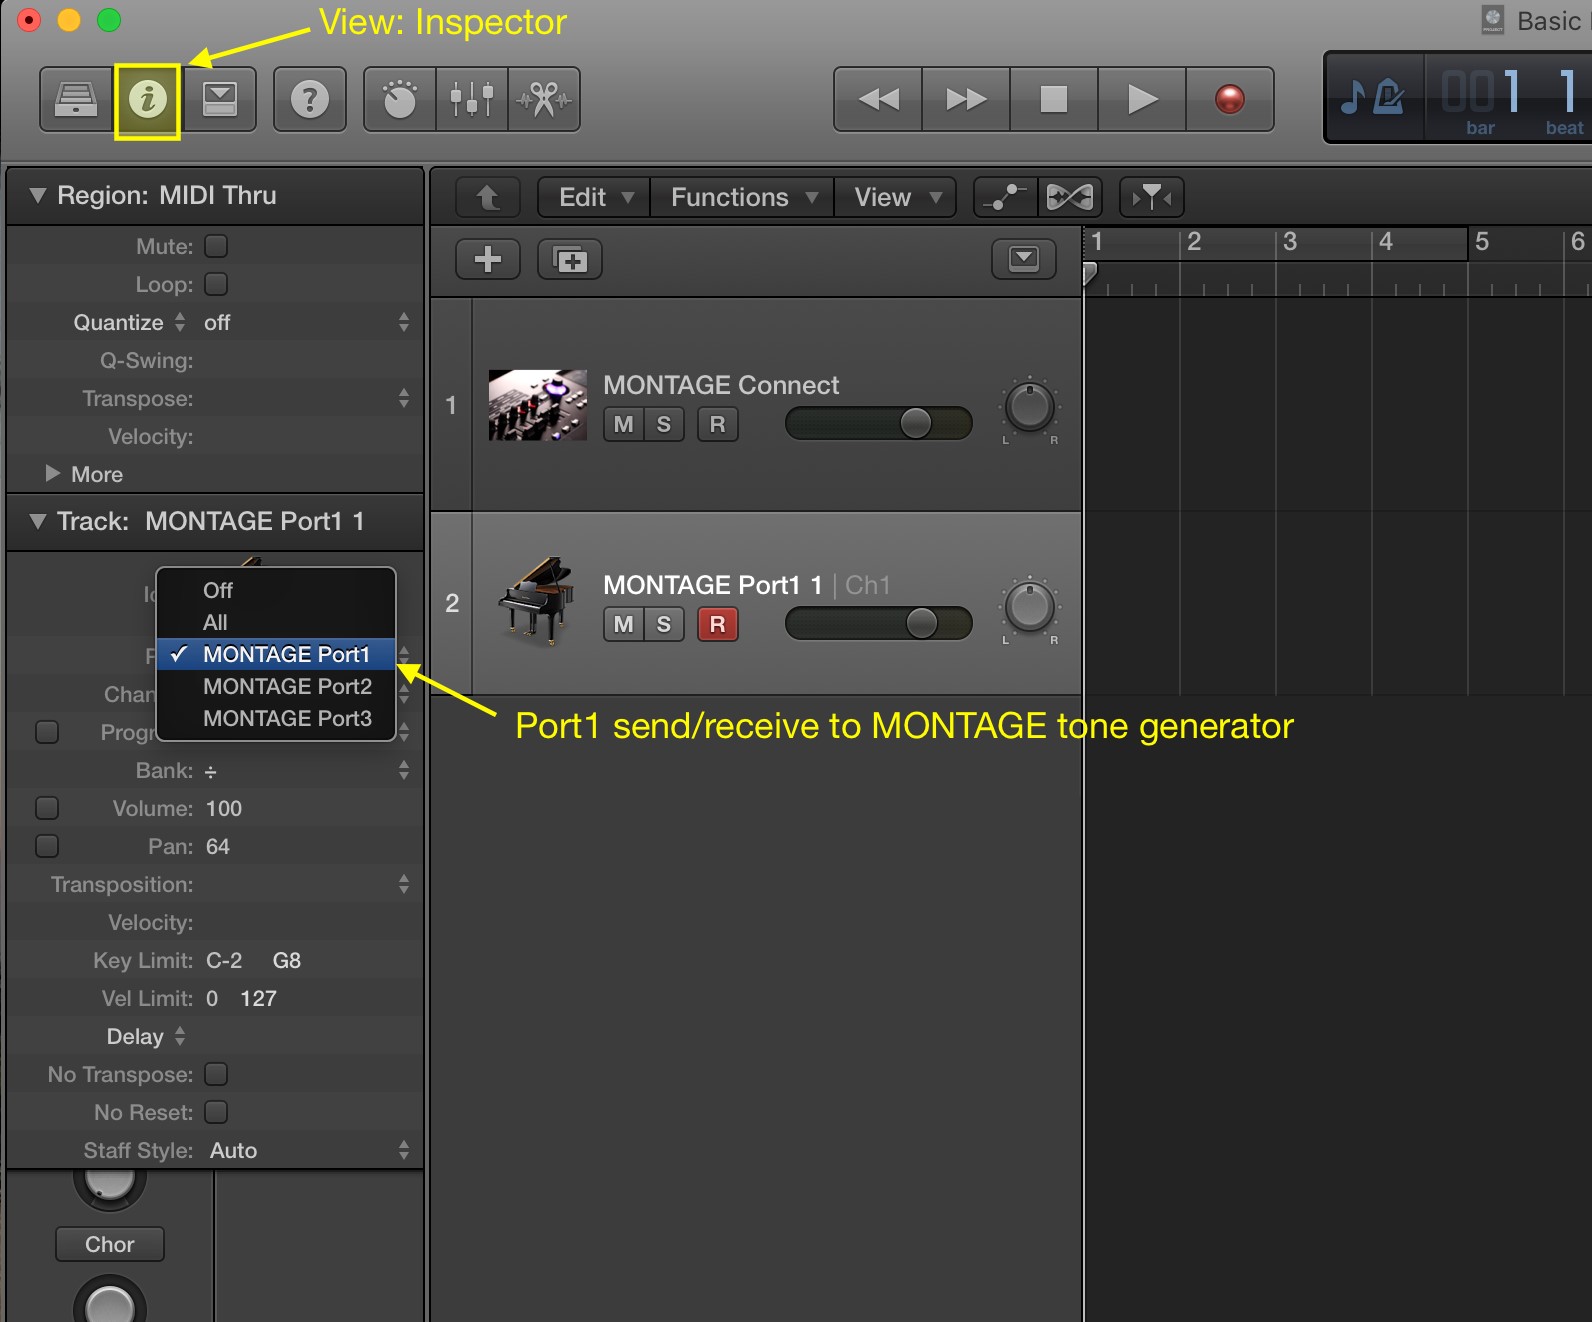
Let’s take a closer look at the inspector window: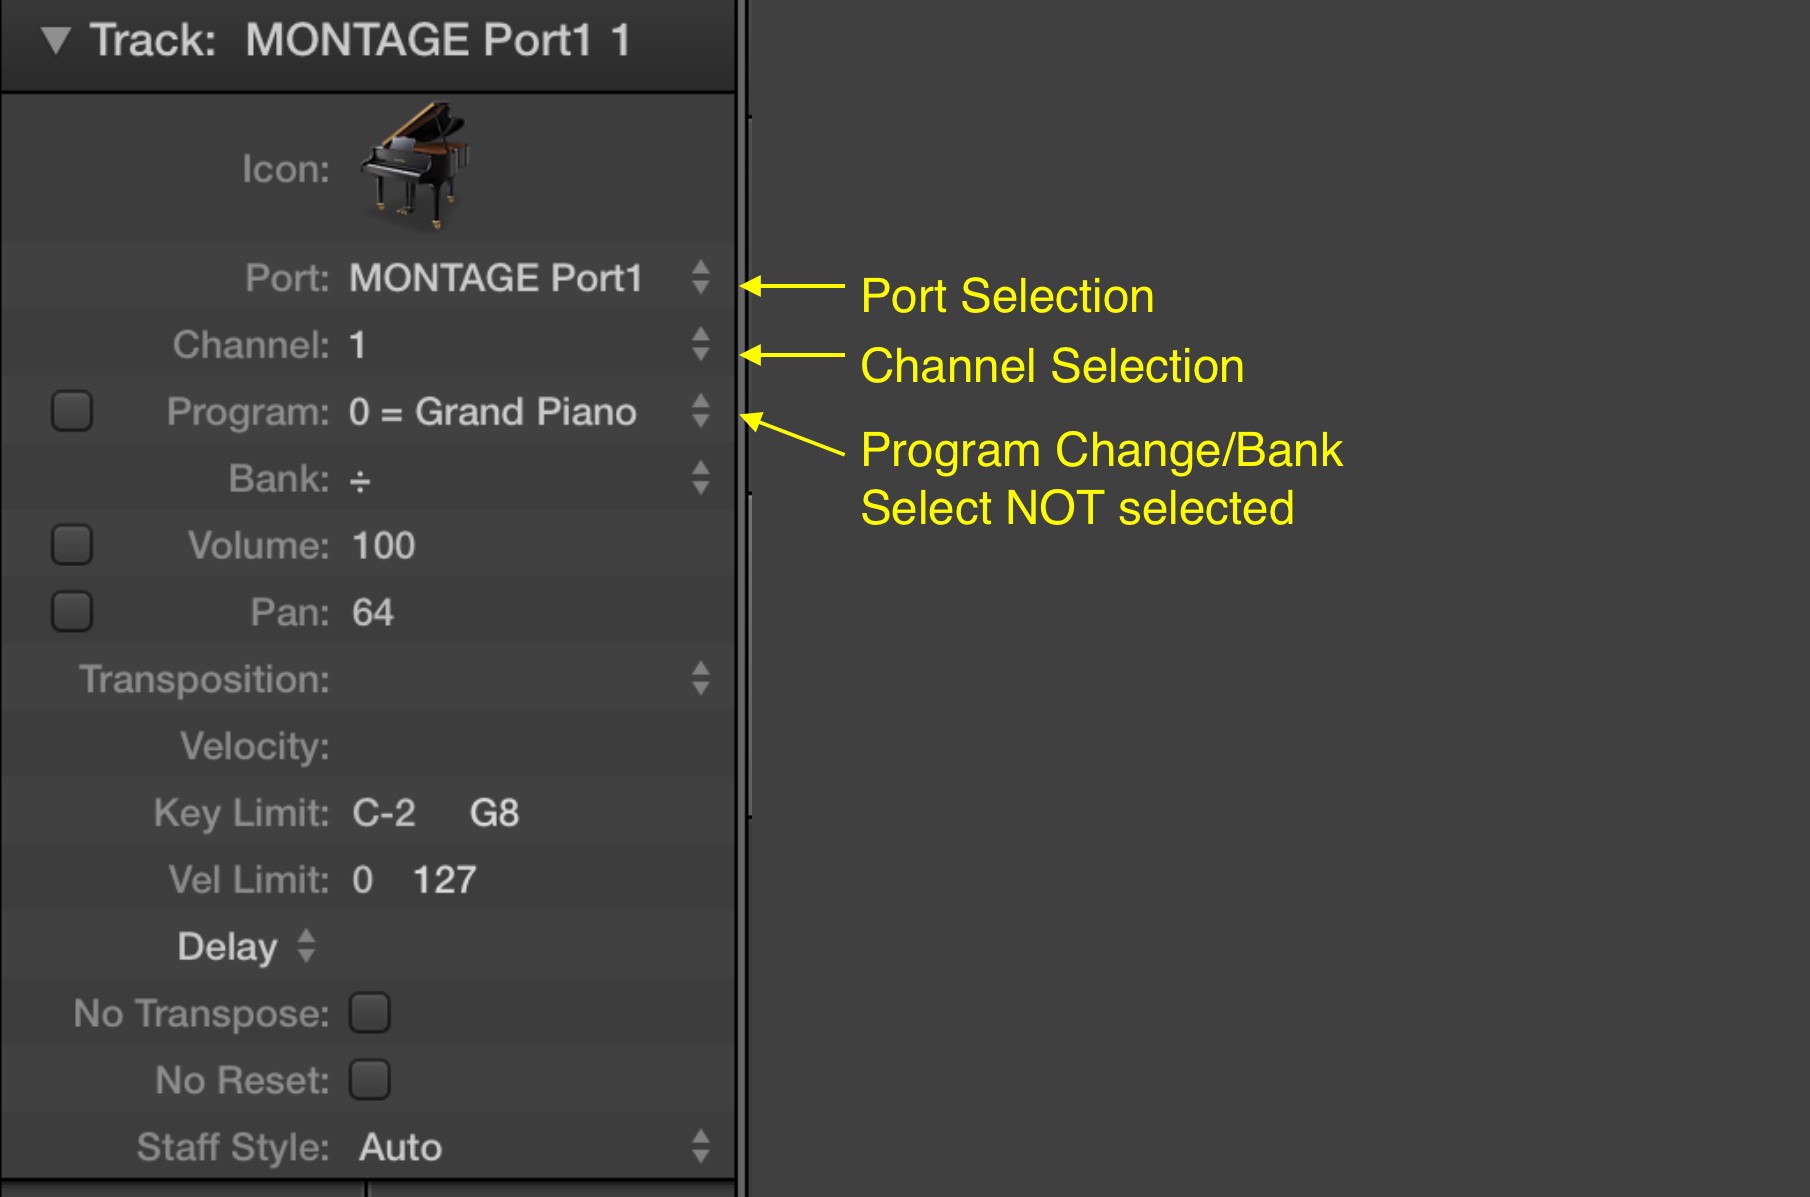
In this window I am set to send and receive on Port1, channel 1. It is important to note that I did NOT select the program and bank select box below the channel select. MONTAGE Connect manages that information within plug-in and is a better solution since Performances in MONTAGE can function as a traditional multi setup, or, as a multi Part Single Instrument where all the parts will send and receive on a single MIDI channel. Again, I’ll cover more about this concept in the Part II of this article.
Audio Tracks: Now lets look at setting up a stereo and a mono track (under Track/New Audio Track). On the left is a stereo channel setup and on the right is a mono channel. You can select stereo or mono configurations by clicking the circle in the input selection area: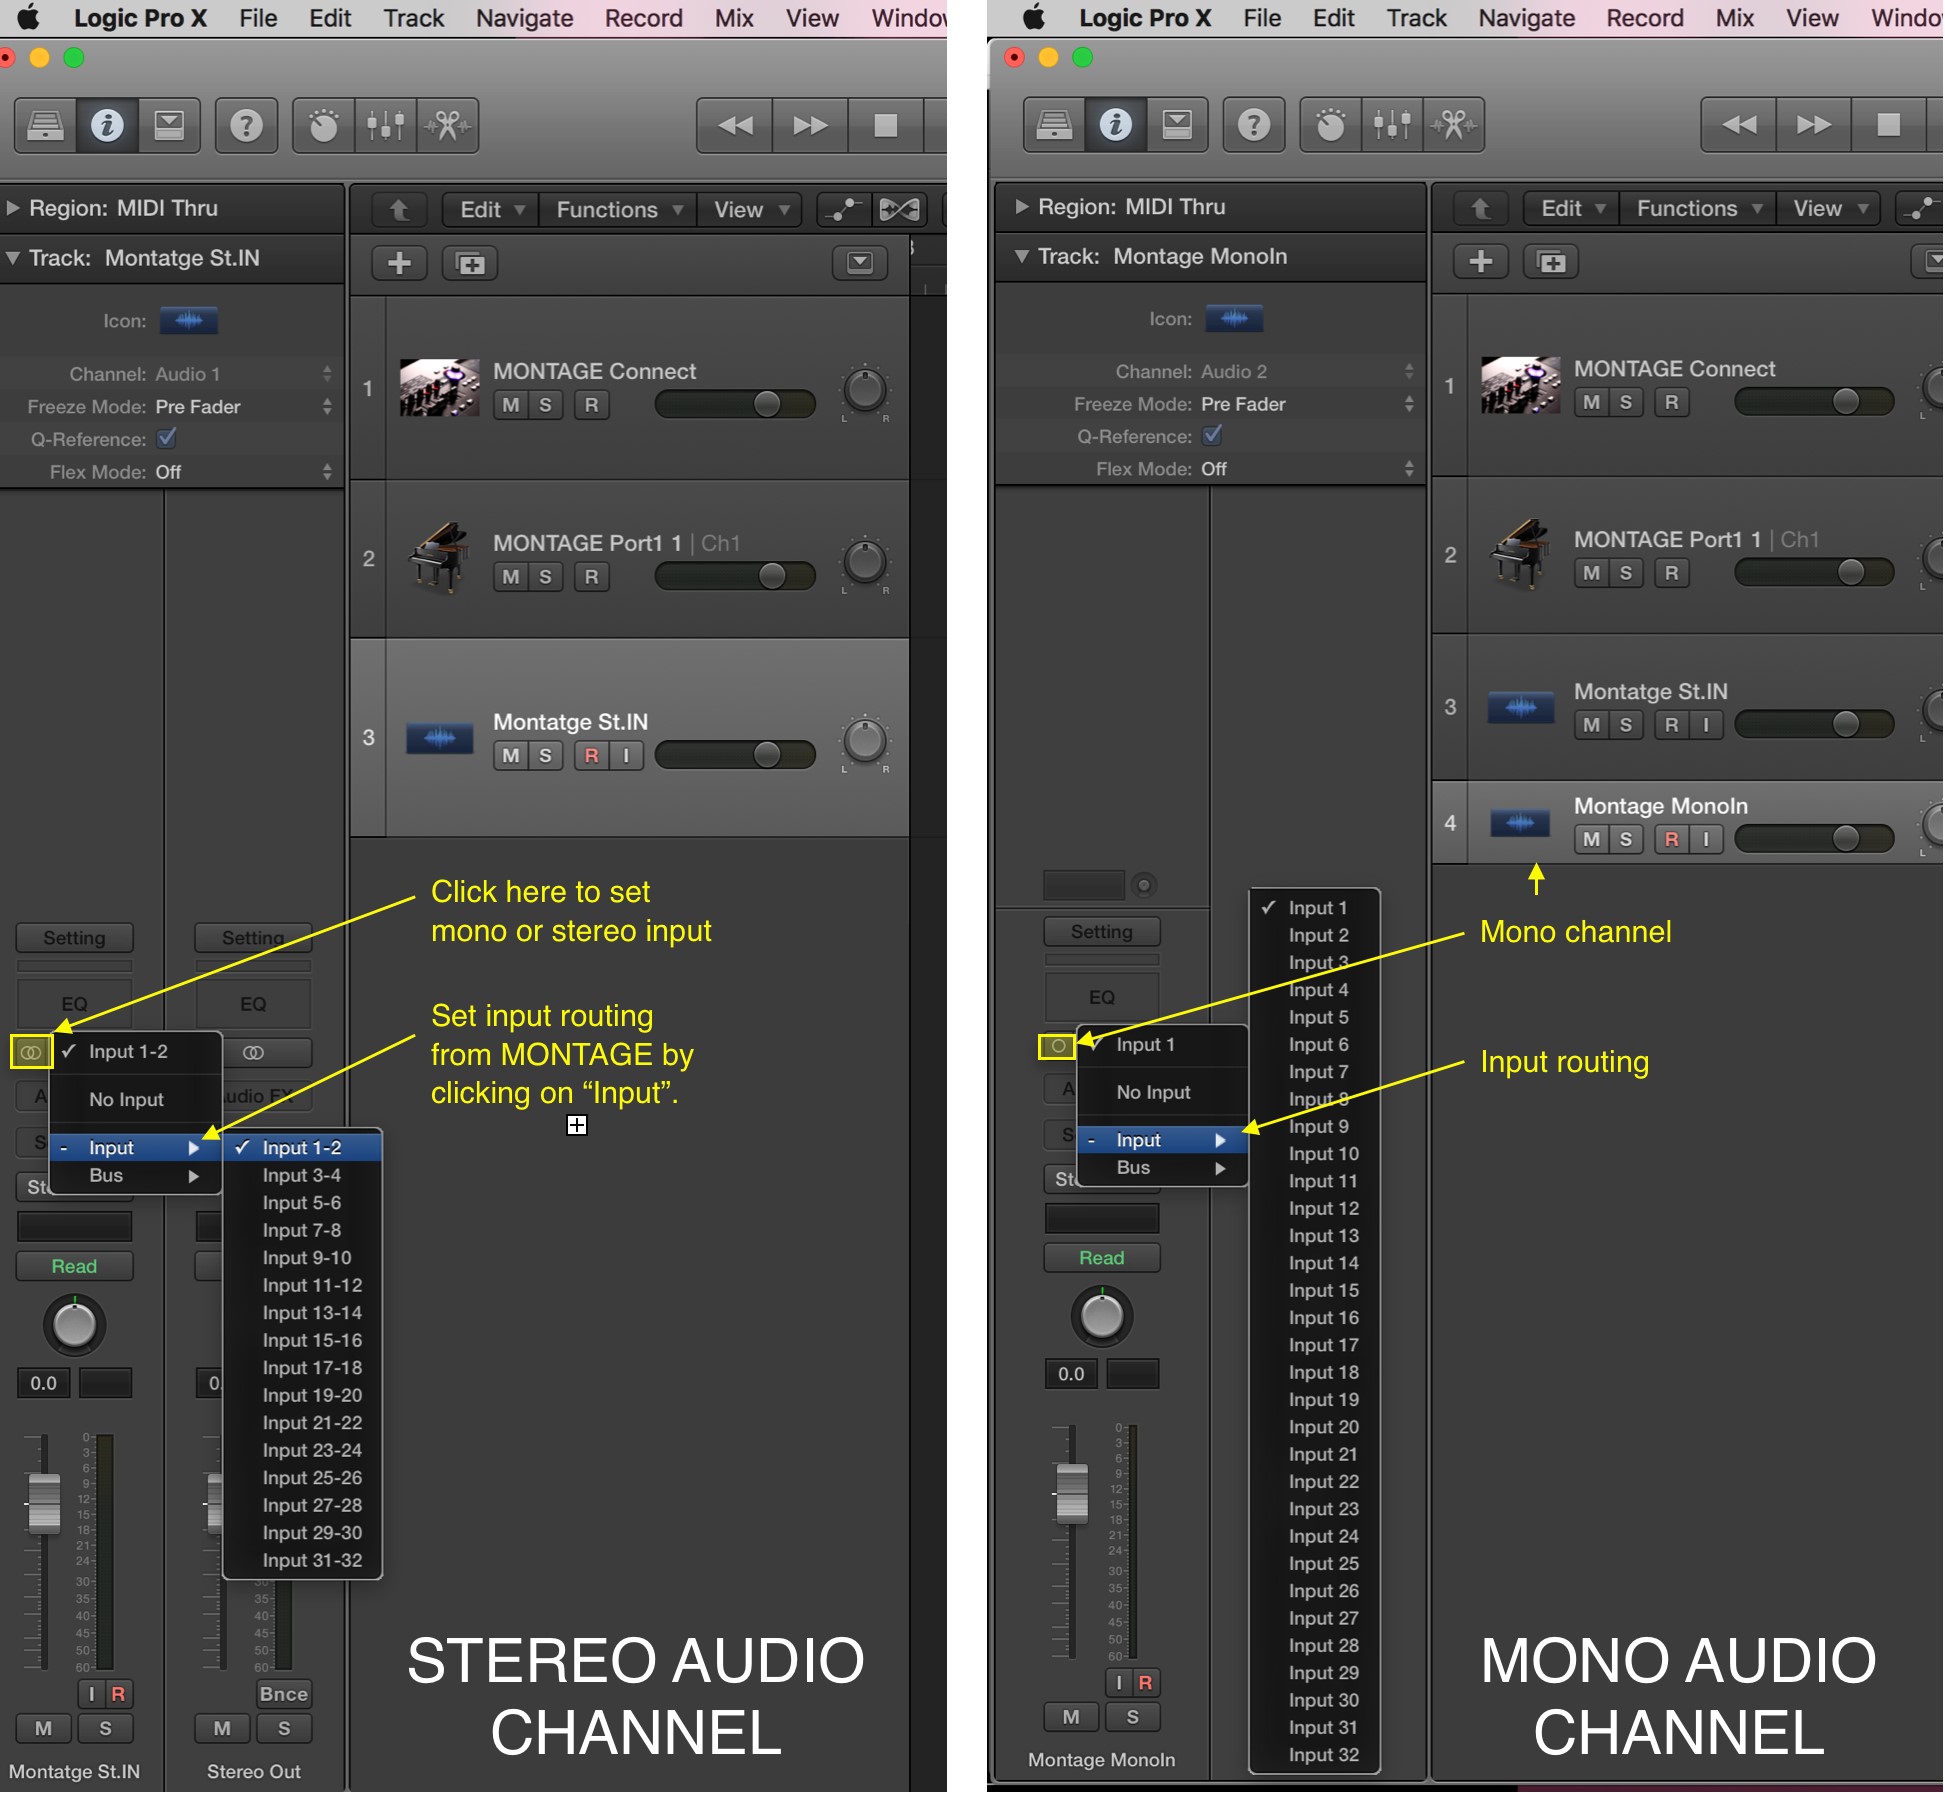
There is a slight difference in how audio channels labeled within Logic and MONTAGE. The chart below outlines those differences. MONTAGE and Logic stereo audio connections are on the left and mono connections are on the right: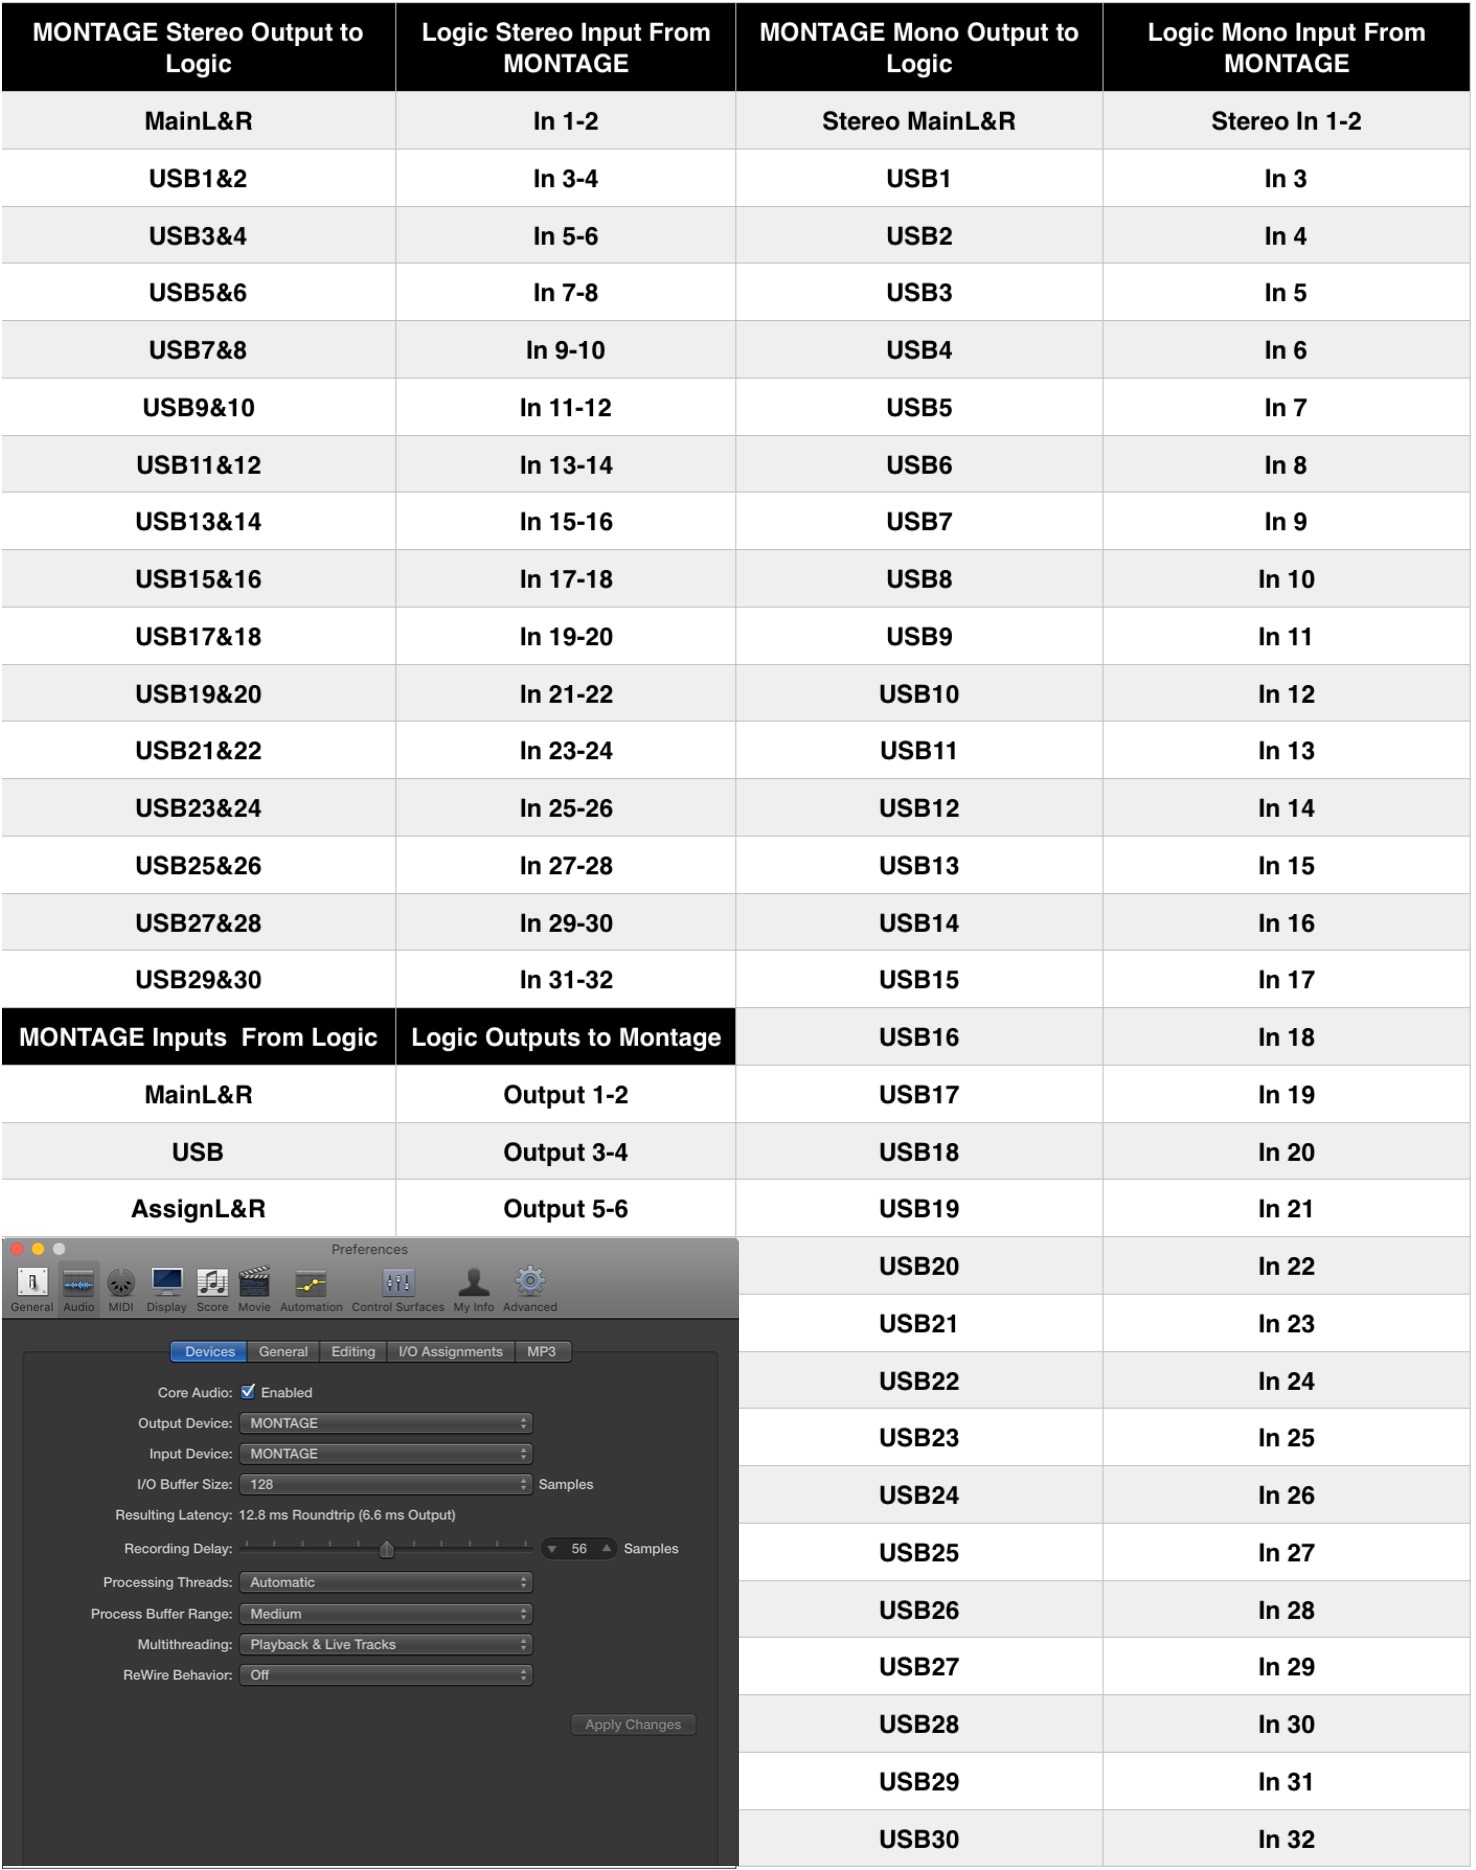
You can find audio preferences under the “Logic Pro X” menu, the select “Preference” and select “Audio”. Here you can get a basic overview of the connected audio system…which is the MONTAGE Music Synthesizer. It’s a very robust, integrated audio and MIDI system.
Want more? Stay tuned – Part II of the article to be released soon.
In the meantime, join the conversation about this lesson on the Forum here.
See you soon with more resources for getting the most out of your MONTAGE!