

Tagged Under
Basically, data from the MIDI Recorder can be converted into Arpeggio Phrases. You can convert data from the internal recorder using the “Put Track to Arpeggio” feature added in version 1.20.x.
The basic rules of arpeggio creation is: you are limited to 16 unique notes to create the phrase data.
There are four Tracks that can be converted to create a single arpeggio phrase. Please do not misunderstand the role of these four Tracks. The four Tracks go to build a single Arpeggio Phrase that will, typically, be played by a single synthesizer instrument PART. Below we will take a look at how the four Tracks of the “PUT TRACK TO ARPEGGIO” Job work to create a musical phrase with more than just average complexity. We will do so by analyzing how one of the Arpeggio Phrases utilizes the four tracks that were put together.
Each of the four tracks can provide a different rhythm (counter-rhythm) or it can be responsible for an entirely different musical line. The four Tracks can be used to trigger different behaviors in a Part – you can precisely create NOTE-ON events that are either KEY RANGE limited to a specific region of the keyboard or they can be VELOCITY RANGE limited to cause just a specific Element to respond.
Let’s take a close look at an arp that clearly uses the four Tracks of the PUT TRACK TO ARPEGGIO Job;
Recall the PERFORMANCE: “Chill Comp 2”
[CATEGORY SEARCH] > BANK: Preset > ATTRIBUTE: Single > Main: “Syn Comp”
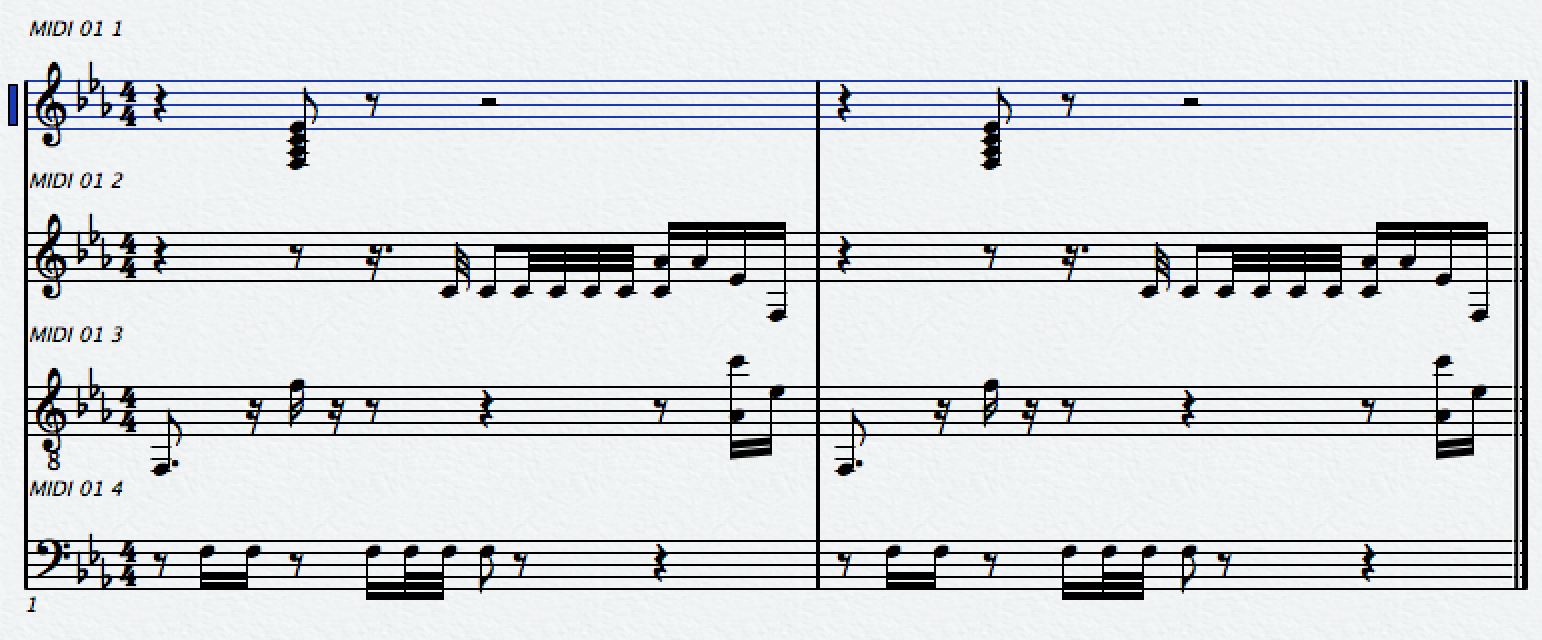
Trigger an Fminor7 chord in root position starting with the “F” below middle “C”. The resulting arpeggio phrase can be seen in the notation below broken down by the four ‘sequencer’ tracks that created it.
From the HOME screen, press [EDIT] > press [PART SELECT 1]
Press the lower [COMMON] button
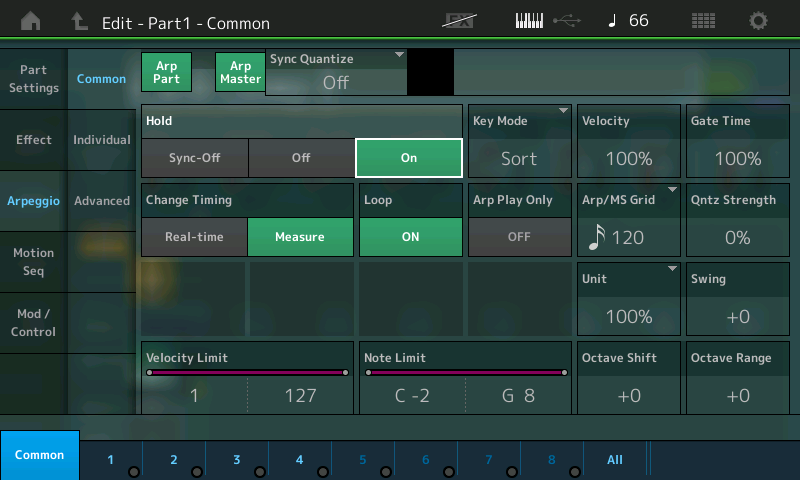
Touch “Arpeggio” > “Common”
Set the HOLD function to ON, this will latch the arpeggio phrase so that you do not have to continue to hold down the keys.
An alternate method would be to latch the arpeggio phrase with the Sustain pedal. The Sustain pedal takes the place of you holding down the keys… it does not sustain the sound (as on an acoustic piano), this is a synthesizer, remember. HOLD is technically, the keys being in KEY ON mode. The Sustain pedal keeps the KEY ON mode active. We mention this because it is a frequently asked question; as to why the sound does not sustain when an arpeggio is playing. It’s because it is the arpeggiator phrase that is “playing” the Part, not you. You are providing the trigger notes, so when you step on the Sustain pedal it is you extending the trigger notes. If you want the sound of the arpeggiated Part to sustain you would need to place the Sustain pedal controller message (cc064) in the actual arpeggio data.
There is some artful fun going on with quarter notes and the “Tempo Cross Delay” INSERTION EFFECT, but that will have to be the subject of another article. If you wish to hear just what was played and transferred from the MIDI data for this Arpeggio Phrase, you will want to turn OFF the [INSERTION EFFECT]. You can do so by touching “FX” on the top line of the screen and turn Off the Insert Effect block..
It is actually a one-measure Phrase. I printed out two measures just for ease of reading. This notation shown in this article was done with Cubase AI’s built-in SCORE function (by the way).
The KEY MODE of this Part is set to “Sort” (shown below) and the VELOCITY MODE = “Original” (on the “Advanced” screen).
Translation: What you are hearing is triggered by the arpeggiator phrase data, and the velocity is determined by that phrase data. So it matters not how strongly you trigger the notes, it is the arpeggiator that is “playing” the Part. It is important to know when you are directly triggering the sound of the
Part and when you are triggering the arpeggiator, which in turn is triggering the Part.
The Element that sounds is pre-determined by the arpeggio phrase.
While in [EDIT] the bottom row of right side front panel buttons indicate the active Elements
Use the [MUTE] function to turn Off Elements and isolate each one in turn.
Or use the [SOLO] function.

Element 1 is an electric piano Waveform that plays the chord on the 2nd beat. This is the actual chord voicing used to trigger this result. Fminor7 played in root position including middle “C”. You trigger the chord but Element 1 does not respond until the arpeggio phrase triggers this Element on the second quarter note (according to the current TEMPO setting).
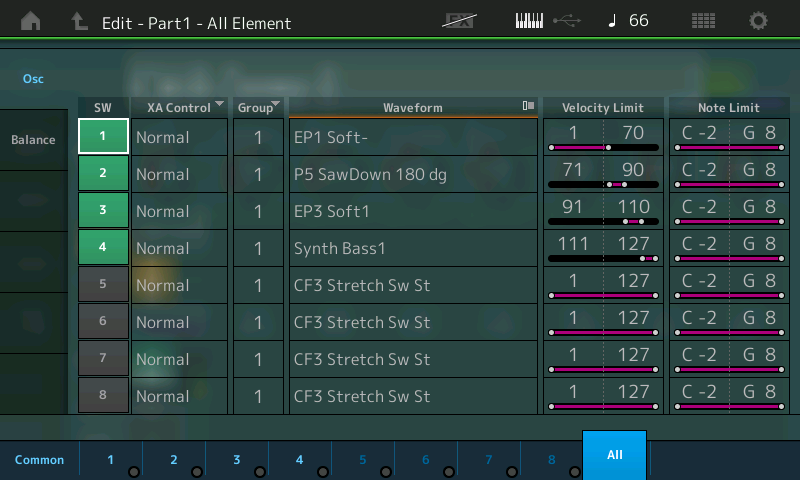
EL1: is responding to velocities: 1-70

Element 2 is a P5 (Prophet V) Waveform that plays a muted, plucky analog staccato phrase. The 32nd notes make this line stand out.
EL2: is responding to velocities: 71-90

Element 3 is a second (different) electric piano Waveform playing a counter line. This is the only note that plays on the first downbeat. Even though you may press four notes, only one note responds initially – that one note is generated by Element 3. The arpeggio phrase’s note velocity is in the range 91-110.

Element 4 is a synth bass Waveform acting as the bass line. Velocity 111-127
Shown is the “All Element” View of the Oscillator screen. You can see the VEL LIMIT LOW and VEL LIMIT HIGH settings for each of the first four Elements _ this is how this Part is Zoned for Velocity response from note-on events sent in by the assigned arpeggiator. The phrase data is edited as to the velocity so that the musical phrases play within the target Element’s velocity range.
Put Track To Arp:
To understand how this ARP was made you must imagine the four phrases recorded to the first four tracks of the recorder. The data can be recorded in your favorite DAW, edited to meet the velocity range limits for the target sound, and then exported as a .mid file and loaded to the Montage MIDI PLAY/REC feature. Once loaded to Montage we can Convert the data into an arpeggio.
Record the above four lines each to a separate Track of the recorder – each assigned to the “Chill Comp 2” Part.
You can COPY “Chill Comp 2” to slots 2, 3, and 4. (You can activate just the single target Element).
On the HOME screen:
- Touch the PART NAME box to view the pop-in option window
- Select COPY
- Set the dialog box that appears to COPY PART 1 > PART 2
- Rinse and repeat…
Record two measures of each line as shown above, to tracks 1, 2, 3 and 4 of the recorder.
When completed touch the SONG NAME box top center of the screen. A pop-in window appears.
Select the “User Arp” option and set the dialog box as shown.
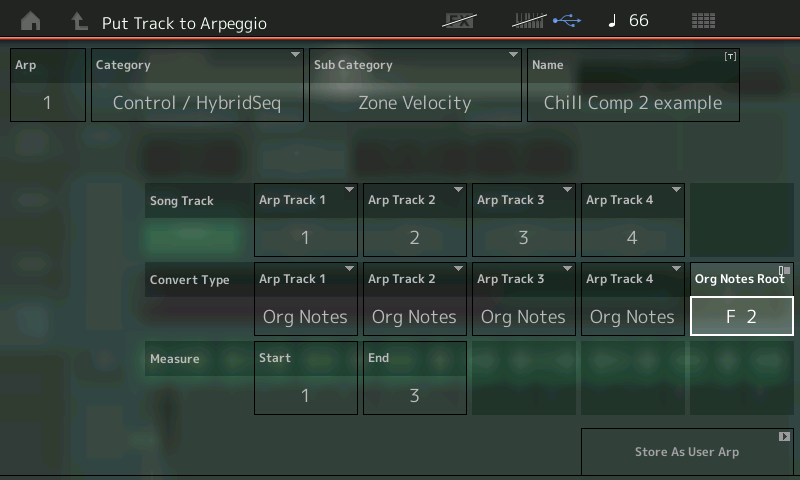
Start Measure 1 – End Measure 3 is the equivalent of two complete measures (top of measure 1 to the top of measure 3 is two complete measures).
The “Original Notes” Convert Type with the “Original Notes Root” = F2 was selected to create a chord intelligent arpeggio phrase, that will sound properly when F2 is the lowest note. This will create the ARP PHRASE you hear for ARP TYPE #9684 _ “MA_4Z_4Zone5A”
Check out another Performance using this same 4-Track Velocity Zoning technique: “Mr. Wah!”
Want to learn more about Arpeggios with MONTAGE? Check out the earlier articles in this series:
Want to comment or ask a question about The 4 Track Arpeggio: MONTAGE article? Join the conversation on the Forum here.
And stay tuned! More to come on Arpeggio making with MONTAGE from our own Bad Mister.