

We know that the original MOTIF XF Performances were four PARTS, with just two Assignable Knobs per PART and no COMMON Assign Knobs; it had just six Control Sets per PART… We’ve been exploring the possibilities using this data to build upon. Let’s take a look at the impact of adding additional PARTs to an existing Performance. In this article, we’ll be expanding on the MOTIF XF Performance data.
“Smooth It Over 5”
The Download Performances with this article contains “Smooth It Over 5” – now a quintet, we have added a B3 organ sound to the previous article’s “Smooth It Over 4”.
The steps in doing this – From the HOME screen of “Smooth It Over 4”, we touched the “+” in PART 5 to *ADD* a new PART.
When you ADD (“+”) a new PART in this fashion, the MONTAGE automatically opens the “Part5 – Performance Merge” Search screen (shown below). This is a special variation of the CATEGORY SEARCH function which allows you to place existing data into available empty Performance slots starting with the PART where you touched the “+”. In this instance I added a single PART, as follows:
- Touch/Set the “Bank/Favorite” = Preset
- Touch/Set the “Attribute” = Single (green denotes Single Part programs)
- Touch/Set the “Main” Category = Organ:
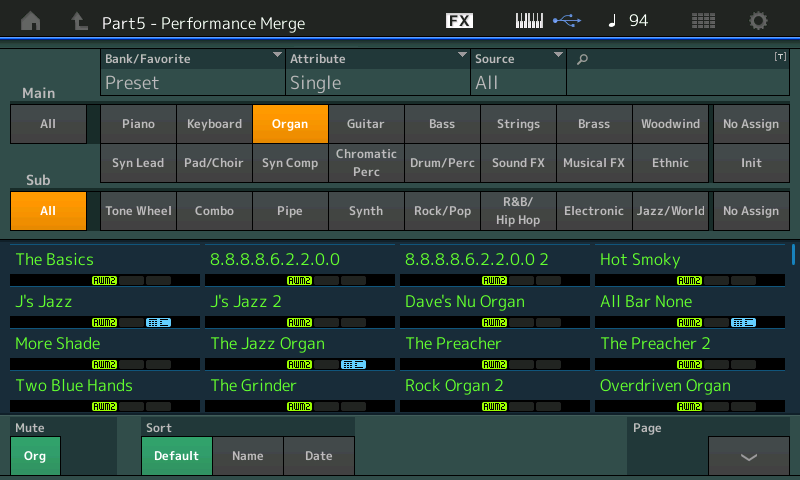
By refining the search in this manner, I can try out different sounds that meet my requirements. Remember, when you have a fully loaded MONTAGE, you can have hundreds and hundreds of Performances onboard (5700+ User and Library Performances and currently over 2100 factory).
I select “The Basics”. This is the basic B3 (Tone Wheel) organ sound with the (new) Rotary Speaker 2 (MW ‘Clean and Wide’). When this Single PART Performance is merged with our existing four PART Performance, it will join it by occupying PART 5, and it will bring along the Insertion A/B Effects and the Control Assignments for the PART exactly as they were originally programmed in the Single Part. This means the programming done to the PART when it was a Single Part Performance is merged to this new location. What is not brought along are any links to upper COMMON parameters of the Single Part Performance:
- This B3 sound features the first 5 FADERS doing real time level control over the 16′, 5 1/3′, 8′, 4′, and 2′ organ footages (drawbars), respectively; These will be acessible in the new PERFORMANCE when PART 5 is “selected”.
- Fader 6 is Rotary Noise/Grit; mix in to taste to add some mechanical noise, cuidado, not too much.
- Fader 8 is the Percussion; which can be defeated by the [AsSw2] Assign Switch 2; Use Assign Switch 2 = ON to defeat the Percussion, use Fader 8 to mix the level of Percussion (only when Part 5 is ‘selected’).
Being in [PERFORMANCE CONTROL] while playing mean you can use the top row [PART SELECT] buttons to zoom in on that particular Part. The Fader switch roles from being eight side-by-side Part Volumes, to becoming eight Element Level controls for the selected Part. This is where/when you begin to appreciate Common versus Part. By using [PART SELECT 5] we enable the ‘drawbar’ (Element Level) Function. The MW will be flipping the Chorale to Tremolo switch (Rotary Speaker Speed Control). You can begin to see that all of the instruments in your (now) quintet have their own relationship with front panel access – yet the physical controllers can be set to respond or not respond.
Initially when merging PARTS, the Arp function is automatically activated. Temporarily, turn the Main ARP ON/OFF Switch to play the organ sound directly. It is completely normal for the Part‘s Arp to activate when using this selection method. If you wish to play the sound directly yourself instead, you will simply set the Part On/Off Switch to Off and store it this way. (The assigned Arp from the original location is brought along, this way if you don’t want to use it you can opt out, by turning it off. It it was brought along and not activated, no one would know it was there…)
When adding the Part, notice the “MUTE” function in the lower left corner of the screen. You can conveniently Mute the “Org” (original) Parts, and/or the “Add” (added) Part. To play the Merged PART alone, you can MUTE the “Org” allowing you to audition the selection you are adding: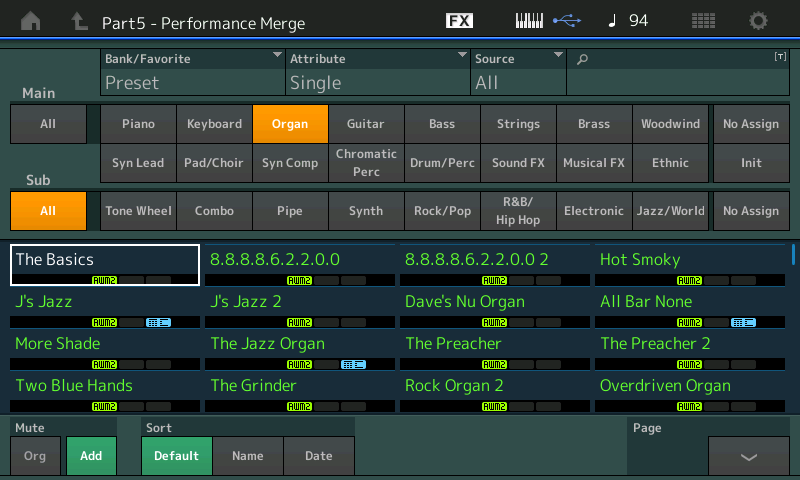
The take away here is that when a PERFORMANCE is ‘merged’ it brings along the Insertion Effects, ArpPhrases and the PART Control Assignments, which you can customize to your liking. When you return to the HOME screen, you can deactivate the ARP ON for PART 5, allowing you direct keyboard access. Significantly, the MERGE process does not bring along any of the upper COMMON level assignments from its previous home, as it now belongs to a new PERFORMANCE with a new set of upper COMMON assignments.
The upper COMMON parameters are always unique to the Performance in which the Part is currently located. These parameters include the System and Master Effects, the Super Knob and links between Assign Knobs under the control of the Super Knob. In a future article we’ll explore creating new Super Knob assignments to this Part. Fear not, the MONTAGE keeps the previous Super Knob assignments and will automatically repoint them to access available Common Assign Knobs in its new home.
Extra Credit:
As you get to know the instrument sounds in the MONTAGE, feel free to substitute your own selections. We purposefully suggested this Tone Wheel organ sound, “The Basics”, because it is very basic and you can build it into whatever type organ sound you prefer. If you’re in a hurry, pick one closest to your ideal, but I recommend starting with the basic and learn how to create your own crunchy sound! You can add drive and grit to your liking. If you prefer a B3 with more ‘edge’, built into the Rotary Speaker 2 Insert Effect are several *Presets* that give you more of a variety from which to choose. These “Preset” setups are useful for those who need to quickly explore the possibilities.
Tone Wheel Organ: “The Basics” – we want to region to the right hand portion of the keyboard as a co-lead or alternate lead sound to the tenor sax. The RANGE should be set the same as the Tenor Sax – as our goal here to be able to switch between the tenor sax and the organ sound:
From the HOME screen you can set the RANGE parameter as follows: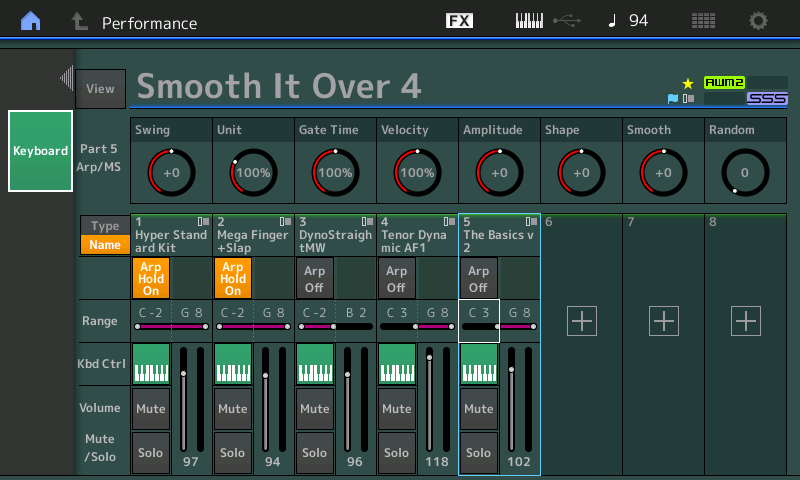
By touching the RANGE box in PART 5, a pop-in menu with “KEYBOARD” appears at the left side of the screen; when activated (green) you can change the highlighted RANGE parameter by touching a KEY on the keyboard. In this case we want to match the “Tenor Dynamic AF1” in PART 4 – “C3”. Once you input the data from the Keyboard, press [EXIT] to deactivate the “KEYBOARD” pop-in. (Alternatively, you can highlight the parameter and use the Data Dial to set the Key).
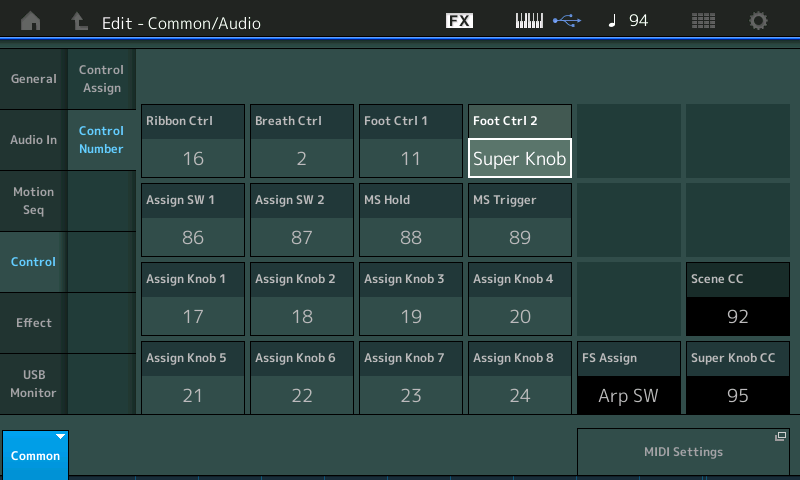
In the “Smooth It Over 5” download, you will notice that the Foot Controller 2 has been set to control Super Knob movement and will be the PART VOLUME for PART 5 (our B3 “The Basics”). Here’s how this was accomplished:
When you encounter a PERFORMANCE that was previously a MOTIF XF (4 Part) Performance, the Foot Controller 2 will default to CC04. To use Foot Controller 2 as your surrogate Super Knob, you must program this by going to the upper COMMON parameters and making that setting on the “Control Number” screen:
- Press [EDIT]
- Press the upper [COMMON] button to select those functions
- Touch “Control” > “Control Number”
- Set the Foot Controller 2 = Super Knob:
- LOAD the “Smooth It Over 5” data from the DOWLOAD link at the bottom of this article – to take a look at some of the programming we’ve added:
In this version, we have stored the PERFORMANCE with PART 5 “Muted” initially: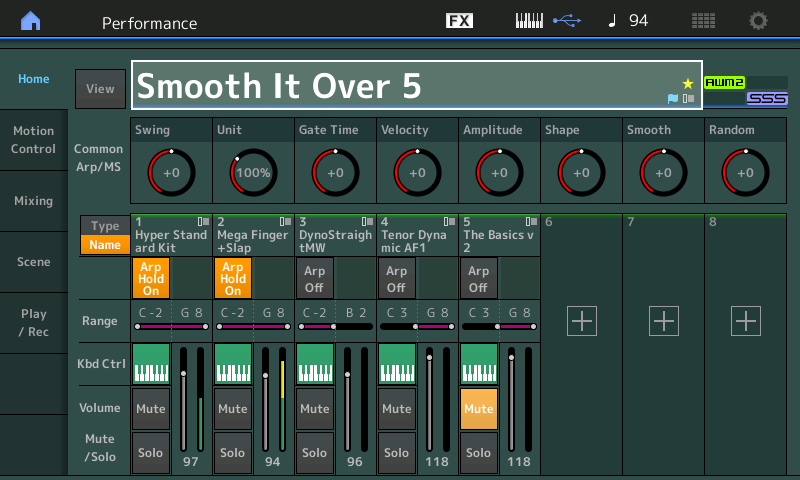
The Work/Playflow: The way you can work with this configuration is to use the right hand front panel Part Mute buttons (row 2 = [PART MUTE]) to activate and deactivate PARTS 4 and 5 when you wish to switch between Sax (4) and B3 Organ (5).
You may find that it is much more practical to use the hardware buttons for MUTING and UNMUTING the lead Parts, than the screen “Mute” icons. You can develop a two finger technique for the buttons that can turn OFF Part 4 and simultaneously, turning ON Part 5, or vice versa. And by not locking a MUTE status to the SCENEs, you can freely choose which instrument goes with a Section. (That said, if your goal is to always play the same instrument over the Section, then you may opt to link Mute status with the Scene – such that recalling a Scene recalls an instrument. We specifically wanted to point out that you DO NOT have to do that). Scenes do not cut off sound by their nature. Muting something does, by definition, stop sound. If you don’t want a Scene to cut off your sound, do not use them to store Mute status.
If no cutting off is your requirement then you can leave the switching of lead sounds to other methods instead of Scene/Mute status. Remember, right hand lead sounds are easily changed by using your right hand to reach up and press the buttons. Like learning to turn the page while reading a chart, it is easily accomplished. In future articles we’ll explore other methods to transition between lead sounds.
With this type of configuration you can play both the Organ and the Sax together, for melody lines, or you can play them separately, controlling the organ volume with the ‘Super-pedal’. The Sax can be made MONO by activating [AsSw1] Assign Switch 1. Increase the balance of the multiple repeats for the Sax when you place your finger on the right side of the Ribbon Controller. Use the Sustain pedal to hold your Electric Piano chords (which are instructing also the Bass line).
You control the Sax level with velocity, you control the Organ with the FC7 pedal doing Super Knob. The SCENE buttons 6-7-8 play with the dynamics and feel of the arpeggiated phrases.
Assignment:
Spend some time getting used to this type of front panel workflow – where you are manually selecting the right hand sound using the buttons, [4] for sax, [5] for organ. By actively using the [PART MUTE] buttons to control which of the right hand Parts are active, you can begin to see the flexibility available. When the organ (PART 5) is active, not only is the Foot Controller your volume, and MW your Rotary Speaker speed control switch, if you additionally, press [PART SELECT 5] the first five Faders become your “drawbars”. Fader 8 is your Percussion. The Percussion can be turned Off completely by activating [AsSw2].
When the [PART SELECT 5] button is lit, you have selected the organ, the role of the Faders changes from being PART VOLUMES to being Element Levels for the selected PART. You will see the green L.E.D. light just to the left of the Faders indicating that they are now ELEMENT/OPERATOR level controls. The Faders become “live” once they pass the associated red level indicator which show the actual level for that Fader control. Once you pass the red mark the Fader will “hook” the setting and become “live”. To return the Faders to being PART Volumes you can press the upper [COMMON] button or the [HOME] button: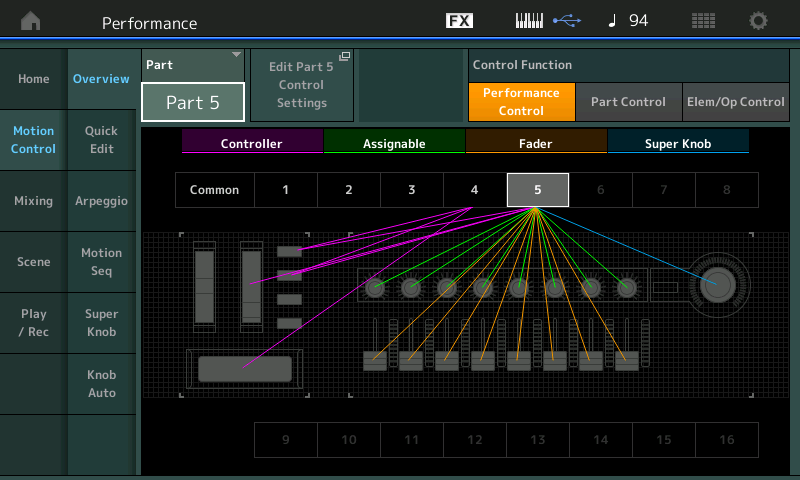
Above, the OVERVIEW screen showing PART 5 assignments, [SHIFT] + [HOME] = Overview.
With each new assignment you make, the Overview screen will reflect that addition.
Below, the Super Knob assignment to control the PART 5 VOLUME. You arrive here from the above screen by touching the “shortcut” box “Edit Part 5 Control Settings”: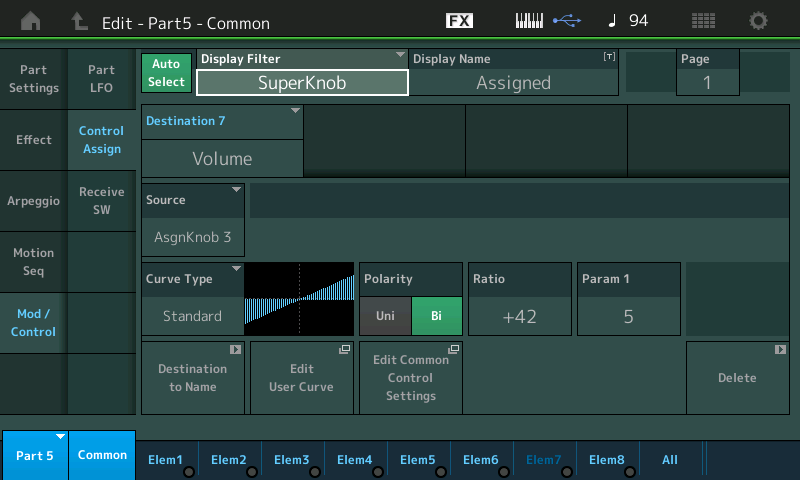
Use Case Concept:
Setting up a PERFORMANCE like this can be used for live play. But can also be used as a way to work out melody lines or solos. The challenge here is in the left hand both “live” playing a direct Electric piano PART, and at the same time responsible for controlling the Bass Arpeggio. You will want to experiment with chord voicings that work for framing your accompaniment. Try out chord inversions to see what works – remember the minor6 (conundrum). Try using both the [ARP SELECT] buttons on the right front panel, and the [SCENE] buttons on the left front panel, to change the combination of ARP Phrases 1-5 with SCENES 1-8. There are five ARP Phrases which can be played at different dynamic levels. While pressing [ARP SELECT] buttons 1-5 directly will recall a Phrase – use SCENE buttons 6-8 to adjust the feel of the currently playing Arp Phrase.
Next time, we’ll expand our “Smooth It Over Quintet” to a Sextet… until then, enjoy!
Want to discuss this session? Join the conversation on the Forum here.
And if you haven’t tried out the other MONTAGifying sessions, find the complete list/access here.
Download here:
Smooth_It_Over_5.X7B