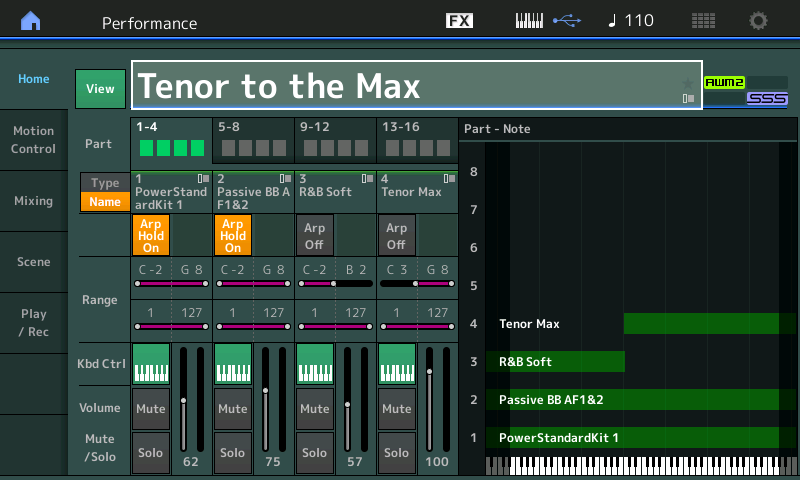
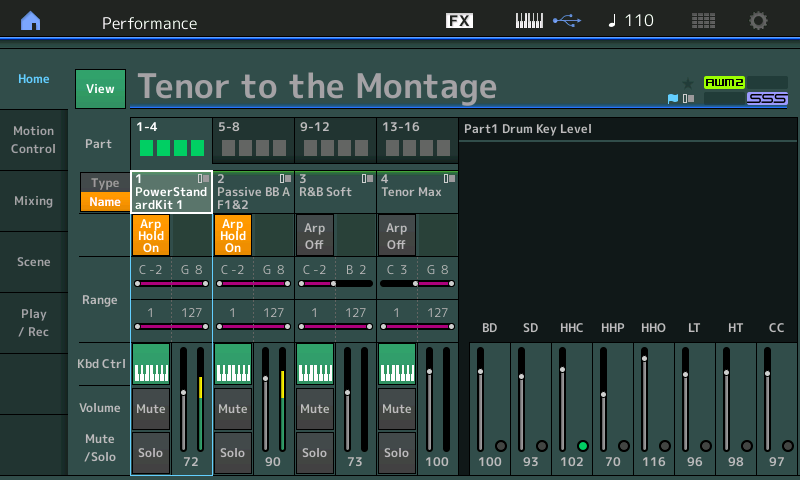
Work with the overall Kit level (when COMMON is selected) and then adjust the individual Drum Key Levels (when PART 1 is selected).
Start by taking a look at the OVERVIEW screen: [SHIFT] + [HOME] or by touching “Motion Control” > “Overview”:
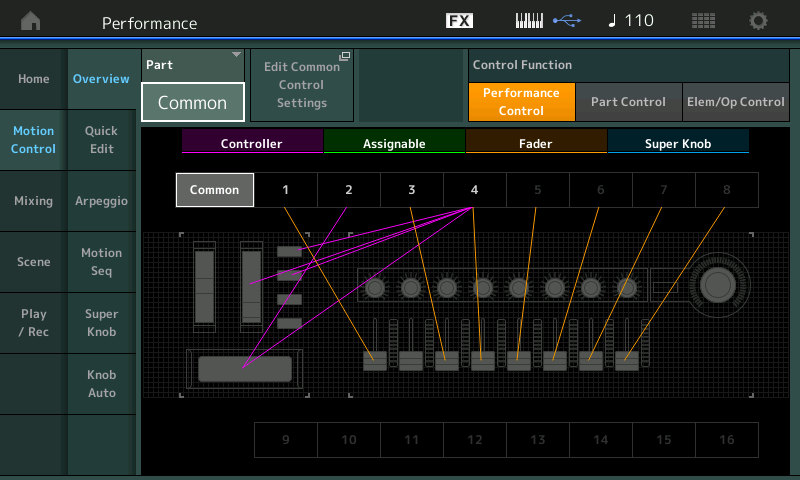
MW, Ribbon, Assign Sw 1, Assgin Sw 2, Faders.
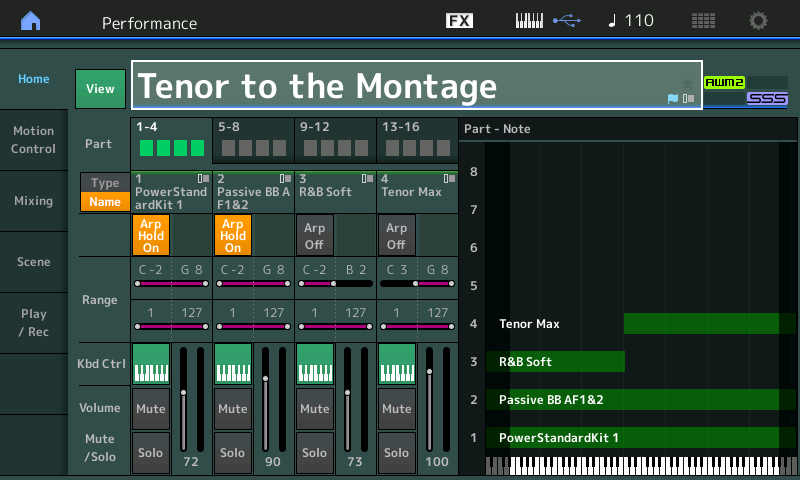
Notice that when “COMMON” is selected, FADERS control the PARTS 1, 3 and 4. PART 2 is not under control of the FADER (this is not a screen glitch) it is true. The FADER function does not appear because the RECEIVE SWITCH for VOLUME/EXPRESSION has been turned OFF for PART 2. Remember, we learned about the RECEIVE SWITCH which can be set per PART, so you can determine which controllers apply to each PART. Often when combining PARTS you wish to NOT have a controller work for a PART, you may not want the Sustain pedal to work on the split bass Part, for example.
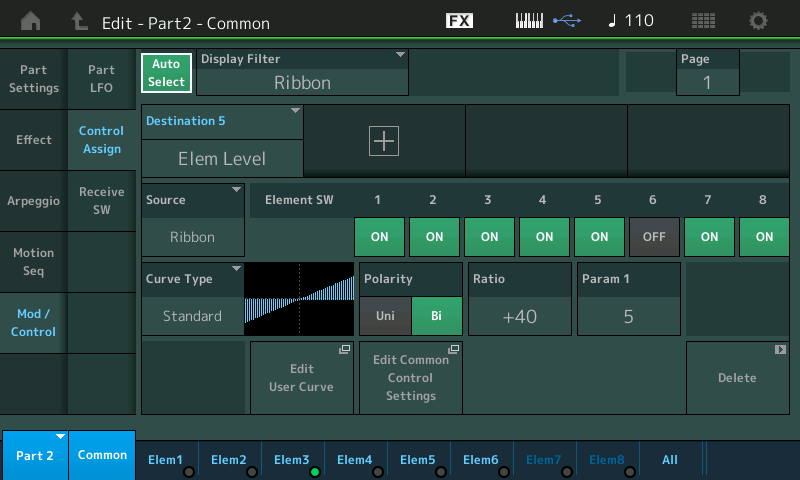
In this case, you will discover it is the RIBBON controller, that is assigned to do Element Level on PART 2, is being used to fade the E Bass:
– Set the PART = “PART 2”.
– Touch the shortcut box “Edit Part 2 Control Settings”.
– Make sure the AUTO SELECT is active (green).
– Touch the Ribbon (when you want to give just the drummer and tenor sax the spotlight, simply hold your finger on the left side of the RIBBON):
As you study the OVERVIEW screen, notice it is color coded. The CONTROLLERS are magenta, the ASSIGNABLE Knobs are green, the FADERS are tan, and the SUPER KNOB is blue.
Change the “PART” parameter setting to view each of the four PARTS, in turn. While the CONTROLLER (magenta) stay the same (after all all PARTS share these physical controls), each PART will have its own ASSIGNABLE Knobs (green). You will see two knobs have assignments, as this was a Motif XF Performance and only two Assign Knobs per PART were available:
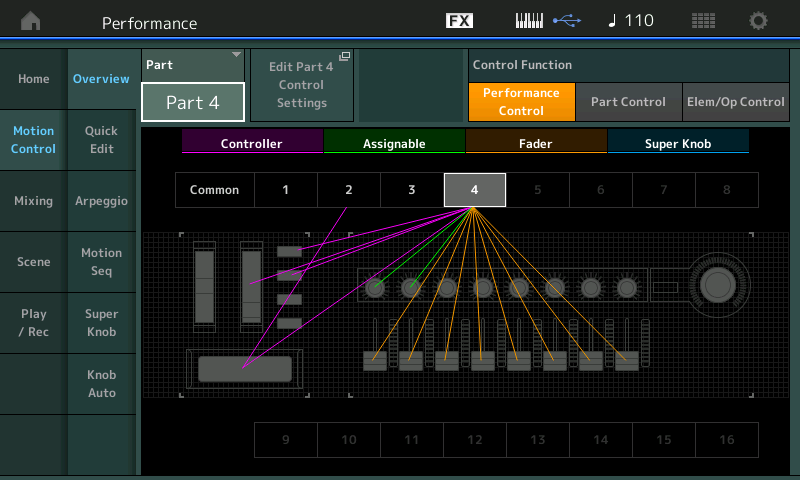
The role of the FADERS (tan) changes from when you are looking at the PERFORMANCE COMMON and when you are looking at an individual PART of the PERFORMANCE. When you select a PART 1, 2, 3 or 4, the FADERS switch to being ELEMENT (AMW2)/OPERATOR (FM-X) LEVEL controls for that PART, instead of PART VOLUMES. The SUPER KNOB (blue) is completely unassigned along with its set of 8 Common Assign Knobs. – the Motif XF did not have any thing like those – so all eight of the Super Knob’s eight AssignKnobs are available, and each PART has Part AssignKnobs 3-8 available.
The “Tenor Max” (Part 4) was a Voice in the Motif series that made use of the XA CONTROL’s Assignable Function Switches and Velocity to determine which of the six Elements is going to be sounding at any specific time. We can learn about this in depth by navigating to the “ALL ELEMENT” screen to see the mapping. From HOME:
– Press [EDIT].
– Press [PART SELECT 4] “Tenor Max”.
– Touch “All” in the screen to view the “Osc” (Oscillators) all Elements simultaneously:

Here you can see that when both Assign Switches are OFF, you can play Soft (Elem1), Medium (Elem2) and Hard (Elem4) Tenor Sax2 Waveform, and only when you exceed a velocity of 126, do you get the Tenor Sax2 Growl (Elem3).
“Assign Switch 1 On” gives you the Fall off, and “Assign Switch 2 On” gives you the Hard (Element) at all velocities. While on the ALL ELEMENT screen play the “Tenor Max” PART 4 (middle “C” and above). Notice the Element 1 – Element 6 indicators. At no time is more than one Element sounding. XA CONTROL is about which Elements are required to sound – an Element must meet the XA CONTROL, the VELOCITY LIMIT, and the NOTE LIMIT* requirement in order to use polyphony and create a sound.
This, velocity access to growl, works fine and you can adjust to playing this saxophone – but what if you want to add growl at a lower/softer velocity? Reminds me of Gato Barbeiri (Google this 20th Century Tenor player, if you’re not familiar), what if you wanted to get growl at soft, or medium velocities? While the hardest velocity strike bringing in the growl, is great for many use cases – we can, with the Motion Control Engine, find a way to create a situation where at any velocity we can bring in the “growl” Element and fade out the other tone with a single gesture. We can use the same kind of thing we learned about in morphing one sound to another – this time we will accomplish it at using Element Levels rather than the Part Volumes. Smooth transitioning can be programmed, if and when you know what you are going for. In the tutorial on the Orchestral Brass Swell sounds we learned how by having the Elements active together we can use direct parameter control of their levels to shape exactly when the Elements are sounding – seamlessly morphing between the actively sounding oscillators. With MONTAGE this can be done on the individual Element level of the architecture and/or with entire PARTS or even multiple PARTS. That’s what it’s about.
Below, notice the edits done to Element 3 (Growl) and Element 4 (Hard); Element 3 is set to sound through all Velocities, 1-127, while Element 4 takes over the full Hard velocity range, 111 through 127:

Now, if you play the keyboard, you will see that Element 3 is sounding along with either Element 1, 2 or 4 depending on your velocity – some combination – at all times two Elements. This will allow us to move in and out of the growl when we desire by controlling these Element’s Level output. We now can use the Super Knob system, for example, to control when we bring in the ‘growl’ Element. We will need to control the Level of Element 3 so that it follows the position of the Super Knob — minimum when the Knob is down, maximum when the Knob is up. And as we bring in the Growl Element, we’ll want to reduce Elements 1, 2 and 4 so that we have full control of when the ‘growl’ is brought in.
Task: Assign Element Level of the Element 3 to the Super Knob.
First, if you have an FC7* and want to use it to control the Super Knob, you must make that assignment on a per PERFORMANCE basis:
– Press [EDIT].
– Press the upper [COMMON] button.
– Touch “Control” > “Control Number”.
– Set “Foot Ctrl 2” = Super Knob:
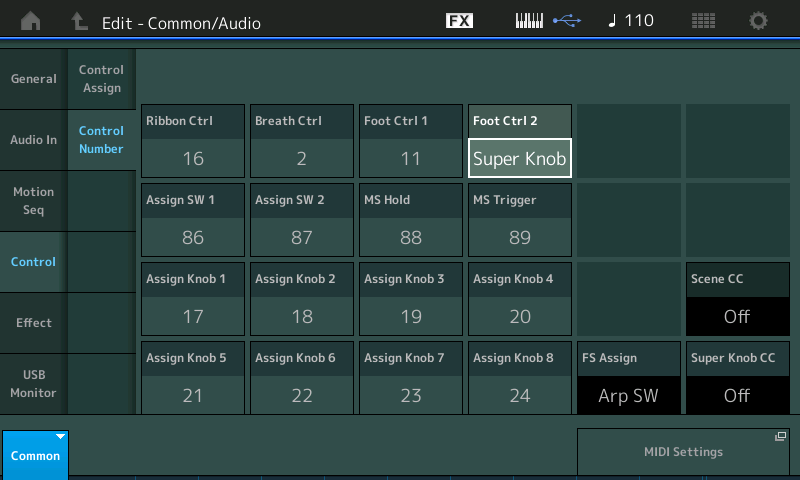
*FC7 assigned so that Foot Ctrl 2 = Super Knob is essential for this Performance, as you are controlling the rhythm section with your left hand, comping with a Rhodes sound, while playing lead on tenor sax. Using the FC7 to bring in the ‘growl’ sound can easily and intuitively be done hands-free! If you do not have an FC7 yet, you can use Aftertouch to bring in the ‘growl’ and simultaneously reduce the non-growl Element levels:
– Next, select the “Tenor Max” Part: Press [PART SELECT 4].
– In the screen touch “Common” > “Mod/Control” > “Control Assign”.
– Make sure the AUTO SELECT is active (green).
– Turn the SUPER KNOB to recall its current assignments:
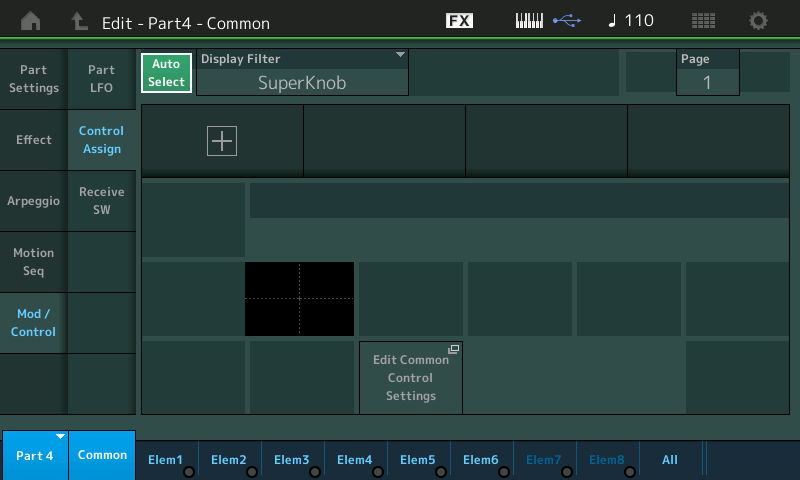
– Touch the “+” to ADD a Control Set SOURCE/DESTINATION.
– Touch the parameter box that appears to view the pop-in menu of the possible DESTINATIONS.
– Touch “Element” > “Element Level”.
A drop-down will appear briefly to inform you of the assignments it just made: “MODIFIED: Common AsgnKnob1 > AsgnKnob3”.
Translation: The first available COMMON AssignKnob (1) has been linked to control the PART’s first available AssignKnob (3).
Turn the ELEMENT SW (Switches) for all but ELEMENT 3 to OFF (shown below):
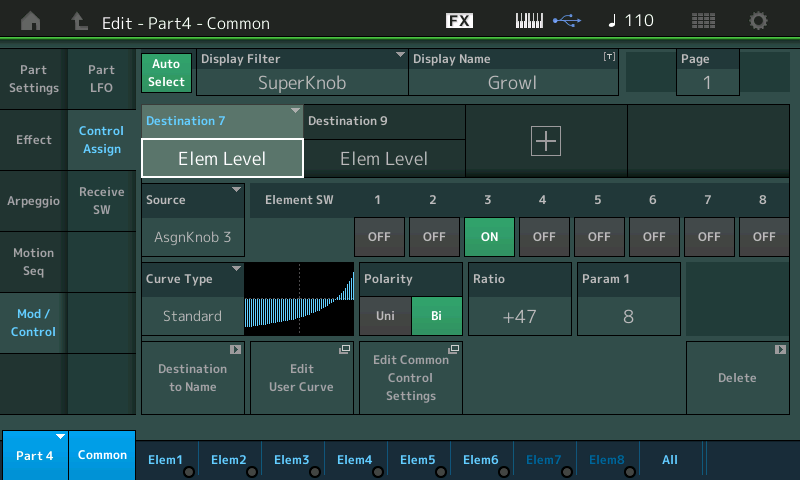
We have tweaked the POLARITY = BI and the RATIO = +47 and PARAM 1 = 8 to shape how we want the Growl to be applied. Please adjust the Curve to your liking. This is designed for those using an FC7 Foot Controller to move the Super Knob, it takes you getting fairly close to toe-down position before the Growl starts to emerge – this must be set to your taste. Standing might be different from sitting, where the growl begins is really subjective – and something you should set to taste.
Task: Turn down the non-growl Elements.
Simultaneously, in another Source/Destination box we can setup to turn down Elements 1 (soft), 2 (medium) and 4 (hard) at the same time the Super Knob is turning Element 3 up:
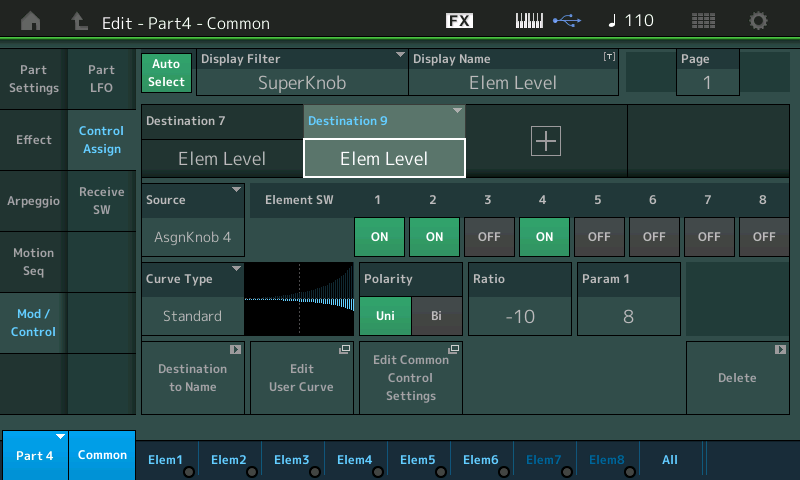
For extra measure, you might also want to assign the Growl Element (3) to Aftertouch – many players find that Aftertouch is ideal for bringing in something like “growl” or vibrato. Here you can use it to bring up the ‘growling’ tone:
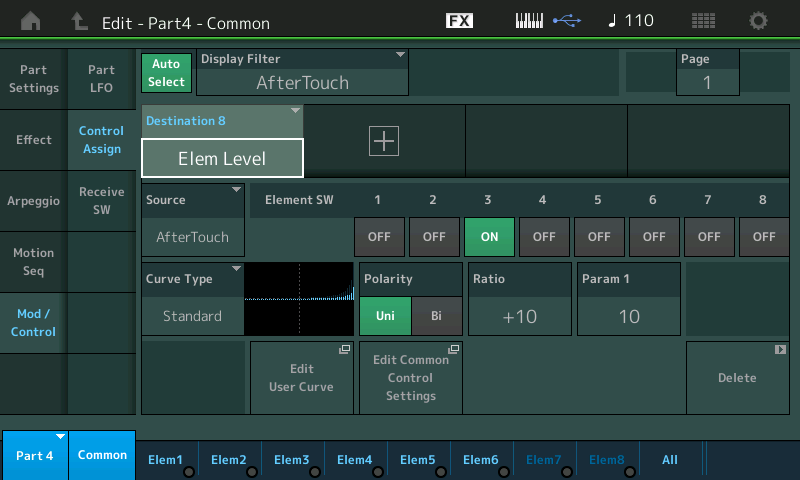
This is set for just a touch of growl, while the main growl is on the Super Knob/FC7. You can adjust it to your liking.
Review: On the upper level of the architecture, where you can address all PARTS of the Performance together, is where you can see the overview of the Super Knob assignment:
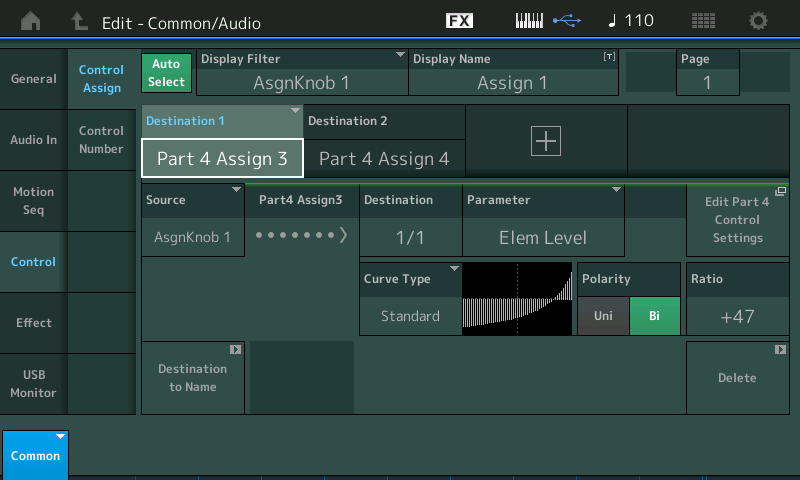
Above, you can see that on the upper COMMON/Audio level Destination 1 is “PART 4 Assign 3“ and is linked to the SuperKnob’s AssignKnob 1 and is responsible for increasing the ‘Growl’.
Below you can see that on the same COMMON/Audio screen Destinaton 2 is PART 4 Assign 4 is linked to the SuperKnob’s AssignKnob 1 and is responsible for decreasing the non-Growl Elements:
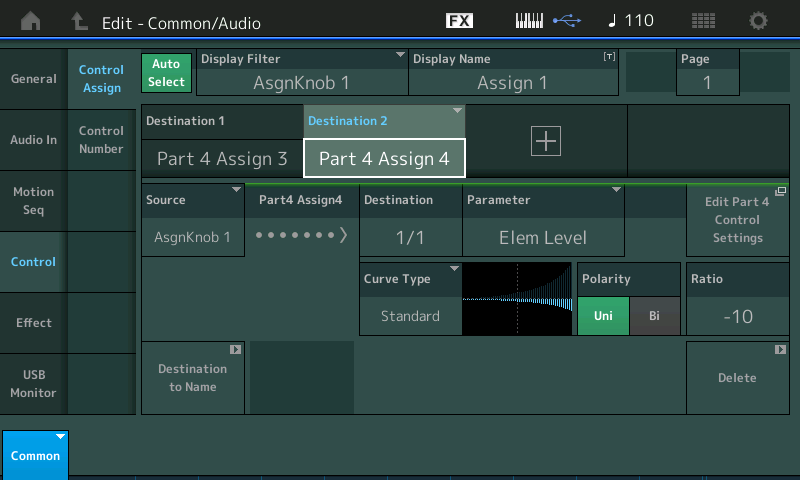
You can begin to understand that each of the upper level Assign Knobs can itself be a “super knob” – controlling more than one thing, in more than one direction, and sending different amounts. Here the upper Common Assign Knob #1 is turning Element 3 up at the same time it is turing Elements 1, 2 and 4 down!
Want to share your experiences, questions or comments? Join the converation on the Forum here.
And stay tuned for more from Bad Mister to help you make the most of your MONTAGE!
Download here: Tenor_to_the_Montage1.X7B

