

Tagged Under
This extremely popular MOTIF XF Performance combined Strings, Pipe Organ, Brass, and Choir sounds which could be mixed using the front panel Control Sliders. We’ll use this Performance to show how the MONTAGE’s Motion Control Synthesis Engine can be applied to real time interaction with these four sounds. This deep realtime interaction is what MONTAGification can do to MOTIF XF Performances. The article assumes you are following along, making each edit as you go. By stepping through the tutorial you will get a feel for how to navigate and make the connections/assignments. All PARTS share the System Effects and the Master Effect. Individual Send amounts to the Reverb and Variation; and all sounds together go through the Master Effect.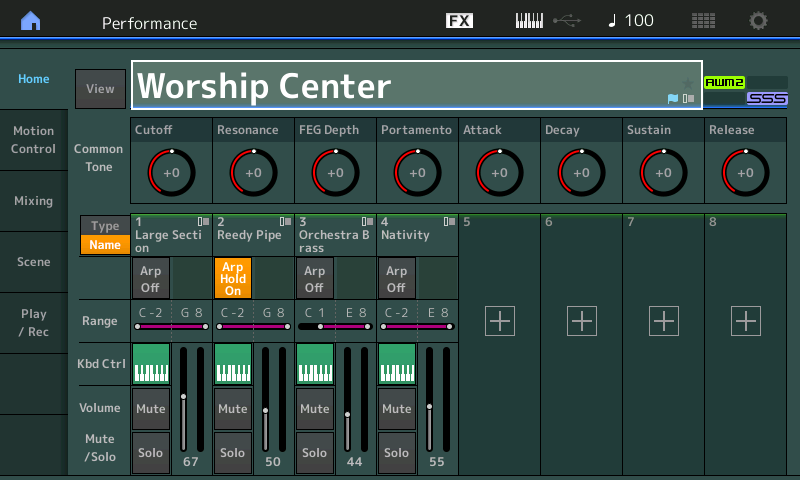
PART 1: Large Section
PART 2: Reedy Pipe
PART 3: Orchestra Brass
PART 4: Nativity
SYSTEM EFFECTS: Reverb = “Rev-X Hall”; Variation = “Tempo Delay Stereo”
MASTER EFFECT: VCM Compressor 376
When initially recalled, all four PARTS are active and you get a rather full, thick sound – naturally, all PARTS are sounding together in a layer. What you did on the Motif XF was to adjust the Control Sliders, 1-4, to bring in and out the different sounds as you needed. Or you manipulated the MUTE buttons to play a particular sound or combination of sounds. With MONTAGE, these four instruments can be combined and recalled in different combinations, and with the Control Matrix, they can be controlled in unique ways that you can design.
Note: Please recognize that we are using these XF Performances as basic jumping off points. Once you are comfortable with the concepts being discussed, feel free to substitute with sounds of your own choosing. At the end of this article find the MONTAGE CONNECT .X7B file that can be bulked to your MONTAGE from your computer. The file is ZIPPED – unzip it and copy the file “Worship Center.X7B” to your computer.
PART 1 “Large Section”
This is a 5-Element string orchestra sound built where Elements 1, 2 and 3 form a 3-way (soft-med-hard) velocity switching stereo composite string section. This is layered with a full Ensemble Mix stereo waveform in Element 4 (which is a single Element that is the entire string orchestra as a single stereo Waveform) you will hear that this is used as a brighter tone, plus Element 5 is the full orchestra Pizzicato stereo (this plucked sound is assigned as an ‘articulation’ on AsSw 1 if we activate the Receive Switch). When playing this Part, the core of the sound (Elements 1, 2 and 3) respond to your velocity, the single Element (4) Ensemble Mix is assigned to Assign Knob 2 (Element Level) and can be balanced with the others to create the size string section you desire:
Press [SOLO] upper right front panel.
Select [PART SELECT 1] to solo the “Large Section” Part.
Let’s explore the Knob assignments. Initially, the TONE row of ‘Quick Edit’ Knob Functions is selected. Because PART 1 is selected, the Knob parameter indicated will affect Part 1, only. Each Part has its own set of 24 Knob Functions via the three rows (TONE, EQ/FX, ARP/MS), plus each Part has eight Assignable Knobs of its own (when [ASSIGN] is lit). In order to see, hear, and understand we will start our journey here:
Press [SHIFT] + [HOME] to go to the now familiar “OVERVIEW” screen.
Here you can see the Controllers, AssignKnobs, Faders, and Super Knob assignment overview.
Touch the shortcut box “Part 1 Control Settings”.
This takes you directly to the PART 1 Control Assign screen.
Make sure the “Auto Select” is active (green).
Press the [ASSIGN] button located just to the left of the Super Knob to activate the PART 1’s Assign Knobs.
Turn Assign Knob 1, the “Display Filter” will recall all Destinations assigned to Part 1’s Assign Knob 1:
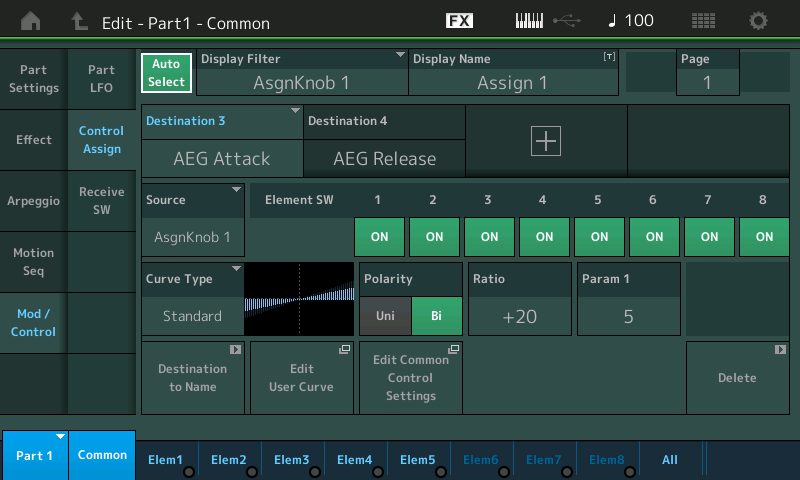
You can see that PART 1 Assign 1 is going to control a change in both the Amplitude Envelope Generator Attack and Release. Each Destination has its own screen – above “Destination 3”, in blue, is actively being shown. Move the cursor to Destination 4 to view its Curve, Polarity, Ratio, etc.
While on this screen lets give the “Display Name” an entry – the default name “Assign 1” does not help us remember what this Knob is assigned to do:
Touch the “Display Name” box.
Give this Knob the name: AEG.
Touch “Done”.
Turn Assign Knob 2 to recall its settings.
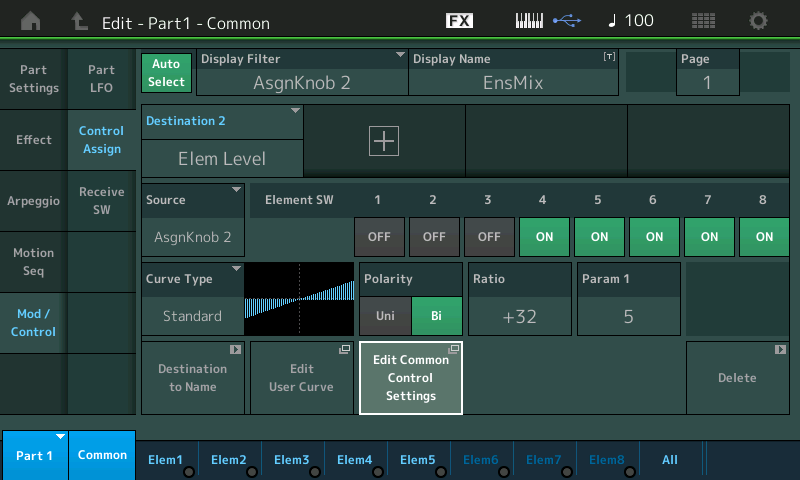
Listen to the affect this has on the String PART. It is controlling the Element Level of Element 4 (highlighted in the screenshot below) – Element 4 is the EnsMix Element that sounds at all velocities. Element 1, 2 and 3 are switched OFF, Element 5 is only in as an Articulation, and Elements 6-8 are not used:
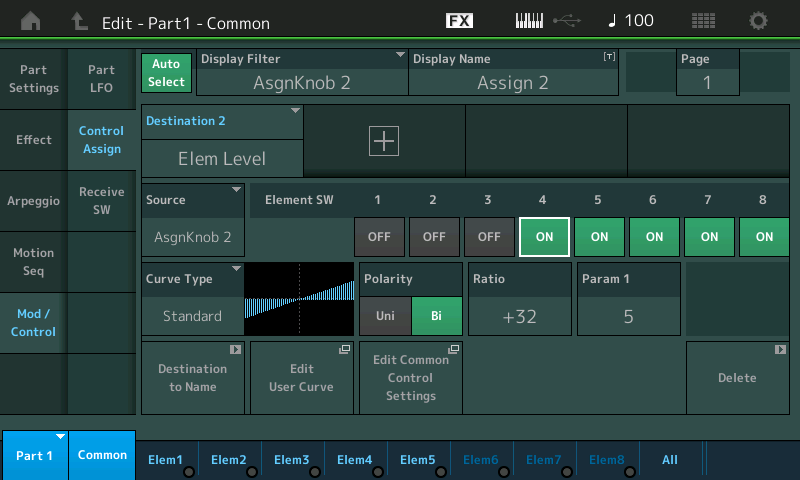
Element 4 changes the size of the string section – when Assign Knob 2 is at minimum versus at maximum, you can hear that the string section has increased in size. As you can see the Polarity is Bi-Directional, meaning that increasing from the stored 12 o’clock position will increase the Level of Element 4.
Touch the “Display Name” box and change name this Assignment from “Assign 2” to: EnsMix.
Touch “Done”.
You can isolate Element 4. On your right front panel, the bottom row of buttons are the “Element Mute/Solo 1-8” (row 4). Those lit brightly when [MUTE] is selected are unMUTED (sounding)… The one lit brightly when the lower [SOLO] button is selected is sounding.
So in addition to SOLO’ing the PART in the PERFORMANCE (with the upper MUTE/SOLO buttons), you can SOLO the Element within the solo’d PART (with the lower MUTE/SOLO buttons).
Solo Element 4 by pressing the 4th button on the bottom row.
Press [SOLO] > [4].
Now isolated, you can clearly hear that Assign Knob 2 is controlling the output of this Element as you go from minimum toward maximum. (Again, RATIO is the amount of change and the direction of change).
When done, press the lower [MUTE] button to bring back in the other Elements.
Try this: MUTE Element 4 by turning its lamp off.
Play the string sound and observe the Elem1-Elem2-Elem3 across the bottom of the screen to see/hear when each of these Elements is set to trigger.
Bring back in Element 4 and increase and decrease the level using Assign Knob 2.
You can hear how the Element 4 can brighten the overall string sound, and how the AEG changes affect the speed with which you can articulate phrases.
Also affecting our overall perception of the String PART is how it interacts with its Insertion Effects.
Touch “Effect” > “Routing”.
This is the ROUTING screen for Elements through the Insertion Blocks: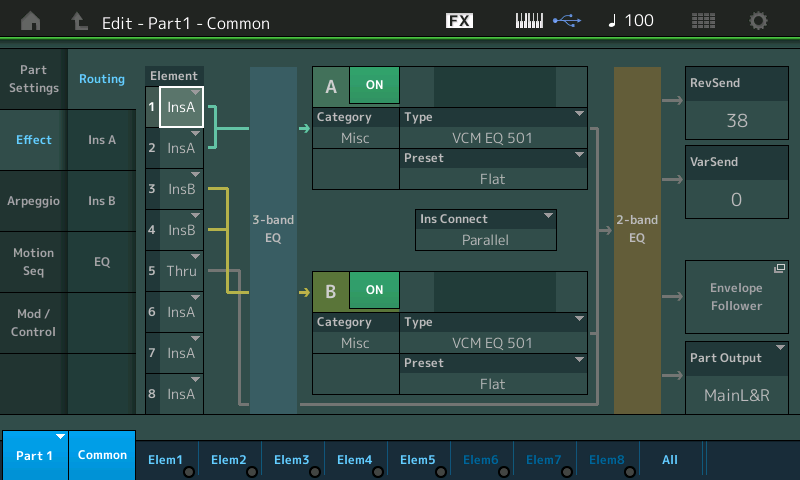
Notice the routing lines which show that Element 1 and 2 (that is, the soft and medium string orchestra, Elements 1 and 2) are going through the VCM EQ 501 at Insertion “A”, while the hard string orchestra (Element 3) and the Ensemble Mix (Element 4) are going through the second VCM EQ 501 at Insertion “B”. This is how the strings get brighter in timbre as you play harder and as you bring in more of Element 4 (via PART 1 AssignKnob 2) – the EQ in Insertion Block “B” is a brighter setting. The Pizzicato Element (5) is set to THRU (bypass) the INSERTION block entirely.
Also influencing the size of this string orchestra is the position of the MW. This can be used for subtle or dramatic effect. MW is assigned to VAR SEND (the amount of signal going to the TEMPO DELAY STEREO). The MW is set to Control the VAR SEND, the Polarity is Uni-Directional, so moving the MW up will send more signal and returning the MW to minimum will return the SEND amount to its original “stored” setting. Up until about halfway you are not aware of the complete repeat – it simply sounds as if you are hearing more strings. This illusion, which is so easily adjusted here would take a team of carpenters weeks to accomplish. The amount of repeat (echo) you hear in a room is determined by how far away the ceiling and walls are from the sound source; what they are made out of also influences how much of a repeat you hear. The complete repeat (echo) gets very audible once you pass about halfway; this is pure sci-fi.
While exploring you will make the discovery that the Ribbon is listed as controlling COARSE tuning but that there is no response: (we also mentioned the Pizzicato articulation):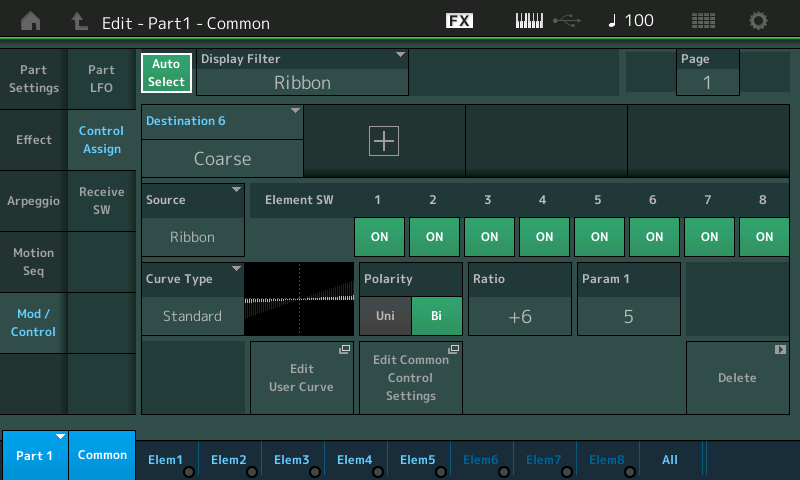
Often when programming merging PARTs into a PERFORMANCE may have assignments that do not necessarily work when you are combining them with others – and you may simply opt to deactivate the reception of that controller. Here you can either DELETE the Control Box (Delete is in the lower right corner) or you can simply deactiave the receiption of a particular Controller.
If you touch the “Receive SW” option in column two in the screen, you will be shown the Active and Inactive Controllers for the PART:
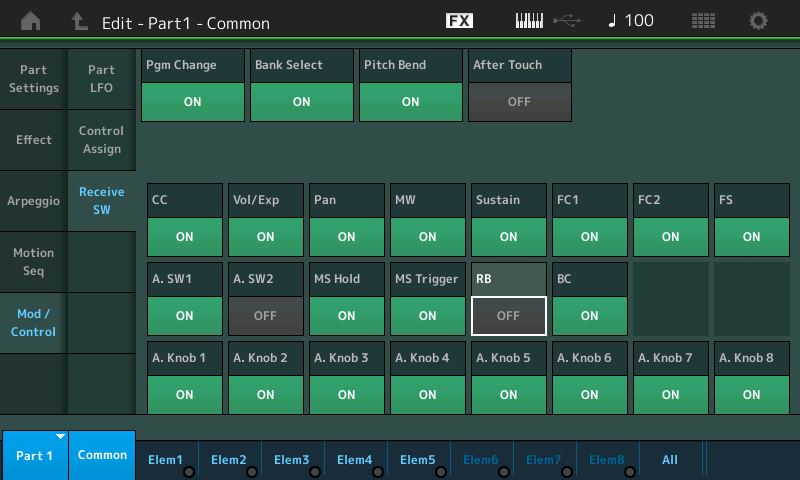
In the “Worship Center” Performance the Assign Switch 1/2 were deactivated for PART 1 – If you want the Element 5 (Pizzicato) to be active, you will want to set “A.SW1” = ON (as shown above). The Assign Switches can be made Momentary (quick On/Off), or Latch (stays On or stays Off) by navigating to upper [COMMON] > “General” > Set “Assign 1 Mode” = Latch.
If you would like to experiment with the COARSE tune on the Ribbon (great for manual vibrato and for Looney Tunes cartoon-like orchestral pitch bends) activate the RB = ON switch.
When exploring, always remember that if you cannot find how an assignment works – it may be that it is simply disabled here on the Receive Switch screen. Always think Transmit/Receive – even with Controllers.
When PART 1 is *selected* the ‘nicknames’ we entered for “Display Name” will remind us what is assigned to those Knobs: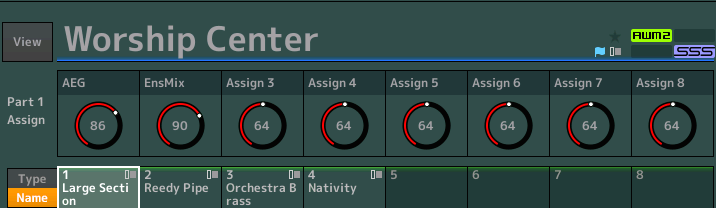
Now, let’s work with the ENS MIX assignment (assigned to PART 1 ASSIGN 2) – we know that this will bring up the “Elem Level” of Element 4 of the String PART. Let’s link that movement to the Super Knob. This will allow us to use a Yamaha FC7 sweep-type pedal plugged into the FOOT CONTROLLER 2 jack to swell the strings as we perform. Having a FC7 Foot Pedal control the Super Knob allows you to keep both hands on the keys while controlling multiple parameters in exacting ways (as we’ll begin to see).
First, let’s make FOOT CONTROLLER 2 = to the SUPER KNOB. This is programmable on a per PERFORMANCE basis.
From the HOME screen:
Press [EDIT].
Press [COMMON].
Touch “Control” > “Control Number”:
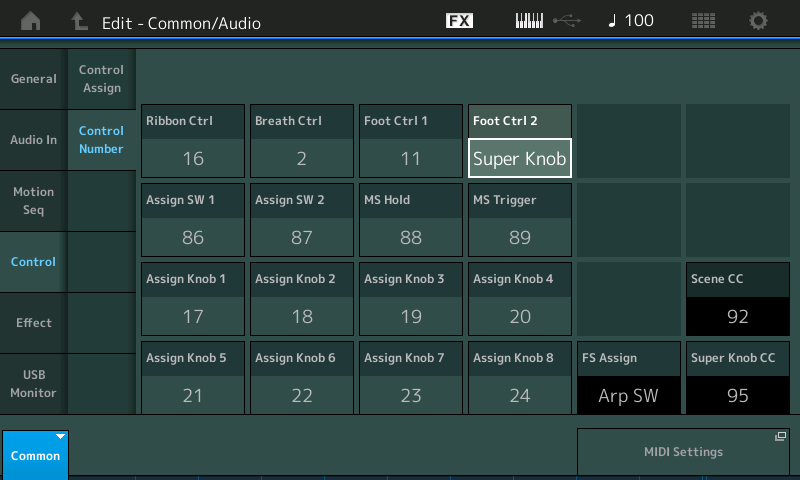
Highlight the “Foot Ctrl 2” box and dial up to “Super Knob” the highest setting.
Now the position of the FC7 Foot Pedal will determine the position of the Super Knob.
Press [PART SELECT 1] to view our “Large Section” PART and navigate to the AsgnKnob 2 screen
In the screenshot below – let’s recount what we are looking at:
We are looking at PART 1 and at what is assigned to PART 1’s Assign Knob 2. Assign Knob 2 is controlling the Element Level of all Elements except 1, 2 and 3 (which are switched “OFF” to this control). So the Output Level of the EnsMix (Elem4) and the Pizzicato (Elem5) will be affected by this Knob’s movement.
In order to link the movement of this PART AssignKnob to the Super Knob we must move to the Common level of the architecture. Here’s how:
Touch the shortcut box “Edit Common Control Settings” to be whisked directly to where you can make this assignment.
On this COMMON level of the architecture, the SUPER KNOB automatically defaults to controlling the eight Common Assign Knobs. We are linking our PART’s Assign 2 Knob to the first of the eight COMMON Assign Knobs.
Here’s how:
Touch the “+” icon to ADD a Source/Destination Assignment field.
Touch the default parameter that appears in the box to open the list of OPTIONS and select “Part 1” > “Part 1 Assign 2” instead – and then press [ENTER] as shown below:
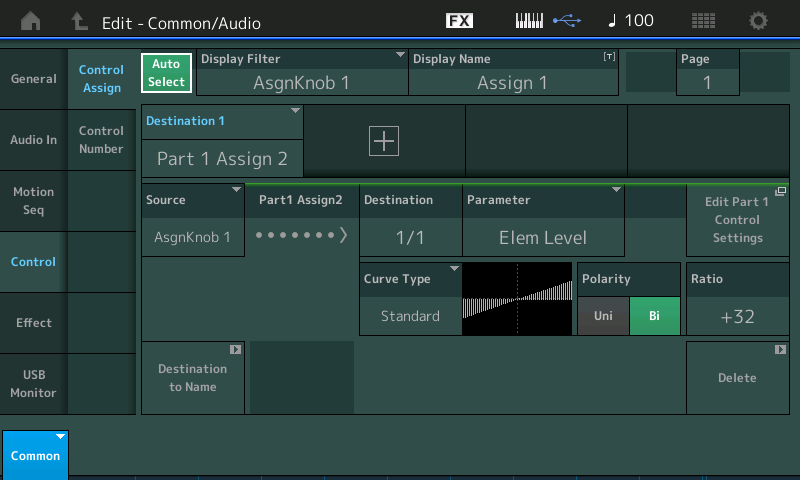
This translates to on the EDIT COMMON level, COMMON AssignKnob 1 (Source) is set to control the DESTINATION which is assigned to “Part 1 Assign 2” which is doing Element Level.
Now as you move the SUPER KNOB while on the COMMON level – you will observe that all eight COMMON Assign Knobs move together with the Super Knob – you will hear the EnsMix come up in Level. Try moving COMMON Assign Knob 1 directly. It is the one linked to control PART Assign Knob 2.
Touch the shortcut box “Edit Part 1 Control Settings” to be returned to the point of origin – PART 1.
Now when you move the SUPER KNOB, while on PART 1 level of editing – you can see ASSIGN KNOB 2 move. PART Assign Knob 2 is being controlled by the Super Knob (And we know it is the Common Assign Knob 1):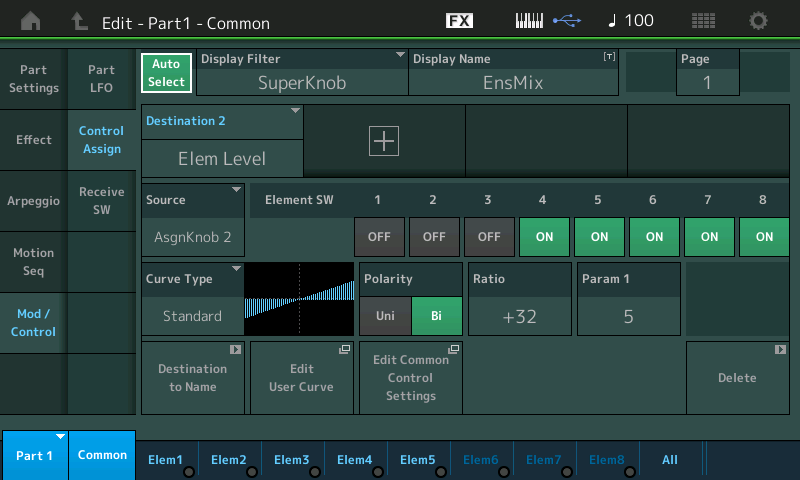
Translation: Currently, PART 1 – our Large Section strings – has one parameter linked to the SUPER KNOB and it is the Element Level of the “EnsMix” Element (4) – the one we renamed. This gives us real time control over the Element responsible for increasing the size and brightness of our string section.The fact that it is assigned to the SUPER KNOB means that no matter what is selected, this parameter will be able to be changed. We do not have to make PART 1 the selected Part in order to have control over this portion of the sound! Super Knob assignments always occur when the Super Knob is moved… and as you will learn as you get deeper into MONTAGE – that is across ALL 16 PARTS!!!
Let’s take a look at the Pipe Organ in PART 2…
PART 2 “Reedy Pipe”
This is a 3-Element Pipe Organ (an appropriate Bach-type arpeggio in-waiting):
With the upper [SOLO] button active, select [PART SELECT 2].
Exploring from the “OVERVIEW” ([SHIFT] + [HOME]) take the shortcut “Edit Part 2 Control Settings” to view PART 2 parameter.
You will discover that MW is doing CUTOFF, for Element 2 which (as you can hear) moving the Wheel up darkens the tone of the Pipe Organ (thus the negative RATIO).
PART Assign Knob 1 is VAR SEND (Tempo Delay Stereo) and a minor VOLUME adjustment.
PART Assign Knob 2 is Element Level for Element 1 controlling ranks of the pipe organ – which works in a similar manner to the EnsMix in the String orchestra sound. It is like pulling out the Stops on the Pipe Organ.
Review the assignments:
Turn Assign Knob 1
Highlight the VAR SEND which will increase the send to the Delay.
Set the “Display Name” = Delay: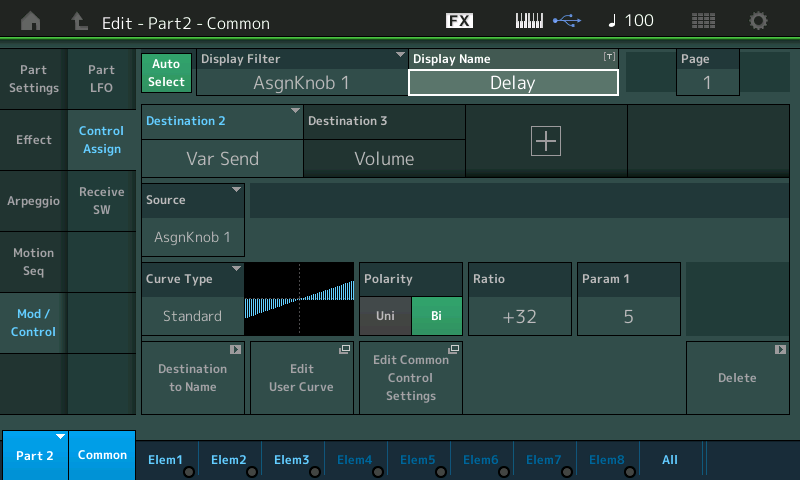
Turn Assign Knob 2 to recall its Display.
Here Assign Knob 2 is Element Level for Element 1 (you can see, below, the Switches are OFF for Elements 2 and 3).
Here set the “Display Name” = Stops: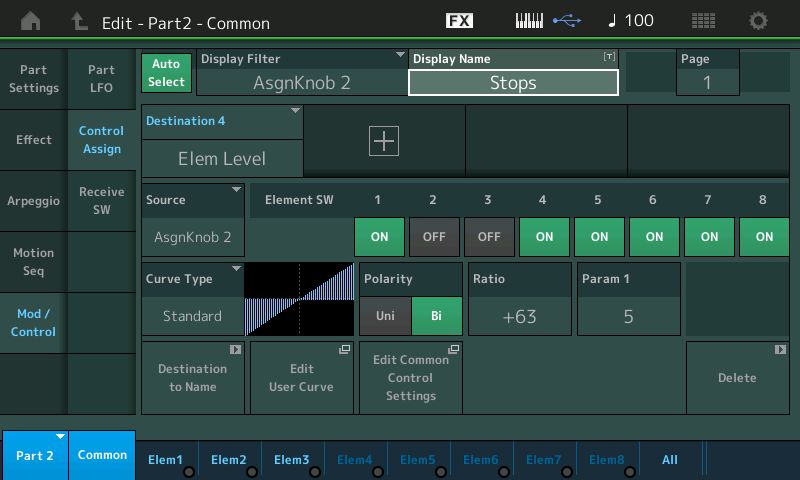
We can assign control of this Element Level and link it to the COMMON Assign Knob which will let us control this Element via the Super Knob.
You would do so as follows:
Touch the shortcut box “Edit Common Control Settings”.
You will see our previous assignment which we make to COMMON Assign 1. We could use any of the eight COMMON Assign Knobs but lets keep this simple, at first, and let assign this to COMMON Assign Knob 2 .
Turn Assign Knob 2 to recall its field – which is blank.
Touch the “+” ADD icon and select “PART 2 ASSIGN 2”.
The “Source” = AsgnKnob2.
This will link the control of Element Level (Elem1) to position of the COMMON Assign 2 Knob (Which is linked to Super Knob position).
Try performing the “Reedy Organ” Pipe Organ, using the FC7 to swell the sound.
PART 3 “Orchestra Brass”
This is a 7-Element brass orchestra sound built with velocity switching French Horns and and two different velocity switching brass ensemble sections – giving this sound a great degree of harmonic timbre change from soft to hard. While is SOLO mode, press [PART SELECT 3] to solo the Orchestra Brass. The harmonic chaos is orchestral brass is quite different from soft to loud. There is a rounded tone when played lightly and a certain characteristic “blatt” achieved at forte volumes.
PART 4 “Nativity”
This is a 3-Element Choir sound. Made up of the Ooh Choir Element and two synth voice Elements. Assign Knob 1 is Element Level for Element 2 and Assign Knob 2 is Element Level for Element 3.
Experiment 1
GOAL: Let’s assign the four PARTS so that we are playing Orchestra Strings + Orchestra Brass initially, and morph from this combination to the Choir voices and finally add the Pipe Organ to the choir.
Undo the SOLO button by pressing the upper [MUTE] button and ensure that all four PARTS are sounding (Second row buttons 1-4 should be lit brightly).
The four PARTS in this PERFORMANCE were single VOICES in the Motif XF – and therefore have just two Assign Knobs programmed – we can expand our control in MONTAGE. We will begin by programming each of the four PARTS so that the PART Assign Knob 3 will do PART VOLUME – this will allow us to customize how each responds to our control gestures. Here’s how we will do it:
From the HOME screen:
Press [EDIT].
Press [PART SELECT 1].
Part 1 and Common appear in blue in the lower left corner.
Touch “Mod/Control” > “Control Assign”.
We can so so by adding a PART Assign Knob 3 for each PART, in turn. Below when you turn Assign Knob 3, you will initially see a blank field. Start with PART 1: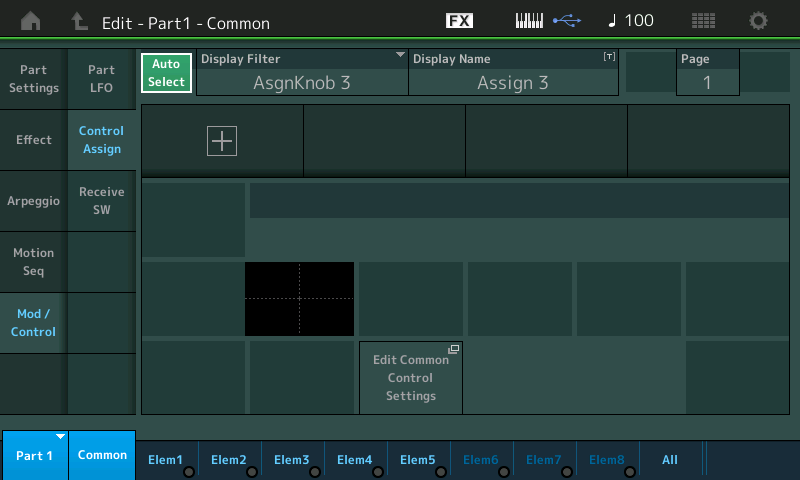
Touch the “+” to ADD a Source/Destination. Touch the default assignment that initially appears and select “PART PARAM” > “VOLUME”: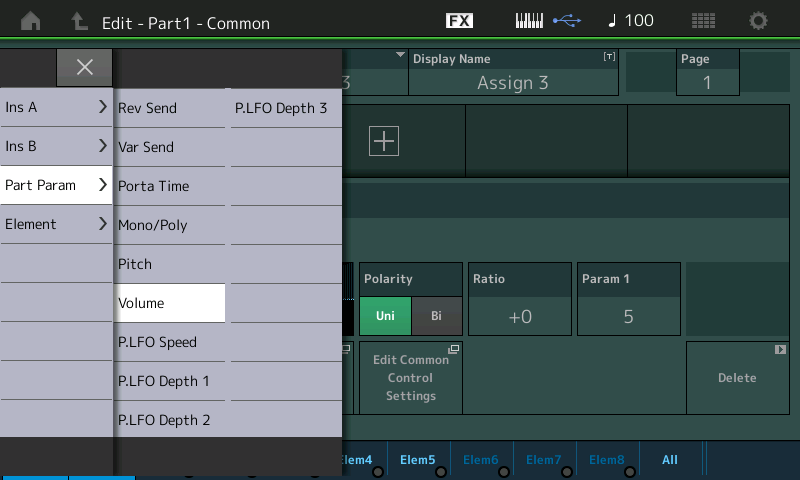
Press [ENTER].
Set the Polarity = Bi-directional.
Set the Ratio = +63.
For now, leave the PARAM 1 = 5: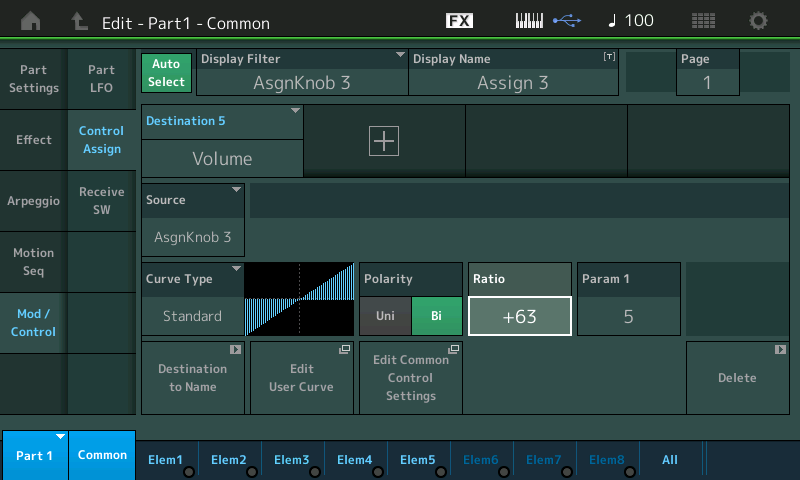
Touch the box “Destination to Name” – this will assign the name “Volume” to the PART Assign Knob 3.
Press [PART SELECT 2].
Repeat the exact same setup by ADDing PART Assign Knob 3 > set to PART Parameter = Volume, set the Polarity to Bi, set the Ratio to +63, set the Destination Name = Volume for each PART 2, PART 3 and PART 4.
When you have completed this task, each of the four PARTS will have their AssignKnob 3 set to control its PART VOLUME. This is the first step to linking them all to the Super Knob. It is always the PART Assign Knob that is linked to one of the eight COMMON Assign Knob’s movement.
What we will be attempting to accomplish is linking the Orchestra Strings (PART 1) and the Orchestra Brass (PART 3) to one COMMON Assign Knob (AsgnKnob1) – while linking the Pipe Organ and Choir to the movement of a second COMMON Assign Knob (AsgnKnob2). This will allow us to address Strings/Brass as one entity and Pipe Organ/Choir as a separate entity.
You may wonder why you have to REPEAT the setting for each PART, and ask, “Isn’t there a way to set them all at the same time.” Actually, we want the ability to set them individually, as we will see in a minute. This is because we still want some independence between the layers and how they respond to controller movement. For example, our goal is to have Strings and Brass instruments work as a layer when we begin to play; we will morph from this into the Choir sound alone, and finally morph the Pipe Organ in with the Choir.
Return to PART 1’s Controller area: “Mod/Control” > “Control Assign” > turn Assign Knob 3 to recall the first of these PART VOLUME assignments.
Touch the shortcut box “Edit Common Control Settings” to which will take us to the COMMON “Control Assign” screen where we can link to the Super Knob’s Assign Knobs.
Our goal is to link PART 1 Assign Knob 3 (Volume of the Strings) and PART 3 Assign Knob 3 (Volume of the Brass) to COMMON ASSIGN KNOB 1:
Touch the first available “+” to ADD the assignments.
Select PART 1 ASSIGN 3.
Touch “+” to ADD.
Select PART 3 ASSIGN 3.
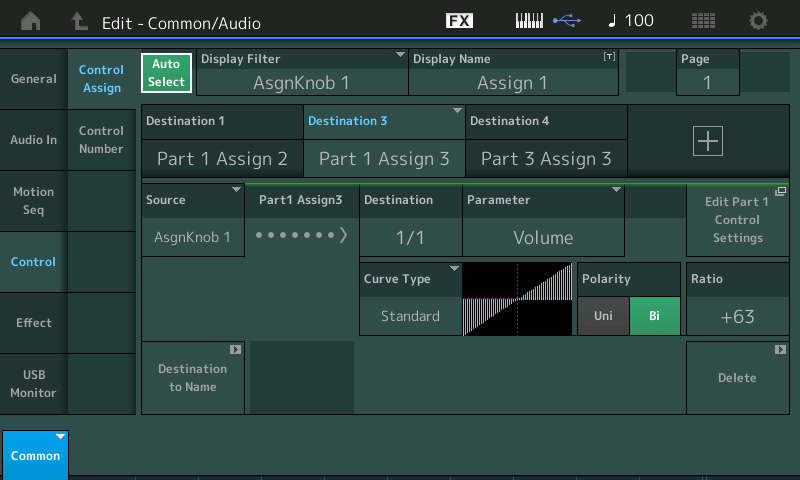
Below you can see Destination 3: PART 1 ASSIGN 3 is linked to SOURCE = AsgnKnob1.
You can also see that Destination 4: PART 3 ASSIGN 3 is also linked to SOURCE = AsgnKnob1.
(you also see our previous assignment Destination 1: PART 1 ASSIGN 2 which is doing EnsMix Element Level).
Turn Assign Knob 2 to recall its assignments.
Touch the “+” to ADD the following to links:
PART 2 ASSIGN 3
PART 4 ASSIGN 3
This will link the VOLUME of the Pipe Organ and the VOLUME of the Choir to the position of COMMON Assign Knob 2… which we know, reflects movement of the Super Knob: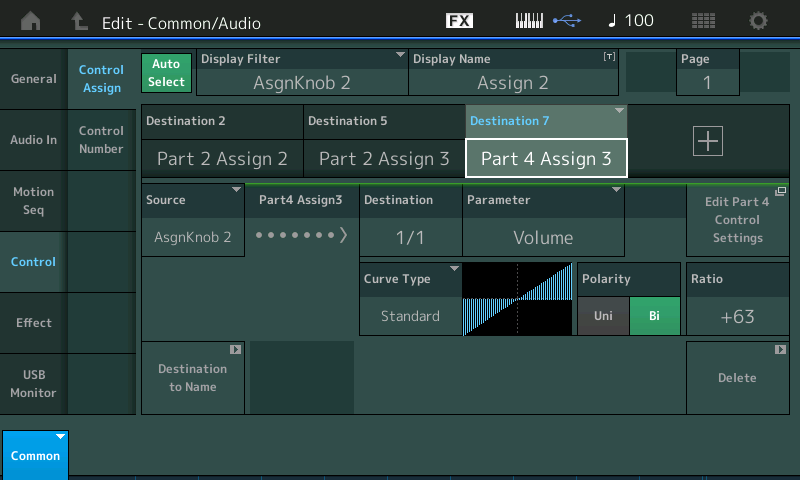
Here’s our next step: To go back to each PART and customize the response of each to its Control movement. Remember we want to have the Strings and Brass initially, then morph to the Choir (alone) and then bring the Pipe Organ up behind the Choir!
Our current situation is that all four PARTs will follow the movment of your Super Knob, together. This is the typical situation when working with a multiple part synthesizer layers. When you layer the sounds to play them, they all respond together when you start to use your controllers.
We had you group the String and Brass to COMMON Assign Knob 1 and the Pipe Organ and Choir to COMMON Assign Knob 2, so that we could link their initial movment. We want to start with String and Brass on the keyboard initially. Current sitation when the Super Knob is at minimum – there should be no sound. All four PARTS move minimum to maximum along with Super Knob movement. This is because the Super Knob is controlling all eight of its Assign Knobs with the exact same scaling.
If the upper COMMON button is lit, notice how turning the Super Knob moves all 8 Common Assign Knobs the same. Since we want the Strings and Brass live initially we need to reverse its movement. We can accomplish this in a couple of ways. We will experiment here with reversing the direction of COMMON Assign Knob 1. This will mean that when Super Knob is at minimum those PARTS under its control will be at maximum and it will behave in the opposite direction… fading out as you turn the Knob up.
Here’s how:
Press the [PERFORMANCE (HOME)] button to return to the HOME screen.
Touch “Motion Control”.
Touch “Super Knob”.
For Assign Knob 1 set the “1” Value (green) = 127.
Set the “2” Value (blue) = 0: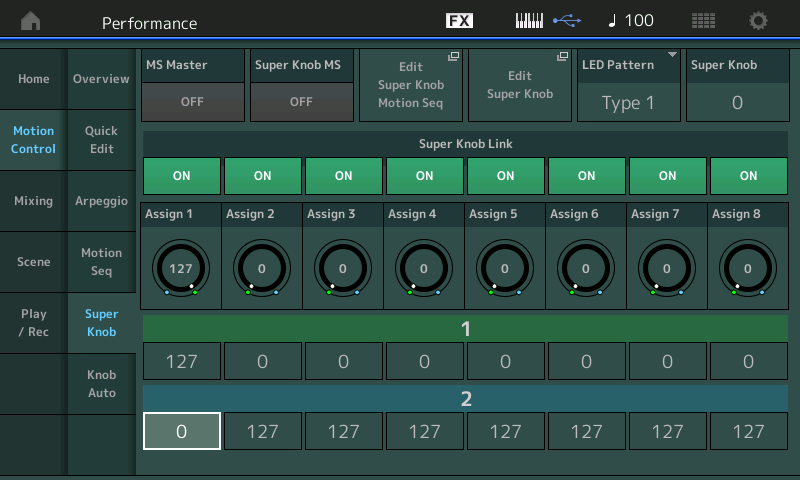
Above you can see that Assign Knob 1 will move in the opposite direction of the other Knobs.
Now the Strings and Brass are in initially (Super Knob set to minimum) and as you raise the Knob (or move toe down on the the FC7) they begin to fade as the Pipe Organ and Choir start to come in.
But how do we separate the response of the Pipe Organ and the Choir?
This is where the individual settings the four Assignment makes sense – we can now tweak exactly how each of the PARTS behave in response to the movement of the assigned Controller.
In our example, we can do this easily by returning to the PART Control Assign area, and with AUTO SELECT take a look at the PART assignment to ASSIGN KNOB 3.
Here is where we can adjust the way in which each responds to the movement of the Control. All are using the “Standard” (linear) Curve Type. We will use the PARAM 1 setting to “shape” the application and the RATIO to determine “how much” is applied. Ratio helps to determine the minimum as well as the maximum.
__ PART 1 AssignKnob 3 is set to PARAM 1 = 5 which gives us a very linear response. On the HOME screen SOLO PART 1 (Strings) and turn the Super Knob. Remembering that we have reversed the Super Knob application you should hear a steady decline in volume as you turn the Super Knob up. You have access to the EnsMix via PART Assign Knob 2.
__ PART 2 AssignKnob 3 set the PARAM 1 = 8 (shown below) with PART 2 (Pipe Organ) Solo’d turn the Super Knob. You should observe that this delays the rise in volume until you reach at least 2 o’clock and then it rapidly rises in volume thereafter. This will make the space for our Choir: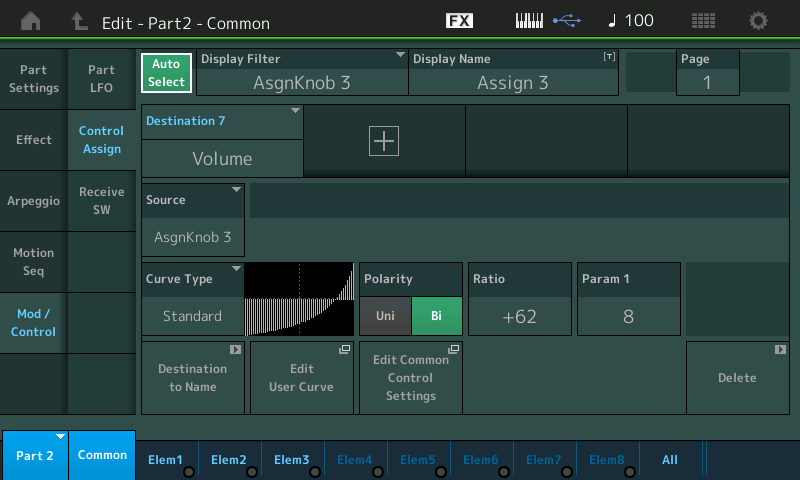
__ PART 3 AssignKnob 3 is set to PARAM 1 = 5 which gives the Brass the same linear response as the Strings in PART 1. Remember that we reversed the COMMON Assign Knobs direction so the response will be that it fades out as the Super Knob is turned clockwise.
__ PART 4 AssignKnob 3 set the PARAM 1 = 4 (shown below) with PART 4 Solo’d turn the Super Knob. You should observe that the Choir is silent initially but start to come in around 10 o’clock and continues to rise from here. By setting Param 1 to “4”, we can have more overlap of orchestral string/brass and choir… 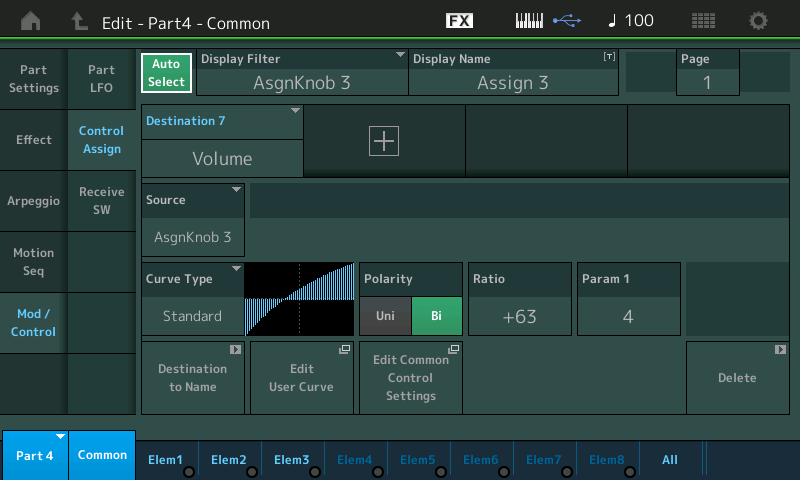
Final Thoughts
Use these advanced concepts to build your own sounds. Select PARTS you find interesting. Don’t be afraid to explore the Assignments made by the original programmer. Study what they have done, experiment. We mentioned that there are several ways to approach sound designing… and you will discover this to be very true. As an example when we reversed the direction of control at the “COMMON Assign Knob’ – but as you might imagine, you can certainly reverse the applicaton of the Control within the “PART Assign Knob” setup itself. Which one you choose will really depend on what else you might need to accomplish. In general, when you have a COMMON Assign Knob moving in reverse, you can link almost anything you need to decrease to it, simply because its direction is correct for what you desire – then you can scale the degree of application within the PART Assignment itself. This is some of what is new and exciting about MONTAGE as a synthesis engine – the degree of control you have on the behavior of the sound in response to your input in the Controller area.
Questions or comments about this article? Join the conversation on the Forum here.
And stay tuned for more from Bad Mister to help you get the most out of your MONTAGE!
Download here: Worship_Center.X7B