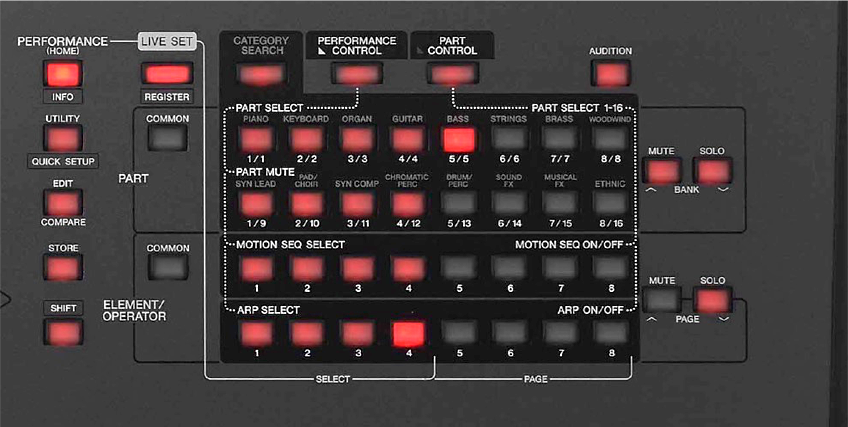
The first general tip is that the lighted front panel buttons (to the right of the screen) tell an interesting context sensitive story -and part of mastering navigation is learning to read what they are telling you in different situations. “Context sensitivity” means that the lights will reflect the current situation and offer you particular specific options. Learning what they are trying to tell you will take you closer to navigation mastery. Using the “glow” feature’s two levels of brightness, you can tell what is selected (full brightness) and what options are currently available (half or quarter glow) for selection.
The other area of exploration studied here will be access to shortcuts – for example, we’ll explore the repeated pressing of a button to toggle through your options, and using shortcut boxes in the screen interface to toggle between the Part’s Assign Knobs and the Common Assign Knobs that link to the Super Knob.
One problem with a touch screen is that you can become too focused on doing it all in the screen, and while this is certainly a matter of personal preference, you may find navigating (for some things) via the front panel buttons can make it a lot easier. We only offer these as alternative methods, you will need to decide for yourself the best way to navigate in each situation. Feel free to mix and match techniques to move from place to place.
When the “View” screen has the cursor highlight outlining the PERFORMANCE NAME (left above), the 16 PARTS of the PERFORMANCE are laid out in four sets of four, 1-4, 5-8, 9-12, and 13-16. Active Parts will have a corresponding green active box directly below the Performance name. You can see four green boxes under ‘1-4″ and three green boxes under “5-8”, indicating that Seattle Sections has seven PARTS active. The Parts under KBD CTRL will be shown on the right half of the screen showing their “Type/Name” and their relative Note regions mapped across the keys. The small keyboard icon across the bottom, will indicate the played Notes.
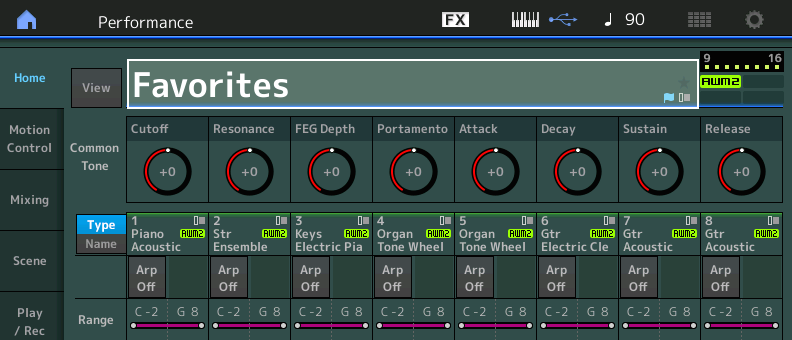
With the “View” option turned Off (right screenshot above), the screen reverts to showing the eight potential KBD CTRL PART slots and for our example, Seattle Sections, seven PARTS are under KBD CTRL. You can see an activity meter and Fader for each of the KBD CTRL Parts. And significantly you can view the values for the 8 Common Assign Knobs. When on the HOME screen, you will see the eight “Common Assign” knobs. (Common Assign Knobs are the ones that are linked to the Super Knob movement); if, however, were you to select an individual PART slot, you would be viewing the eight Assign Knobs for that Part.
Additionally, you might see the positions of the 8 knob functions of the Quick Edit area: “Common Tone”, “Common EQ/FX” or “Common ARP/MS” depending on which of the three rows is selected: [TONE], [EQ/FX] or [ARP/MS].
This is is an important thing to know. On this HOME screen you can change the view to examine other specific areas of the Synth engine. The Knob Functions recalled when a PERFORMANCE is initially recalled will be either the “Common Assign” Knobs, or one of the three QUICK EDIT area functions: “Common Tone”, “Common EQ/FX”, or “Common ARP/MS”; you can STORE your version of the PERFORMANCE with those items on the Knobs. If you want the PART ASSIGN KNOBs you will need to select that PART via its [PART SELECT] button.
The info shown for the eight screen Knob icons changes depending on the context. We can see that when the [PERFORMANCE (HOME)] option is selected, most often the “COMMON ASSIGN” functions for the eight Knobs are shown. If you press [PART SELECT 1], the screen will show you Part 1’s eight Assign Knobs. This is true for all sixteen Parts. And you can understand that you can customize for each of the sixteen what 8 parameters are shown when that PART is selected. This allows you to have the knobs one way for a LEAD SYNTH sound and an entirely different set of paramters for controlling your E.Piano sound – even if they are in the same PERFORMANCE. Assignable means customizable to your needs – whatever you need when you select the sound in that PART!
When you have selected a Part, 1-16, you can then press the buttons [TONE], [EQ/FX], [ARP/MS], to view the 24 so-called “Quick Edit” parameters. These are parameters that are used to apply overall offsets to the selected Part‘s stored programming. As you select the row, the parameters are accessible via the Knob directly below it. You have a way to apply an offset that would apply to all Filter Cutoff settings within the Part. Remember, a Part can be multiple filters, for example, each AWM2 Element each could have its own separate filter. Changing the CUTOFF Knob for Part 1 would tell all filters of this Part to open or close from their current stored position. You are literally applying an offset that raises the cutoff frequency or lowers the cutoff frequency proportionally for each filter.
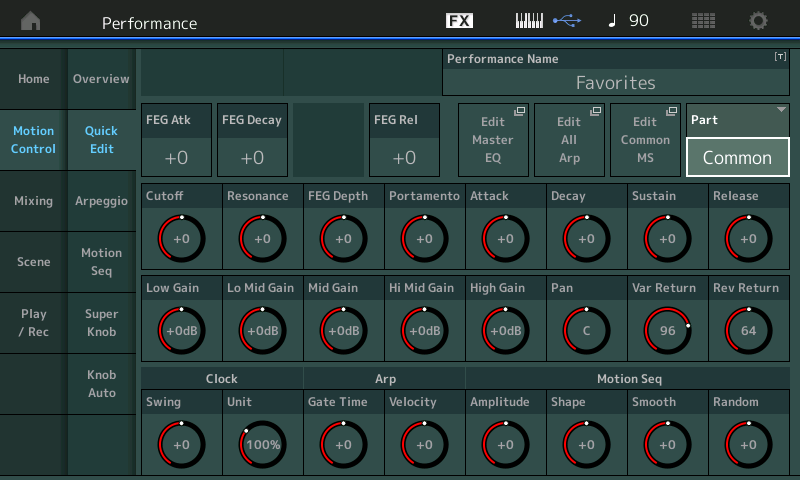
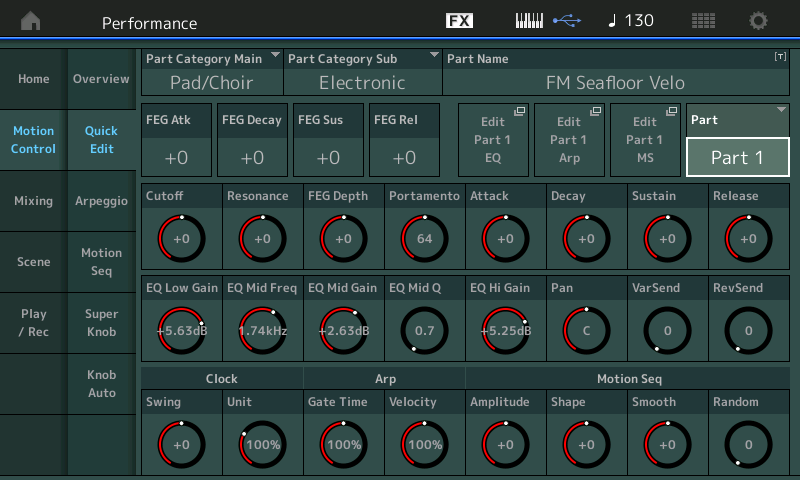
The Quick Edit functions can be viewed directly by touching “Motion Control” on the HOME screen, then touching “Quick Edit”. Shown below PART is “COMMON”:

Moving the CUTOFF KNOB here would affect all PARTS in common. If you select an individual PART the parameters are going to address just that one PART.
By pressing the [TONE] button from the [PERFORMANCE (HOME)] screen will change the screen to show the top row of functions: Cutoff, Resonance, Depth, Portamento, Attack, Decay, Sustain, Release.

It must be stated that the Quick Edit parameter Knobs can be applied to a selected Part, or if you select [COMMON] the offsets are applied to all sixteen Parts, in common.
If you select the [EQ/FX] row from the HOME screen the Knobs will indicate: Low Gain, LoMid Gain, Mid Gain, HiMid Gain, Hi Gain, Pan, Variation Send, Reverb Send.
Selecting the [ARP/MS] button would place the so-called Play FX that offset the timing and feel of the Arpeggios and Motion Sequences assigned to the selected Part or Parts. You can apply swing offsets, double time, half time, change duration, etc.
And finally, when using the Performance as a multi channel MIDI tone engine, you can view your Pan positions, Var and Rev Send amounts, side-by-side, 8 at a time. This makes it easy when mixing. You can shift the view from Parts 1-8 and 9-16 by either pressing [SHIFT] + [PERFORMANCE CONTROL] flashes… or you can press [PART CONTROL], which turns the top two rows of buttons into direct Part Selection.
Extra Credit:
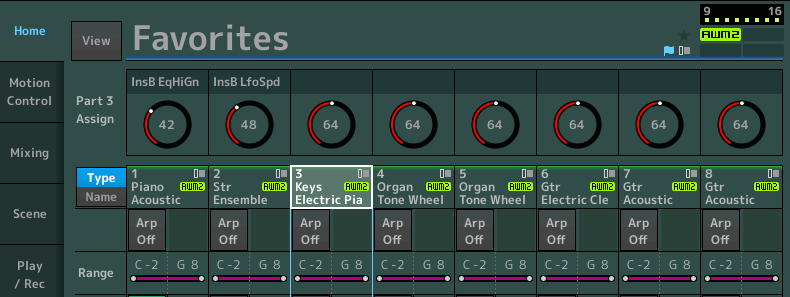
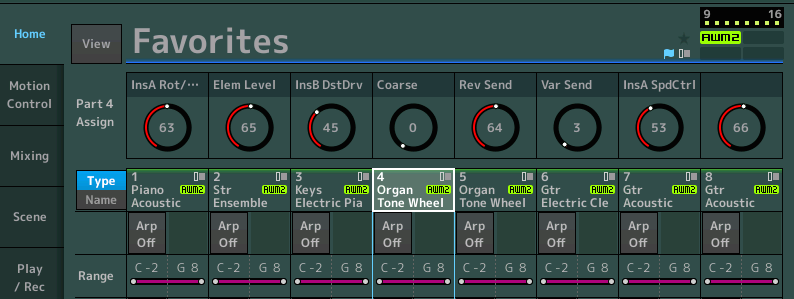
When assigning sounds to a PERFORMANCE – each PART could have its own custom arrangement of 8 parameters assigned to its PART Assign Knobs. For example, in my custom Performance shown above (called “Favorites”) I have an Acoustic Piano in PART 1, a String in PART 2, Electric Piano in PART 3, a Tone Wheel Organ sound in PART 4 and so on… each an individually selectable program. (The example data is taken from the Download included in the “Performance Basics and the Live Set II“ tutorial.
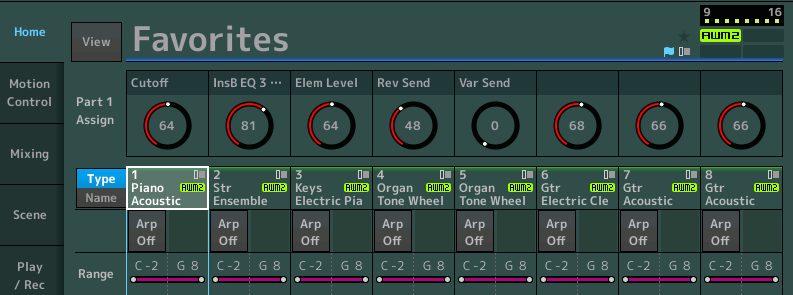
PART 1 (Acoustic Piano) it happens that I have selected the following parameters for real time access: Cutoff, InsB EQ 3 Gain (MidRange on Insert EQ), Element Level (KeyOff Sound), Reverb Send, and Variation Send.
Cutoff and the Mid Range EQ Gain allow me enough room to tweak this piano for use in the band and as a solo piano – the Element Level can bring up and down the ‘hammer noise’ – Reverb and Variation Effect Send levels.
Shown below PART SELECT 1 is activated. The first five PART 1 Assign Knobs are ready for real-time manipulation:

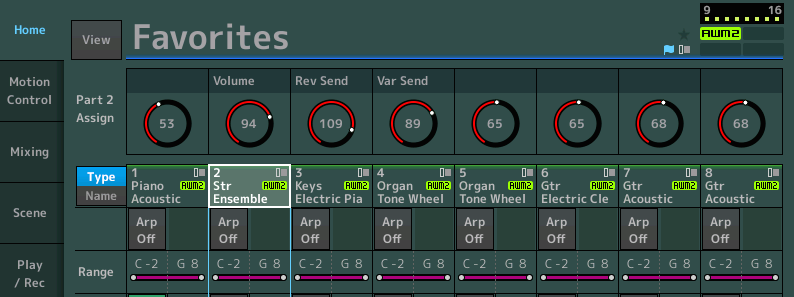
PART 2 (String Ensemble) when I select PART 2, I decided that for the Assign Knobs I needed just Volume, Reverb Send and Variation Send.
Shown below for PART 2 I opted for just Volume, Rev Send and Var Send:

PART 3 (Electric Piano) it happens I’ve opted to just control the High Gain of the EQ and the LFO Speed of the Auto Pan. The MW happens to control the Auto Pan Depth, but Speed is assigned to PART 3 AssignKnob 2:

PART 4 (Tone Wheel Organ) here I have decided to access InsA Rotar/Horn balance, Element Level (leakage noise), InsB Dist Drv (overdrive), Coarse Tuning (Turn up creates pitch and volume drop; emulates powering down the mighty B3), Rev Send, Var Send, and InsA Rotary Speaker Speed:

Point being that when recalling a sound by selecting a PART you can customize what Assign Knobs are available for each PART – it is entirely up to you on each PERFORMANCE. You would base it on what you require from this sound at the time. Rather than hunting through the architecture every time, if you know you want to adjust certain parameters in real time, simply make sure you customize the PART’s “Mod/Control” > “Control Assign” screen to serve your needs – within the PERFORMANCE PART.
You can create custom “NICKNAMES” (Display names) for the PART Assign Knobs, this way you do not have to guess at what a Knob is controlling when you select that PART. In the Tone Wheel organ sound in PART 4 (shown above), at the end of the organ solo, I need the sound effect of turning the B3 OFF – it dies in both pitch and volume simultaneously. This is accomplished by assigning a single PART Assign Knob to do both COARSE tuning (with a negative curve) and Part VOLUME (with a negative curve) – as the Assign knob is turned up, the pitch and volume will dramatically decrease. By adjusting the curves I can get just the right feel for the simultaneous pitch and volume fade.
Important Tip: The Super Knob and its COMMON ASSIGN Knobs are always available for control via the movement of the Super Knob (or your FC7 set to control it). That means, no specific front panel button needs to be selected for the Super Knob assigned parameters to be engaged. This allows you to be viewing and engaging other functions assigned to the Assign Knobs while you can continue to control those linked to Super Knob position via its movement. Understand that if you want to set physical Knob #1 to be available as a real time PART control, yet still use the Super Knob to do what is assigned to it, that is possible.
The [ASSIGN] button located to the left of the Super Knob determines if the rotary encorder LEDs are showing the Common Assign function values currently. It is totally possible to have the 8 physical knobs doing [TONE] row control functions for a specific PART, while movement of the Super Knob parameters is taking place as normal – when the FC or Super Knob is moved. Remember, the Super Knob can be addressing multiple PARTS while you can have the physical knobs set to control a specific individual PART. This makes for the utmost flexibility while performing. You can be directly controlling a set of parameters on your lead sound, while simultaneously morphing the backing arps, pads, and motion sequences being applied to other PARTs via the movement of the Super Knob. One of the ‘super’ powers of being a ‘super knob’ is you can be everywhere simultaneously – and you can continue to work behind the scenes even though the screen currently is not showing what you are doing.
Translation: You do not have “see” what is assigned to control it via the Super Knob. They work without having to select any button. (Simple explanation: you don’t need to be looking at the Volume parameter for the Foot Pedal to control volume, you don’t have to be looking at the Modulation screen for the MW to work, likewise you do not have to be in any special place or have any special button active in order for the Super Knob to do what it is assigned to do. You can be assured that when you move the Super Knob it then in turn moves the eight Common Assign Knob functions that are linked to it – and this happens regardless of what’s in the screen, what’s showing on the Knob LEDs, or what buttons are pressed!
The “QUICK EDIT to FULL EDIT” Wormhole:
You can move between the QUICK EDIT screen and several of the actual parameter areas using the SHORTCUT boxes that appear near the top right of the QUICK EDIT screen. The “QUICK EDIT” overview is not a traditional EDIT screen, you get to it from the HOME screen by touching “MOTION CONTROL” > “QUICK EDIT”:

You have three ‘shortcut’ boxes shown when “COMMON” is selected “Edit Master EQ”, “Edit All Arp” and “Edit Common MS”. Again COMMON is when you are addressing everything together. So certainly, the MASTER EQ would make sense because it is the EQ that everything runs through. The Edit ALL ARP view takes you to the screen where you can review all PARTs, eight at a time, 1-8, 9-16; what Arpeggio Phrases are assigned for each of the eight Arp Selects. Edit COMMON MS – will take you to the COMMON (AUTO KNOB) Motion Sequencer where you can create or tweak your MS. Touching the Shortcut box takes you directly to the deeper Edit screen, and pressing [EXIT] will bring back to the QUICK EDIT screen… avoiding several manual steps to get from here to there and back.
If on the QUICK EDIT screen you select an individual PART, or an individual PART is already selected when you arrive on the QUICK EDIT screen, your options will concern the selected PART: “Edit Part x EQ”(this will take you to the 3-Band EQ just pre the INSERTION EFFECT block), “Edit Part x Arp” (this will take you to the Arpeggio edit area for just this one PART), and “Edit Part x MS” (this will take you to the Motifion Sequence setup page for this PART). This is very convenient when tweaking existing parameters as well as when you are about programming your own setups. QUICK EDIT are those for quick tweaks, the shortcut takes you to the deeper area where you can get at all the details. Shown below when “Part 1“ is shown as selected the options for the shortcuts appear just to its left:

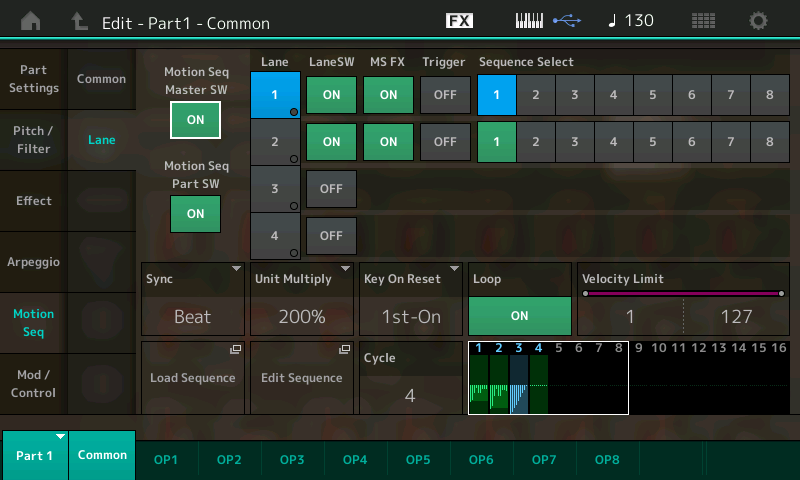
Touching the box that is labled “Edit Part 1 MS” would take you directly to the screen where you could edit or create a MOTION SEQUENCE for Part 1.

Pressing the [EXIT] button will take you right back to where you were, (the QUICK EDIT screen). The usefulness of this quickly becomes apparent as you can imagine applying timing offsets to the Motion Sequence playback, then jumping to tweak the Motion Sequence parameters in depth, then returning to where you can apply offsets to timing, shape, etc. Or when working with the “feel” of an arpeggio, you may want to drop down into edit or try out a different one. This “wormhole” quickly lets you toggle between the two screens you want to work with. (Wormhole being a theoretical direct connection between dimensions in deep space… between what we know as the known universe and the ‘beyond’.
[LIVE SET]
Repeated presses of this button will efficiently take you through your Live Sets. We use the word “efficiently”, because this shortcut will advance you, on each press, to the first PAGE of each Bank – Preset 1 > User 1 > then the first Page of each of your installed Library Live Sets. This is an improvement over scrolling through potentially empty User locations before reaching your Libraries.
There are 8 “Live Set” USER BANKS, each with 16 PAGES, each Page with 16 slots. Once you know about this Live Set shortcut, you can move through your data quickly and yes, efficiently. Many of you will discover there are many more locations than you first thought. The Bank “User 1” has 256 Live Set slots; “User 2” has 256 Live Set slots, and so on (2,048 User Live Set slots; and 16,384 Library Live Set slots).
Since you can create Live Sets and install them in your Library area, you can amass quite a collection. Repeatedly press the hardware [LIVE SET] button to quickly define the Bank, then use the first four vertical columns of buttons to SELECT a slot on the screen; use the second four columns of buttons to view the 16 PAGES of the current Bank. If a Library has data but there are no LIVE SETs stored in that Library, it will not be selected via this toggle method (blank Banks are skipped).
On your front panel notice that above the [LIVE SET] button the words ” Live Set” are linked by a white line to the words “SELECT” and “PAGE” – dividing the field of 32 buttons into two halves. There are 16 buttons in each section half. Navigate the current Bank via its PAGE buttons on the right half of the filed. Select an item on the current Page using the SELECT buttons on the left half of the field.

Currently, above, the 16th item in the screen is selected, from PAGE 1 of the current LIVE SET.
Performing Tip: Navigating while using [LIVE SET+] “live”
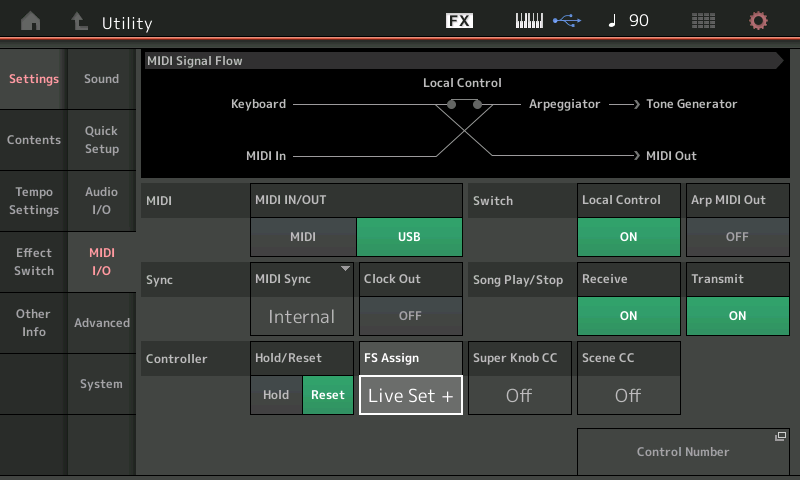
This tip is more of a “Did you know…?” You can advance through your LIVE SET list with a FS (FC4/5 type momentary connected to the Assignable Foot Switch jack) assigned to “Live Set+.
Press [UTILITY] > “Settings” > “MIDI I/O”
Set “FS Assign = Live Set+”:

Press [LIVE SET] and select the first slot in the LIVE SET grid.
You can now be on any screen of this Program when stepping on the FS to advance to the next Program in your current LIVE SET. As long as you do not manually change Performances you can use the FS to advance, it will matter not whether you are deep into real time manipulation of the Motion Sequencer, or tweaking the Filters, you can advance to the next Program in the current active “Live Set”.
You would only need to view the Live Set (Home) screen grid if you need to see what’s coming next in your set… once you realize you are not locked into looking at the names of 16 Programs, it really frees you to be anywhere. The better you get to know your way around MONTAGE, the bigger a feature “Live Set+” via FS Assign becomes. When manipulating Motion Sequence Lanes in real time on your first LIVE SET program, you can advance to the next set by simply stepping on the pedal – and without leaving the ‘Edit Sequence’ screen you can advance to the similar screen in your next program.
[CATEGORY SEARCH]
Repeated presses of this button when used to search for a Performance or for a Part (or Parts), will toggle you through the “Banks” available on your MONTAGE- “All” > “Favorite” > “Preset” > “User” > “Library1” > “Library2” > “Library3” – and so on, then back around to “All”. If you simply press and hold this button it will return to “All”.
This can help you quickly define your search area. It is highly recommended that you use the Bank and Attribute functions whenever searching – in addition the Main and Sub Category refinements make it possible to zero in on just what you need.
Toggle to the Bank you want to explore, use the first two rows of eight right front panel buttons to select the sixteen Categories in the screen. In fact, written in the same blue font as the words “Category Search” above the dedicated button, you see the names of the categories above the two rows of buttons – “Piano”, “Keyboard”, “Organ”, “Guitar”, etc., etc. The upper [MUTE] and [SOLO] buttons are used to select the “No Assign”, and “Init” categories, respectively.
While in Category Search on one of the 16 instrument categories, the third row of eight buttons selects the Sub Category, listed as “Sub” in the screen, left to right.
While in Category Search, the fourth row of eight hardware buttons select the individual program as listed in the lower half of the screen. Try it!
Tip: The very first Factory Performance is “CFX + FM EP”. The very last Factory Performance is the “Init” > “Multi/GM”. As of firmware 3.50.x there are 2739 Factory Preset Performances in all. The 640 USER Bank locations will follow this, but is initially empty (0/640). Following the USER Bank is any installed Library data, 1 through 8 Banks.
The MONTAGE contains all 1354 Motif XF Voices as Single Part (green) Performances. They form the backbone of the instruments found in the Factory ROM. You will find many brand new instruments among the Single Part programs in addition to the many Multi Part (blue) Performances. It is possible to select any single Part from any other Performance, by setting the Part selection, Part 1-Part 16. As you may already be aware, a “Part” can be used as a complete playable instrument or it can be just an articulation ot partial building block of a larger sound. With MONTAGE multiple Parts can be used to build a single sound. So it becomes important to know when searching is what you are selecting a full instrument or just a partial building component (where velocity range and/or Note range may be restricted).
When using the MONTAGE as a 16 Part Multi-timbral Tone Engine, you can have the Search show just Single Part programs that are complete playable instrument sounds. This makes knowing how to use Category Search very important.
Say you are using your favorite DAW and you want create a 16 Part setup to begin your Project:
Press [CATEGORY SEARCH]
Touch “Init” > “Multi/GM”
This creates a 16 Part Mixing Setup, where you can use [PART SELECT] and substitute the instrument you wish in each Part.
press [HOME]
Start by pressing [PART SELECT 1]
Then using [SHIFT] + [CATEGORY SEARCH] you can enter PART search
Set the BANK you wish to search
Set the ATTRIBUTE to “Single”.
Because you entered Part Category Search from an INIT MULTI, where you are substituting for the default data in the slot, you will be shown only those Single Part programs that are playable instruments on their own. Therefore you will see all 1354 Motif XF Voice data available as a Part Selection, plus you’ll see the new Single Part instruments created just for MONTAGE.
Once you have defined the BANK and ATTRIBUTE settings, use the Main Category and SubCategory boxes to narrow the search further. Rinse and repeat.
[PERFORMANCE CONTROL]
When this button lights, you are initially set to “control” the current Performance.
The top row of eight across, are PART SELECT 1-8 (dotted white line extends down around the left of the buttons).
The second row of eight across are PART MUTE 1-8 (switch a light from bright to dim, you’ve muted the Part).
Row three across are MOTION SEQ SELECT 1-8.
The bottom row are ARP SELECT 1-8.
When you select a Part while [PERFORMANCE CONTROL] is lit, you have entered the PART. If you are on the normal HOME screen you will now view the 8 PART Assign Knobs for the “selected” PART.
The act of selecting a PART, 1-8, automatically flips the function of the Faders from Part Volumes, to the selected Part’s Element Levels (AWM2) or Operator Levels (FM-X). Realtime access to the selected Part’s Oscillators in this fashion can mean balancing the response of an instrument can be done without a bunch a menu moves (and screen changes) – letting you use you best tool for the task, your ears. In general, set output levels by ear, not by eye. Break the habit of thinking you “know” how loud numbers are, (you’re a human, you don’t) – you judge sound intuitively, when it sounds right, it is right. If you are curious about a number value, then go to the View screen and see your values. That can help make an impression about what works, but it will be based on what your ears are telling you, not your eyes!
[PART CONTROL]
This button switches the front panel functions to those written down the right side of the button grid, as follows:
Notice all 16 Part buttons of the first two rows glow dimly when the upper [COMMON] is lit – when you select a PART, 1-16, that “selected” Part will glow brightly and the slot in the screen will be selected (highlighted).
Row three is MOTION SEQ ON/OFF
Row four is ARP ON/OFF
When [PART CONTROL] is lit, the Faders become Element/Oscillator Level controls (this is useful when setting the Faders to act as Level controls like when acting as pseudo-‘drawbars’). You can STORE the Performance so that this type of Element/Oscillator Control is available when recalled – in such an instance the [PART CONTROL] button will flash.
Want to share your own tips, comment or ask questions? Join the conversation on the Forum here.


