MONTAGE also features Pure Analog Circuit, a digital-to-analog conversion technology Phil “Bad Mister” Clendeninn accurately describes as “mind numbingly good to your ears. You’ll hear it immediately. You’ll feel it immediately… Next level stuff.”
A solid understanding of MONTAGE is recommended in order to get the most from this guide. You will find over four hours of tutorial videos, tutorial articles and a vibrant forum to ask questions about MONTAGE at yamahasynth.com.
MainStage Support
If you are new to Mainstage check out this article from our friends at AskAudio.com. MainStage3 is the version used in this guide.
First Things First
You will need to make sure your MONTAGE and your computer both have the most up-to-date firmware and software components installed. Firmware and drivers can be found here:
- MONTAGE Firmware: Make sure your MONTAGE has the latest firmware installed. The version referred to in this document is 1.51 or above.
- The Yamaha Steinberg USB driver: This is the robust and low-latency driver MONTAGE uses to send MIDI and multichannel audio. The version referred to in this document is 1.9.10 or above
MONTAGE Setup
MIDI Settings
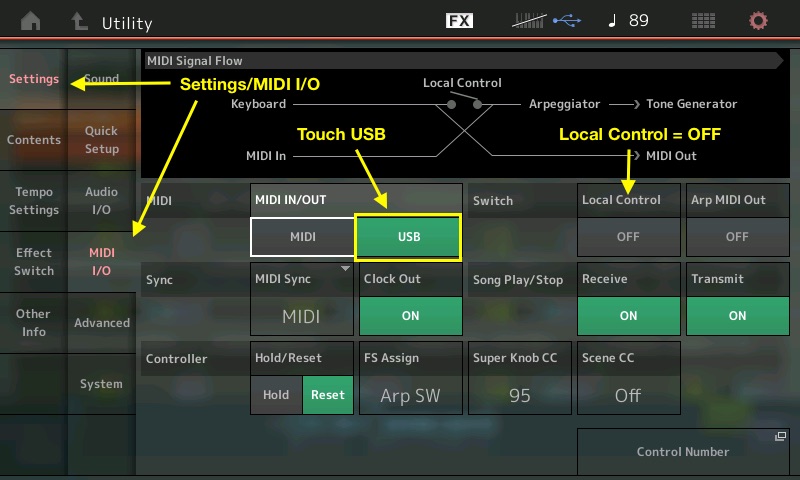
It is very easy to set up MONTAGE to work with MainStage3. In this setup guide, we will be using USB as the MIDI driver since it also will be the audio connection to and from the computer. Press the [UTILITY] button, then touch “Settings” on the left side of the touchscreen, then “MIDI I/O” in the adjacent column. You should also turn local control off. See below:
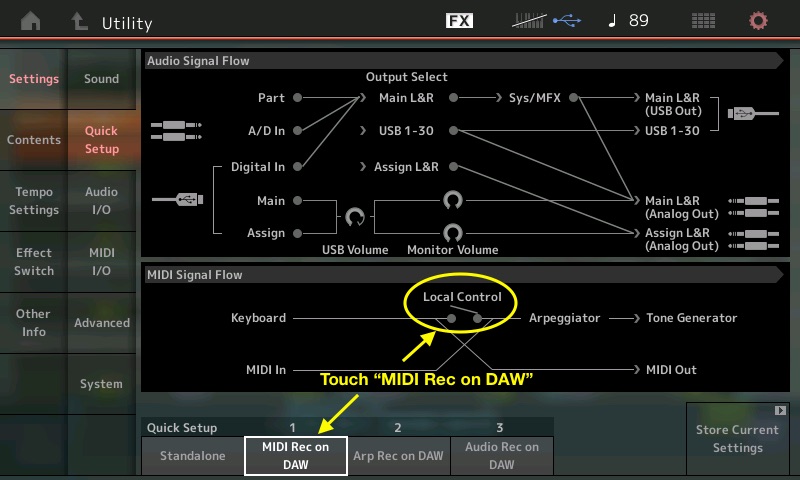
MONTAGE has a “Quick Setup” that can be selected as well. Press [UTILITY], touch “Settings” then “Quick Setup”. Since I will be connecting to MainStage3, I have selected “MIDI Rec on DAW”:
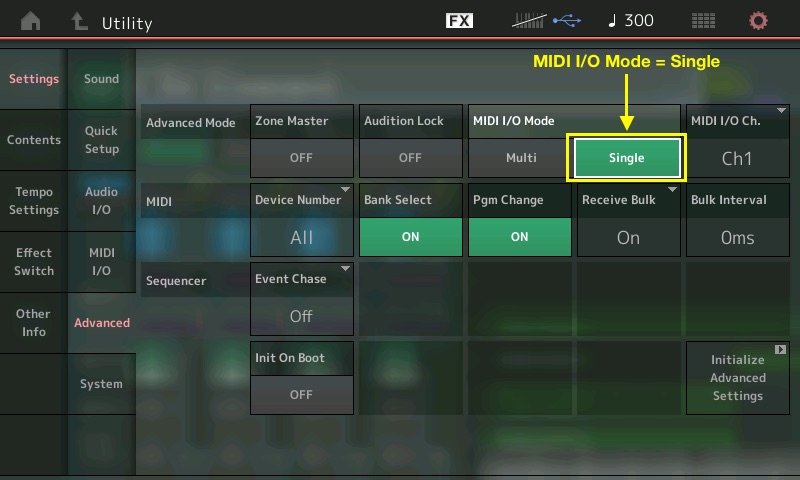
The best way to use the MONTAGE with MainStage is the “Single MIDI I/O Mode”. There are many Performances in MONTAGE using more than a one-part (for example, “CFX Concert” which uses four Parts). This is found under the “Advanced” tab:
Audio Settings
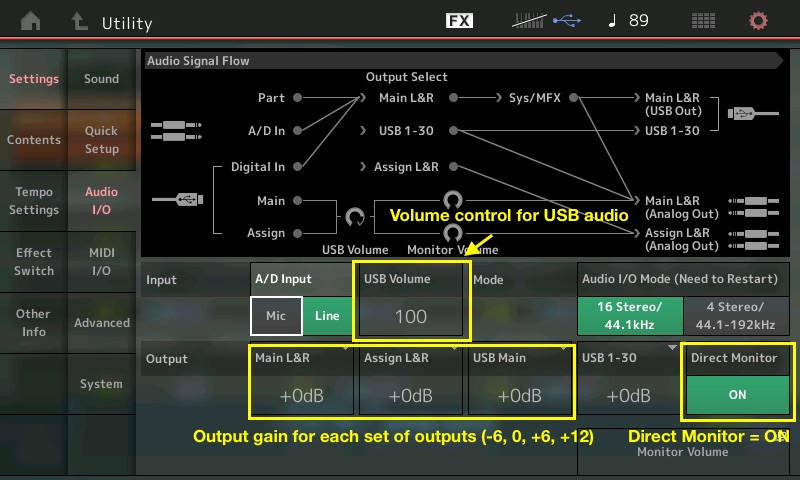
Touch “Audio I/O” to view the MONTAGE audio settings. Note that you can control the incoming USB volume and gain for each of the audio outputs (Main L&R, Assignable L&R, USB Stereo and Direct Monitoring On/Off). This allows finer balancing control of the overall audio system. For this article, I will leave Audio I/O in the default 24-bit/44.1kHz setting:

Mac Setup
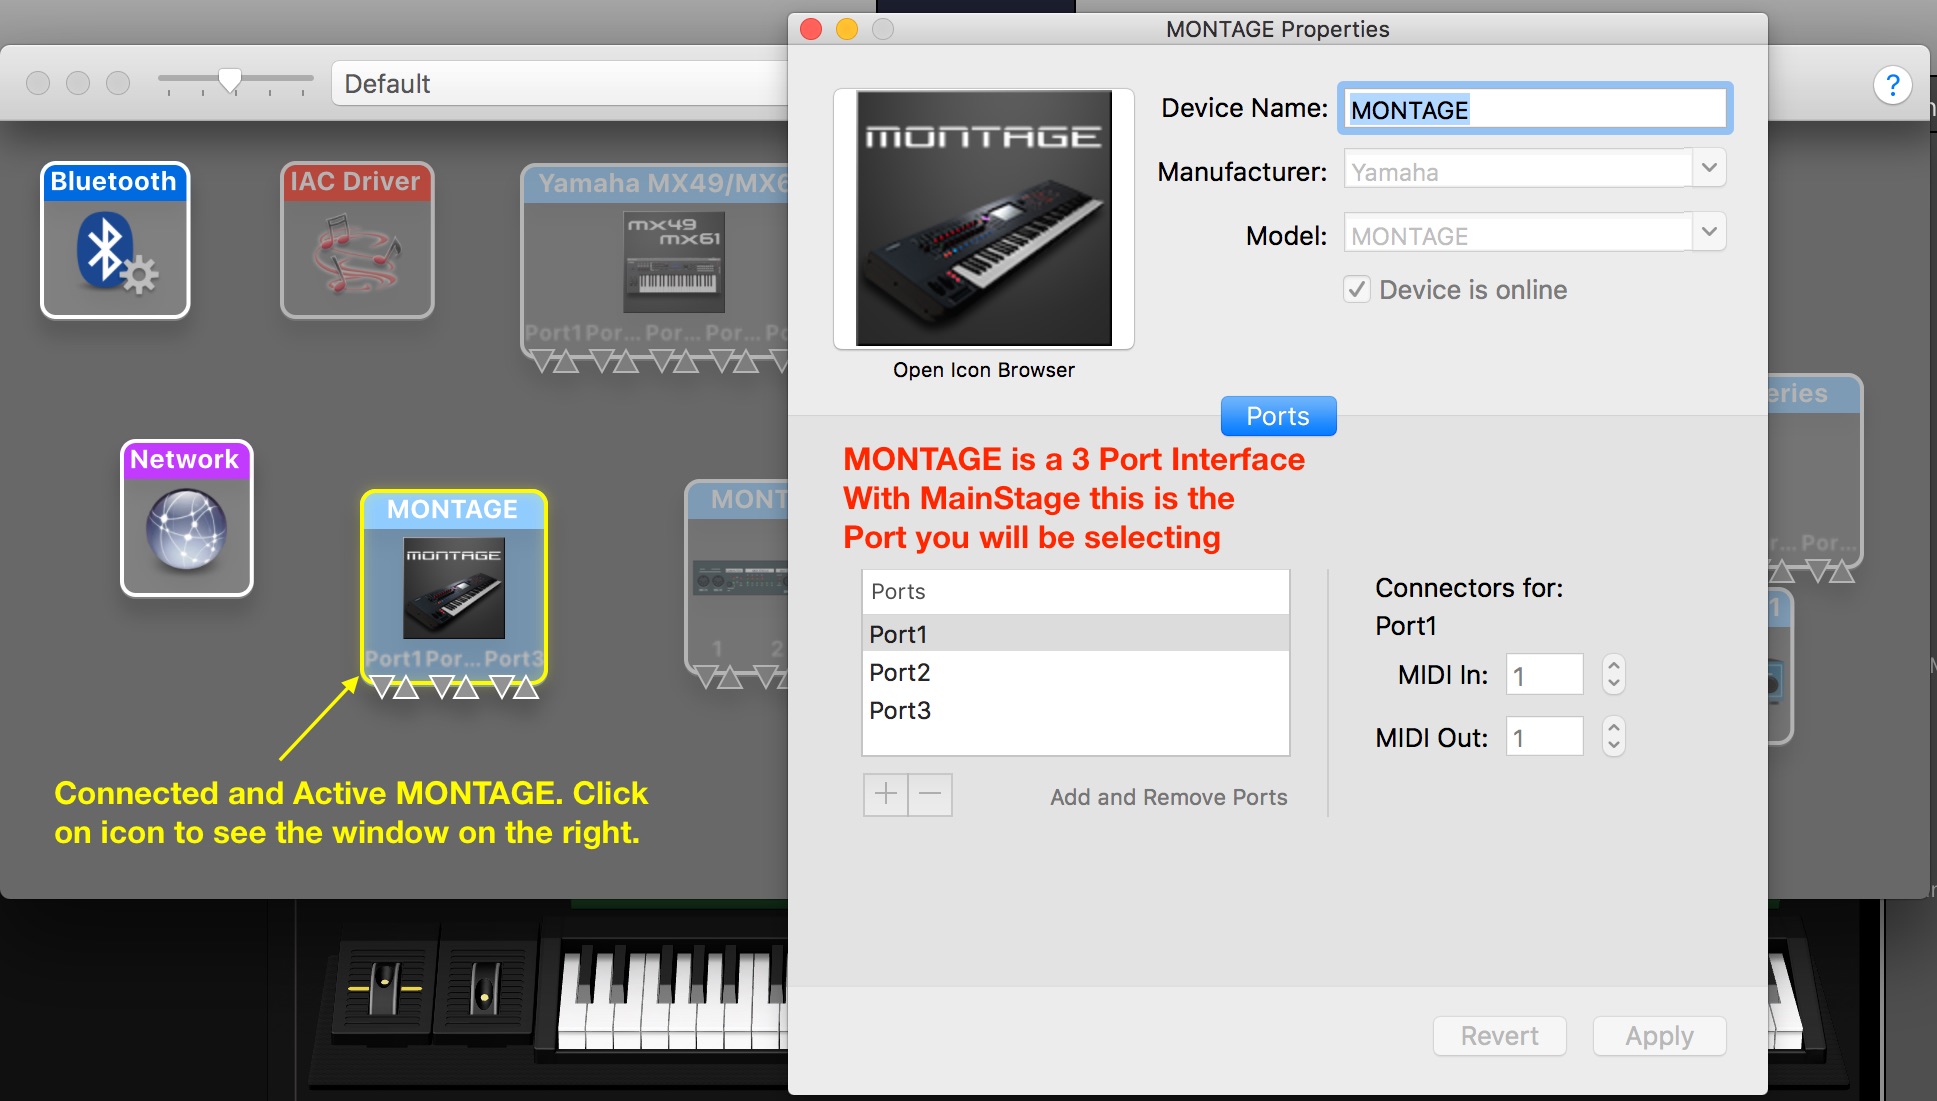
Before looking at the MainStage application, let’s take a look at the Audio MIDI Setup Utility application in the Mac computer. This can be easily found by searching “Audio MIDI Setup” in Spotlight. Open the application, and under “Window” select “Show MIDI Studio”. If the Yamaha Steinberg USB driver is installed and your MONTAGE is connected to the computer via USB, you should see something like this:
When using MONTAGE with MainStage, the only port you will be using is “Port1” (The other Ports are for uses with external gear).
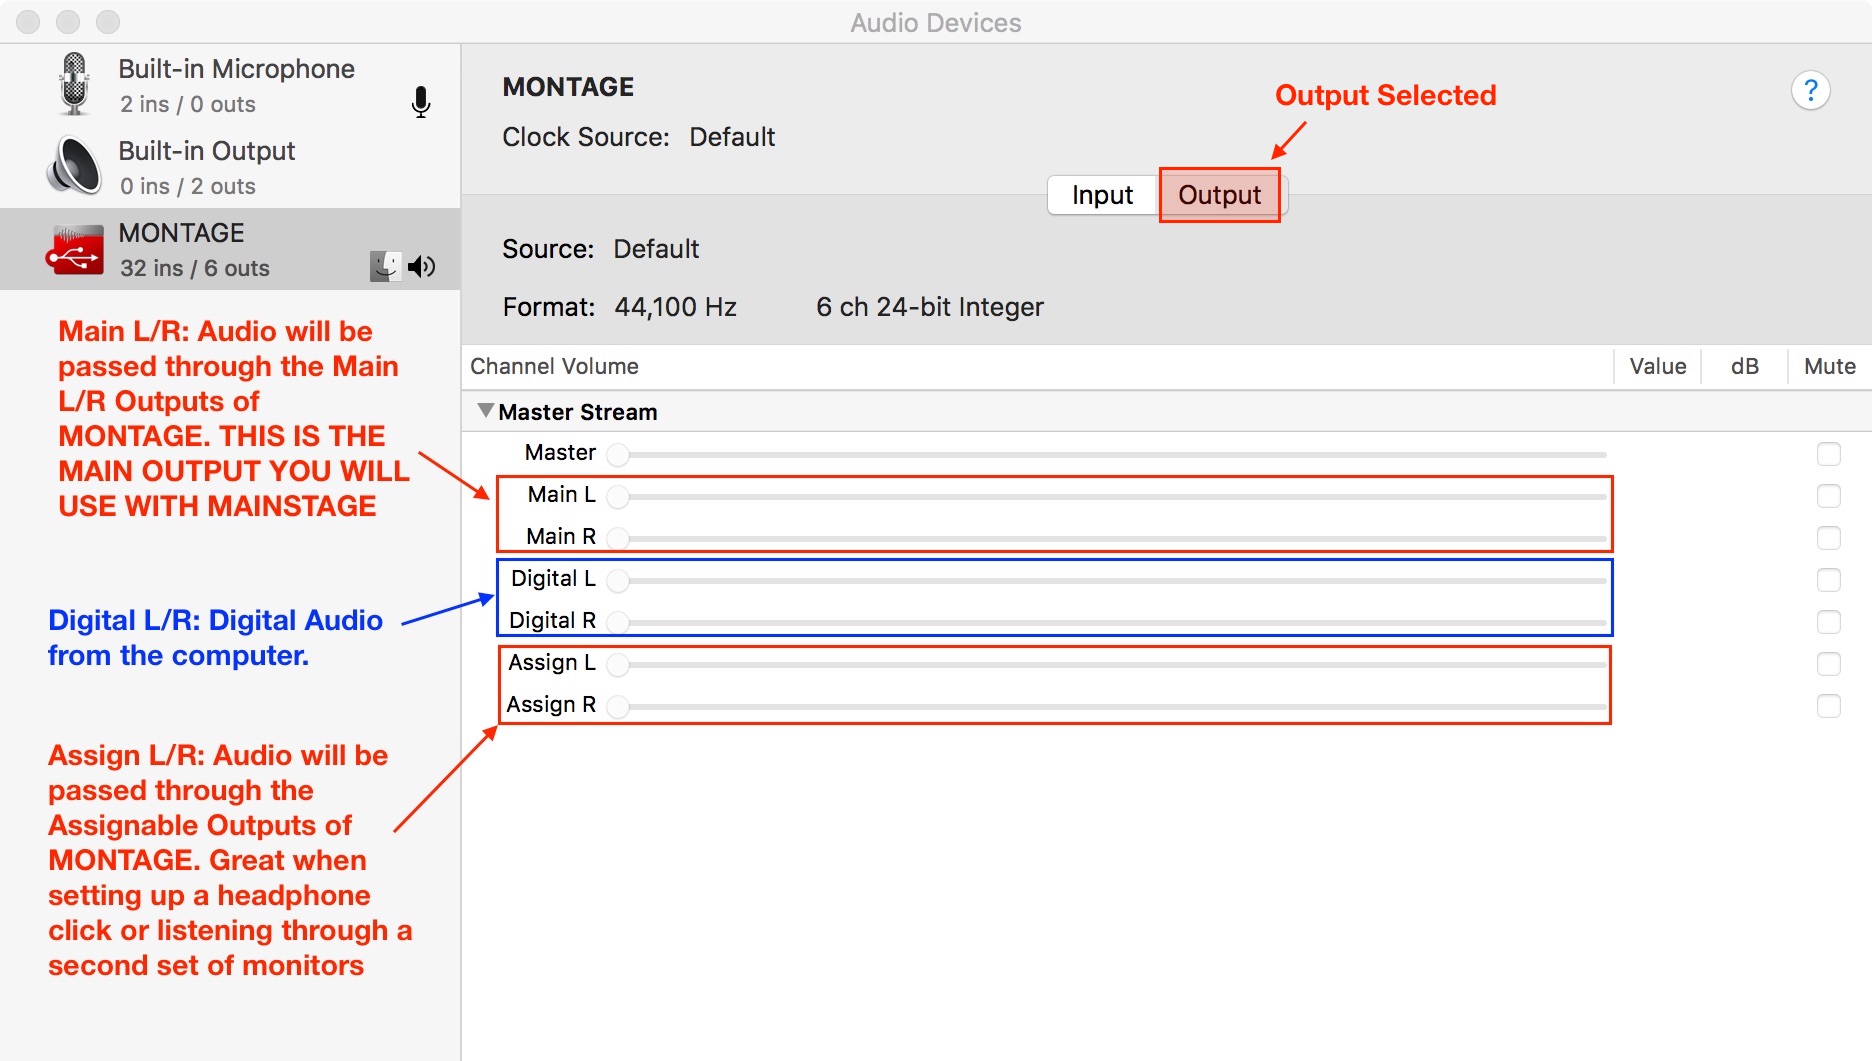
Next, let’s take a look at the Audio Setup. Under “Window” select “Show Audio Devices”. First select the “Output” view as in the image below:
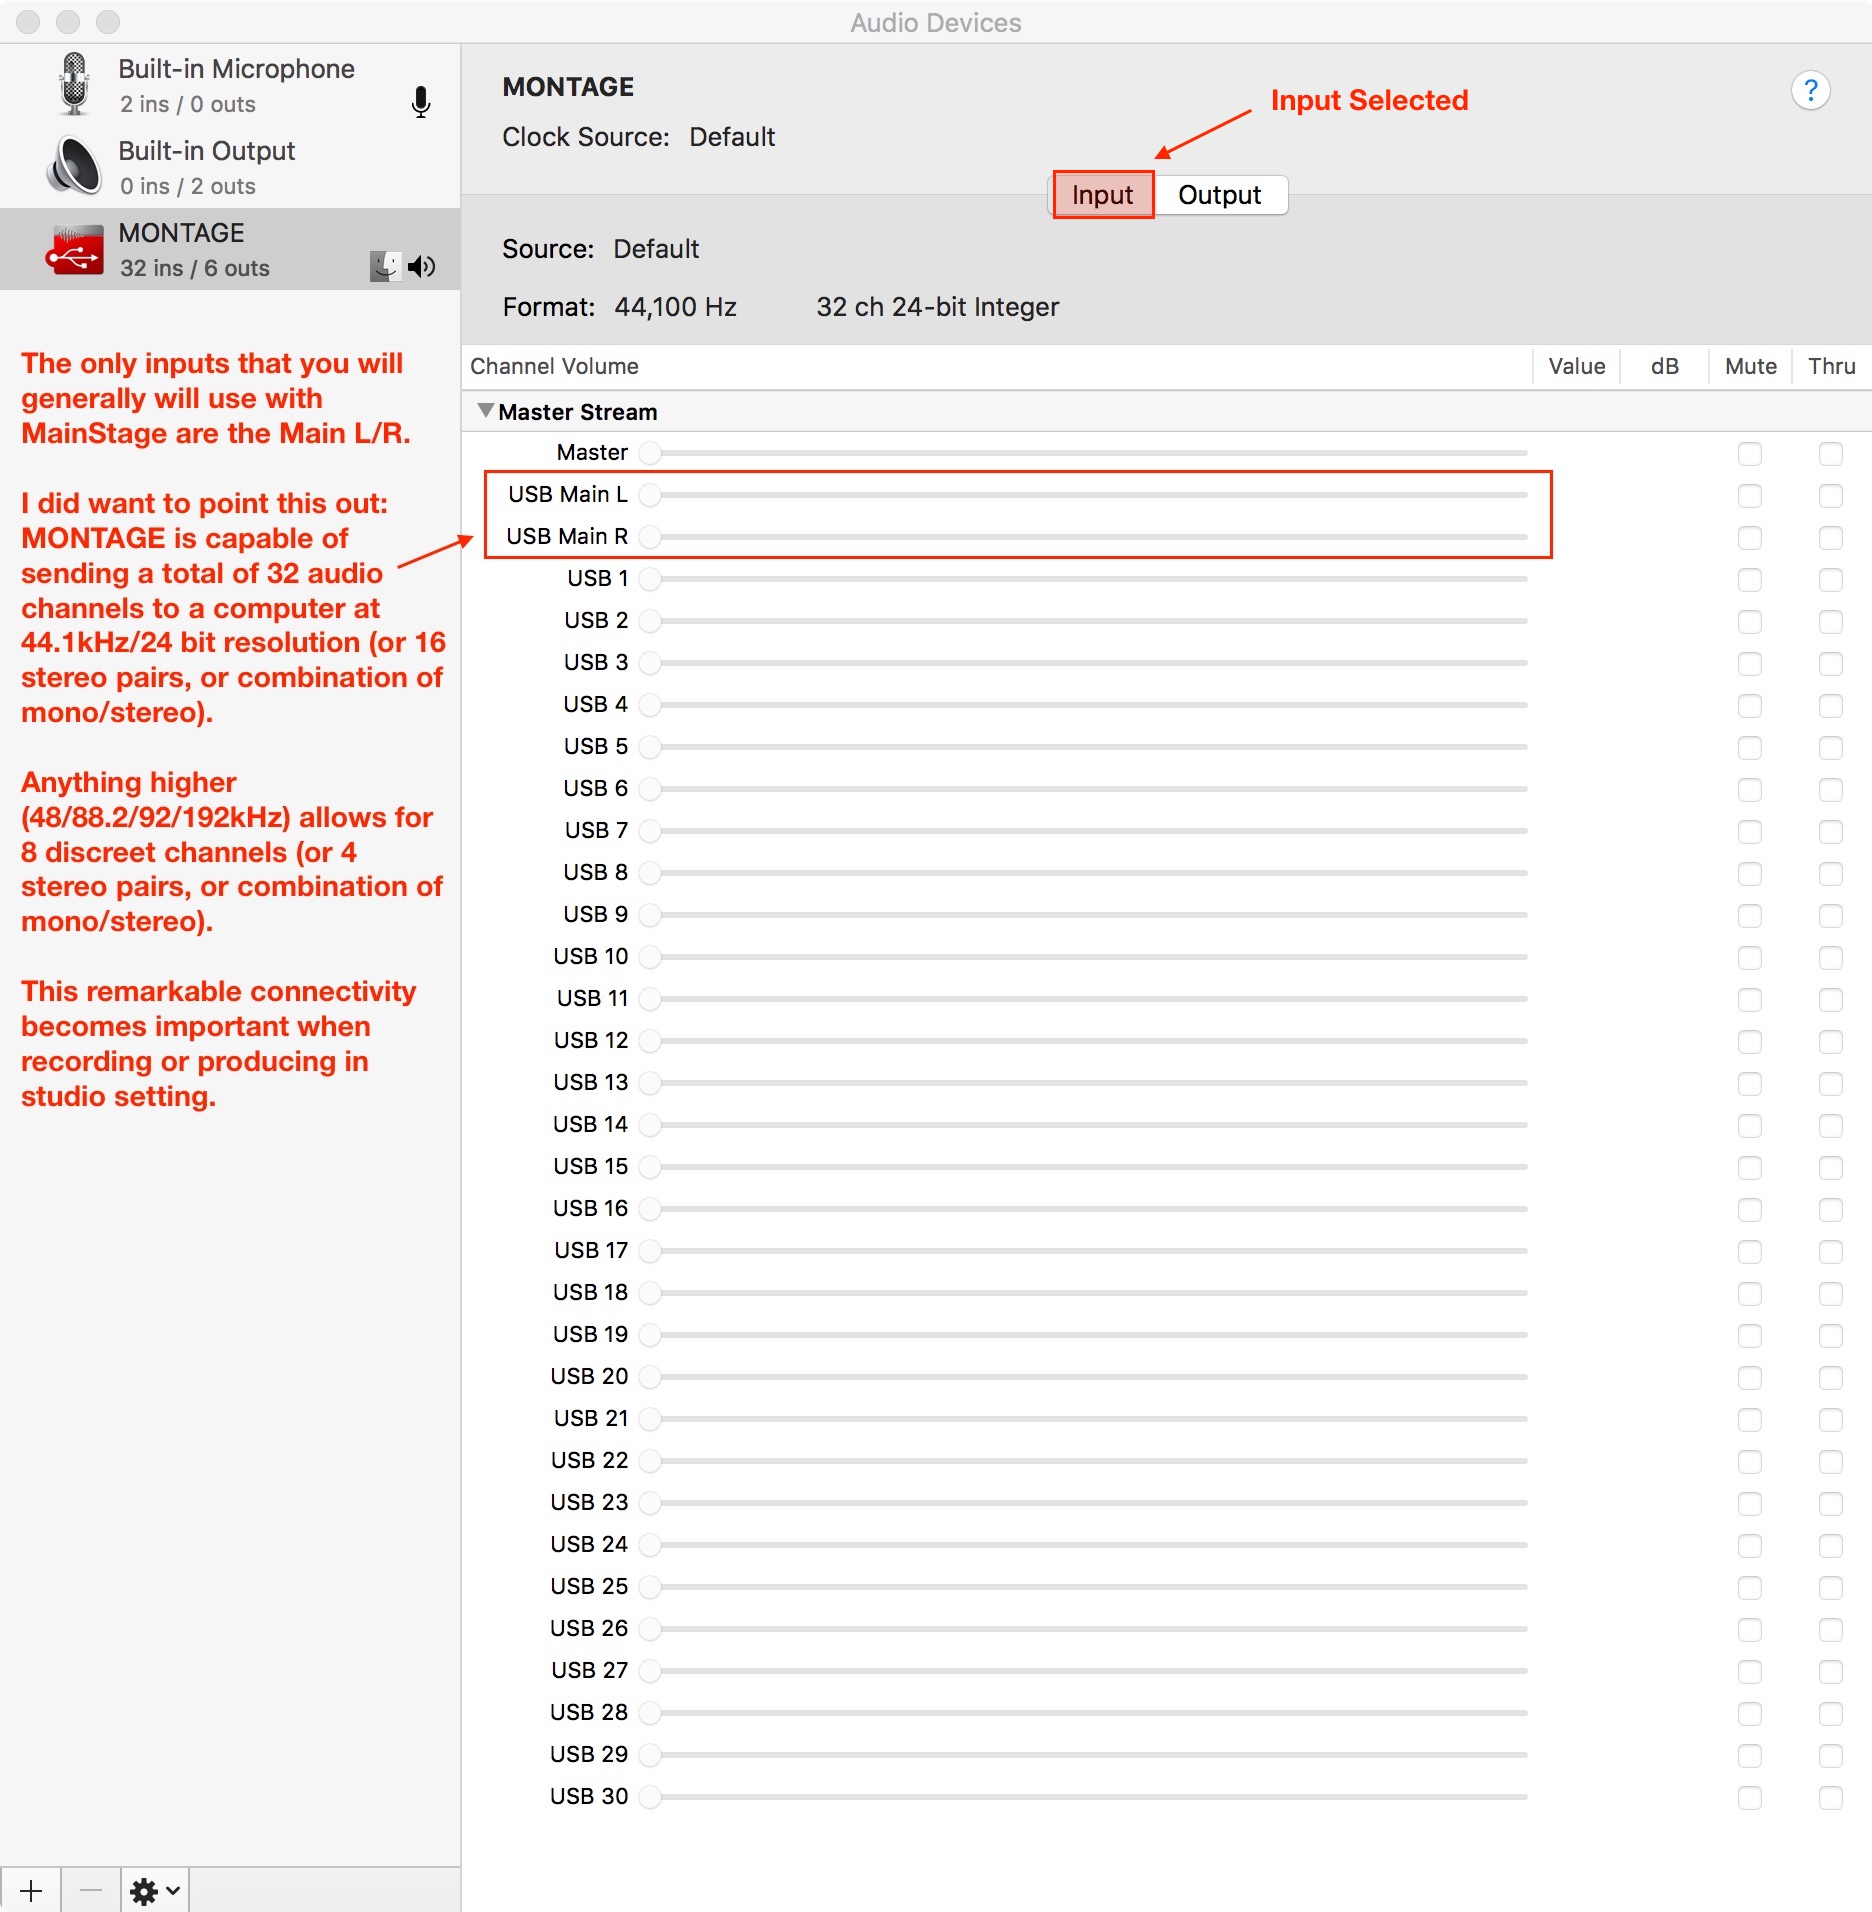
Now select “Input”. You should see something like this:
The Audio MIDI Setup Utility is great way to see exactly how a MONTAGE connects to the Mac and ensures that the two devices are properly connected. Now let’s take a look at MainStage.
MainStage Setup
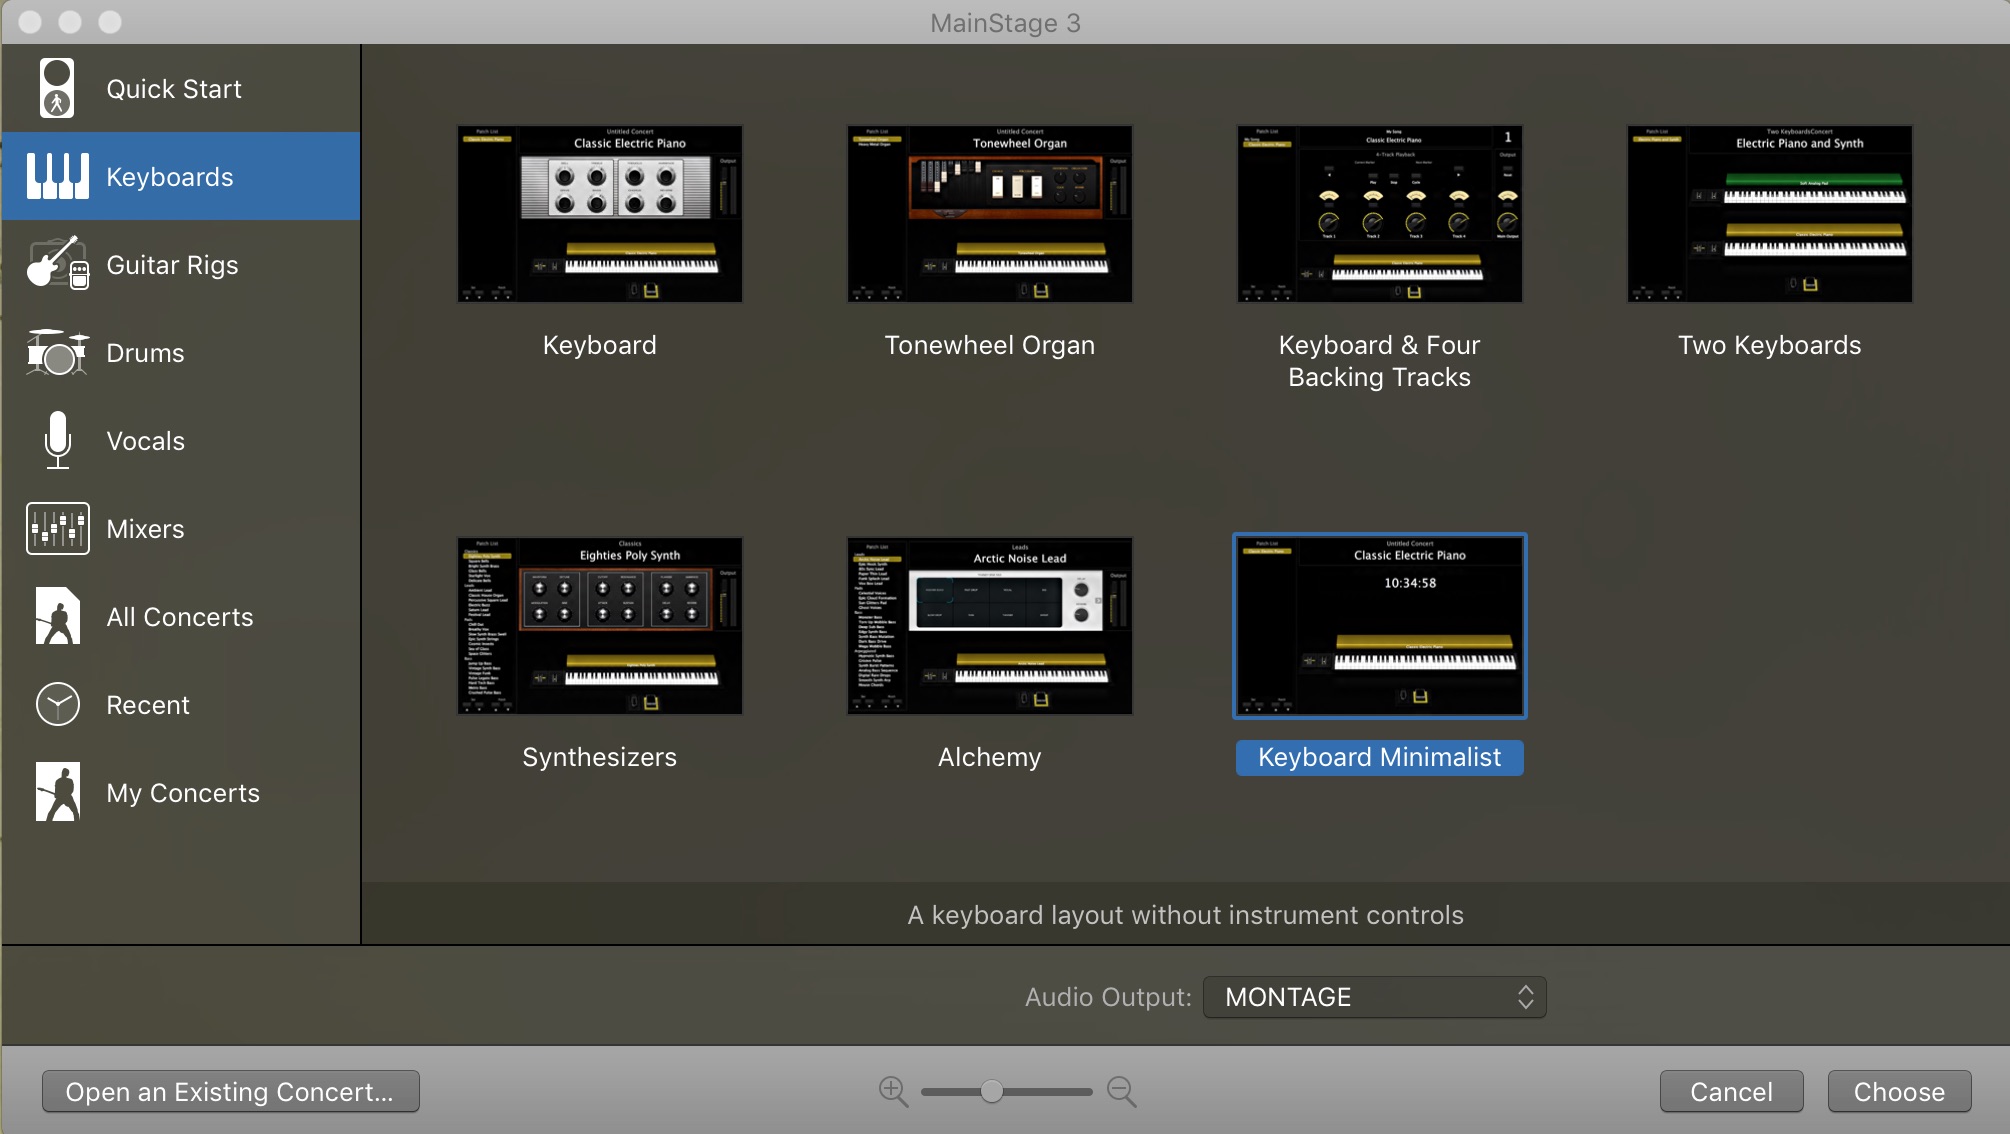
When you first open MainStage, there are a few preset selections to choose from. In this guide, I chose “Keyboard Minimalist.” Note that the “Audio Output” at the bottom of the dialog says “MONTAGE” meaning that I will be using MONTAGE as my audio interface:
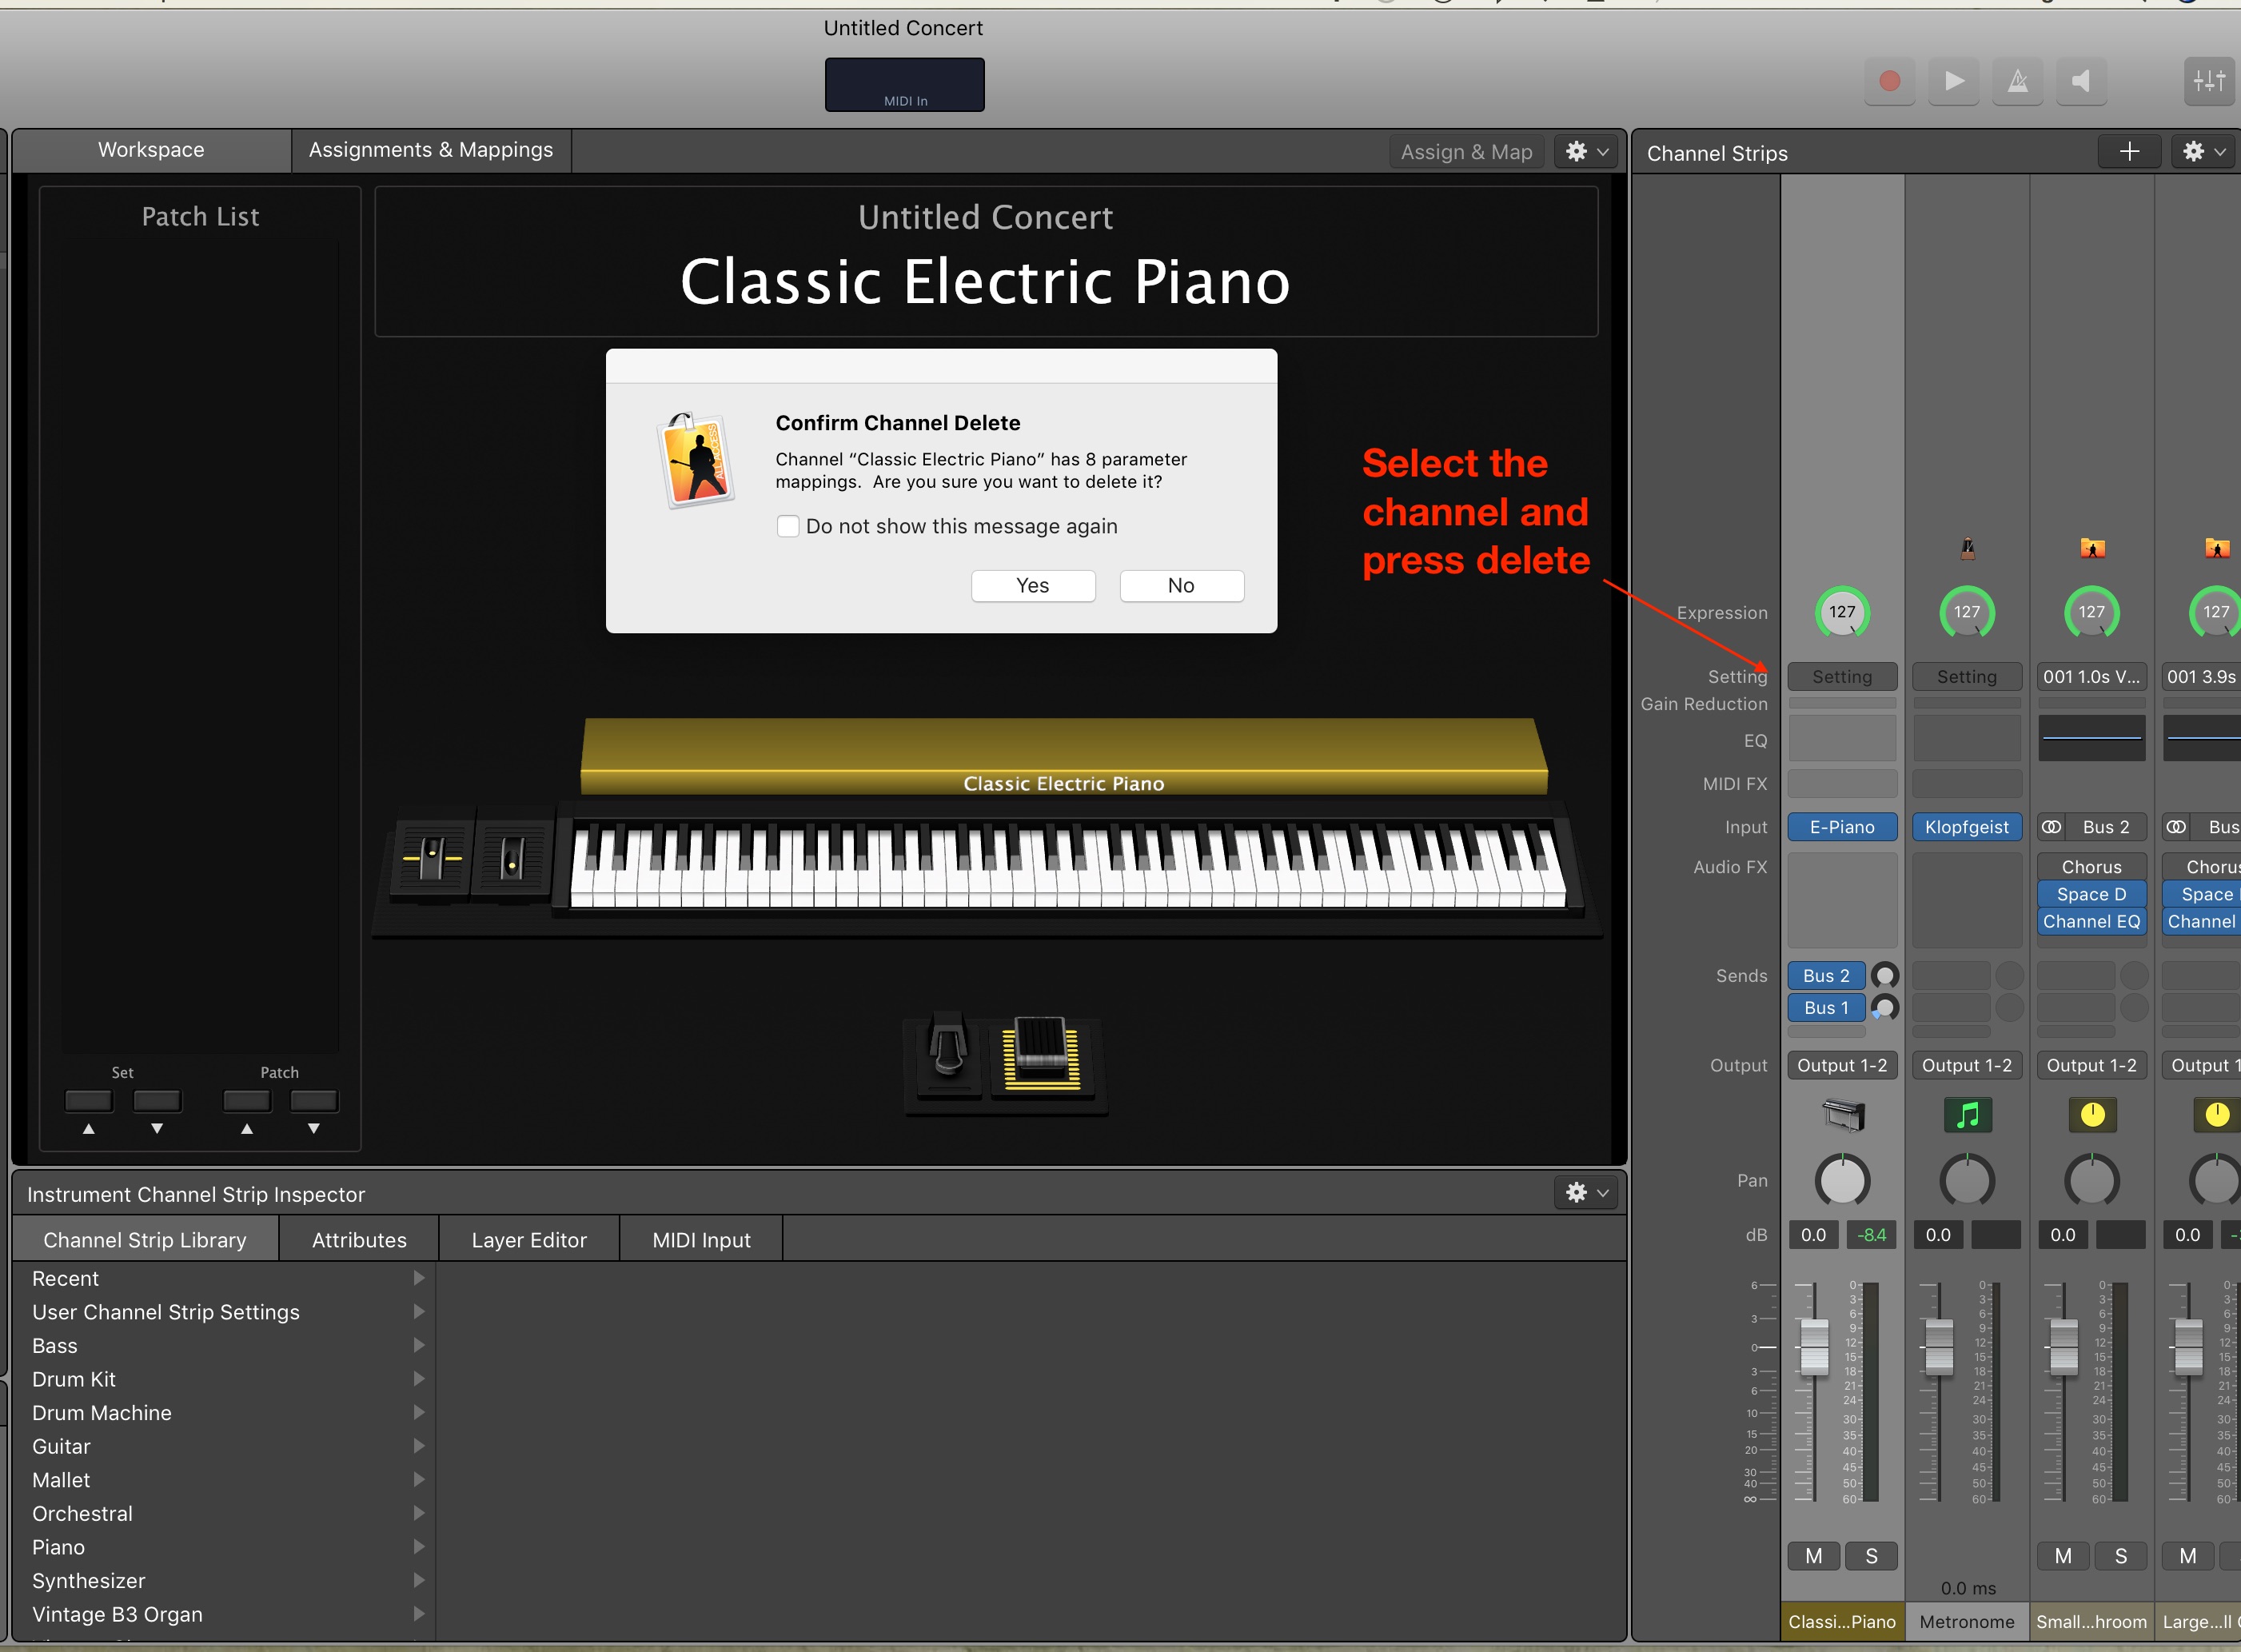
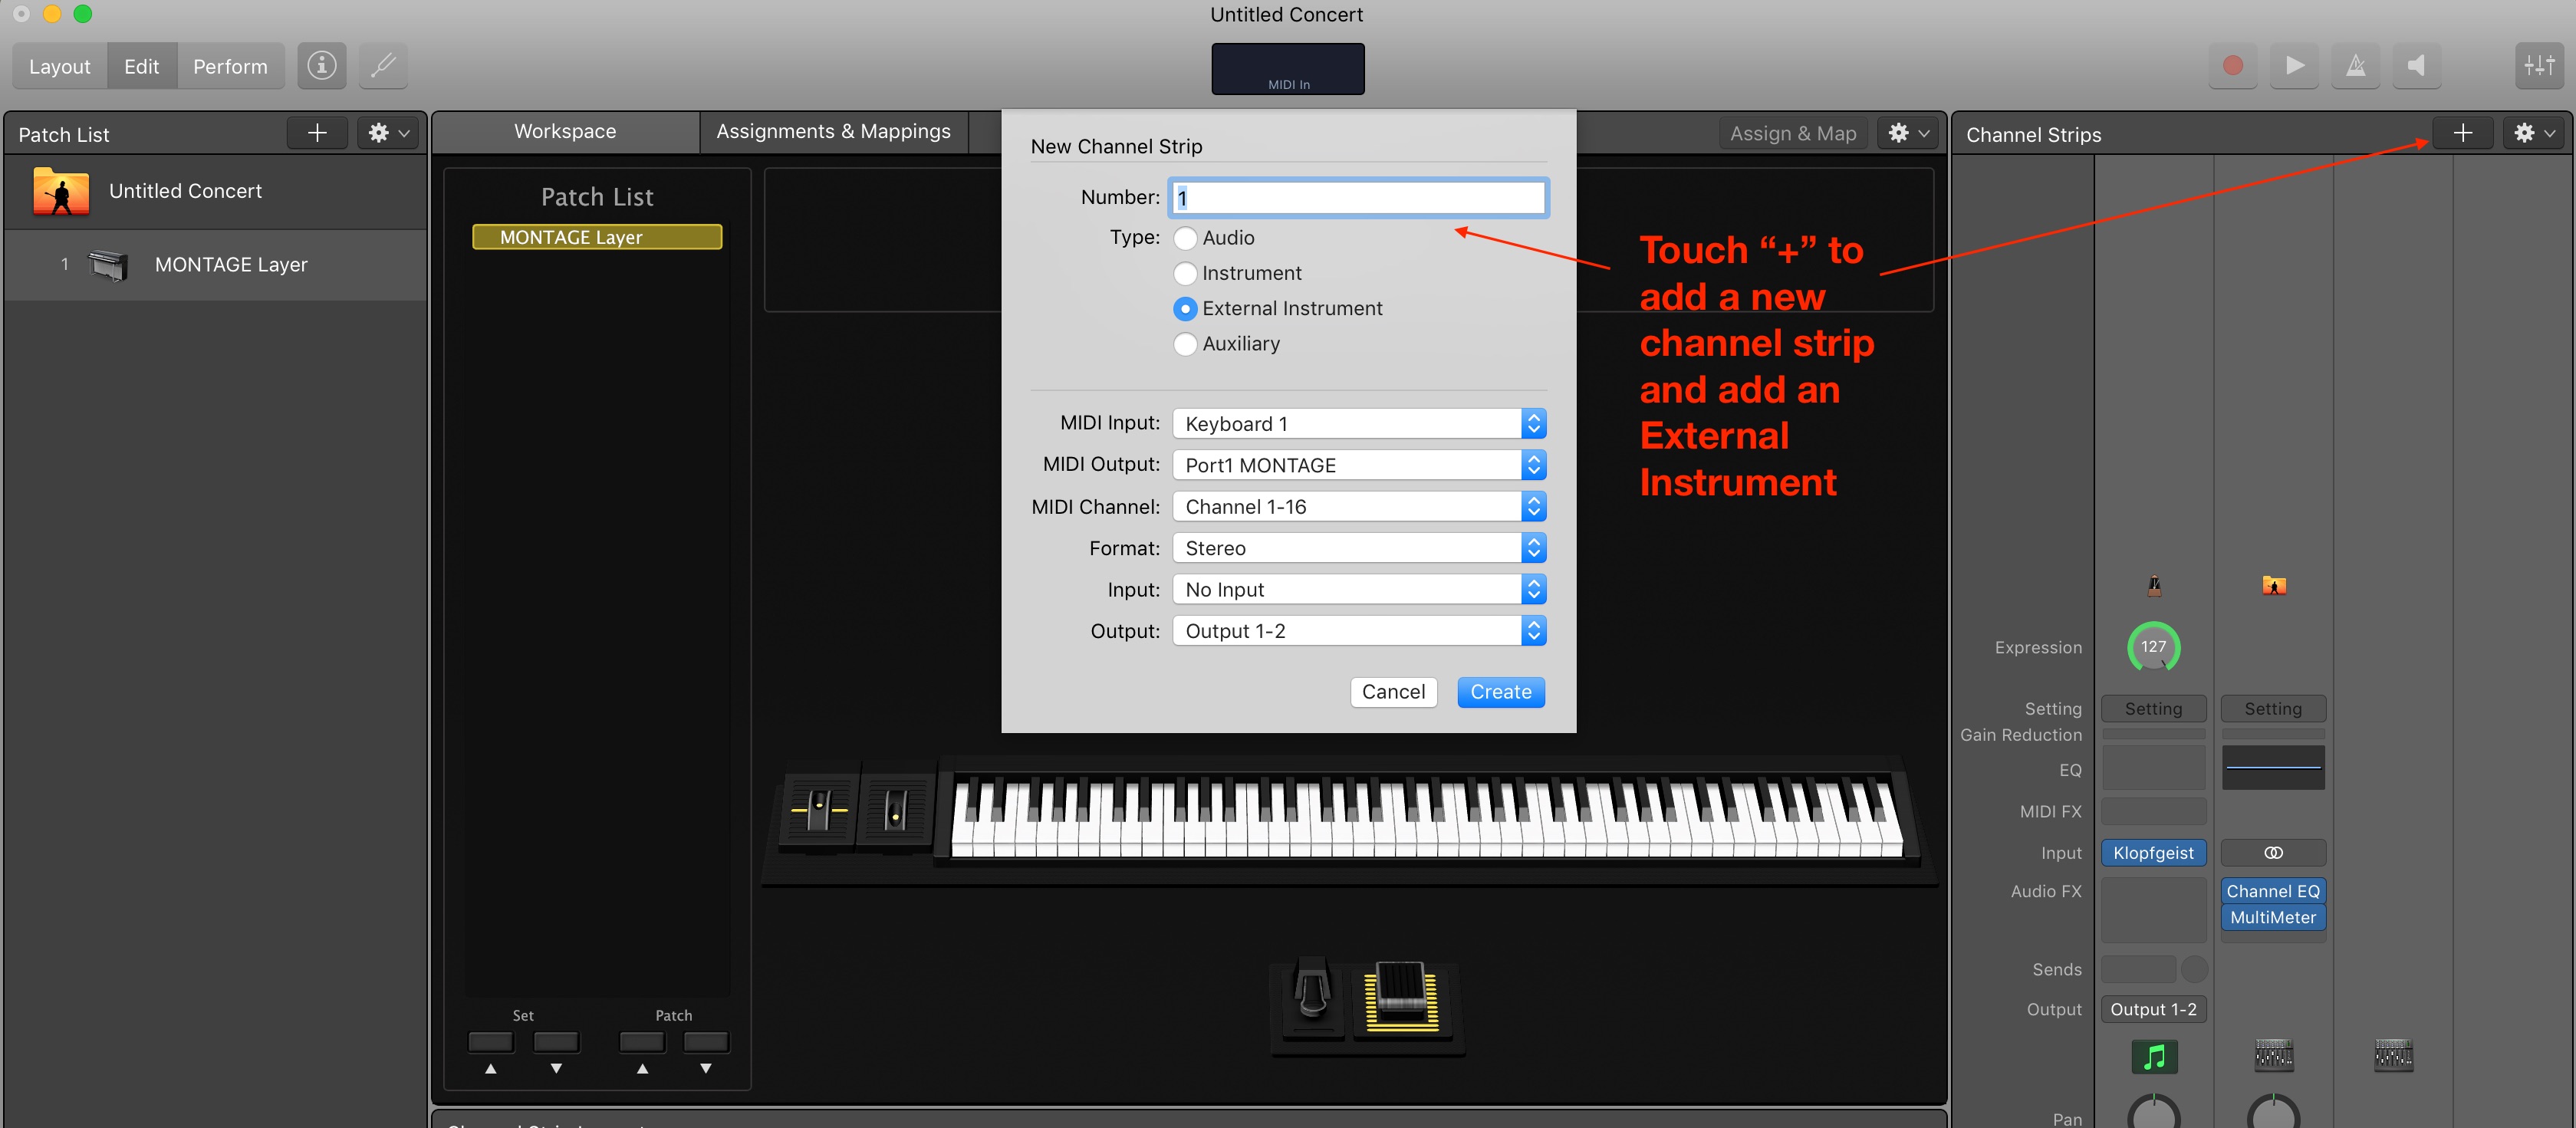
When this template opens, I get a very basic set up with an electronic piano virtual instrument. What I want to create is a basic layer set-up with the MONTAGE Performance “CFX Concert” and an ambient pad sound using the virtual instrument “Sculpture”. First, I’ll delete the electronic piano instrument by selecting the associated channel and pressing delete, then I’ll add the MONTAGE as an external instrument:


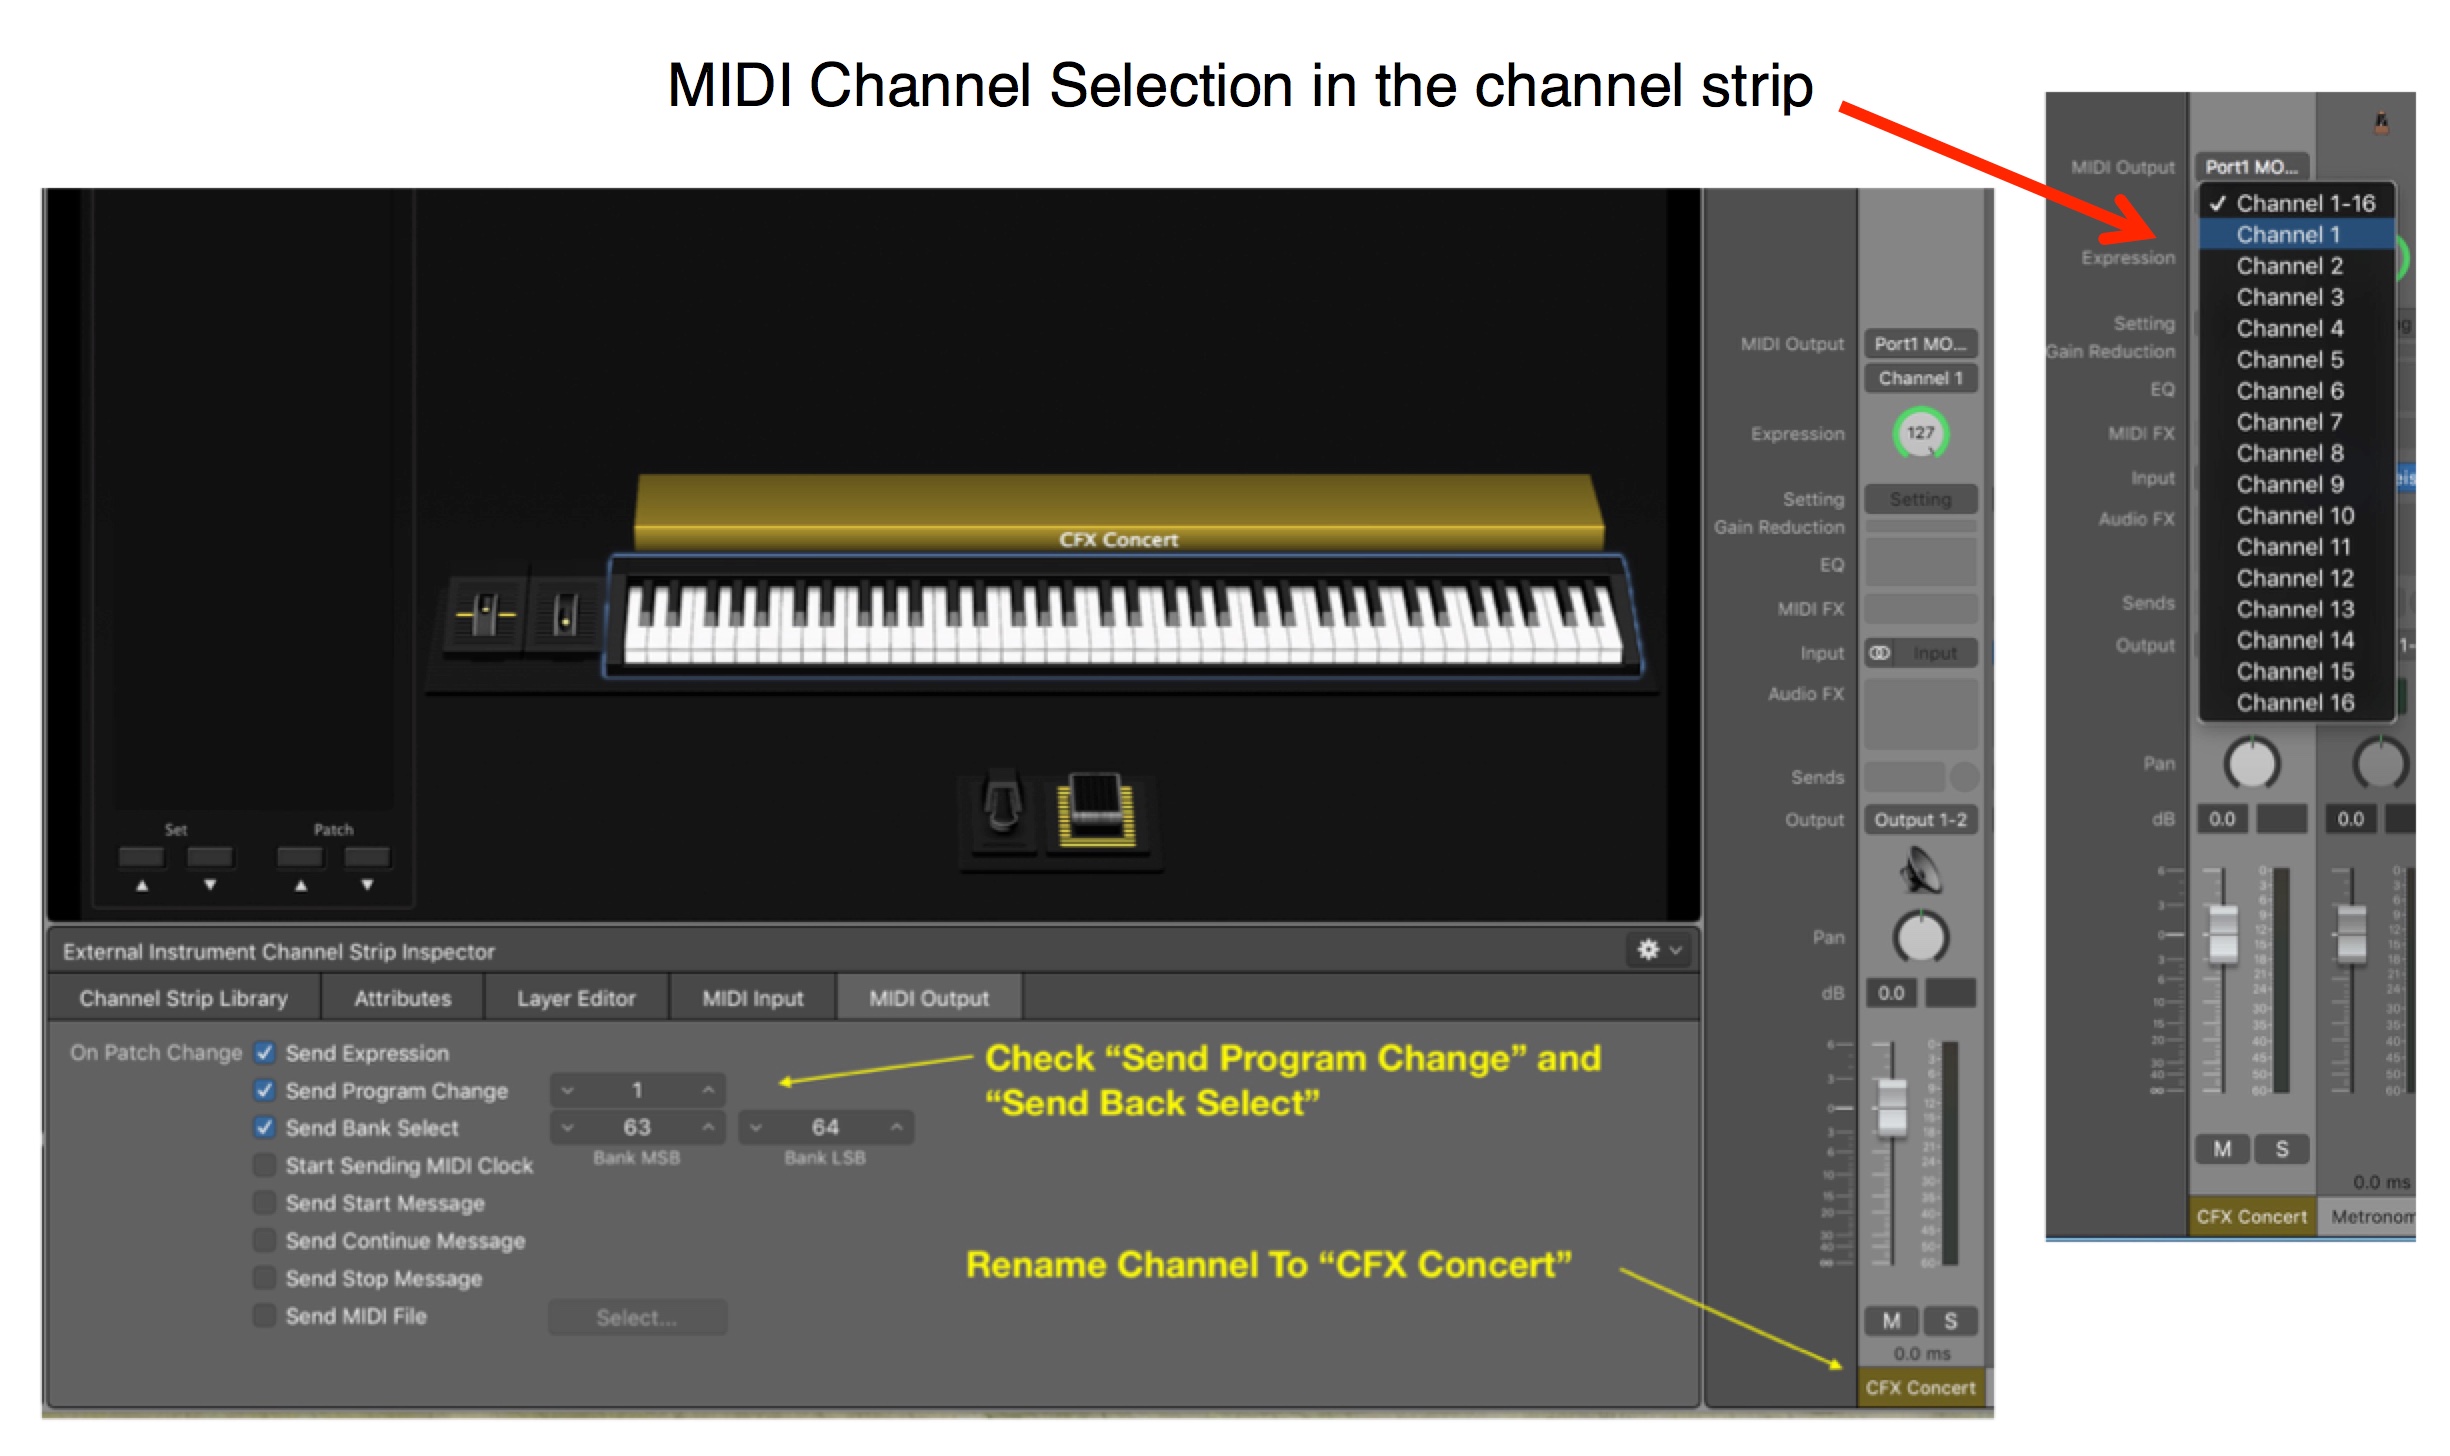
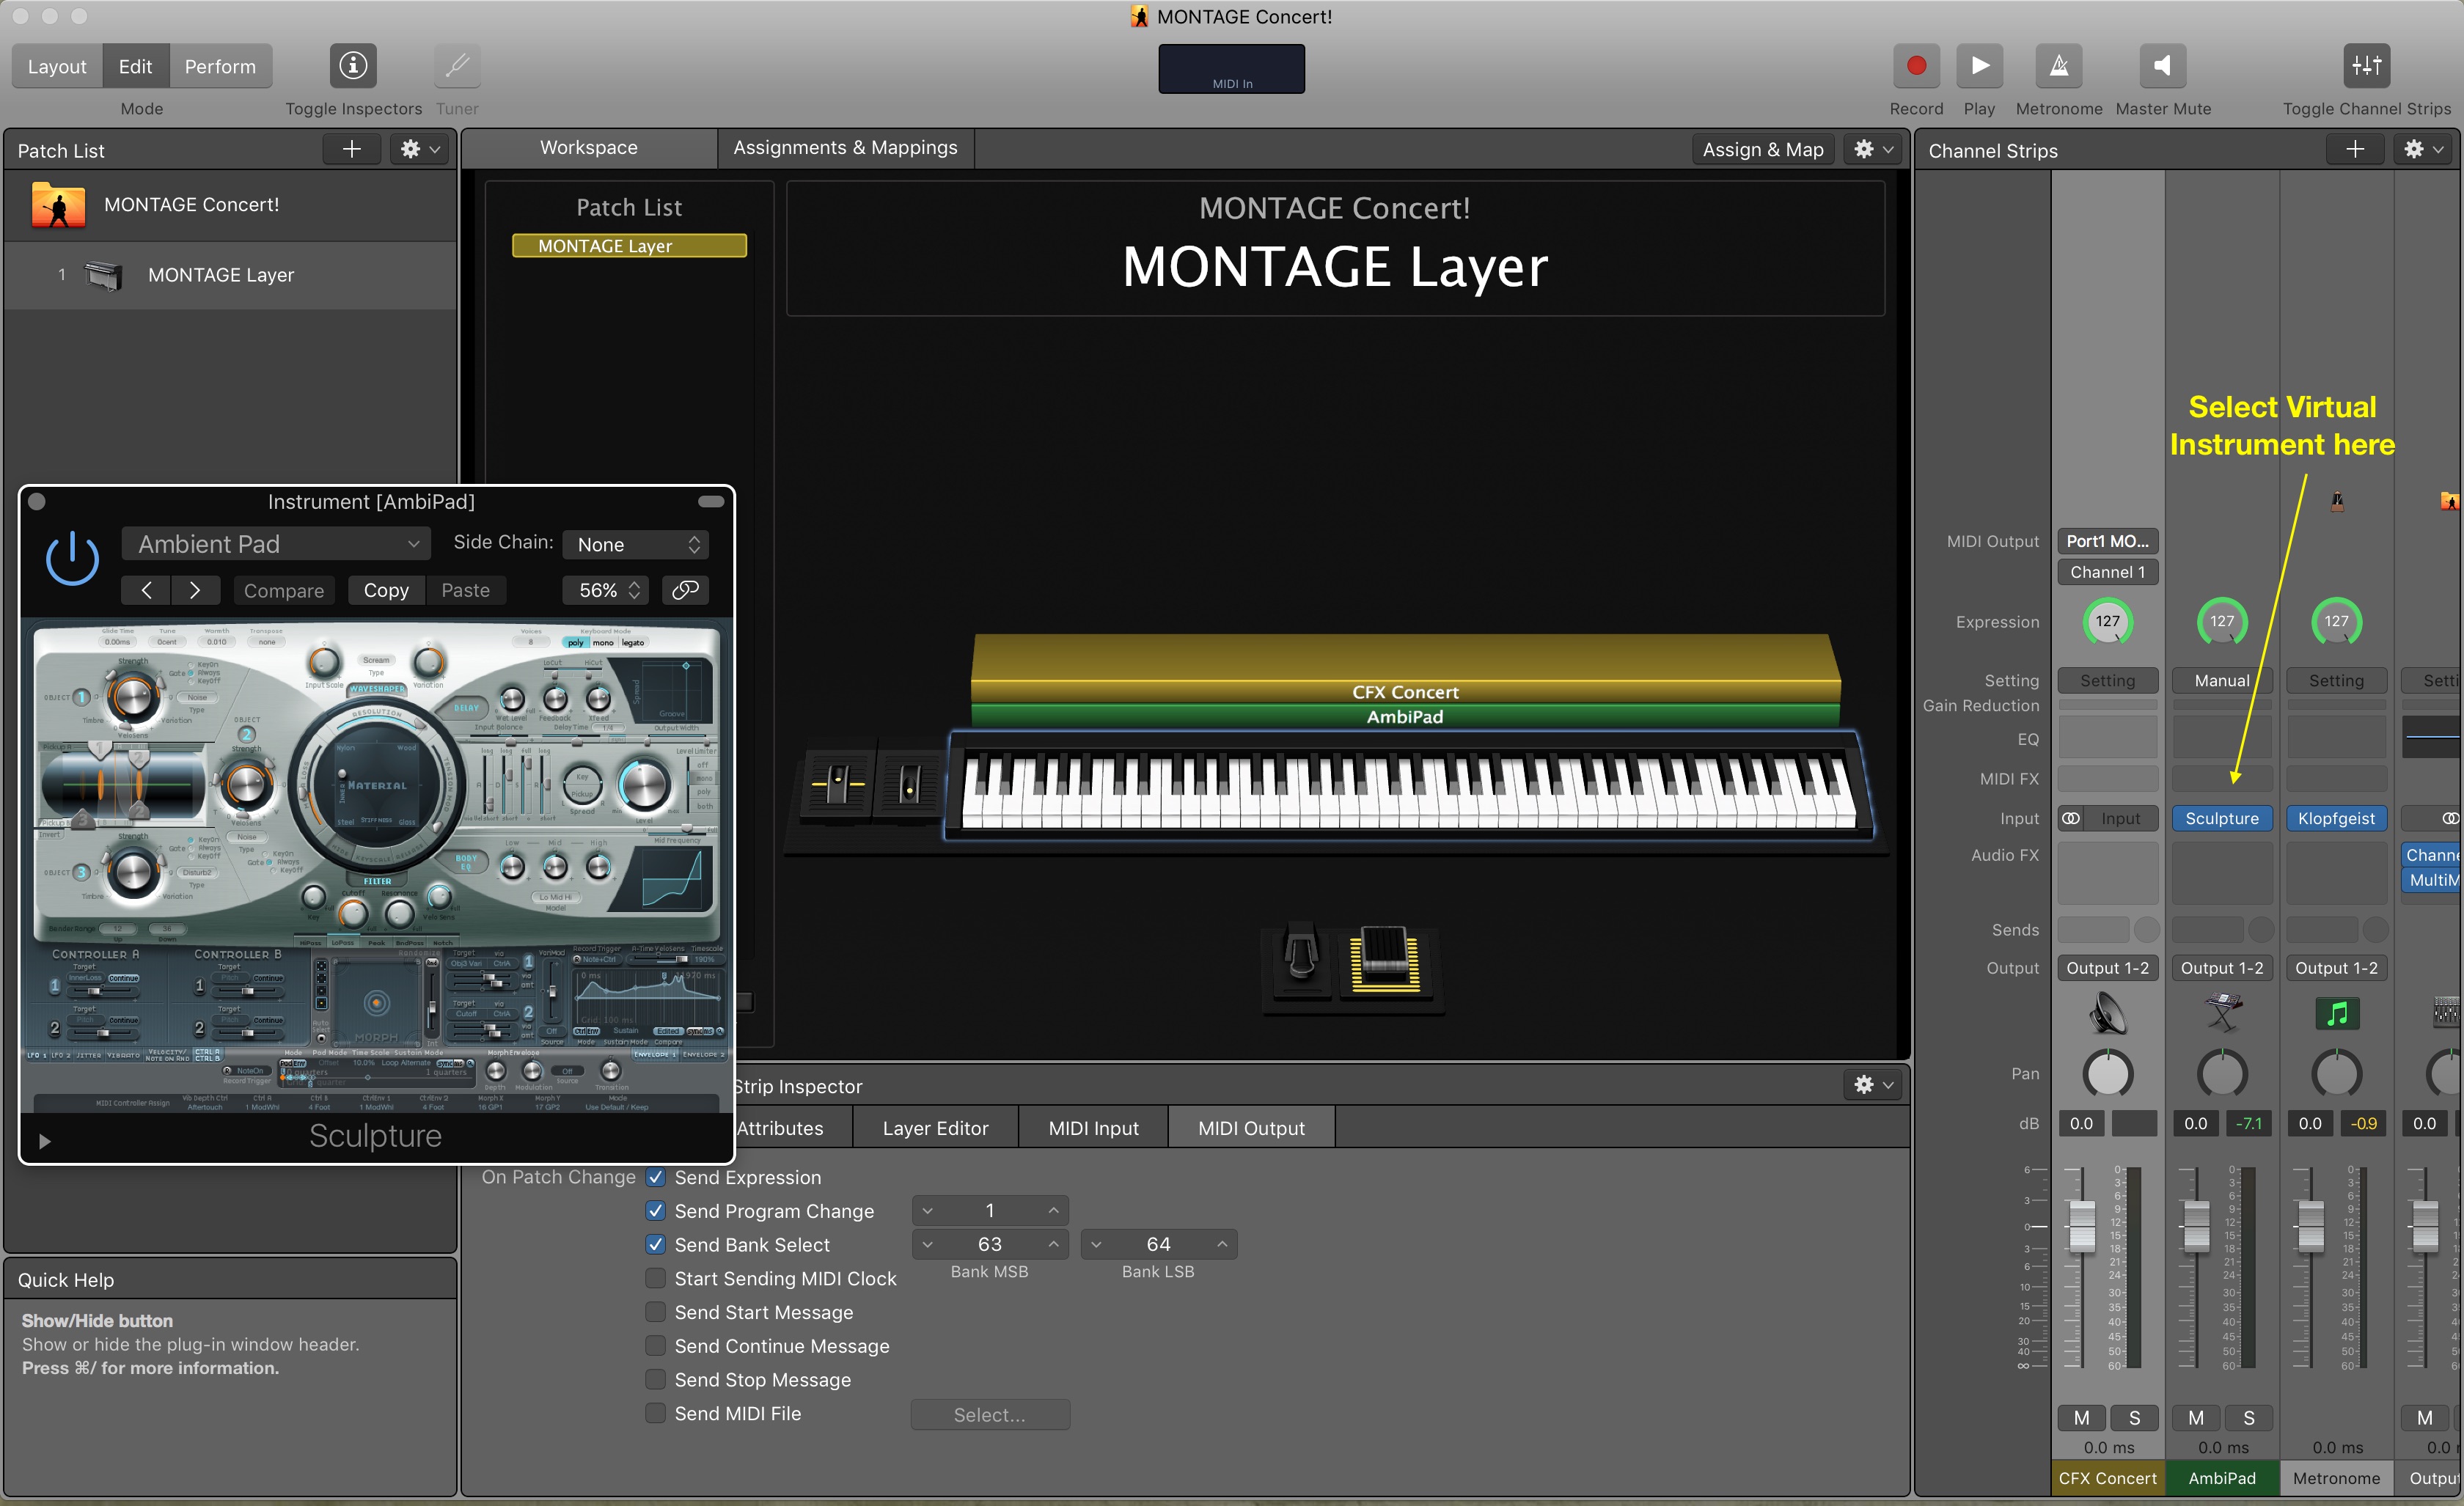
Once I’ve added MONTAGE, I will set up a few things. First, I’ll go to the channel strip and make sure MONTAGE is set to send and receive on channel 1, since the instrument is set to Single Channel Mode. After setting the MIDI channel, I’ll rename the channel strip to “CFX Concert”. When you have selected this channel associated to MONTAGE you should see the “External Instrument Channel Strip Inspector”. Select “MIDI Output”. This is where I add appropriate program change and bank select information so when this Patch is selected in MainStage, the “CFX Concert” Performance will be selected in MONTAGE:
You might wonder how I got the information to enter program change and bank select. You can certainly look in the data list that can be downloaded here, but there is an even easier way to get this information directly from MONTAGE.
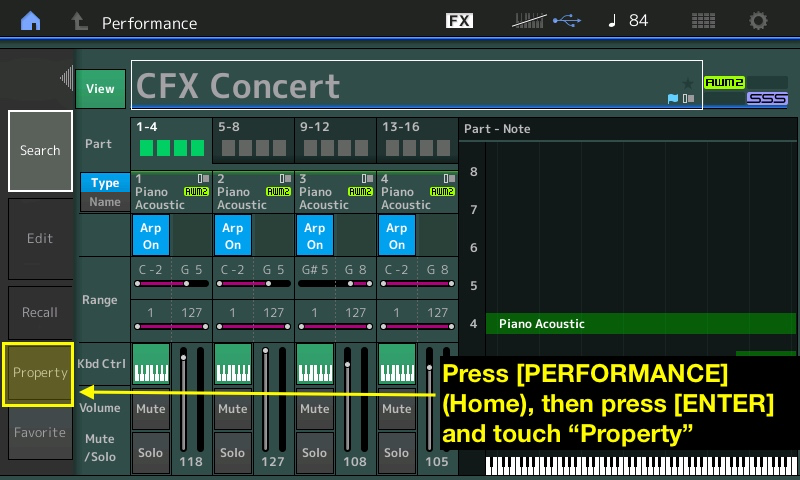
- First, select the Performance “CFX Concert” in MONTAGE and press the [PERFORMANCE] (Home) button on the front panel.
- Then press the [ENTER] button (or simply touch the name “CFX Concert” in the touchscreen). You should see the screen below when you do this:
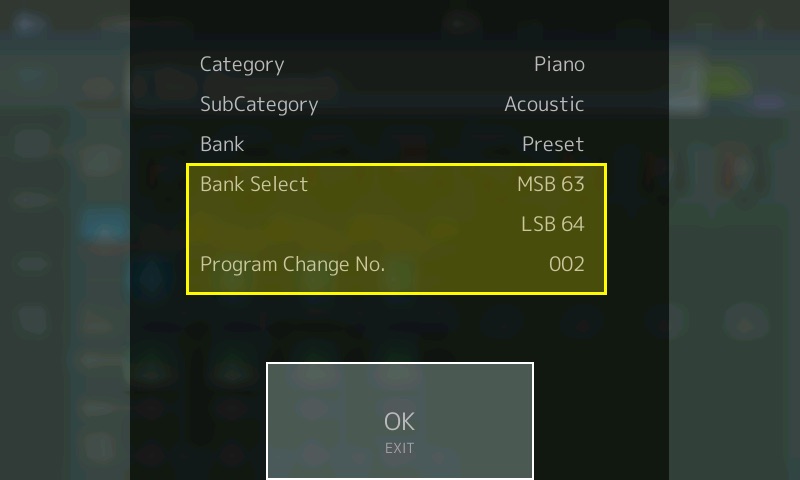
Now touch “Property”, and you will see the following information in the touchscreen:

The information needed is there.
IMPORTANT POINT: Note that the information in the screen says “Program Change No. 002” but in MainStage I entered Program Change 1. This is because MainStage uses 0-127 for program change assignments and MONTAGE uses 1-128. When entering Performance program changes into MainStage just subtract 1 (for example, if the program change is 32 in the MONTAGE property screen, enter 31 into MainStage). There is a setting in MainStage where this can be changed (0-127 or 1-128) but you will still need to enter the program change information as described in the document for it to work properly.
Now I’ll add the virtual instrument pad sound in the same manner I added the external instrument above but this time selecting “Instrument”. After adding the instrument, I need to select one of the virtual instruments I have installed on my system. I selected “Sculpture”, a cool modeling synth from Logic Pro:
Now that I have my first MONTAGE layer created in MainStage, I saved this concert as “MONTAGE Concert”. Now I can add more Patches with multiple layers, splits or any combination needed. The setup is very streamlined with a single USB connection, and the entire system sounds amazing due to the remarkable fidelity of both MONTAGE and Pure Analog Circuit digital-to-analog technology. It’s a great system!
Stay tuned for Part II where I’ll cover some additional ways to set up MONTAGE and MainStage.
In the meantime, join the conversation about this series on the Forum here.

