Setting up the MONTAGE A/D INPUT
A/D is short for Analog-to-Digital. We will use a microphone for our example but you could substitute a guitar, a bass or virtually any kind of input device. These are analog devices and we are going to convert their audio to digital signals inside the MONTAGE.
Set the A/D Input
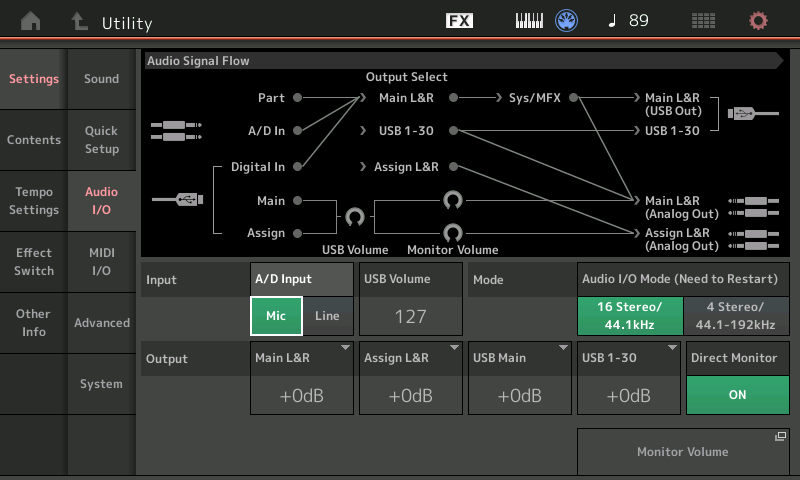
- Press [UTILITY].
- Touch “Settings” > “Audio I/O”.
- Set the MIC/LINE parameter to “MIC”.
- Use the Gain control on the left front panel to raise or lower the input gain.
Microphones are weak signals so it is not unusual at all to have the Gain set at or near maximum:

Setup for Audio processing
The “MIC/LINE” selection prepares the input for a wide range of Input devices. Microphones, which generate movement of electrons by passing a very small magnet, attatched to a diaphragm, between a coil of copper wire – this generates a very small amount of electrical signal and needs a significant amount of boosting. The GAIN control on the front panel will be raised for weak signals like microphones, guitars, basses, and raised not so much for stronger output signals like synthesizers, modules, playback devices, etc.
To properly set the GAIN, the peak indicator should light briefly at the strongest signals. You do not want it lit fulltime – it is best when it blinks briefly at the loudest peaks, only.
The A/D INPUT PART has its own setup parameters within each PERFORMANCE. This means you can customize the setup on a per PERFORMANCE basis. Setting up your microphone to be a Vocoder in one PERFORMANCE, and as a straight mic with reverb and tempo delay in the next.
[PERFORMANCE (HOME)]:
- Press [EDIT] > press upper [COMMON] to view the Edit-Common/Audio level of the architecture.
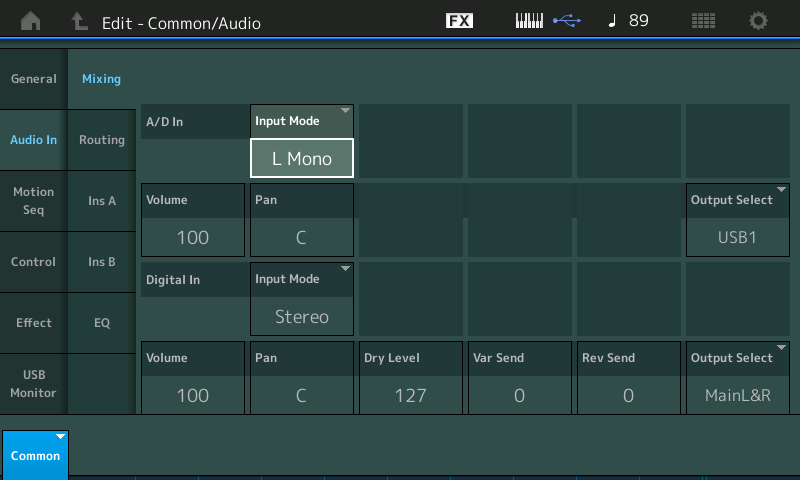
- Touch “Audio In” > “Mixing”.
Here you can setup the Analog-to Digital In and the Digital (USB) In on a split screen. The A/D In is on the top. The DIGITAL IN is on the bottom half of the screen.
Set the A/D In “Input Mode” to match the input you are using on the back panel. For example, you might plug a microphone into the L/MONO jack on the back panel, you would then set the INPUT MODE = “L Mono”:

The A/D In “Volume” parameter is used, not to set the input gain, but is the subjective level of the input compared to other channels. The front panel GAIN Knob sets the critical input stage, while this VOLUME is the subjective usage of this input. If the input stage signal is distorted turning down this VOLUME will not fix the issue, you simply will hear the distortion less well! If the input is distorted adjust the GAIN. GAIN is scientific, VOLUME is subjective:
- Set OUTPUT SELECT as desired
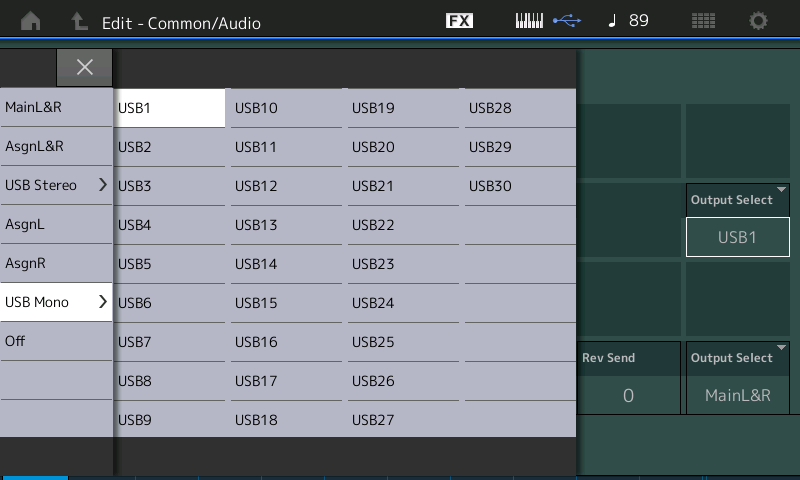
Your OUTPUT SELECT options here are many:
- MainL&R – will allow the A/D In to use the System Effects (Reverb, Variation), the Master Effect, the Master EQ on its way to the Main left and right outputs.
- AgnL&R – will allow the A/D In to use the Assignable output jacks on the back panel of MONTAGE. you would use this when you want to isolate the A/D Input to its own sound system.
- USB Stereo – there are 30 assignable USB Outputs available in odd/even stereo pairings, 1&2, 3&4, 5&6 etc.
- AsgnL – available as a separate send.
- AsgnR -available as a separate send.
- USB Mono – the are 30 assignable USB Outputs available as individual sends.
- Off – when you are routing the A/D Input as a silent modifier or modulation source within the MONTAGE engine. For example, when using the VOCODER to create the “robot voice’, you would prevent the ‘dry’ signal from being. heard by setting the OUTPUT SELECT = OFF:

Shown above, the USB Mono selecting USB1 as the Output Select – an example would be when feeding a mono source to a mono track in your DAW via USB.
You do not have to record your microphone (typically, a mono source) to a mono track. It depends on what you want to do to the signal. For example, the MONTAGE makes available two INSERTION EFFECTS exclusively for use with the A/D Input. This allows you to process the signal on the way to the DAW. You can assign Compressor/Limiter, and any of the wide variety of available processors. If you select a stereo Effect, Tempo Stereo Delay, for example, you would want to record the results to a STEREO TRACK in your DAW. This is a production decision:
- Press [STORE] to set this as your preference.
This is programmed on a per PERFORMANCE basis.
If you are going to route your A/D INPUT Part to the Main Left and Right outputs (L&R), you can use the System Reverb and Variation Effects. Additionally, assign the A/D PART its own (2) INSERTION EFFECTS. If, however, you are going to route the A/D INPUT PART to any of the assignable outputs (“AsgnL&R”, or any of the various USB outputs, “USB1~USB30”) then the signal is isolated from the rest of the system, and will not use the SYSTEM EFFECTS, nor the MASTER FX nor the MASTER EQ. You’ll see this in the Audio Signal Flow diagram.
This is because when you route something to an assignable output you do so to isolate it from the rest of the signals – precisely because you want to process it differently from the rest. In such a case, you have the capability of assigning your A/D PART its own setup of INSERTION EFFECTS.
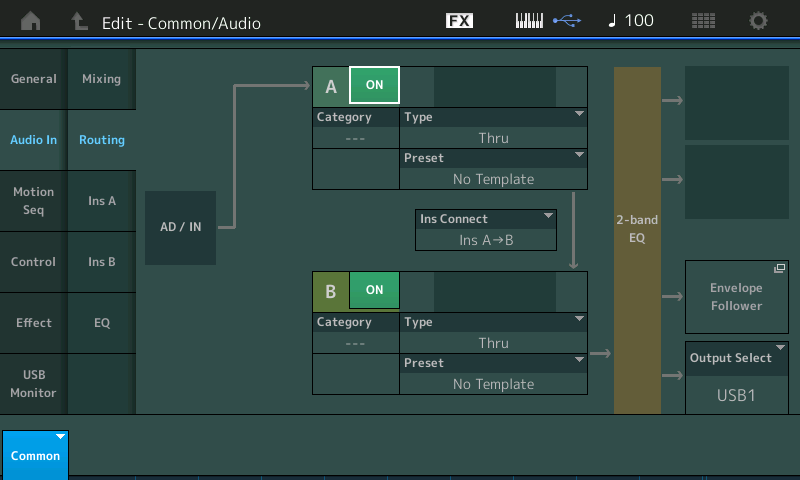
If you want to process the A/D Input you can use the INSERTION EFFECTS, let’s set that up now:

Here you can setup the A/D In through the two Insertion Blocks. Routing can be INSERT A to B or B to A.
The signal then passes through a powerfully flexible 2-band fully parametric EQ, and a +12/-12dB Boost/Cut. You can select any two INSERTION EFFECTS. You have access to all manner of effect types (Reverbs, Delays, Chorus, Flangers, Phasers, etc., etc., etc.). The audio signal’s path is shown and the OUTPUT SELECT parameter is repeated here, for convenience.
In MONTAGE, all 16 Synth PARTS plus the A/D In Part can simultaneously have their dual INSERTION EFFECTS active:
- Please turn down your main Volume. It is always a good idea when scrolling through effects – to prevent ear damage. Never grow tired of lowering and raising the volume – your ears will thank you.
Set the INSERTION A to the “Comp” category and select the
VCM Compressor 376. The VCM Compressor will allow you to maximize your level and add
presence and
punch to your vocals. A compressor is a special kind of amplifer that the more signal you send in the less signal you get out. Sounds strange to say, but it is an amplifier that detects signal that exceeds a INPUT value you set, and quickly prevents that signal from reaching its maximum. When a compressor is to a 2:1 (two to one) RATIO, for every 2dB the signal wants to travel above the Input threshold, the Compressor only allows 1dB to travel out.
When you get to 4:1, 8:1, you can start to hear that loud signals are closer to the soft signals. You can bring the SOFT signals up in volume without increasing the maximum peak as much. By the time you get to RATIO’s like 12:1 and 20:1 – this is referred to as LIMITING. You are basically setting a LIMIT – when the signal exceeds the INPUT Threshold, it would have to have the energy to travel 12 or 20dB above that point to get even 1dB louder. Basically it is a ceiling on how loud sound can get.
- Touch “INS A” to edit the selected Insertion Effect parameters.
Now you can edit the INSERTION “A” effect. Just below the CATEGORY and Effect TYPE you will see that you can select a PRESET. Move the cursor to highlight the “PRESET” parameter.
- Touch the box to reveal the LIST.
This will let you select from a list of preset setups for the VCM Compressor 376. Scroll down the list and select the Preset called, “Vocal Comp 117x”. This preset is a good starting point for vocals. If you are routing your A/D INPUT to the Assignable Outputs, you will be bypassing the SYSTEM EFFECTS, the MASTER EFFECTS and the MASTER EQ. So in order to use MONTAGE reverberation, you might opt to select a reverb algorithm as the second effect (of course, this is entirely up to you).
Extra Credit: AUDIO SIGNAL FLOW
Routing scenarios: Following the “A/D In” from left to right you can see how it traverses the MONTAGE.
“A/D In” is routed to the Main L&R:

The A/D In has two 1/4″cables next to it to show it is an incoming signal. The Analog Out also features the two 1/4″ cables. You should always setup your MONTAGE in stereo to take advantage of its superior sound quality.
When the AD INPUT is routed to the Main L&R you can see that it travels through the SYS/MFX block before the signal goes to the Main L&R (Analog Out).
A/D In is routed to the Assign L&R:

Following the “A/D In” from left to right you can see how it traverses the MONTAGE. When the AD INPUT is routed to the Assign L&R you can see the signal goes to the Assign L&R (Analog Out).
A/D In is routed to one of the USB assignable Outputs: (Assumes a USB “To Host” connection shown by the USB cable icon; left side IN from computer, right side OUT to computer):

Following the A/D In from left to right you can see how it traverses the MONTAGE. When the AD INPUT is routed to the USB 1-30 you can see the signal goes to the Main L&R (Analog Out) for monitoring purposes. The connection to the USB 1-30 Out goes to the computer via the USB cable. This is for when you are using the A/D Input as an input source to an AUDIO TRACK in your favorite DAW. You can see how the A/D IN can be assigned its own discreet audio bus (USB1-30) which goes both to the computer for recording, and to the Main L&R (Analog Out) so we can DIRECT MONITOR the signal.*
Once a USB cable is connected to the MONTAGE all the Signal Flow diagrams will update to indicate the current status of the routing. We mention this because many do not realize that these diagrams actually show the current status and are the first place you should go when troubleshooting issues with signal routing. When you can read and understand the Signal Flow, you can know exactly what is happening and why.
* You can choose, in your DAW software, to monitor either the signal “direct” (just as it is when it leaves the MONTAGE) or you can turn DIRECT MONITOR OFF, and monitor the signal post (after) it travels through the computer (“latency”). Audio doubling occurs when you do not make this selection to monitor one or the other. Both are available for a reason. If you are processing signal with a computer plug-in, naturally you will want to monitor post it traversing the computer. Otherwise you would naturally opt to Direct Monitor (Zero Latency – is not a marketing term, it means, the normal audio path directly to the speaker outputs.
“A/D In” is set to OUTPUT SELECT = OFF:

The A/D In set to OFF – there is no connection between the A/D In and any of the paths to the audio outputs. This would be the case when you are using the A/D Input to modify or modulate an internal MONTAGE function and do not want to monitor the direct signal. This would be the case where you are setting up a Vocoder, or using the A/D Input to create an Envelope for the “Envelope Follower” or as a modulation source within the FM-X engine, etc. You can just have the result without hearing the source.
Want to share your thoughts/comments? Join the conversation on the Forum here!

