

Using the original MOTIF XF Performance “Smooth It Over” – a 4-PART (quartet) Performance – we have seen how when ”merging” we can add Control Sets to define ’how‘ (and when) we access the new PART. If all you want to do is layer sound upon sound upon sound, you don’t need any special guide to do that. But each time we add a PART we adjust the settings to allow access to it, and more importantly we are discovering different methods of approaching performing with it.
“Smooth It Over 6” – the Sextet
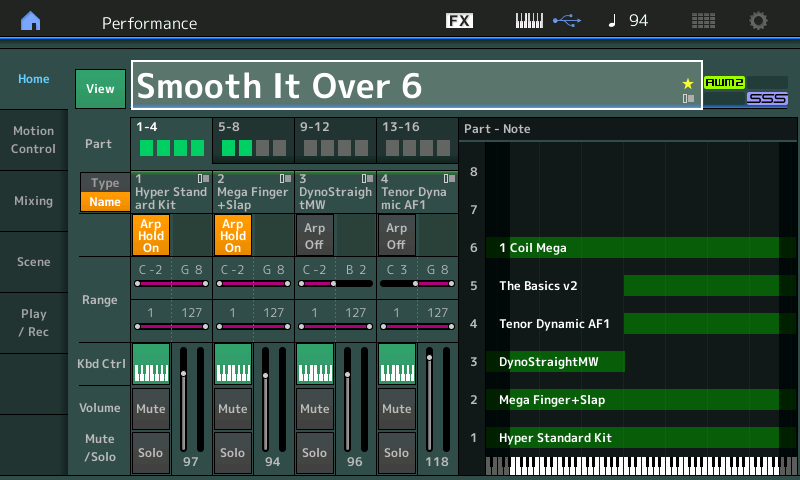
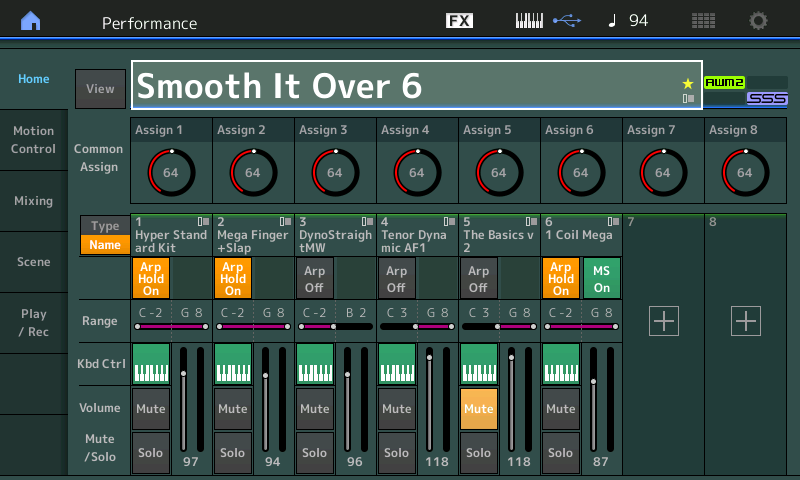
I’ve added an Arpeggiator rhythm guitarist to Part 6 using a multi-Velocity switching “Mega” single coil electric guitar. Notice the “1 Coil Mega” Part is mapped across all keys, same as the other two Arpeggio controlled Parts: ”Hyper Standard Kit” and the “Mega Finger+Slap” bass. The Key range shown is the Part sounding. The guitar (Arp) control is Note Limited to just the left hand. Remember: Part Note Limits determine what notes sound from that Part, Arp Note Limits determine which notes will control that Part:
- A “Stereo Phaser” creates its unique presence and a Motion Sequence is responsible for the random panning.
- Use the button [MOTION SEQ HOLD] to “freeze” the rhythm guitar in place. Given its random panning and deep Phaser, you can ‘catch’ its movement in various poses, if you like, depending on where it is at the moment you touch the button.
- [MOTION SEQ HOLD] – stops the movement of a Motion Sequencer. In this case, it will let you position the guitar in various places at various times. Sometimes it is farther away in the mix, others it is right up close:
The electric rhythm guitar Arp will take its chord information from your left-hand (electric piano) chord voicing. We mentioned in a previous article that advanced chord voicings concerning 9th chords and 13th chords that do not include the root work for the Pop/Rock Mega Guitar arpeggios, as well. Example: Playing an E – Bb – D will be interpreted as a C9 even though C is not included in the chord. E – A – Bb – D will be interpreted as a C13, even though C is not included in the chord. And these work in all inversions: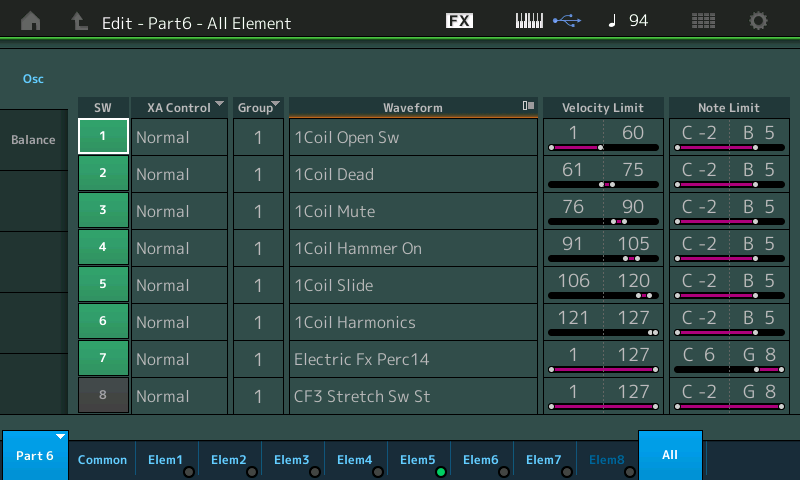
Both the guitar and bass PARTs used here, are “mega” sounds – and are using the specially created “mega arp” phrases that utilize specific velocity and key ranges to access specific guitar and bass articulations. The electric guitar Part (shown above), like the electric bass (shown below), is playing in response to the assigned Arpeggio phrase, while both are physically controlled by the left hand side of the keyboard, both sound in the proper range for the instrument being emulated. And both will change radically if/when you alter the Velocity (as an ARP PLAY FX):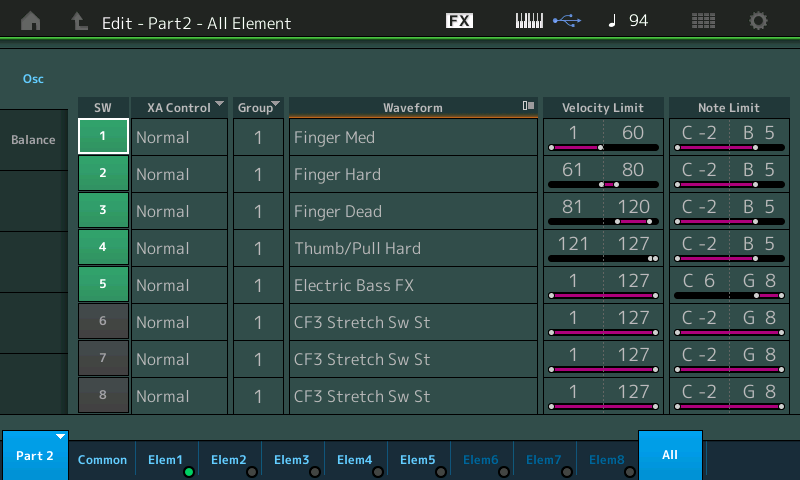
Again, you will need to experiment with different chord voicings to get to a point where you are comfortable conducting the ensemble in this fashion. Take your time. The keyboard sound (electric piano) will also determine the chord quality for the bass and guitar ‘players’. in a real life band situation, you could only wish you had control of them like this! With this great power comes great responsibility. You’ll need to work with this to get know what works and when you can comp- and when you *must* comp (to change the root).
Even if you are experienced with similar types of chord intelligent systems and/or even if you’ve never encountered this type of thing before, please recognize it might take some time to find a comfort zone – allow for this. As you experiment you will naturally begin to make adjustments (tweaks) to the programming to better serve your specific needs/requirements. As we go deeper into MONTAGE, we’ll discuss how putting together rhythm sections can be a compelling method of song writing, composing, and recording.
A brief word on this approach to Performance construction… It can be used to setup musical “sections”, each Scene could be a verse or chorus section. These can be constructed while they cycle; meaning you can create a mix balance, select and manipulate the Arp phrases using the Play FX (Swing, Unit Multiply, Gate Time, Velocity); you can then record the “section” to your the MONTAGE Performance Recorder or to your favorite DAW. Whether your recording workflow is MIDI-based or audio based, transfer from MONTAGE to the DAW will allow you to edit, change, even replace the Parts. You can create your own lines substitutimg your own phrases by punching in. Developing a workflow with MONTAGE is your own personal journey – in future articles we will look at transferring these Multi-Part constructions to your favorite DAW as MIDI and/or Audio Tracks, section by section. You can literally record as MIDI or Audio Internally to the MONTAGE, then literally drag and drop the results to your favorite DAW!
As with “Smooth It Over 5” – we are switching between Tenor Sax (Part 4) and Organ (Part 5) by using the front panel [PART MUTE] buttons. A two-finger technique can be used to simultaneously switch the Sax Off and the Organ On: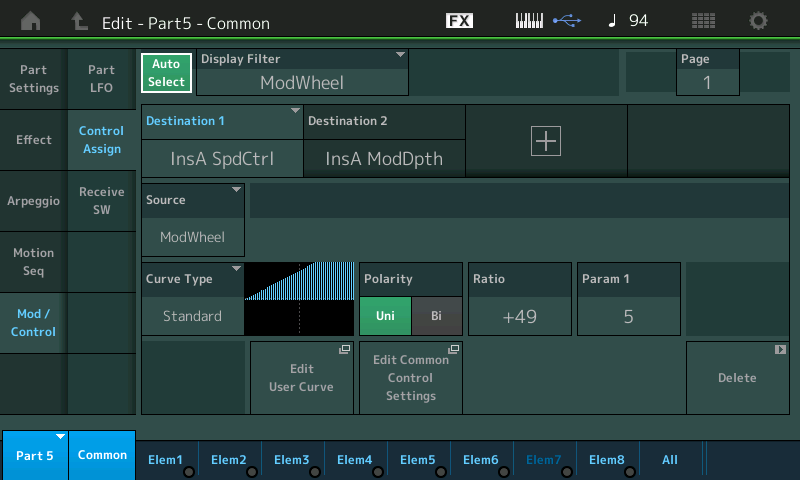
PART 5 (Organ): the MW is set to switch the Speed Control of the Rotary Speaker from SLOW to FAST. This is a “Switch”. Above you see that Control Set (DESTINATION 1). The graphic CURVE shows one direction (Uni Polarity) which means as the MW is moved up, the values will change as shown. It is the RATIO = +49 that determines where along its travel the Speed will “flip” from SLOW to FAST. A RATIO of +32 would make all values below the halfway point, SLOW, and all values above the halfway point, FAST. But by increasing the RATIO, you can see that the value rises faster/earlier in its travel. So you can understand that “+49“ is the setting that allows the Speed to switch the speed control. The lower you make the RATIO, the farther you will need to move the MW to get the Speed Control to “flip”from SLOW to FAST.
“Smooth It Over 7” – The Septet
Here we are going to introduce a different approach to this Performance. We have added a “String Machine” sound in PART 7 which is under realtime control of your left hand – it acts as a pad under the electric piano: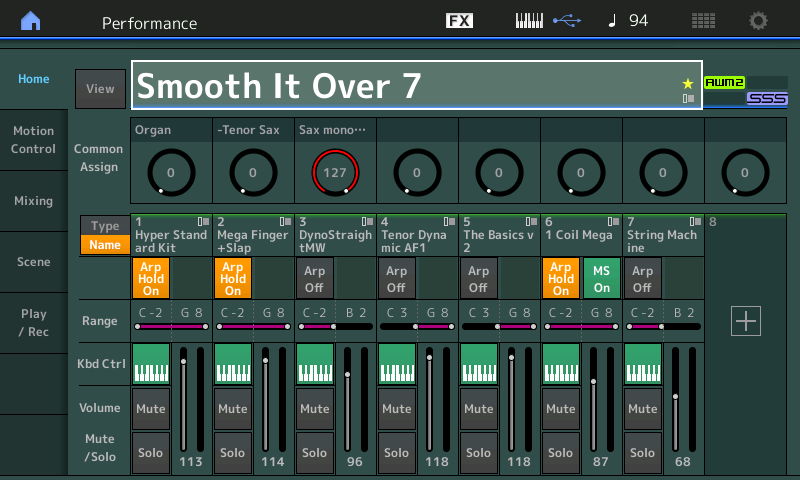
Historical Note: The ‘String Machine’ name refers to the classic Arp/Solina String Ensemble – which, for those too young to remember, was a dedicated keyboard that was used everywhere back in the mid 1970s and early 1980s and was the ultimate, quintessential string pad sound. It has been set to RECEIVE SW = ON for the Sustain pedal. You can mix in the amout of the “String Machine” by using the MW: When the MW is at minimum the strings will be ‘in’ – as you raise the MW it will fade the strings out – allowing you to set a balance for how much strings are present behind the electric piano. Remember: programming ‘how quickly’ it fades out is what MONTAGE does best – you get to adjust that to your requirement/liking. Because the controller might also be doing other things to other PARTs, tweaking “how” each controller is applied is very much a personal preference.
Significantly, in this configuration of “Smooth It Over”, we have created a hands-free method to move from the Tenor Sax, as the lead right hand sound, to the ToneWheel Organ, as the lead right hand sound. Many times you may wish to create a situation where, without having to reach up and touch a button, you can switch to a different sound. The Super Knob is a Knob which is handy (pun intended) in some situations, but using a Yamaha FC7 Expression pedal to move the Super Knob can allow you to keep your hands on the keys – in those situations where you simply must – as you sweep the FC7 set to Super Knob control, you will morph the Sax to Organ. The pedal will still control the B3 volume output as you expect, increasing as you increase application, but this same gesture will fade out the Tenor Sax. We’ll take a closer look at that morph programming.
Morph programming
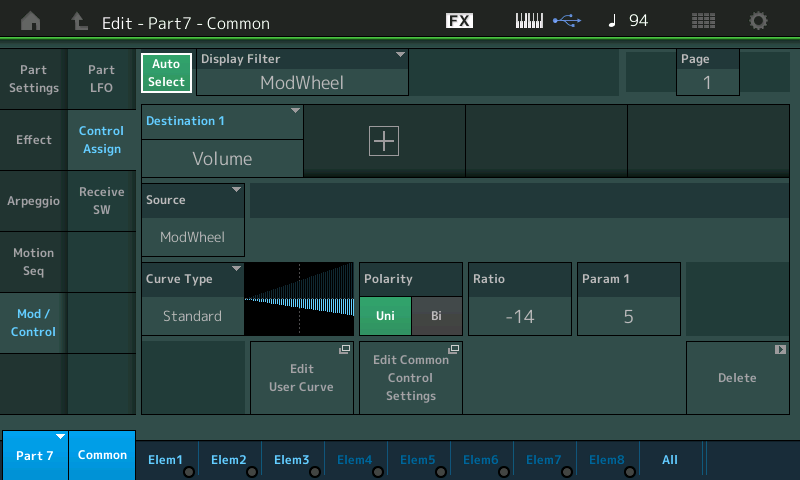
The MW will switch the “Rotary Speaker 2“ Insertion Effect from Chorale (Slow) to Tremolo (Fast) – so when you ‘flip‘ the MW up for the Fast Speed, the “String Machine” fades out. You can set it so that you can still hear strings yet switch Rotary Speaker Speed. The transition point from SLOW to FAST is programmable – you can determine where the Speed flip point occurs. Normally, when a continuous controller like a MW is used as a “Switch” – all values 0-63 are OFF, and all values 64-127 are ON – but with MONTAGE’s ability to scale controller movement, you can determine exactly how far you need to move the controller to get the “switch” to occur. Here, in “Smooth It Over 7”, before you move the MW half way, the speed will switch, giving a small area where you can still hear strings and play the Organ with the Fast Speed:
- The String Machine, in PART 7, is set to fade when the MW is moved up: RATIO = -14
- Adjust the RATIO to change ‘how’ the fade-out occurs. Adjust PARAM 1 to change the shape of the CURVE:
This control is really a mix control. You will set the amount of string pad you like and then play that – obviously not a real time performing control as your left hand will be playing the strings, so MW is not convenient to move as you play. It is more of a “set and forget” assignment.
We have also provided direct access to the VOLUMES of the lead sounds on the MAIN HOME screen: when COMMON is selected, direct access to the Organ Volume (Common AssignKnob 1), the negative Volume for Tenor Sax (AssignKnob 2) since the Sax is in initially turning this up actually turns the Sax down. This allows you to individually adjust them relative to each other, directly, whenever you require/desire. We will take a close look at how this “morph” was setup:
- The FC7 (SuperKnob) will control the Tenor Sax at minimum, and the Organ at maximum – but then you can use these direct control knobs at anytime to change the balance between the two sounds as you need. Giving you the best of both worlds – hands free morphing between right hand sounds and real time control to play both together if the mood hits you.
- The two buttons located just above your Super Knob, “KNOB POSITION 1/2” can be used to immediately recall Tenor Sax (press [KNOB POSITION 1], or the Organ (press [KNOB POSITION 2].
Morphing the Cat
Let’s take a look at PARTs 4 (Tenor Sax) and 5 (B3 Organ) and see how the transition is accomplished:
- Press [SHIFT] + [PERFORMANCE (HOME)] to view the OVERVIEW screen. Each time we add an assignment it will manifest itself in the OVERVIEW:
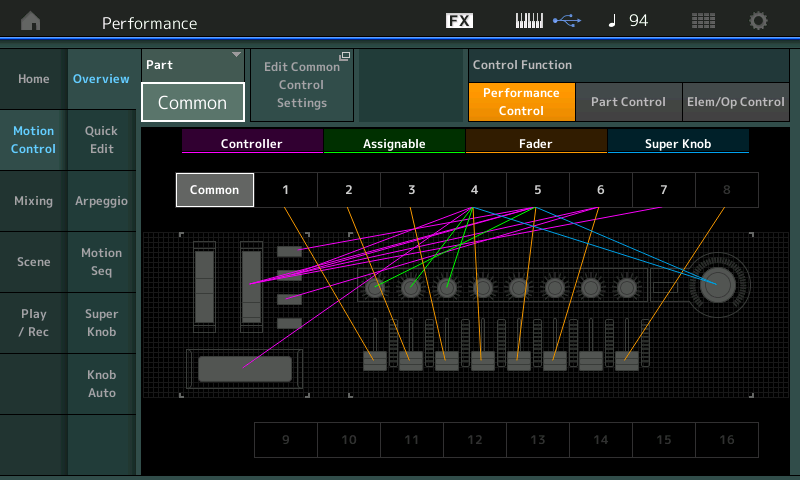
- Turn the SUPER KNOB to highlight just those assignments – you can clearly see that PARTS 4 an 5 are both being affected by the Super Knob (blue):
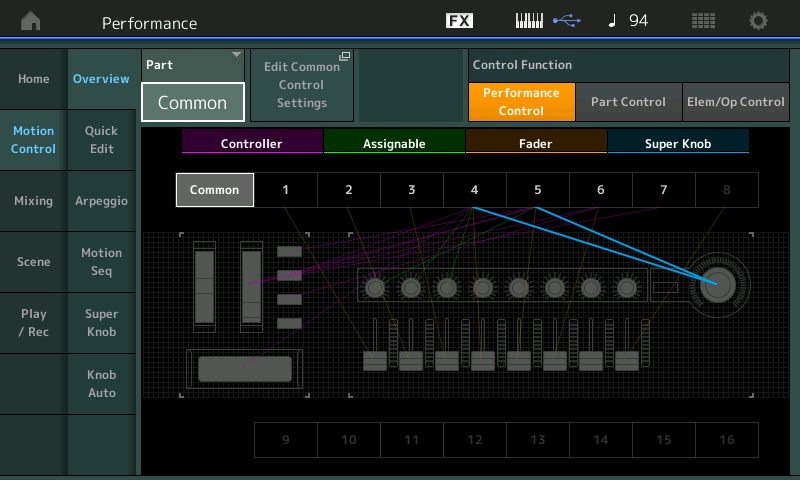
- We can take the shortcut to the Common Control Assign page, by simply touching the box “Edit Common Control Settings”.
- When you arrive on the Control Assign screen, ensure that “Auto Select” is active (green) and turn the Super Knob.
- This will recall the assignments – we should expect to see control setups for PART 4 and PART 5:
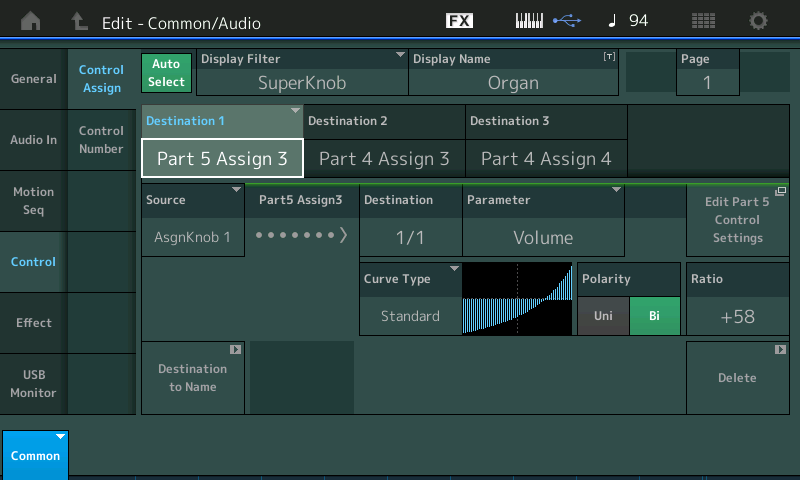
- Highlighting the “DESTINATION 1” box shows “Part 5 Assign 3” (shown above) – this means that with PART 5, AssignKnob 3 is set to control the Volume, and this has been linked to the COMMON AssignKnob 1 (Source). You can see from the CURVE and POLARITY how, as the Super Knob is moved from left to right, just how the “Volume” of the PART 5 (organ) will change.
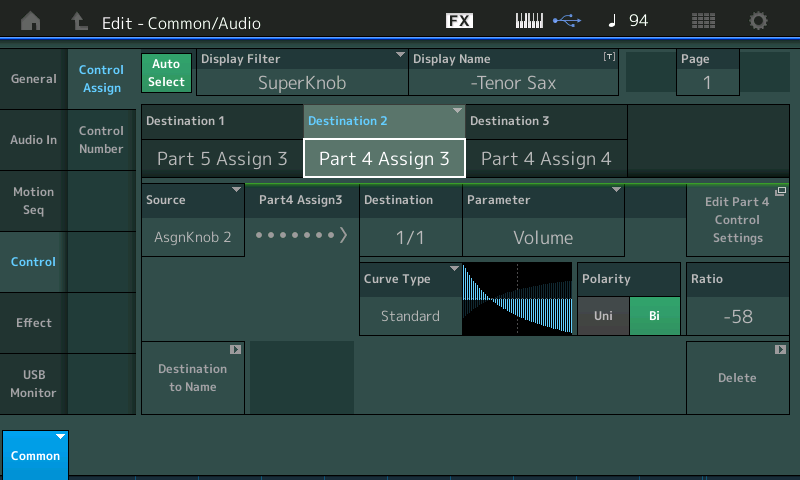
- Contrast that with “DESTINATION 2” (shown below) where the Tenor Sax (PART 4) has its Assign Knob 3 linked to the COMMON AssignKnob 2. You can see from the CURVE and POLARITY how as the Super Knob is moved from left to right just how the Volume of the PART 4 (Sax) will change in an opposite direction:
- Use the right front panel’s [PART MUTE] buttons to isolate just PARTs 4 and 5. That is: turn OFF, PARTs 1, 2, 3, 6 and 7 – this way you can concentrate just on the transition in response to moving the Super Knob with the FC7 pedal plugged into Foot Controller 2. There is no substitute for using the Foot Controller; turning the Knob does the same thing but using the pedal is a performance thing that is hard to describe.
In the previous versions of “Smooth It Over” the AssignSw1 would switch the Tenor Sax from Poly to Mono play modes. When Mono was selected (AsSw1 = ON) the sax’s legato behavior is allowed. When AsSw1 = OFF the Sax played as a polyphonic sound. Here, since the object is to keep the hands on the keyboard during the transition, I have also set this so that the Sax when active will be “mono”. This, of course, is a personal decision – in fact, much about what you do with a PART is really personal preference. In this case, any time I want to access the Tenor, I want it to come in already in mono play mode. But if a need to switch it to poly play mode, I can do so because it is available on a real time acessible ASSIGN KNOB.
On the HOME screen you can see how this applies: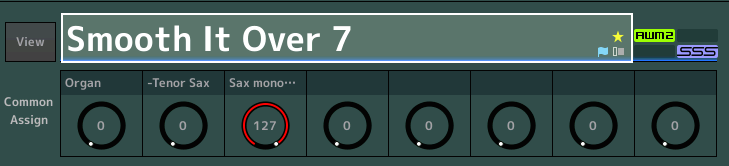
- You can see that the COMMON Assign Knob 1 is the Organ Volume.
- COMMON Assign Knob 2 is the negative Tenor Sax Volume.
- COMMON Assign Knob 3 is the Sax mono/poly switch.
- With these Knobs you can use the Super Knob (FC7) to move them in your predefined way, or you can manually reach up and configure what you desire at any time. Try it.
When COMMON ASSIGN is shown just to the left of the eight Knob icons in the screen, you are viewing the HOME screen with the upper [COMMON] button lit. You can have a selection of controls availabe to reach any PART under KBD CTRL.
PERFORMANCE CONTROL
If/when you want to ‘perform’ with a specific PART, pressing its [PART SELECT] button will allow you to focus your front panel Knobs and Faders on that one selected sound. For example, you can imagine that the Tenor Sax will be the melody instrument in this particular setup – and the B3 sound will be for one of the solos. When its time to feature the B3 Organ sound, I can ‘morph’ to it, and additionally press the [PART SELECT 5] button. Shown below, PART 5 is selected, the “PART 5 Assign” knobs are available:
If you take the time to NAME your Knobs as you assign them, it makes so much easier when it’s time to perform on stage.
The FADERS become individual level controls. For this Jazz Organ sound drawbars: Use FADERs 1-5 to work the 16′, 5 & 1/3′, 8′, 4′ and 2′ drawbars, respectively. FADER 8 is the percussion level (AsSw2 kills the percussion).
Percussion on a B3 was generated using the 1 foot drawbar, and had a mono behavior – meaning you only hear the ‘pop’ of the percussion when you “hit-it-and-quit-it’, – and when you play legato you do not hear the percussion.
Take a look at the Performance Knob Control you have available when PART 5 is “selected”:
- Part 5 Assign 1 = Insertion Effect A (“Rotarty Speaker 2”) balance between the Rotary and the Horn – the low frequency drum and the high frequency horn inside the speaker cabinet. You set to taste. It changes the high/low frequency character.
- Part 5 Assign 2 = Element Level – this Knob is dedicated to work the “4 foot drawbar”. The classic Jimmy Smith jazz organ was basically the first 3 drawbars and bringing the fourth drawbar for effect – moving this is the same as moving the FADER 4with the Organ Part *selected*.
- Part 5 Assign 3 = Volume – as we’ve heard before PART 5’s AssignKnob 3 is the PART VOLUME, allowing us to control the organ output overall. While viewing the screen shown above, turn the Super Knob (or move the FC7) to see how this is, indeed, the parameter linked to the Super Knob.
- Part 5 Assign 4 = Insertion Effect B (“VCM EQ 501”) EQ2 is the low mid range of this boutique grade 5-band EQ. You can adjust the GAIN of the Low Mid frequency.
- Part 5 Assign 5 = Insertion Effect B (“VCM EQ 501”) EQ5 is the high frequency range of the 5-band EQ.
- Part 5 Assign 6 = EFX – this is controlling two parameters. It is turning up the SEND to the VARIATION Effect (“Tempo Cross Delay”) and it is turning down slightly the influence of VCM EQ 501.
- Part 5 Assign 7 = Rev Send.
- Part 5 Assign 8 = Insertion Effect A (“Rotary Speaker 2”) overdrive: If the pristine, clean organ tone, is not for you – between the ‘grit noise’ effect on FADER 6 (careful with that one) and this AssignKnob 8, you can throw some overdrive into the mix.
Take Away: The take away here is that you want to assign those things you want to control directly to the PART ASSIGN KNOBS – you only link that PART ASSIGN KNOB to the upper COMMON ASSIGN KNOB level when you wish to move it with the Super Knob. I may only wish to add the overdrive in the middle of the organ solo. I’m using the Super Knob (Super Foot) to adjust organ level, but I have an array of my selected parameters in front of me when I need them.
When first programming MONTAGE, you want to assign everything to the Super Knob (hopefully, that initial inclination will pass as you get to know your MONTAGE better). Once you realize that when you know where you are, you know what you can access. The PART ASSIGN KNOB are for those things you wish to have available during your PERFORMANCE. That’s what [PERFORMANCE CONTROL] is all about.
Don’t obsess about your hands having to be on the keys at all times. There are times when you need that, and there will be many more when it is not necessary. Same with seamless transitions, you don’t always need it. Program for what you need. Synthesizers originally did not have keyboards… it was all about the front panel, the Knobs and switches… the Keys just provided a convenient set of On/Off switches musically arranged by pitch. Even when the synth became portable and affordable, the original ones had one hand on the front panel, one hand on the keys. So don’t be afraid of navigating the front panel while you’re performing. One of the major differences between a piano and a synth, a piano and an organ (even): on an organ as on a synth, part of performing is real-time interaction with the front panel.
Enjoy! Until next time…
Want to discuss this session? Join the conversation on the Forum here.
And if you haven’t tried out the other MONTAGifying sessions, find the complete list/access here.