
Tagged Under
Check out the other articles in this series:
Blake’s Take: Level of Your Drums 1—Basic Concepts of Rhythm
Blake’s Take: Level up Your Drums 2—Active Listening
Blake’s Take: Level Up Your Drums 4 – Multitrack Recording to the DAW – Yamaha Synth
NOTE: The current OS versions of MONTAGE and MODX feature useful tools for programming drum parts. If you haven’t already done so, download and update your instrument to the latest OS version before checking out this article.
Get MONTAGE OS v3.51
Get MODX OS v2.52
Drum Kits and Arpeggios
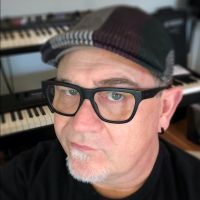
MONTAGE and MODX feature over 10,000 Arpeggios. Almost half are drum Arpeggios. Right out of the box you have access to a huge library of sounds and drum grooves to inspire your creativity. I’ll show you how to check them out below. First, you’ll need to check out some drum kit. Press [CATEGORY SEARCH] and touch “Drum/Perc” in the Touch Screen:
Workflow Tip for MONTAGE users: Did you know you can navigate Category Search with the buttons on the right? The top two rows select all the Main Categories (the top [MUTE] and [SOLO] buttons select “No Assign” and “Init”), the third row selects the Subcategories, and the bottom row selects the first 8 performances listed in the display. You can use the bottom [MUTE] and [SOLO] buttons to scroll through pages.
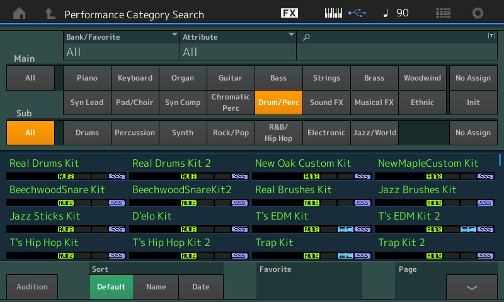
Let’s focus on Performances with only a single drum Part. Touch on “Attribute” in the Touch Screen and select “Single” to view Performances with just a single drum Part:
Now you’ll only see Drum Single Part Performances. Select the Performance “New Oak Custom Kit” and press the [ENTER] button. This is a punchy and resonant Yamaha Custom Hybrid Oak drum kit great for many types of music. There are drum sounds on keys C0 to C6. Take a moment and check out this kit on the keyboard. After you’re done exploring this kit press the [ARP ON/OFF] button then press and hold any key. You’ll hear a two measure sixteenth-note funk/rock groove in 4/4 time with kick, snare, hi-hat and tambourine. The snare drum is particularly interesting with a solid snap on beats two and four and cool ghost notes that propel the beat forward. Check out the little triplet figure in the snare drum right before the downbeat of the second measure. Faith No More drummer Mike Bordin plays a similar figure in his “I Play Yamaha” video.
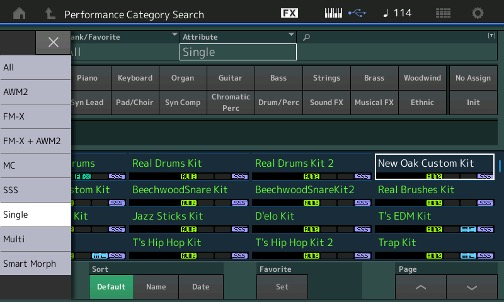
There are eight arpeggios assigned to this kit. You can check them out playing and holding a key and pressing each of the [SCENE] buttons. To view the assigned arpeggios, press the [EDIT] button and touch “Common” in the lower left of the Touch Screen and select Part 1:
Touch “Arpeggio”, then “Individual” on the left side of the Touch Screen and you’ll see all eight arpeggios:
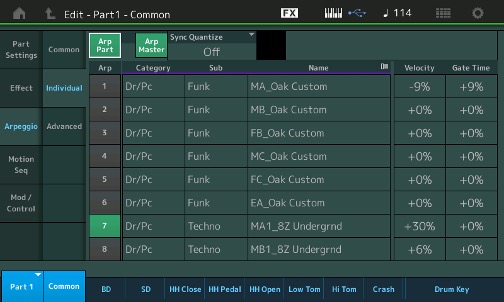
I described the Scene one arpeggio “MA_Oak Custom” above. In case you were wondering, “MA” stands for Main A which means the main groove a drummer might play in the verse of a song above. The rest of Scenes trigger the following arpeggios:
- Scene two/Arp 2 “MB_Oak Custom” is a two-measure variation of the arpeggio in Scene two added congas.
- Scene three/Arp 3 “FB_Oak Custom” is a one-measure variation of Scene two with a fill on beats three and four.
- Scene four/Arp 4 “MC_Oak Custom” is a two-measure arpeggio that is similar to the first three but goes to the ride cymbal. It works like groove a drummer might play on the bridge of the tune.
- Scene five/Arp 5 “FC_Oak Custom” is a one measure break/fill.
- Scenes six/Arp 7 and Scene seven/Arp 8 (“MA1_8Z Undergrnd” and “MB1_8Z Undergrnd”) feature two related basic kick-snare arpeggios. These could be used in a breakdown section of a song. This also shows Arps can be assigned to Scenes in any order.
- Scene eight “EA_Oak Custom” for “End A” is a pattern a drummer might play at the end of tune.
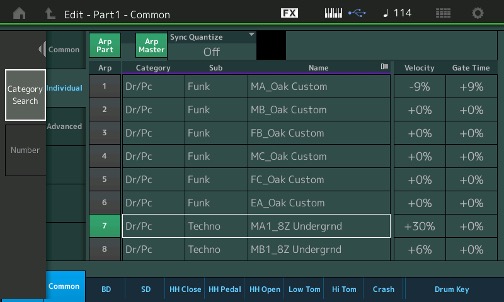
I’d like to replace the Arpeggios in Scene six and seven with something else from the MONTAGE/MODX drum arpeggio database. After I’ve found something, I’ll resave this drum kit as a User Performance. Touch on the name of the Arpeggio 7 (“MA1_8Z Undergrnd”) and you’ll see “Category Search” appear on the left side of the screen:
This is Arpeggio Category Search. You can search by instrument type or musical genre. Let’s search for Drum/Perc Arpeggios in the Funk Sub Category:
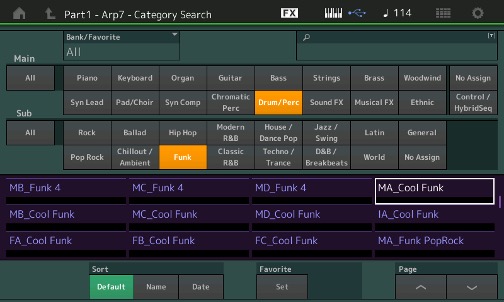
Take a minute to check out a few of the Funk Drum Arpeggios. Select from the screen or scroll with the DATA wheel to scroll through them. Select “MA_Cool Funk” for Scene six/Arp 7 and “MB_ Cool Funk” for Scene seven/Arp 8. Your Arpeggio/Individual page should now look something like this:
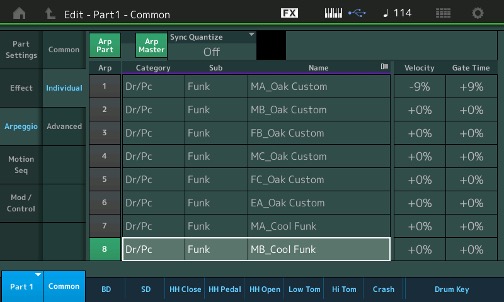
After you’ve replaced these two Arpeggios, Press [STORE] and store this as a new Performance. I just added the letter “B” to the end of the Performance name so I can find it later:

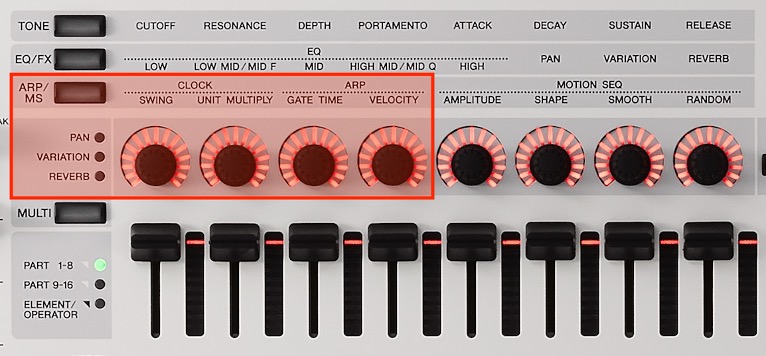
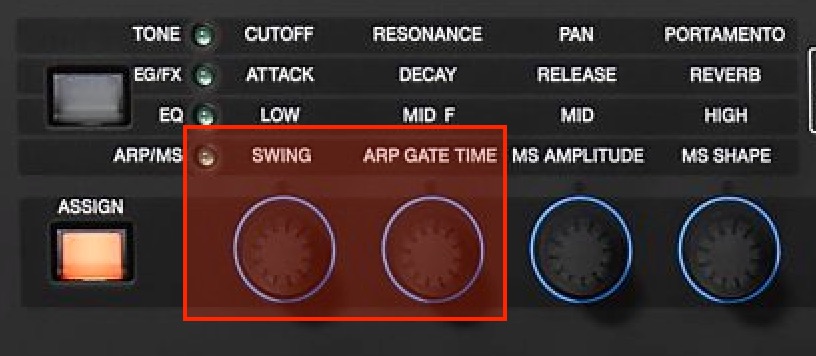
Before moving on to recording drum Arpeggios, there are two parameters in this screen I’d like to point out. On the right you’ll see two rows for “Velocity” and “Gate Time”. These parameters adjust Velocity (increases or decreases velocity relative to the original Arpeggio) and Gate Time (adjusts how long/short notes are held). You can adjust these and save them with the Performance. The Velocity parameter is especially useful to increase how hard or soft the Arpeggio “drummer” plays. These two parameters mirror the physical knobs Arp Controls:
If you’d like to learn more and how to create your own Arpeggios, check out the Mastering MONTAGE article “Arpeggio Making 101”.
Recording Drum Arpeggios
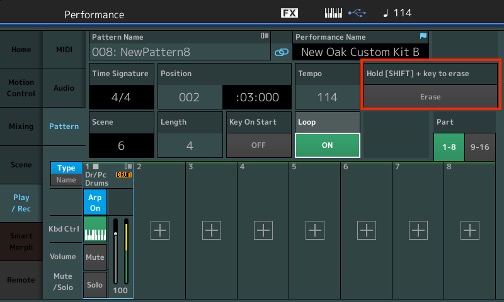
Let’s record drum Arpeggios with the Performance Pattern Sequencer. I’ll record the two drum Arps we just replaced in Scene 6 (“MA_Cool Funk”) and Scene 7 (“MB_Cool Funk”). First select Scene 6 and press any key on the keyboard. Because Scene 6 is saved with the Arpeggio ON (The [ARP ON/OFF] button on the left should be illuminated) you should hear the “MA_Cool Funk” drum Arpeggio playing (a funk beat with a “four on the floor” kick drum with cross stick, hi-hat and shaker). Press the [RECORD] button on the transport control to enter Pattern Record. You’ll see this screen:
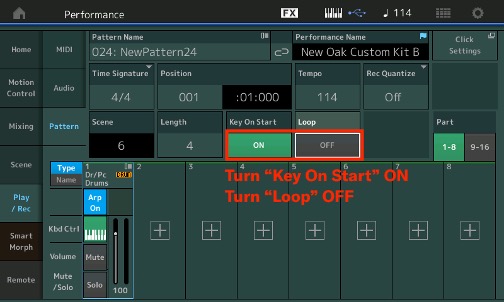
The two parameters highlighted above make Arpeggio recording simple. “Key On Start” starts recording the drum Arpeggio immediately. Switching the “Loop” parameter to “OFF” stops the Pattern Sequencer at the end of the loop (set via the “Length” parameter). This avoids note doubling when the Pattern Sequencer loops. After setting these two parameters press and hold any key until the sequencer stops automatically to record this first Arpeggio. Press [PLAY] and you’ll hear the recorded drum Arpeggio. It’s that easy to record a drum track with a drum Arpeggio. Now repeat the process with the second Cool Funk drum Arpeggio: Select Scene 7, press the [RECORD] button, press and hold any key until the sequencer stops. Press [PLAY] to check. That’s it!
Workflow Tip: After I’ve finished recording, I like to switch the [ARP ON/OFF] button OFF (not illuminated] then press and hold [SHIFT] to resave both scenes with the Arpeggio OFF to avoid retriggering. Also, once I’m done recording Arpeggios and want to record other things like bass, keys, guitars, etc., I like to turn “Loop” back ON and “Key On Start” to OFF.
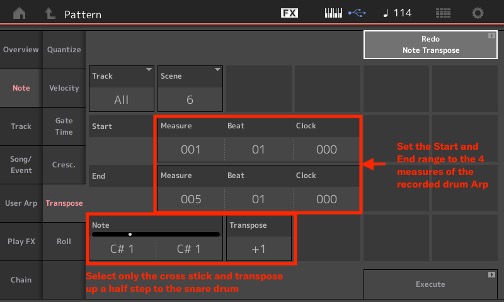
Transpose a single drum: Now that you have recorded the drum Arpeggios you might want to change the cross stick (C#1) to a snare drum (D1). To do that select “Edit/Job” on the right side of the screen, then touch “Note” and Transpose on the left:
Overdub Erase: Maybe you want to get rid of that cross stick entirely and overdub a new cross stick or snare drum part. Drop into overdub record mode. Press and hold both [SHIFT] button C#1 for the duration of the four-measure loop. You’ll erase just the cross stick allowing you to replace it with something else:
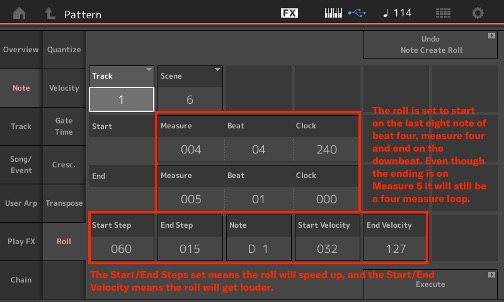
Create Roll: Drum rolls are challenging to record in real time but MONTAGE and MODX have a great job that makes it easy. Say you want to place a drum roll on back half of beat four, measure four of our drum loop. Touch “Edit/Job”, then “Note” and “Roll” on the right:
Check out the audio file below. First, you’ll hear the original “MA_Cool Funk” recorded drum Arpeggio with the cross stick. Then you’ll hear the result of erasing the cross stick during overdub record, replacing it with the snare drum on D1 and adding the drum roll created using the “Create Roll” Job:
ttps://soundcloud.com/yamahasynth/cool-funk-drum-groove
Pretty cool!
A quick explanation of sequencer resolution should clarify a few aspects in the Create Roll graphic above. MONTAGE and MODX feature a sequencer resolution of 480 PPQ or “pulses per quarter note”. Given this information it’s easy to create a table expressing note values in PPQ:
|
PPQ
|
Note Value
|
|
480
|
Quarter note
|
|
240
|
Eighth note
|
|
120
|
Sixteenth note
|
|
60
|
Thirty-second note
|
|
30
|
Sixty-fourth note
|
|
15
|
One hundred twenty-eighth note
|
|
160
|
Eighth note triplet
|
|
80
|
Sixteenth note triplet
|
|
40
|
Thirty-second note triplet
|
So, in the create roll screen shot, the starting point of the roll is on measure four on the “and” of beat four. The start step is a 32nd and the roll will speed up to a 128th note resolution, and the velocity will increase relative to the start/end step (starting at a velocity of 32 and ending at a velocity of 127). Understanding the PPQ/Note values will help make sense of the numbers in the next section on Play FX.
Quantize and Play FX
The Wikipedia article on quantization is very informative. The article defines it as the “process of transforming performed musical notes, which may have some imprecision due to expressive performance, to an underlying musical representation that eliminates the imprecision. The process results in notes being set on beats and on exact fractions of beats.” MONTAGE and MODX have three ways to address quantization:
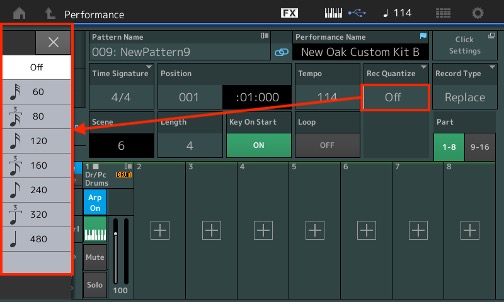
Record Quantize (Rec Quantize): You can record with quantize “on” in the Rec Ready screen. This process fixes all incoming data to the value selected:
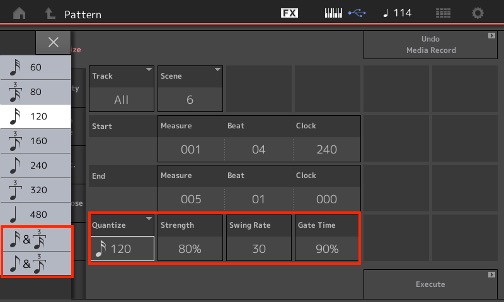
Edit/Job > Note > Quantize: This Edit/Job quantizes the track after recording. This adds a few more quantization options like blended duplet/triplet eighth and sixteenth quantize, quantize strength, swing rate and gate time and you have one level of undo if you’d like to try different settings:
Play FX: Play FX work like MIDI quantize effect processors. This is a great feature, especially when you want to try out different time feels without actually changing the data. Play FX can be accessed during playback, too. This is a bonus: You can hear the changes happen in real time. Touch “Edit/Job” then “Play FX” on the right side of the Touch Screen. There are two pages named “Play FX 1” and “Play FX 2”.
Play FX 1 is where Quantize Value and Strength are set and below that are specific parameters that only affect the “swung” note:
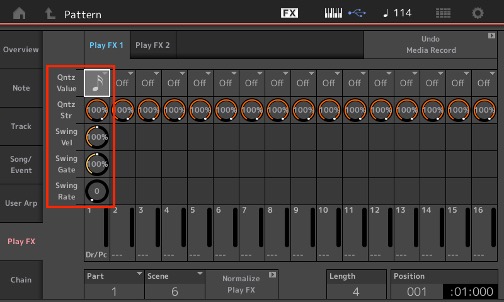
When using Play FX, the first step is selecting the right Quantize Value (Qntz Value) for your drum groove. The bottom three parameters—Swing Velocity (Swing Vel), Swing Gate and Swing Rate—are especially cool. At the very bottom is Swing Rate. This dials in the amount of swing, and the number changes depending on the value. If your drum groove subdivides to a sixteenth note (like our two “Cool Funk” drum Arpeggios) you’d want to select the sixteenth note quantize value. The Swing Rate range at this value is 0-60, or half PPQ range of a sixteenth note. That range changes dependent on the Quantize Value, so if the value is set to an eighth note the Swing Rate range is 0-120. You can find a description of Swing Rate in the Supplementary Manual for MONTAGE OS v3.51 and MODX OS v2.52:

Play FX 2 features 5 additional parameters:
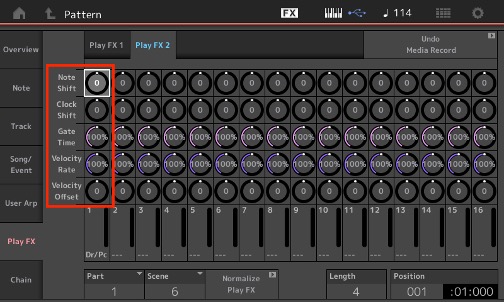
Note Shift transposes the track by +/- 99 half steps (!). This is great when you want to transpose a pitched Part, but not might not be that useful for a drum Part.
Clock Shift allows you to shift the track forward or backward by +/- 120 (or a sixteenth note). Clock Shift is especially useful when used with other tracks, like a bass track. You can achieve some great bass/drum grooves by slightly shifting a bass Part forward in the time (by reducing the Clock Shift by three or four ticks) against the drums. You could even shift a drum Part behind a few ticks. It’s fun to experiment with these slight changes to the time.
Below Clock Shift are Gate Time, Velocity Rate and Velocity Offset. Like Note Shift, Gate Time is more useful with a pitched part, notably one where a note played short vs one played long can have a marked influence on the groove. Velocity Rate changes the overall velocity of a Part from 0-200% (where 100% is no change) and Velocity Offset works like a velocity dynamics processor with a range of +/-99.
Below is an audio example of PlayFX with “MB_Cool Funk”. It starts with the Quantize Value set at sixteenth notes, then I’ll add adjust Swing Rate, Swing Velocity (I pull it all the way down so all you hear are the eighth notes, then I gradually increase it) and Velocity Offset. As the groove plays, you’ll hear a fingered bass Part come in. Listen as I decrease the Swing Gate, making the notes on the offbeats shorter and funkier. Then I’ll change the parameters in Play FX 2. At the very end check out the Bass Part! I moved the Note Shift parameter around for a cool effect. Check it out:
https://soundcloud.com/yamahasynth/playfx
Play FX are one of my favorite features and I use them all all the time. I love how you can change things, hear the results in real time and when the time comes you can “print” those changes directly to the track data. There are two ways to do this:
- Drop into Overdub Record and the Play FX are added to the track. All the parameter settings in the Play FX 1 and Play FX 2 pages return to defaults.
- You can touch “Normalize Play FX” at the bottom of the screen, choose a Part (or all Parts) and a Scene (or all Scenes):

That’s it for now! I’ll be back with the last article in the “Level Up You Drums” series with a look at how I create original drum parts in MONTAGE/MODX and transfer them over to the DAW for final production.