
Tagged Under
The first thing I consider is how I want to divide my Operator resources to be either Carriers or Modulators.
The Reface DX is a 4-Operator FM engine. In general, using more Modulators gives the possibility to have more widely varied, complex timbres and harmonic (overtone) control.
Using more Carriers gives the possibility of thicker, detuned sounds or the ability to have multiple pitches played for each key, such as octaves or fifths. Compare the Voices “Detuned Saws” referenced in our prior article with Peter Jung’s “Fat Analog Sawtooth Pad“. For the Voice Detuned Saws, it uses two 2-Operator stacks for an emulation of an analog two-oscillator synth sound, then uses the effects to enhance the ‘thickness’. Because it uses Modulators to create the sawtooth wave harmonics, the brightness can be controlled with velocity dynamics and the Modulator Envelope for ‘filter’ sweeps and decays, etc., by changing the EG’s Rate and Level values.
In contrast, Peter’s Fat Analog Sawtooth Pad uses all four Operators as Carriers, having to rely on the Carrier Feedback to create the sawtooth wave harmonics. This allows for a much thicker and fat detuned four-oscillator analog sawtooth synth sound and doesn’t need the effects to thicken the sound. In addition, you can re-tune some of the ‘oscillators’ (Carriers) to octaves, fifths or other intervals. However, with no Modulators the only harmonics available are simple sawtooth or square waves depending on the feedback setting. More importantly, without any Modulators you lose the ability to create complex or unique waveform harmonics as well as losing any behavior or dynamic change in the harmonics with either velocity or the EGs for ‘filter’ sweeps, etc. You have to consider this trade-off when envisioning the type of pad sound you want to create; when choosing the Algorithm – a complex & dynamic pad needs more Modulators.
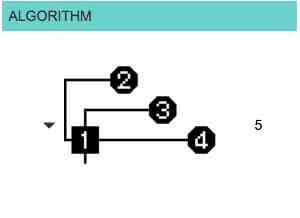
So, it’s example time — reference the Voice “Complex Pad Example” on Soundmondo and the linked video. This is a soft-attack sawtooth sound that sustains as a square wave pad, which then gradually evolves into a LFO controlled harmonic ‘shimmer’ effect. Play and hold notes or chords for 10-12 seconds to hear the entire sound. To allow for the independent control of these different components of the timbre, I’m using Algorithm 5 which has Operator 1 as the single Carrier, and Operators 2, 3, and 4 and the modulators:
OK, time for a quick quiz question: Where have you seen the core structural components of this sound before?
Answer: The example Voice “Wave Example” from our first tutorial article! The important tweaks I made to create the significant differences between the basic “Wave Example” Voice and this polished and finessed “Complex Pad Example” Voice are as follows:
* changing the Envelope values for Operator 1 for a sustaining pad sound;
* tweaking the Modulator Ops 2, 3 & 4 Level and Feedback values;
* using the Level Key Scaling to even out the volume and brightness across the keyboard range;
* adding velocity sensitivity to control volume and brightness with playing dynamics;
* using the LFO to control the PMD and AMD of Operator 4 for the repeating ‘shimmer’; and,
* then using Flanger and Chorus Effects for final polish.
The core components – the Algorithm and all Operator Ratio Frequency settings – are the same in both Voices.
Again, I encourage you to play around with changing the Level, Feedback and Frequency settings for the Modulator Ops 2, 3 & 4 and listen to how they change the sound.
To hear a subtle variation of this example Voice using different Frequency settings and faster LFO shimmer effect, check out the Voice “Evo Example” on Soundmondo. For an example of a more complex variation check out the Voice “Complex Bell Pad” which has edits to the Op 1 & Op 4 Envelopes to add the bell tone in the attack, along with adding Pitch EG to Op 4 to accentuate the percussive strike for the bell tone. Also, the Frequency settings for Ops 1 and 3 have been changed for a more ‘digital’ timbre. This shows how much complexity and control can be achieved with three Modulators.
Next let’s see and hear the advantages versus trade-offs in creating a similar type of pad using more Carriers for a ‘lush’ or ‘thick’ type of sound with a little less harmonic complexity as discussed earlier. Reference the Voice “Lush Pad Example” on Soundmondo along with the linked video. For this example, I’m using algorithm 8:
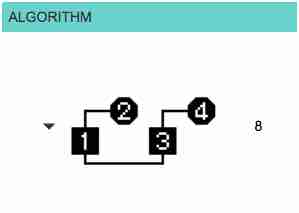
By detuning the two separate Operator stacks, we can create a lusher, thicker sound. However, there will be less opportunity for creating timbral complexity and behavior as there is only one Modulator Operator in each of the Operator stacks to create and control the harmonics. One way that I compensated for some of the loss of complexity is by mixing up the Ratio Frequencies for the Operators in the different stacks, so that in effect we’re mixing two different sounding waveforms with our “two oscillators.” In the first stack, the Frequency for Carrier Op 1 is set to 2.00 and the Frequency for Modulator Op 2 is set to 1.00, which along with the Feedback settings for both Operators and the Op 2 Level create a pulse wave timbre with a soft filter sweep type behavior.
In the second stack, the Frequency for Carrier Op 3 is set to 1.00 and the Frequency for Modulator Op 4 is set to 2.00, which along with the Feedback setting for those two Operators and the Level setting for Op 4 gives a square wave timbre, again with a soft filter sweep type behavior. Note that the Envelope Level and Rate settings are different for Op 2 & 4. The values for Op 4 are set to make the square wave timbre (from the Op 3 & 4 stack) fade-in slower and fade-out faster compared to the Op 1 & 2 stack pulse wave sound. In addition, the Envelope Level 3 and Rate 3 settings for Op 2 and Op 4 have them eventually fade back in with longer held notes. So overall, the Op 1 & 2 stack pulse wave timbre will fade back in sooner than Op 3 & 4 stack square wave timbre. All these variations in the Envelope Level and Rate setting mixes up the harmonic behavior over time to also help compensate for the diminished complexity and control available because there are fewer Modulators as compared to the “Complex Pad Example” Voice. For another example of this approach for creating lusher pad sounds check out the Voice “Subtle Evolution Pad” on Soundmondo.
So there you have it – two different approaches to pad sounds. As always, take some time to tweak the Frequency, Level, Feedback and Envelope values and listen what happens to the sound. Also play around with the Effects. Modulation effects like the Chorus, Flanger and Phaser mixed with lots of Reverb or longer Delays can be very effective enhancements to the final sound. Finally, some additional pad Voices to check out on Soundmondo: “Aetherium“, “Seraphine 1“, “Seraphine 2“, “Mobius Trip“, “Neeto Repeeto“, “Digi Repeeto” and “Evolviane“.
So have fun – and when you are ready, the next lesson is now available: Lesson 5 – Bass Sounds.
Want to discuss this lesson? Join us for a discussion on the Forum here.
Not had a chance to experience the earlier lessons in Manny’s Modulation Manifesto? Catch up now:
A little bit about the Author:
Manny Fernandez has been involved with sound programming and synthesizer development for over 30 years. Initially self taught on an ARP Odyssey and Sequential Pro-One, he also studied academically on Buchla modular systems in the early 80’s. With a solid background in analog synthesis, he then dove into digital systems with release of the original DX7. Along with his aftermarket programming for Sound Source Unlimited, Manny is well known for his factory FM programming work on Yamaha’s DX7II, SY77, SY99, FS1R and DX200 as well as the VL1 and VL70 physical modeling synthesizers.