Included with this tutorial are several VOICE examples _ provided in the DOWNLOAD link at the very bottom of this article _ Download the ZIPPED File to your computer, unzip it and open the approrpriate FILE for your particular keyboard with the Yamaha Motif XF Editor Standalone/VST or Yamaha MOXF Editor Standalone/VST or Yamaha S90XS/S70XS Editor Standalone/VST as appropriate in your case. The same data is provided for the three synth series: one file for the Motif XF (.X3E), and one for the MOXF (.X6E) and a third for the S90XS/S70XS (.X2E). Please make sure you have completed the first article in this series to gain a full understanding of the Experiments: Synth Basics Getting Started
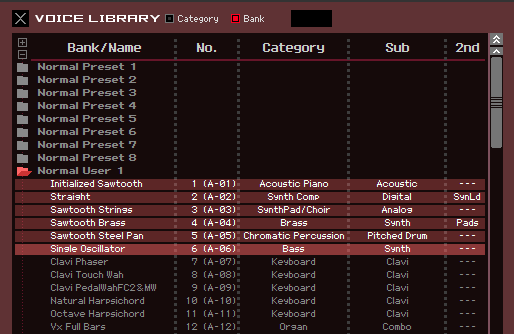 Shown at left are the 6 example Voices included in the DOWNLOAD found at the very bottom of this tutorial. This view is the VOICE LIBRARY in the Editor, viewing the data by “BANK”. They are located in the Normal User 1 Bank of the FILE. You can audition these Voices without loading them by simply opening the Editor as a Stand Alone application on your computer. Highlight the VOICE name and bring the Editor ONLINE. For details on AUDITIONING please see the following article on using the Editor to Audition Voices: Auditioning Voices Using the Editor
EXPERIMENT 1: Frequency Experiement
We started last time with the Synth Lead VOICE: “Soft RnB”
“Soft RnB” Preset 5: 055(D07) – in the Motif XF and MOXF6/MOXF8;
“Soft RnB” Preset 5: 060(D12) – in the S90XS/S70 XS;
Take a few minutes and explore playing this sound. Play across all octaves, experiment with the KNOB CONTROL FUNCTIONS, etc. Try raising the CUTOFF FREQUENCY (turn the Cutoff knob clockwise from 12 o’clock). The 12 o’clock position will always restore this parameter to the ‘stored’ value for the filters. For this experiment set the CUTOFF Knob to about 3 o’clock. This will give us a very bright and buzzy sawtooth sound.
Play the “A” above middle “C” (A440), play each “A” going lower; play each of these notes in turn: A220, A110, A55, A27.5 (this is the lowest ‘A’ on the acoustic piano, “A-1”) using the OCT DOWN – go one lower and play that “A” at A13.75 … Notice how the sound is no longer the bright and buzzy Sawtooth Wave but has broken down to a series of audible CLICKS – you can almost count them – there are thirteen and three-quarter of them every second (by the way you cannot go any lower on the “A”s than A13.75 – the lowest MIDI note is C-2 (frequency is approximately 8.176 cycles per second, below that the frequencies loop around repeating the lowest octave). When it is said that you cannot hear below 20 cycles per second, you simply do not recognize it as a contiguous (musical) tone. You have reached the edge of that sense of perception (your hearing or your brain’s ability to hear this as a connected entity). As you chromatically play up from A13.75, you will hear the clicks get closer and closer together. And very much like if you were placing dots on a piece of paper, closer and closer together, soon your eye will not see them as separate dots but will perceive them as a continuous line. When these audible clicks get close enough you start to hear it as a musical tone (some where around about 20 times per second). You know this – or have at least heard about this! …probably from science class in grade school. Anything that vibrates (oscillates) at precisely 440 times a second will give off the pitch “A” and the frequency range of the human ear is approximately 20 to 20,000 cycles per second. (Just FYI: the highest note on the piano is C7 which is 4,186.009 cycles per second). Quick math should tell you that we can hear about 2 octaves and change above that highest “C”.
We are looking at a simple one Element Voice. It uses a Waveform from the geometric Wave category “Wv:P5 SawDown 0dg”. This is a Prophet V SawTooth Down sample – the “0 dg” is the phase orientation of the source sample – “dg” short for degrees. This can account for subtle movement within the Voice, by simply combining two Waveforms with different phase relationship, without necessarily “detuning” the oscillator. The understanding of “Phase” will take you back to your grade school days (when you actually knew all of this stuff, sine, cosine, remember?). We’ll come back to this later.
The fact that we are starting with a single oscillator is going to be important because – each Element can be a complete instrument or it can be a building block within an instrument. But it has its own complete signal path, its own Filter and Filter EG, its own Amplifier and Amplitude EG, its own LFO, etc. It is a complete synth all by itself!!!
Experiment 2: Exploring the Voice parameters
Back in the day the Sawtooth waveform was used to do strings and brass Voices. When I worked as an audio engineer, in the studio we had cause to splice tape. If you have a recording of a string section holding a long chord, and a separate recording of a brass section holding a long chord, it is very difficult to tell the two apart if you cut off the ATTACK and the RELEASE portions – allowing someone to hear only the sustained segment. We would edit those portions of tape and just play the chord without its natural attack segment and without its natural decay segment. It is at that point that your ear/brain realizes that the two timbres are very, very similar. It is the very important ENVELOPE (that shapes the sound overtime) that helps you recognize what you are hearing. Much like an optical illusion where they show the same line with two different backgrounds and clearly one is bigger than the other, I mean, clearly… then they remove the background and you cannot believe that now, in fact the two lines are, indeed, the same length. This is an “aural illusion” that until you experience the timbre without its Attack and Release – you’d swear they were very different tones, from different waveforms.
Let’s take a look at the FILTER – the Filter determines how dark or bright a sound is. It does this by altering the balance of musical harmonics. Each musical tone has a unique ‘fingerprint’ which is created by the volume levels of each successively higher Harmonic. As musicians we should have a fundamental working knowledge of Harmonics. These are the whole integer multiples of the Fundamental Frequency. By allowing or filtering out a specific frequency range the Filter causes us to hear the balance of the upper harmonics differently. And that is how a synthesizer can hope to “fool” the listener – by not only mimicking the harmonic content, but the attack, sustain, and release characteristics of the instrument in question.
What is CUTOFF FREQUENCY? – This is a Low Pass Filter (LPF24 is a 24dB/per Octave filter) – one that allows Low Frequencies to pass through and blocks high frequencies.
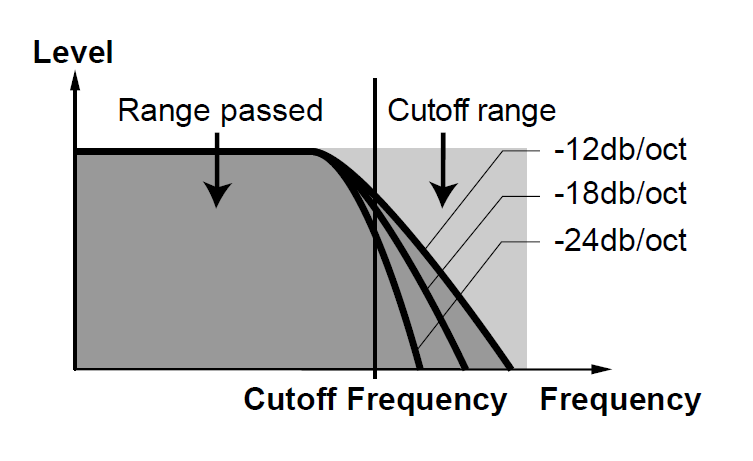 The Cutoff Frequency is the point along the range of all frequencies where this filter has dropped the signal -3dB and has begun FILTERING OUT upper harmonics. And from that point to an octave above, the level will have decreased by 24dB (very steep dropoff in volume above that Cutoff Frequency). By raising this Cutoff Frequency, the sound will immediately begin to brighten (we are allowing more high frequencies to pass through). Move the Cutoff Frequency and observe (shown below) you will get a graphic that will help you visualize exactly what is happening.
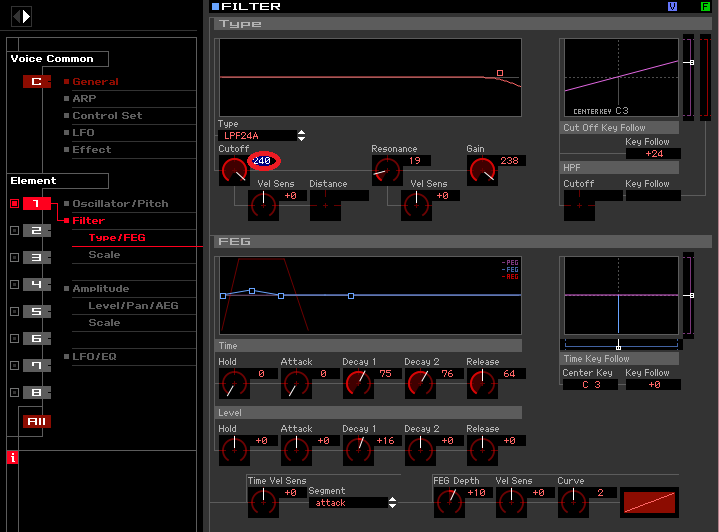
Please raise the Cutoff paramter from 118 to 240 – hear how this affects your perception of the sawtooth waveform. See how the graphic changes as you raise the Cutoff Frequency. The numbers, 0-255 are simply indicating higher and are not indicating a value in cycles per second… which is fine because, in general, you set this “by ear”.
Notice the slight rise in the (blue) FEG LEVEL graphic (Decay 1 = +16). Highlight this LEVEL value and increase it… Look and listen for the change as you hold down a note.
Find FEG DEPTH = +10 _ notice how as this value is increased the change in the envelope becomes more prominent, and if FEG DEPTH is 0, how no change in the Filter Envelope is heard at all.
Find the RESONANCE parameter (currently set at “19”) raise it slightly – see how it adds an emphasis at the Cutoff Frequency, by making that particular frequency slightly louder than all others. The higher the Resonance the more prominent the bulge at the Cutoff. You can better understand how moving the Cutoff Frequency while a prominent emphasis (peak) is applied at this frequency calls your attention to it over all others. With a “resonant peak” (emphasis at that one particular frequency, the cutoff frequency) causes a very distinct sound when the filter is moved (called a sweep)… A Filter Sweep can be considered a very “synthy” type sound, as such occurances are fairly rare in acoustic instruments.
Amplitude Envelope Generator
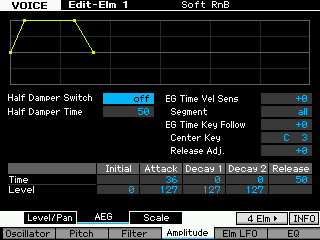 Let’s take a look at the AEG (Amplitude Envelope Generator) – which determines how the sound is shaped in terms of LOUDNESS. How it starts (attack), continues (sustain) and disappears (release). Basically, the envelope describes what happens from KEY-ON and beyond KEY-OFF until silence. It will ‘shape’ the sound as it exists. Part of what your ear/brains uses to recognize and identify sounds is the loudness envelope.
The synth lead is structured as follows:
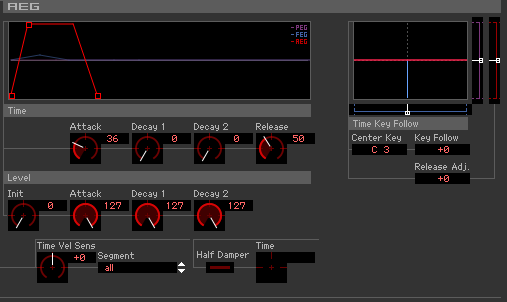
The AEG (Amplitude Envelope Generator) consists of the following components:
Initial Level
Attack Time
Attack Level
Decay 1 Time
Decay 1 Level
Decay 2 Time
Decay 2 Level
Release Time
These are the parameters that the synth uses to describe what in old analog synthesizers was referred to as the ADSR (Attack-Decay-Sustain-Release). It uses a series of TIME and LEVEL settings to describe the loudness shape of the sound.
In the first figure below you see a graphic that describes a DRUM or PERCUSSION envelope. Drum and Percussion sounds are trigger events and significantly cannot be held. A Whole Note to a percussionist is more an instruction to not play during that time, than it is an instruction to “hold” anything. In the second figure, you see a graphic where the DECAY 2 TIME is set to 127 or HOLD – the envelope is set to play indefinitely* useful for playing audio clips or sound effect events.
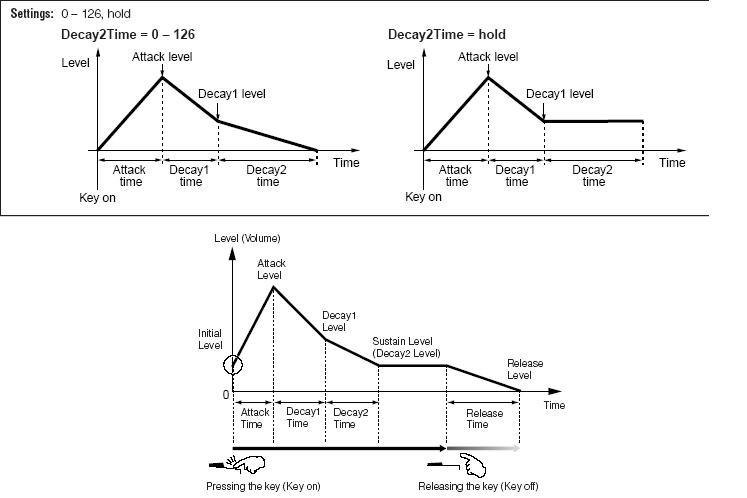
In the third figure, you see a typical musical (Non-Drum/Percussion) instrument described (think a piano note, hammered string). Here a Whole Note means to hold the sound for that length of time. You can hold a musical note, while a traditional drum/percussion instrument cannot hold a note. Notice the finger showing “Releasing the key (Key off)”. Normal musical instrument require Key Off, traditional drums and percussion mostly ignore Key Off. True, the piano is, technically speaking, a percussion instrument, but it’s behavior as to loudness contour and its sustain function make it unique among this family of instruments.
If DECAY 2 LEVEL is 0, you have a percussive sound. And as you will discover, the piano always has this behavior – while a sustain slows down silence, the sound continues to decay towards silence. If DECAY 2 LEVEL is not 0, you have a sound that will be dependent on KEY-OFF to begin the RELEASE portion… to return to a level of 0. We will emphasize this point Because it is a key to understanding musical behavior. TIME can be understood as how long it takes to move from LEVEL to LEVEL. If DECAY 2 LEVEL is anything but 0, the sound will never go away while a key is held… Eventually as long as a key is held the level will reach the value as set by Decay2Level. If it is 0, then the sound will die out, eventually.
By the way: RELEASE LEVEL is always going to be 0 (that is why the parameter is not included).
In a Piano (and all percussion family instruments) the DECAY 2 LEVEL is 0, you can delay the eventual return to level = 0 with the sustain pedal or by holding the key… but it will stop vibrating eventually. (The Sustain pedal does not hold the sound of the piano FOREVER _ as piano players we know that because we grew up with the sustain pedal’s natural behavior on the instrument). Of course, if you do release the KEY at any time in the envelope, the sound proceeds directly to the RELEASE TIME.
RELEASE TIME on a piano is not immediate – you don’t often appreciate it until it is wrong. But there is a definite slope to how the sound disappears – if you set the RELEASE TIME so that is too fast, it is just not comfortable. If you set it so it is too slow, it is not right either. Experiment with a PIANO Voices Release time and you’ll hear immediately what I mean.
STRING sounds: Strings that are played with a bow fall into a family of instruments that are considered “self-oscillating” as opposed to “percussive”. Instruments that are bowed or blown fall into this ‘self-oscillating’ category. Here’s what this means:
The sound vibration is initiated by bowing (applying pressure puts string in motion) or blowing (pressure puts a column of air in motion) and will continue as long as the pressure is maintained by the performer. This can be indefinitely. The bow can change direction and continue the vibration indefinitely… the blown instrument performer can circular breathe and continue the vibration indefinitely.
BRASS sounds: Brass sounds are typically programmed, like strings, to sustain (continue) as long as the key is held.
The AEG in these types of instruments will very rarely have DECAY 2 LEVEL at 0… because they need typically to continue to sound as long as the key is engaged (the key being engaged is how, in the synthesizer sound, we apply the “pressure”). This does not mean you couldn’t setup a String Orchestra sound that ‘behaved” like a percussion instrument… it is just that most strings sounds are programmed to be “bowed” (continue the vibration) along with how/when you hold and/or release the key. And most brass sounds are programmed to be “blown” (continue to vibrate) as long as you hold the key down.
This is why they do not “behave” correctly (sic) when you use a Sustain pedal. If you engage a Sustain pedal on a sound that DECAY 2 LEVEL is NOT equal to 0 – the sound will be maintained (forever) at the DECAY 2 LEVEL.
If you engage a Sustain pedal on a sound before it reaches output level of 0, and the DECAY 2 LEVEL is not 0, the sound will be latched at the level it has reached thus far.
Remember an envelope develops over time. Therefore, if you lift the sustain pedal, (KEY-OFF) the sound jumps immediately to the RELEASE TIME portion of the envelope… If you re-engage the pedal before the sound reaches LEVEL = 0, the envelope will be latched at the level it has reached. Think about your use of Sustain pedal always in terms of what the Voice does at DECAY 2 LEVEL. We don’t normally use a Sustain pedal on Organ sounds – because as piano players we understand that an Organ remains a FULL volume as long as the key is held, so quick all notes run tragically together at the SAME MAXIMUM Volume. This is also why using a Sustain Pedal on Strings and Brass is almost as tragic. Normally, the Amplitude Envelopes of Strings and Brass are just a bit lower than maximum but the result of notes remaining at a constant value is just as musically tragic. Now you understand why!
String Amplitude Envelope
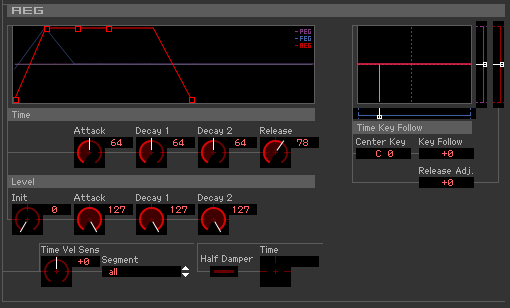 Typical String AEG would have a somewhat gradual Attack Time _ imagine that bow having to be drawn across the string _ it takes some time for the sound to reach its full volume. Again, the sound will sustain as long as the key is held down. When the key is released the Release (78) Time has the sound gradual disappear. Experiment by isolating one of the 2 Elements of this VOICE and change the settings to get a feel for how they change the behavior of the String envelope. To isolate Element 1 you can turn OFF Element 2: You can simply click the ELEMENT 2 radio button in the EDITOR, or if you are editing from the front panel of your instrument _ you can turn OFF the LED for button [10]. Alternatively you can press the SOLO button on the front panel and select ELEMENT 1.
You can see super imposed in blue the Filter Envelope.
Brass Amplitude Envelope
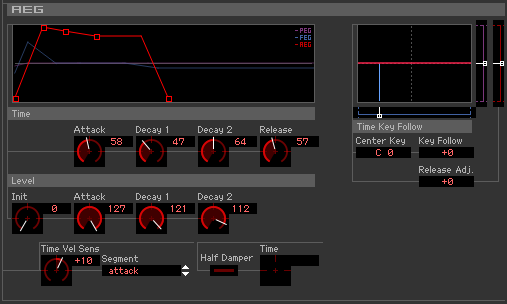 Typical Brass AEG would have a slightly faster Attack time than strings _ it has a distinct drop in Level once maximum Volume is reached. You can see (super-imposted in blue) that the Filter Envelope again is different from the AEG. Isoloate one of the 2 Elements of this VOICE and experiment with the Envelope settings. And as we’ll see below the Pitch Envelope comes into play on the Brass Voice (purple). You can manipulate the Envelope by either using the dials next to the parameter in the Editor, or by double clicking on the value and typing in an exact value, or by using your mouse to click on a box in the graphic and drag it to a new location… Whichever way you choose the graphic, values and knob icons all move together.
Hint: Use the EDIT/COMPARE button on the front panel of your instrument, or in the Editor go to EDIT and use VOICE COMPARE, or simply [CTRL + P] on your QWERTY. While in the COMPARE mode, obviously, no further edits can be made, until you exit the COMPARE function.
Steel Pan Amplitude Envelope
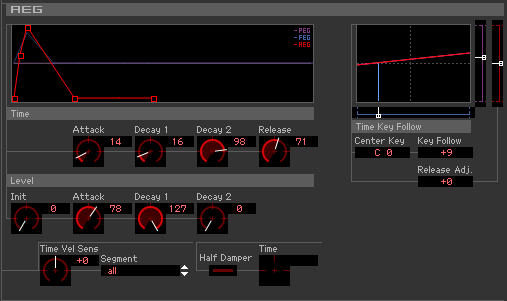 Here you can see the very Percussive Amplitude Envelope of the Steel Pan (often wrongly referred to as Steel Drums… They are made from Oil Drums but become Steel “Pans” when you shape them into musical instruments _just FYI.) The Attack time is rather Fast (14) and being a percussion sound it does not matter if you hold the key down, the AEG forces the sound to silence (Decay 2 Level = 0). The drastic DETUNING of the 2 Elements here give this a very metallic sound and “how” you play on the keyboard will add to the illusion of this VOICE sounding like Steel Pans.
PITCH and FILTER ENVELOPES
Understanding how the envelope Time and Level parameters function is a key to emulating programming. Getting the Attack and the Release correct, go a long way to helping the result sound like something emulative. As you’ll soon hear this same waveform is used to create Synth Strings, Synth Brass and a Synth Lead VOICE.
Brass Filter Envelope
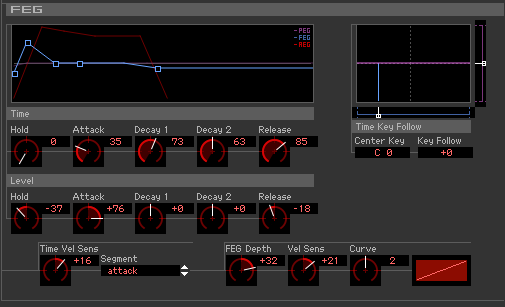 Here you can clearly see the FEG (blue) is different from the AEG (red). In order for changes in the Filter to be heard they must occur while the AEG is allowing amplitude. In other words, if the AEG forces the Voice to silence the Filter movement will not be heard. Part of programming is paying attention to how the timbre of the sound you are emulating changes overtime. As musicians, we should have a more “educated ear” when it comes to listening to instrument sounds. Mostly, when we as humans listen to music we don’t analyze the construction of the sound. We simply enjoy the whole performance. When programming you must pay close attention to the movement of the Filter and hear it as “separate” from the movement of the Amplitude. Subtle changes can make a huge difference in the end result. And while none of these synth emulations will really fool anybody into thinking they are hearing the real thing… thus was the condition of analog synthesizers. The sounds we used to give us the general feel of the role strings or brass play within a musical ensemble.
Brass Pitch Envelope
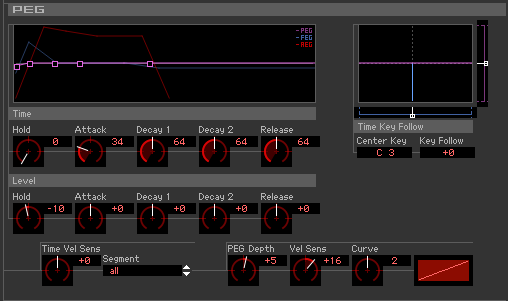 There is a slight movement at the attack where the Brass sound starts just south of the actual pitch. Experiment and make that movement more audible. You can do so by adjusting the LEVEL HOLD parameter which starts at negative 10 (-10) and just as AEG starts being audible you get a sense of this slight pitch ‘scoop’. Try lowering the value for LEVEL ATTACK. The results will be obvious. Try starting the PEG from a positive value (above zero) so that there is a drop initially in pitch. It is a synthesizer so you do not have to follow any sort of reality… you can experiment. Move the parameters around, as you do your eyes will help your ears and your brain will start to, literally, connect the dots! The more dramatic your experimentation the more likely you are to have that all important “Aha! moment”.
Please use the Editor to explore the PEG, FEG, and AEG to gain an understanding of how they shape the same source waveform into very different sounds. Don’t be afraid to try different values – use the graphic to let your eyes support what your ears are hearing. A gradual Attack should look like an uphill ramp, while a quick Attack should look like a steep climb, and so on.
Using this same Waveform to create other instruments:
To make the String and Brass tones sound like a section of strings and brass, I copied Element 1 into Element 2, and used the Detune (Fine) to create a sense of an ensemble. We want you to begin to use the Editor to visually explore the VOICE and the settings. Please experiment with changing the TIME and LEVEL parameters of the various ENVELOPES.
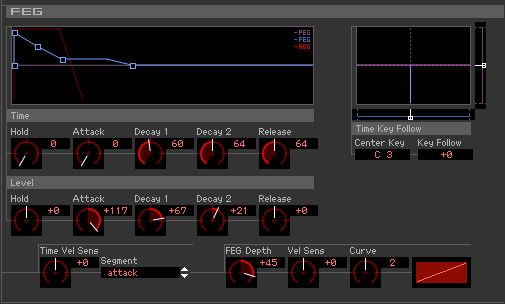
VOICE = “Straight” Synth Brass (Prince “1999” type comping sound) FEG movement (blue) occurs within the AEG (red).

In the screenshot above is the single Element 1 _ this makes it easier to concentrate and hear better what I’m doing.
I’ve clicked on the FILTER tab for Element 1. Notice the unique shape of the envelope: A sharp rise at the ATTACK TIME (0 is almost immediate) means the filter is flipped open at the beginning of the sound (LEVEL = +117), then at a rate of 60 it closes a bit to a LEVEL = +67… as you continue to hold the key down (either physically or with a sustain pedal) the filter continues to close to a LEVEL +21 at a speed of 64… then returns to neutral at a speed of 64 when the key is released. The FEG DEPTH is very important because it determines how deeply this filter movement is applied. If FEG DEPTH = +0, as you may have guessed, NOTHING HAPPENS… no DEPTH means no filter movement will be applied. The higher the number value the deeper the application of the Envelope.
AMPLITUDE means loudness – if the AMPLITUDE ENVELOPE shuts the sound down, then no matter what FILTER changes you have set, they will not be heard. In other words, TIME is a critical factor. If you setup a FILTER movement (Envelope) that requires more time than the AMPLITUDE envelope allows, well, you simply will not hear it. Make sense? Opening or closing the FILTER when there is no AMPLITUDE to support it, means it takes place but like the tree in the empty forest – no one can hear it! 
The Editor graphically shows you the AEG (red), the FEG (blue) and the PEG (purple) simultaneously, so you can easily see where, or better *when*, in time you have programmed your movement relative to each other.
Okay, those are the logistics. Please note that this filter movement gives this sound a unique harmonic shape which should make sense to you as you see in the FEG graphic. You can, with the Editor, either work with the numbers or you can edit the graph itself (position the mouse exactly over the dot which represents the parameter in question and drag it to a new location. The number values will change accordingly). Dragging the little squares can be used to alter both Time and Level settings together.
DOWNLOAD THESE EXAMPLES:
The download is a ZIPPED file containing VOICE EDITOR File (.X3E for the Motif XF; .X6E for the MOXF; .X2E for the S90 XS/S70 XS)
We strongly recommend you use the Yamaha Editor Standalone version for your particular synthesizer. If you do not have the Editor it can be downloaded from the official Yamaha Download Site:
http://download.yamaha.com
If you have not discovered the Yamaha Editor, this gives you a good reason to introduce yourself to it. This will require a USB (or FW, Motif XF) connection for MIDI communication.
IMPORTANT WARNING: please make a Backup ALL data FILE of your current data so that you can restore it after working with this tutorial. Loading the FILE as LOAD TYPE = EDITOR will overwrite your current internal USER locations. If you have a backup of your own data, you can recover quickly and easily. If you do not, you will lose your current internal data.
The Example VOICES _ all made with the same Waveform:
USER1 001(A01): “Initialized Sawtooth” – Basic initialized Voice – raw Waveform placed in Element 1. This is the default condition for EGs (organ type envelope)
USER1 002(A02): “Straight” – Basic sawtooth fashioned into a synth comping sound… Synthy, brassy, 1980’s through “1999” type sound
USER1 003(A03): “Sawtooth Strings” – minor adjustments to the tone (Filter) and volume (Amplitude) we have fashioned strings- uses two Elements detuned to give ensemble feel
USER1 004(A04): “Sawtooth Brass” – minor adjustments we have fashioned a brass ensemble – again, uses two Elements detuned to give ensemble feel
USER1 005(A05): “Sawtooth Steel Pan” – additional detuning of two Sawtooths can give a metallic percussive tone
USER1 006(A06): “Single Oscillator” – bass sound with attitude. Notice that the fact that the Voice is mono (versus poly) and portamento (glide) is applied, changes how the Voice “plays”. Legato phrasing is re-markedly different from playing staccato.
Download File
Next Article: Synth Basics: All Squares are Pulse…
 Shown at left are the 6 example Voices included in the DOWNLOAD found at the very bottom of this tutorial. This view is the VOICE LIBRARY in the Editor, viewing the data by “BANK”. They are located in the Normal User 1 Bank of the FILE. You can audition these Voices without loading them by simply opening the Editor as a Stand Alone application on your computer. Highlight the VOICE name and bring the Editor ONLINE. For details on AUDITIONING please see the following article on using the Editor to Audition Voices:
  The Cutoff Frequency is the point along the range of all frequencies where this filter has dropped the signal -3dB and has begun FILTERING OUT upper harmonics. And from that point to an octave above, the level will have decreased by 24dB (very steep dropoff in volume above that Cutoff Frequency). By raising this Cutoff Frequency, the sound will immediately begin to brighten (we are allowing more high frequencies to pass through). Move the Cutoff Frequency and observe (shown below) you will get a graphic that will help you visualize exactly what is happening.
 Let’s take a look at the AEG (Amplitude Envelope Generator) – which determines how the sound is shaped in terms of LOUDNESS. How it starts (attack), continues (sustain) and disappears (release). Basically, the envelope describes what happens from KEY-ON and beyond KEY-OFF until silence. It will ‘shape’ the sound as it exists. Part of what your ear/brains uses to recognize and identify sounds is the loudness envelope.

 Typical String AEG would have a somewhat gradual Attack Time _ imagine that bow having to be drawn across the string _ it takes some time for the sound to reach its full volume. Again, the sound will sustain as long as the key is held down. When the key is released the Release (78) Time has the sound gradual disappear. Experiment by isolating one of the 2 Elements of this VOICE and change the settings to get a feel for how they change the behavior of the String envelope. To isolate Element 1 you can turn OFF Element 2: You can simply click the ELEMENT 2 radio button in the EDITOR, or if you are editing from the front panel of your instrument _ you can turn OFF the LED for button [10]. Alternatively you can press the SOLO button on the front panel and select ELEMENT 1.
  Typical Brass AEG would have a slightly faster Attack time than strings _ it has a distinct drop in Level once maximum Volume is reached. You can see (super-imposted in blue) that the Filter Envelope again is different from the AEG. Isoloate one of the 2 Elements of this VOICE and experiment with the Envelope settings. And as we’ll see below the Pitch Envelope comes into play on the Brass Voice (purple). You can manipulate the Envelope by either using the dials next to the parameter in the Editor, or by double clicking on the value and typing in an exact value, or by using your mouse to click on a box in the graphic and drag it to a new location… Whichever way you choose the graphic, values and knob icons all move together.
  Here you can see the very Percussive Amplitude Envelope of the Steel Pan (often wrongly referred to as Steel Drums… They are made from Oil Drums but become Steel “Pans” when you shape them into musical instruments _just FYI.) The Attack time is rather Fast (14) and being a percussion sound it does not matter if you hold the key down, the AEG forces the sound to silence (Decay 2 Level = 0). The drastic DETUNING of the 2 Elements here give this a very metallic sound and “how” you play on the keyboard will add to the illusion of this VOICE sounding like Steel Pans.
  Here you can clearly see the FEG (blue) is different from the AEG (red). In order for changes in the Filter to be heard they must occur while the AEG is allowing amplitude. In other words, if the AEG forces the Voice to silence the Filter movement will not be heard. Part of programming is paying attention to how the timbre of the sound you are emulating changes overtime. As musicians, we should have a more “educated ear” when it comes to listening to instrument sounds. Mostly, when we as humans listen to music we don’t analyze the construction of the sound. We simply enjoy the whole performance. When programming you must pay close attention to the movement of the Filter and hear it as “separate” from the movement of the Amplitude. Subtle changes can make a huge difference in the end result. And while none of these synth emulations will really fool anybody into thinking they are hearing the real thing… thus was the condition of analog synthesizers. The sounds we used to give us the general feel of the role strings or brass play within a musical ensemble.
  There is a slight movement at the attack where the Brass sound starts just south of the actual pitch. Experiment and make that movement more audible. You can do so by adjusting the LEVEL HOLD parameter which starts at negative 10 (-10) and just as AEG starts being audible you get a sense of this slight pitch ‘scoop’. Try lowering the value for LEVEL ATTACK. The results will be obvious. Try starting the PEG from a positive value (above zero) so that there is a drop initially in pitch. It is a synthesizer so you do not have to follow any sort of reality… you can experiment. Move the parameters around, as you do your eyes will help your ears and your brain will start to, literally, connect the dots! The more dramatic your experimentation the more likely you are to have that all important “Aha! moment”.