A compressor is an amplifier where the more you put in the less you get out once the signal has passed a set point of engagement called the “threshold”.
The threshold is the point at which the compressor will begin to reduce the gain.
There are several different types of compressors. The one just called “Compressor” will work on the entire frequency range of the incoming signal. A “Desser” is a special kind of compressor that will work on high frequencies only. A “Multi-band Compressor” typically is used on full frequency signal because it is divided into distinct frequency ranges (called “bands”) so it can compress the low frequencies independent of the mids and highs, the mids independent of the lows and highs, and the highs independent of the lows and mids, etc.
Thus in the Multi Band Compressor you have the main threshold offset and three independent frequency range GAIN controls. This will allow you to pump up or reduce the gain in a particular frequency band. Multi-band compressors are typically used to punch up certain frequency bands on final mix. Subtlety is the rule here.
There is a 3-Band Multi-band Compressor in the INSERTION EFFECTS of your Motif XS/XF, MOX/MOXF, S70 XS/S90 XS and MX49/61. Like all Insertion Effects you can assign it to a VOICE in VOICE mode or via VOICE EDIT function (within the MIX) on any normal User Voice.
There is also MULTI-BAND COMPRESSOR in the MASTER EFFECT section of all (except the MX49/61). Typically, when applying this you are applying it to the overall mix. Multi-band compressors are commonly used in the Mastering process to even out the overall impact of a project. Often different studios, and different recording engineers work on a project, and the Mastering engineer can make the entire project appear to have a more consistent overall sound throughout – this is done via artful use of the Multi-Band Compressor.
Try playing the sound manually increasing and decreasing velocity. Try the available “presets” to hear the variety of results that are possible. Multi-band Compressor presets include: Basic, Maximizer, Wild, Attacky, Hard, Hip Club, Slap Bass (Ch). Recall a preset setup then tweak the threshold and the 3-bands. It is a frequency dependent compressor so it will analyze signals based on the frequency. Those settings are general response, the best way is to try them and use your ears – You can speculate as to why the presets are called what they are – in general they are descriptive.
By making presets these are theoretically easier to use. The Threshold setting is a very critical setting as it is where Gain Reduction begins for that frequency band. Let me be clear GAIN REDUCTION translates (in layman’s terms) to the lowering of transient spikes in a particular frequency range… and that energy is converted into a fatter, richer sound. In short, less energy is lost to the momentary peaks in level. The transient peaks are reduced – the overall tone of that range will change. You must be able to listen very closely. And the skill of A/B’ing (comparing by going back and forth) is a very important part of setting this type of processor.
The GAIN parameter allows you to bring the overall output of the specific frequency band back up. Since Gain Reduction will lower the overall volume of the frequency range – the GAIN control is used to restore what is technically called “Unity Gain” – returning the overall signal to the same level as the incoming signal. The result is that signal will not sound more “present”, will sound “phatter”, richer, more “punchy”, etc.
Gain Reduction and the individual Frequency Gains may seem to work against each other, but are really at the heart of the magic of the multi-band compressor. You are taking a transient peak and reducing its impact on the meter, by lowing that peak, then you counter the loss in volume by increasing the Gain. Picture a snare drum smack – it is really two events: first the crack of the stick on the skin and then the response of the drum shell. The “crack” causes the meter to spike (transient peak), but it is the main body of the sound (the response of the drum shell) that gives the snare it fullness. You cannot make the snare loud in the mix as long as all that energy is lost in that momentary (transient) peak. So GAIN REDUCTION reduces the spiky peak so that now it is closer to the main body of the snare drum sound and the GAIN control allows you to raise the overall output up. The snare will sound fuller, fatter, richer, wider, louder without the meters being adversely affected… that’s the “magic”.

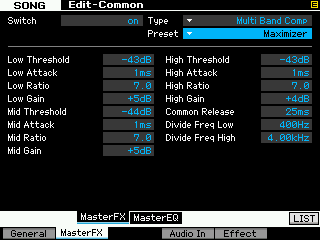
The full compliment of parameters:
Low Threshold – The level when exceed by low frequency signals that will engage the peak gain reduction
Low Attack – The time in milliseconds before the gain reduction begins
Low Ratio – The compression ratio applied to the low frequency. The higher the value the more severe.
Low Gain – Allows you to restore overall engery of the frequency band after peak reduction
Mid Threshold – The level when exceed by mid frequency signals that will engage the peak gain reduction
Mid Attack – The time in milliseconds before the gain reduction begins
Mid Ratio – The compression ratio applied to the mid frequency. The higher the value the more severe.
Mid Gain – Allows you to restore overall engery of the frequency band after peak reduction
High Threshold – The level when exceed by high freq. signals that will engage the peak gain reduction
High Attack Time – The time in milliseconds before the gain reduction begins
High Ratio – The compression ratio applied to the high freq. The higher the value the more severe.
High Gain – Allows you to restore overall engery of the frequency band after peak reduction
Common Release Time – The time that it takes in milliseconds for the unit to cease gain reduction
Divide Frequency Low – Sets the cutoff between low and mid
Divide Frequency High – Set the cutoff between mid and high
Warning: Over use, and/or misuse of the compressor can cause your mix to become lifeless and non-dynamic. Remember, what makes loud appealing is the moments of quiet that surround it. That is what dynamics are about in music. If high frequencies (upper harmonics) add “sparkle” to a mix, then dynamics give it “emotion”.
Using the Multi-Band Compressor to make your audio samples better
Creating just a raw sample of your song via the Motif XS/XF Resample function will give you ‘clean’ results, but not always the finished quality results you seek. The way to get an “in-your-face”, upfront, Resample is to realize exactly what is happening and to treat it as if you were doing a MASTERING session.
One of the special ‘mastering’ tools is the Multi-Band Compressor applied to the overall signal. You have one in your Motif XS/XF MASTER EFFECTS section. Properly processing your song’s output through this “leveling amplifier” will:
1) Give you more perceived volume without clipping (overload)
2) Allow you to compensate for apparent lack of low end or for lack of any of the three available frequency bands.
Now you could wait to do this when you actually “master your CD” but you may want to experiment with the tools you have right on board the Motif XS/XF. The first point – “more perceived volume without clipping” takes advantage of the compressor’s ability to narrow the dynamic range of the overall signal… used with care (as it must be) this can improve the overall ‘punch’ of the signal and seemingly bring it closer to you. When done poorly you will have a signal that is boring and lacking in dynamics (loud/soft changes). Your mileage will vary. Over-compression will give you a LOUD mix but an uninteresting mix. But the key is NOT to over-compress your data, just to tweak it so that it has the proper punch while maintaining the dynamics that make it interesting to the ear.
Mastering engineers are audio wizards and they get paid handsomely for their years of expertise. Do not be frustrated if you are not Bernie Grundman or Bob Ludwig, overnight… If you don’t know who these gentlemen are, you should read the credits of your favorite CD’s. You probably own some mastered by them.
Applying the Multi-Band Compressor when Sampling (Motif XF/XS only)
In your MIXING setup before you setup to Resample.
Press and hold the MASTER EFFECT button for 3 seconds.
This “shortcut” will take you directly to the EDIT page for the Master Effect.
Select the “Multi-Band Compressor”
Try the various Presets and see if any give you close to the results you are looking for… if one is correct it is more serendipity than anything else as these Presets are painted with very broad general strokes to give you and idea of how it can impact your overall mix. You will have to go through ‘trial and error’ to find the proper settings. Going back and forth between setting this up and the overall output level of your mix as found on the sample Record Standby screen. The object is to increase the overall output level of the mix without clipping the meters on the Stand-by screen.
VCM Compressor 376 Explained
