

Tagged Under
As you’ve seen so far in the tutorial examples and the additional sounds I’ve put on Soundmondo, FM is very adept at making sounds with unique timbres and behaviors. Some of the main characteristics for lead sounds should stand out, grab your attention and be expressive to your playing idiom. Whether it is for a signature riff, adding melodic counterpoint or for straight-on soloing, FM offers a wide and expansive palette of possibilities. Let’s dig in!
The conceptual building blocks I’m combining together from the previous articles are:
- The attack “stuff” mentioned in the solo and ensemble brass sounds
- The harmonic evolution over time from our pad sounds
- The multiple stacked Modulators and Feedback types from our bass sounds
I’m going to add in some new concepts as well – monophonic playing mode and overmodulation.
To start, let’s talk about how monophonic mode behaves on the reface DX. When using the monophonic mode, the reface DX will only be playing a single note at a time (no chords). The important point to understand is that the Envelopes will only affect discrete notes that are played. Meaning, you have to let off the first note completely before playing the next note to hear the Envelopes begin again using the Rate 1 & Level 1 settings. If you play legato – playing new notes before letting go of the prior note – then only the pitch of the note will change. The Envelopes will continue playing, progressing through their Level 2 & 3 values at the rate set by their Rate 2 & 3 values. If you continue to play legato, the sound will eventually maintain its static Level 3 value for all operator Envelopes. You won’t get new Envelope behaviors until you play the next discrete note, letting go of the last one before playing a new one.
Side note – this is also true of Velocity. The Velocity of the initial discrete note is maintained for all the following legato notes, regardless of how hard or soft you play the legato notes. To hear the effect of a different Velocity in the sound, you have to play a new discrete note. These behaviors in monophonic mode of the Envelopes and Velocity allow your playing articulation and phrasing to be very expressive when they are set for your playing idiom and tempo. So, example Voice time!
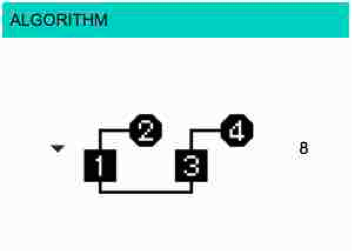
Reference the Voice “Lead Example” and its accompanying video on Soundmondo. The concept for this sound is a typical analog synth lead guitar type timbre. Because I want an analog style ‘two oscillator’ type sound, again we’ll be using Algorithm 8 so that Ops 1 & 2 will be our first oscillator, and Ops 3 & 4 will be our second oscillator:
First turn off Operators 2 & 4, so we just hear the Carrier Ops 1 & 3. I’ve chosen to use Feedback settings of 86-87, which is a somewhat mellow square wave timbre. You will hear that we have a nice detuned square wave sound. This will be the sustaining timbre of the sound that remains after the Modulator Ops 2 & 4 decay down to their Level 3 settings. Now turn off Op 3 and focus on the Op 1 & 2 stack. For the Modulator Op 2, I’ve set a Frequency Ratio of 1.00, a Level of 71, and a Feedback of 85 with the Square Feedback Type. The Velocity and Envelope settings are for fairly quick decay to create the behavior and timbre of a warm, distorted, picked electric guitar that will indefinitely sustain at the square wave timbre of Op 1. Play some notes and change between legato and discrete note phrasing. With every new discrete note you get a new “pick” behavior, and at higher velocities you get more overtones in the sound. For the legato notes, the sound gradually evolves into the sustaining square wave tone, and I’ve also built in some delayed vibrato. For fun, change the Op 2 Feedback Type from Square to Saw and hear the change in the sound.
You can see how I’ve used the concepts of Envelope control of Modulator Level to change the timbre over time from our Pads article, and the Feedback Types from our Bass article to shape our timbre and sustaining tone. Now, turn Ops 3 & 4 back on. These Operators are essentially duplicates of Ops 1 & 2, but detuned to create the analog synth quality for the sound. But notice that Ops 3 & 4 have the PEG turned on – this is to accentuate the picked attack “stuff” in the sound as discussed in our Ensemble Brass article. To put the final ingredients on top – set Effect 1 to Distortion and Effect 2 to Delay for a nice synth guitar lead. Please, also make sure you check out the Voice “Octa Vio” and its tutorial video, which specifically highlights the articulation and phrasing differences between monophonic mode and polyphonic mode. Some other Voices of this type to check out on Soundmondo are “Forecast…JZ“, “Tweedle Lead“, “Synchron“, “Buzz Pulse Lead” and “Metrosync“.
Time now to get down and dirty (literally!) with the next example that will demonstrate stacked Modulators from our Bass article and the other new concept I mentioned at the beginning of this article – overmodulation. The context in which I use the term overmodulation basically means having your Modulator Levels set very high to create those unique harmonic structures and behaviors that can give FM synthesis its characteristic sound. It allows for the easy creation of bright, cutting and edgy digital timbres. And because those high Modulator Levels emphasize the non-linear response characteristics from the FM math, combining overmodulation with velocity sensitivity and Envelope control makes these timbres very dynamic. When you start stacking multiple Modulators there are huge possibilities for crazy, complex & unique sounds that can be especially suited for Leads. Reference the Voice “Bad Transistor 2” on Soundomondo and its accompanying video.
This Voice is a very bright, dirty & grungy lead sound with extreme solid-state style distortion, including a ‘clipping’ glitch reminiscent of an amplifier that has a transistor going bad. First thing you’ll see when you look at the Voice in the Soundmondo editor is that no distortion effect is being used. The ‘distortion’ sound is being created purely by FM synthesis using the concept of overmodulation. Let’s break it down and see how this sound is put together.
First, set both Effects 1 & 2 to “Thru” so you hear the base sound. You’ll see for this sound I’m using Algorithm 7:
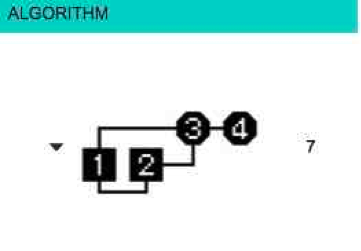
This Algorithm has two Carriers, Ops 1 & 2. It also has stacked Modulators, Ops 3 & 4, that are shared with both our Carrier Ops 1 & 2. So there are two different waves we can create, the one from Ops 3 & 4 modulating Op 1, and the one from Ops 3 & 4 modulating Op 2. And since Ops 1 & 2 can have completely different settings for Frequency Ratio, Level & Velocity Sensitivity, Feedback Type & Feedback Level and Envelope shapes, there’s a lot of versatility to shape and control our final timbre & behavior. Turn off Ops 2, 3 & 4 to hear Op 1 in isolation. It’s a bright sawtooth wave due to the Saw type feedback and very high Feedback Level of 110. Now turn off Op 1, and turn on Op 2 to hear it in isolation. It also has a high Feedback Level of 90 with the Saw Feedback Type creating another sawtooth wave. Turn Op 1 back on, and play. Notice that the Frequency Ratio for Op 1 is set at 2.00, and for Op 2 it is set at 1.50. Ops 1 & 2 are tuned to an interval of a fourth with Op 2 tuned below Op 1. In addition, Op 1 has a much larger Velocity Sensitivity so that Op 2 is dominant at low velocities, and Op 1 dominant at high velocities. Another difference is that Op 2 has a softer attack setting and an Envelope Level 3 of 97, while Op 1 has a harder attack and full sustain with Envelope Level 3 set at 127. Thus, as we hold notes and play our legato phrases the timbre from Op 1 will remain as Op 2 decays. Finally, the Pitch EG is turned on for Op 2 to accentuate the attack ‘bite’.
Now, let’s turn on Op 3 and talk about overmodulation. You can see Op 3 is set with a very high Level of 110, Feedback Type of Saw with a Feedback Level of 80. These settings are in the range where the really unique &cool (or annoying!) characteristics of FM come into play. Play and hold notes at both low and high velocities to hear the timbre and behavior. You’ll hear the ‘bad transistor’ clipping about a half second into the sound, and as you hold notes for 7 to 9 seconds you’ll hear the timbre continually evolve and shift from the Envelope behavior of Ops 1, 2 & 3 along the slight detuning of Ops 1 & 2. The ‘bad transistor’ effect comes from a type of digital distortion called aliasing that is caused by the very high setting for Feedback Level of Ops 1 & 2 combined with the high Modulation Level of Op 3. Basically, the amount of harmonic content created by the high Level setting for our Modulator Op 3 is so extreme it is overdriving the system and causing digital ‘clipping’. As the modulation amount from Op 3 decreases as its Envelope decays to the Level 3 setting of 97, the ‘clipping’ goes away and we’re left with a bright & buzzy digital FM timbre that has built-in delayed vibrato from the LFO.
Finally, let’s add in our stacked Modulator and turn on Op 4. You’ll see that Op 4 has a Level of 78, Square Type Feedback Setting with Feedback Level of 86, moderate Velocity Sensitivity, and a moderately quick decaying Envelope shape. Note that is has a Frequency Ratio of 1.75, which is an interval tuning of a whole step below Op 1, a minor third above Op 2, and a seventh above Op 3. These ratios combine to allow Op 4 to create the subharmonic dirt and grunge in the final timbre. Play at low and high velocities across the keyboard range. At low velocities the waveform from Op 2, 3, & 4 is dominant as the Carrier Op 2 has very little Velocity Sensitivity. As you play high velocities, the waveform from Ops 1, 3, & 4 gets emphasized and you can hear the distortion overtone character stand out. Again, hold the notes 6 to 8 seconds to hear the ‘bad transistor’ effect gradually morphing into the sustaining timbre of Op 1. It bears repeating that you watch the linked video for this Voice as it includes real-time spectrograms to demonstrate what’s happening with the overmodulation timbral behaviors.
Hopefully you’re beginning to understand how to combine the concepts discussed so far in this article series to begin to create your own, more complex, FM sounds. As always, play around and practice tweaking the example Voices and additional linked sounds to continue to build your ‘ear experience’ find some haxidents. Some additional Lead sounds to check out are “Pulze Phaze“, “Xtortion1“, “Xtortion 2“, “BowTron Lead” and “Digi Lead“.
Ciao for now…
In the meantime, join us in the discussion about this lesson on the Forum here.
Not had a chance to experience the earlier lessons in Manny’s Modulation Manifesto? Catch up now:
Lesson 1 – Basics of FM Synthesis
Lesson 2 – Solo Brass Voices
Lesson 3 – Ensemble Brass Voices
Lesson 4 – Synth Pads
Lesson 5 – Bass Sounds
A little bit about the Author:
Manny Fernandez has been involved with sound programming and synthesizer development for over 30 years. Initially self taught on an ARP Odyssey and Sequential Pro-One, he also studied academically on Buchla modular systems in the early 80’s. With a solid background in analog synthesis, he then dove into digital systems with release of the original DX7. Along with his aftermarket programming for Sound Source Unlimited, Manny is well known for his factory FM programming work on Yamaha’s DX7II, SY77, SY99, FS1R and DX200 as well as the VL1 and VL70 physical modeling synthesizers.