

The YC61 Stage Keyboard interface puts the important controls on the front panel. For deeper customization, you have Menus (for making global adjustments) and Settings (specific to each Live Set. Let’s take a look at each.
MENU
MENU items are global for the entire instrument. Press the [MENU] button and you’ll see the top-level list of items:
Use the Encoder dial to select an item and press down on the dial (the [ENTER] button. Top level YC61 menu items are the top heading, next level are in Bold Underline and below that items are bulleted.
GENERAL
Under the “General” item you will see the following selections:
MASTER TUNE
This sets the overall tuning of from the default of A=440 Hz to a range between 414.72-466.78 Hz. In situations where you need to adjust this setting you will find this useful. There also is a dedicated [TUNE] button on the front panel for easy access.
MIDI SETTINGS
There are a few important items under MIDI settings.
MIDI PORT
Selects USB and MIDI for MIDI transmission. BOTH USB and MIDI are active when they are set to ON and both default to ON.
Cool tip, you can use the YC as a multi-port MIDI interface. When the MIDI Port is set to OFF, you can use USB port 2 to send and receive MIDI to the 5-pin DIN jacks. This allows you to use the YC MIDI terminal as a second set of MIDI ports for external gear.
- MIDI Channel: Sets the MIDI receive and transmit channel for CP independently. Default is set to channel 1 for both transmit and receive.
- MIDI Control: This setting turns MIDI control changes On, Off or Invert.
“Invert” has some interesting use cases. In Invert mode, all panel lights illuminate and MIDI control changes only send or receive when a Section is switched OFF. This is cool when using YC61 with a DAW. For example, say you want to have the Keys “A” Section ON layered with a virtual instrument in a DAW. With Invert On, you can use the Sub Section controls to change the virtual instrument parameters when that section is switched OFF.
Invert is like a hybrid mode where I can play the YC61 Keys “A”, record the note data and automate the Section controls when the Keys “A” is in the ON position and simultaneously control a virtual instrument using the Sub Section in the OFF position.
You cannot change the CC# for the YC61 controls, but most if not all DAW support “learn” modes so you can assign specific controls to controllers.
- Tx/Rx Pgm Change: Determines whether program changes are transmitted or received to an external device.
- Tx/Rx Bank Select: Determines whether bank select messages changes are transmitted or received to an external device.
CONTROLLER RESET
Resets controllers to default states when switching between LIVE SETS. The default is “Reset”.
KEYBOARD/PEDAL
- Octave: Sets the octave settings +/- 3 Octaves. There is a dedicated [OCTAVE] button on the front panel as well.
- Transpose: Transposes the pitch of the YC61 -12 to +12. There is a dedicated [TRANSPOSE] button on the front panel as well.
- Touch Curve: This sets the velocity sensitivity of the YC61.
This is an important setting to get the best experience with the instrument. I like to play acoustic pianos with the “Hard” setting but that is ENTIRELY subjective. Experiment with these settings to find what works for you. One thing to try is the Wide setting for Electric Piano voices which functions a bit like a velocity compressor/expander. I like it with the 75Rd Funky Voice to really grab the “bark” of the sound!
- Fixed Velocity: When fixed velocity is “On” you can fix the note velocity between 1 and 127. This is useful for instruments that don’t respond to traditional velocity like harpsichord or organ experience.
- Sustain Pedal Type: Determines the type of foot switch you are using. The YC61 includes an FC3A sustain pedal which is capable of half-damper like an acoustic piano. When set to “FC3A (HalfOn)” it functions in this half-damper mode. When set to “FC3A (HalfOff)” half-damper is bypassed and it will function as a standard switch pedal.
The last setting “FC4A/FC5” is what you would select if you are using the Yamaha FC4A or FC5 which are both switch pedals.
- Foot Switch Assign: Determines the assignment of the Assignable Foot Switch. This is a global setting and you can set it to do some useful things like engage a Section effect, adjust the volume of a Section, engage the Reverb/Delay or advance incrementally from one LIVE SET to another which is the default.
LOCAL CONTROL
Turns Local Control On or Off.
I/O VOLUME
Adjusts the incoming USB audio level from computer/DAW or iOS device.
AUTO POWER OFF
Determines whether or not Audio Power Off is engaged.
CONTROL PANEL
PANEL LOCK SETTINGS
Determines which features you want locked out when engaging Panel Lock. For example, you can choose to lock out the Section Switches but allow control over the Delay/Reverb Section.
DISPLAY LIGHTS
This allows you to set how the panel lights illuminate. You can choose to turn all the Section Lights ON (default is OFF) or turn the Ins Effects ON (default is OFF). You can also turn the LCD light OFF (default is ON) and LCD Contrast allows you to change the LCD screen contrast from 0 to 63. The default value is 32.
ADVANCED SETTINGS
DRAWBAR MODE
This sets the conditions for a drawbar position to be reflected when the drawbar’s actual position and the LED display (setting called up) do not match. When this is set to “JUMP” the LEDs will instantly jump to the position of the drawbar as soon as it’s moved. When set to “CATCH,” the current setting holds until the drawbar’s position matches (catches) the LED display. Once they have matched, the drawbar’s position changes.
The default setting is JUMP.
SECTION HOLD
This setting lets you maintain settings from one LIVE SET to other LIVE SETS.
Example: Say you want to keep the same Reverb Setting for every LIVE SET but you don’t want to save that setting in a LIVE SET. With Section Hold enabled, switch the Reverb Section ON and HOLD THE SWITCH on until the red Reverb Section LED blinks. You can now switch between different LIVE SETS and the Reverb setting will remain the same, overriding what was saved with the LIVE SET. An entire Section can be set to “Hold” as well and will override whatever is set to Live set, so if you wanted to keep a Sub Voice like a string pad the same regardless of the LIVE SET selected switch the Sub Section ON and HOLD THE SWITCH until the red Sub Section lamp blinks. The screen will say “Sub Section Hold On” to confirm.
LIVE SET VIEW MODE
Determines whether to maintain the LIVE SET View (Keep) or return to the Top screen (Close) when switching between LIVE SETS. When this is set to “Keep,” eight LIVE SETS are displayed in one screen.
The default is “Close”.
VALUE INDICATION
Determines whether or not to display the values of each of the knobs on the LCD. Default is ON.
SW DIRECTION
Determines whether if a switch turns a Section On by switching UP (the default) or DOWN.
EG/FILTER RESET
Determines whether to reset (On) or maintain without resetting (Off) the parameters of EG and FILTER when Voices are switched in the Key A/Key B Sections.
JOB
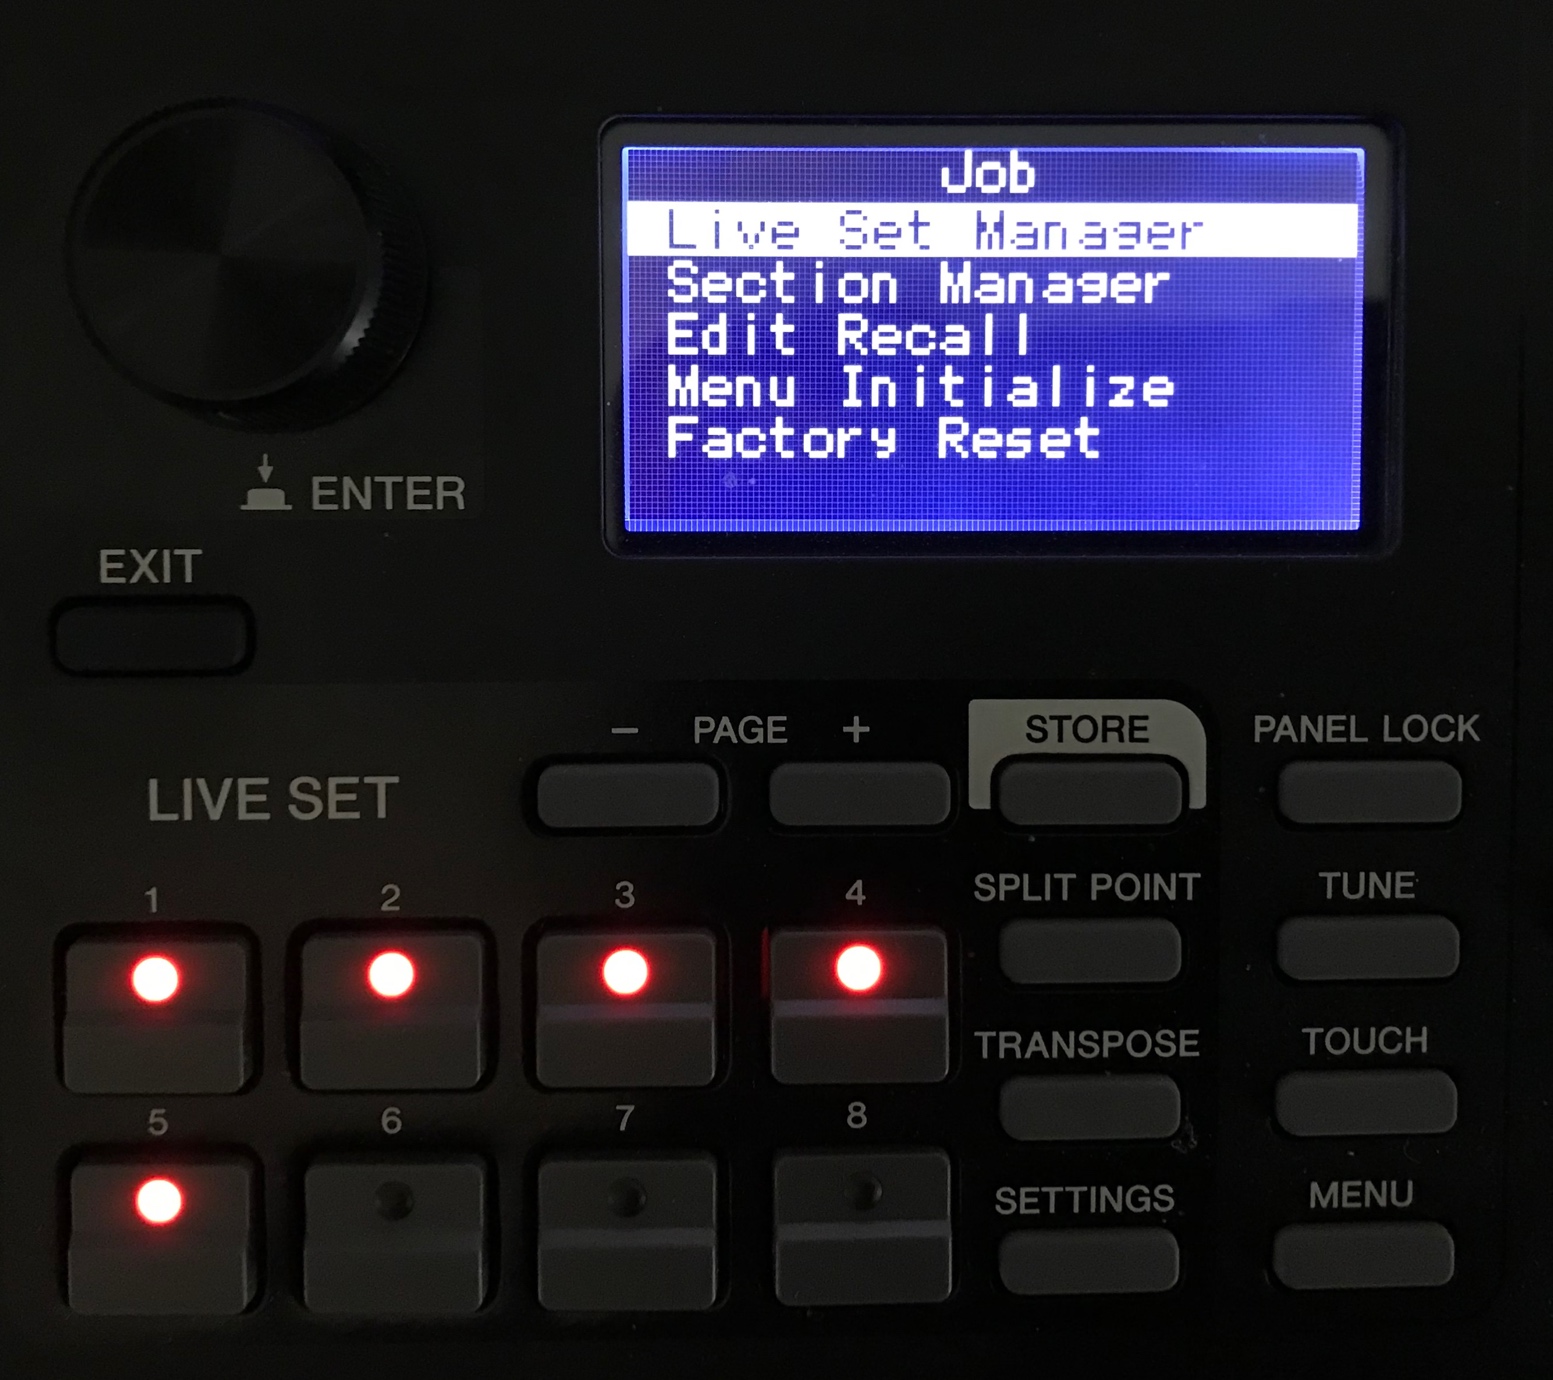
LIVE SET MANAGER
This function allows you to move LIVE SETS. You can choose between “Swap”, “Copy” and “Initialize”.
SECTION MANAGER
The next level down from LIVE SET Manager is Section Manager. This allows you to “Copy” one LIVE SET Section and “Paste” that Section into another LIVE SET Section. This is useful if you want to select a cool Sub Section Pad with all the Section Effects and levels set exactly how you want them and use it with a different LIVE SET.
EDIT RECALL
This lets you recall the contents of the edit buffer.
If while editing a LIVE SET you have not yet stored, you select a different LIVE SET and then return to the one being edited, the latest stored version will be selected. Using this function, you can restore your latest edits and keep them intact.
MENU INITIALIZE
Resets the settings of MENU screens to the default values.
FACTORY RESET
Restores this instrument to its default (factory) condition.
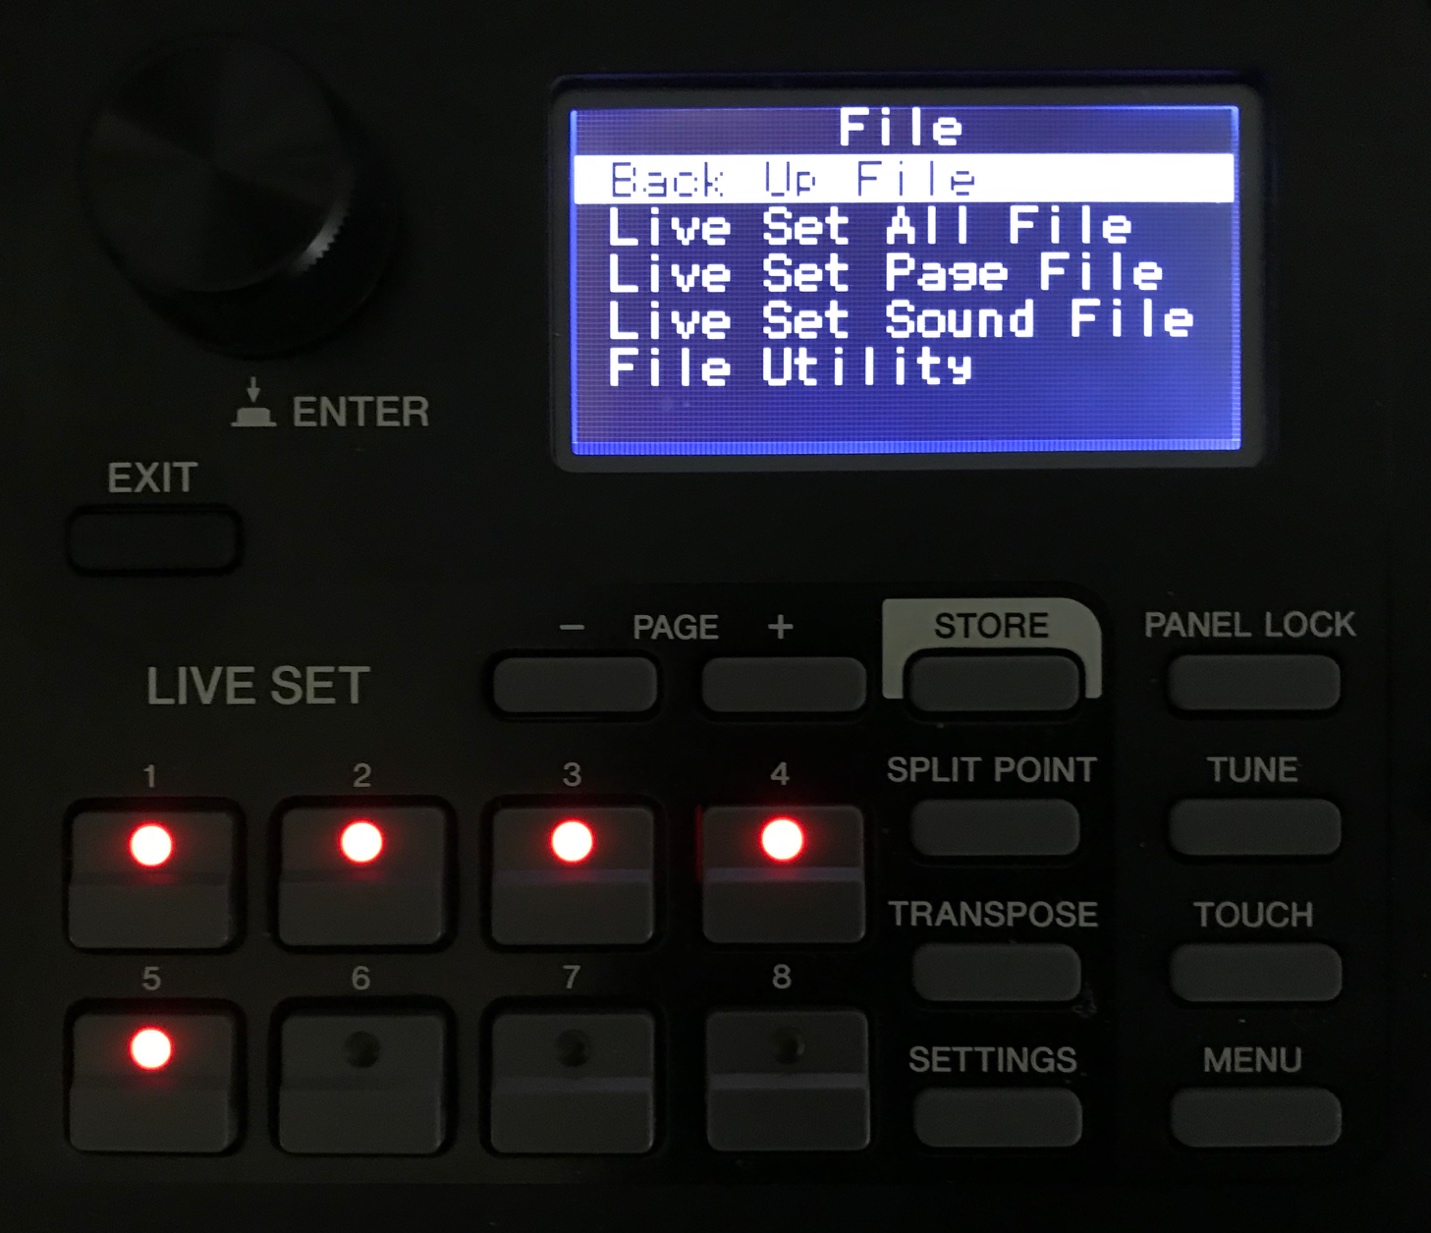
FILE
This is all about saving, loading, renaming and formatting.
BACK UP FILE
Saves or loads all the data stored in YC61 including the system settings to a USB flash drive as a “Back Up File” with the extension “.Y0A”.
LIVE SET ALL FILE
Saves or loads all the LIVE SET data stored in this instrument but NOT the system settings to a USB flash drive as a “LIVE SET All File” with the extension “.Y0L”.
LIVE SET PAGE FILE
Saves or loads a LIVE SET Page (Eight LIVE SETS) stored in YC61 to a USB flash drive as a “LIVE SET Page File” with the extension “.Y0P”.
LIVE SET FILE
Saves or loads a single LIVE SET stored in YC61 to a USB flash drive as “LIVE SET File” with the extension “.Y0S”
FILE UTILITY
Allows you to “Rename” a file, “Delete” a file or “Format” a USB flash drive.
VERSION INFO:
This shows the YC OS Version currently installed in your YC61.
Those are some of the highlights in the MENU section. Now let’s take a look at the SETTINGS which work with LIVE SETS. SETTINGS are saved with each Live Set Sound.
SETTINGS
Press the [SETTINGS] button to see the items you can select:
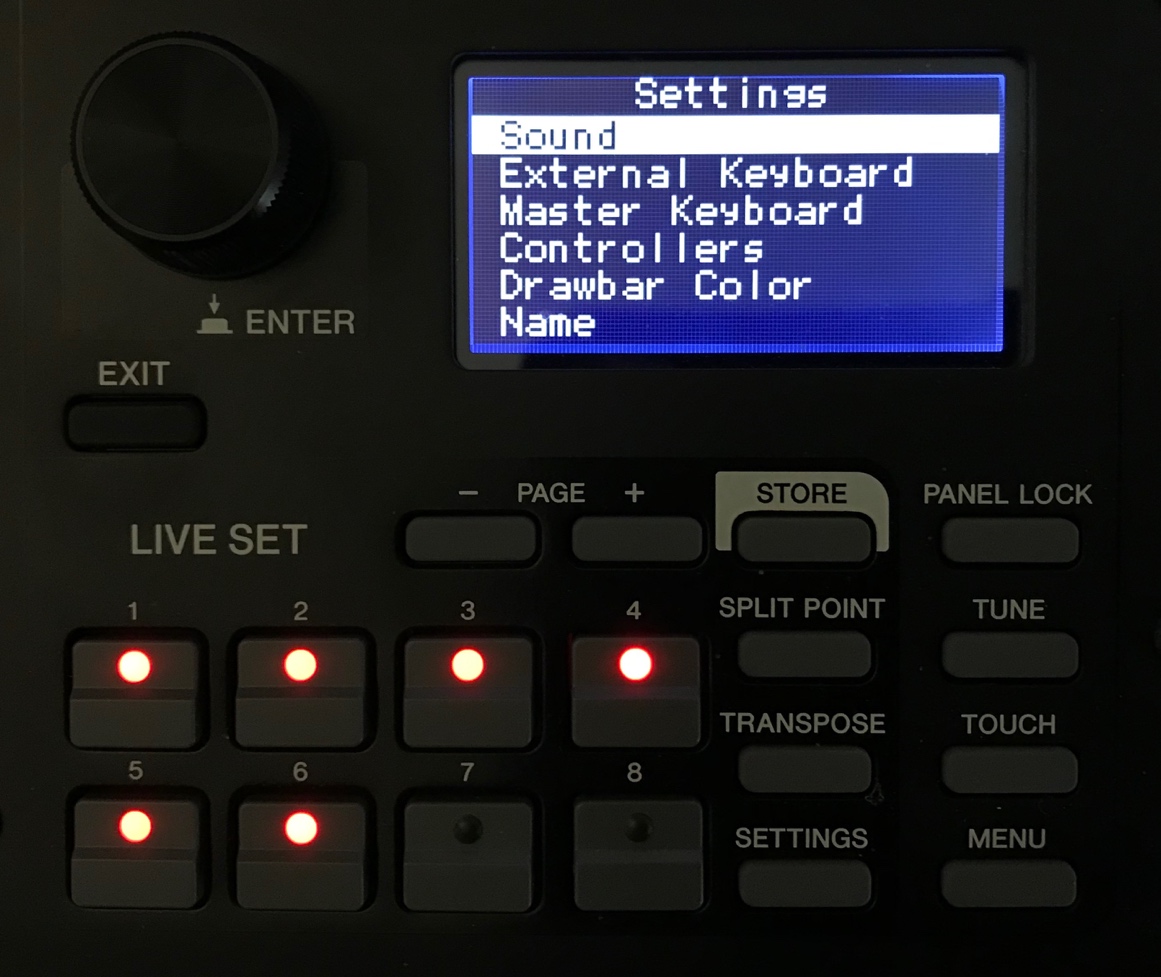
SOUND
In this section there are several important parameters that allow for changing sound characteristics for the ORGAN and KEYS A& B blocks.
ORGAN SETTINGS
Determines the detailed settings for the Organ Section. Items marked with an asterisk (*) can be configured only when the VCM Organ type (H1–H3) is selected. If at least one of the items marked with (*) is changed from the default, a “+” will be displayed on the upper right of “H1”– “H3” on the Top screen.
LEAK LEVEL
Adjusts the volume of the leakage sound (sound leaked from the tonewheel to the electric circuit).
KEY CLICK LEVEL
Determines the volume of the key click sound produced when you press a key.
Perc. Link to 1feet- Determines the operation of the [1′] (one foot) drawbar when switching the PERCUSSION on or off. When PERCUSSION is turned on, the sound of the [1′] drawbar stops.
When off, the [1′] drawbar generates sound regardless of whether PERCUSSION is on or off.
Default: On
EXPRESSION TYPE
Determines the position in the organ’s signal path where the expression pedal is applied.
Drive+Vol: The pedal effect is applied to the pre-amplifier in the Organ. Operating the pedal changes both the volume and the distortion of the Organ sound. If the VCM Organ type is selected, this faithfully reproduces the effect of the expression pedal on a vintage organ.
Volume: The pedal effect is applied directly before the REVERB Section after the Organ sound is generated. Operating the pedal changes the volume, but not the distortion, of the Organ sound.
Default: Drive+Vol
KEYS A & B SETTINGS
MONO/POLY
Selects whether to play the Section as monophonic (Mono) or polyphonic (Poly). When set to “Mono,” the icon is displayed to the right of the Section name (A, B) on the Top screen.
Default: Poly
PORTAMENTO
Determines settings regarding the portamento function, which continuously changes the sound from one played note to the next.
This can only be set when “Mono/Poly” is set to “Mono.”
- Switch: Determines whether the portamento effect is applied (On) or not (Off).
- Time: Determines the time (speed) that it takes for the portamento effect to shift in pitch between notes.
- Mode: Determines how the portamento effect should be applied depending on how you play the keys.
- Full-time: The portamento effect is always applied.
- Fingered: The portamento effect is applied only when you play legato performances (playing a key while still holding the previous key). Default: Full-time
- Time Mode: Determines the time standard for portamento pitch shifts.
- Rate: The pitch shifts at a speed corresponding to the distance between sounds (notes). The further the pitches between the two sounds, the more time it takes.
- Time: The pitch shifts over a particular amount of time, regardless of how far apart the pitches between the two sounds are. Default: Rate
FM UNISON
FM Unison is a cool setting for lead sounds found in many classic FM Synthesizers. Unison adds a thickness and spaciousness to the sound by duplicating notes when a single note is played. This setting is available only FM Voices.
- Mode: Selects the number of notes played when a single note is struck. When set to “Off” only one note is played. When set to “2 Unison” the note is duplicated twice; when set to “4 Unison” the note is duplicated 4 times. Default: Off
- Detune: Determines the difference in pitch between the two or four notes, which affects the degree of thickness of the sound. Detune adds a cool chorusing effect. Default: 0
- Spread: Determines the difference in panning between the two or four notes, which adds a nice spaciousness to the sound. Default: 0
EG CONTROL
Selects the EG control type. For details on the types that can be selected, see “EG/Filter Control Type List” (page 34). Default: Atk&Dcy&Rls A
FILTER CONTROL
Selects the Filter control type. For details on the modes that can be selected, see “EG/Filter Control Type List” (page 34). Default: Flat Reso
ROTARY SPEAKER
These parameters control the detailed operations of the 2 VCM Rotary Speaker types: RtrA and RtrB (Located in the SPEAKER/AMP Section). It is an integral part of the organ sound and you can adjust the various components of the rotary speaker in this area.
Such parameters include level of the Horn and Rotor, the speed of the Horn and Rotor, acceleration/deceleration control of those components, switch and Level control of background noise ( yes, there is actual simulation of the noise a rotary speaker device generates!), and a switch to determines whether to use stereo or monaural output for RtrA and RtrB.
FUNCTION
Under the Function Sub Menu you have two selections: “Sound Transpose” and “Split Point”. You can transpose YC61 by +/- 12 semitones and you can set a Split anywhere on the keyboard. There are of dedicated buttons directly above the [SETTINGS] button to accomplish these same functions, for easy access while playing the YC61.
TEMPO DELAY TIME
This determines the delay time in note lengths relative to the tempo for the “Tempo Delay” effect.
EXTERNAL KEYBOARD
Determines the generation of sound for each Section when the YC61 receives performance information (key-on, key-off) MIDI messages from an external MIDI device. You can make settings so that combine the YC61 with an external keyboard for a two-manual organ, or performing only the Key A and/or Key B Sections on an external keyboard, etc.

For Sections/parts that are set to generate sound only when playing an external keyboard the display
of the Split on the Top screen changes from the icon on the left to the “EX” icon on the right.
Each of the YC61 tone blocks has its own External Keyboard settings. They are as listed below:
ORGAN
- Ext+Int: Sound is generated for both key-on signals received from an external MIDI device and performance on this instrument’s keyboard.
- ExtOnly: Sound is generated only for key-on signals received from an external MIDI device. Sound is not generated when the keyboard on this instrument is played.
- 2ManualUp: This setting is for performances on a two-manual organ. The UPPER part generates sound for key-on signals received from an external MIDI device, and the LOWER part generates sound when the keyboard on this instrument is played.
- 2ManualLo: This setting is for performances on a two-manual organ. The LOWER part generates sound for key-on signals received from an external MIDI device, and the UPPER part generates sound when the keyboard on this instrument is played.
- Off: Sound is not generated for key-on signals received from an external MIDI device. Sound is generated when the keyboard on this instrument is played. Default: Ext+Int
Note: When “2ManualUp” or “2ManualLo” is set, the settings of the Organ Section Split become invalid, and the lamps for the SPLIT [L U] button both automatically light.
KEY A & KEY B
- Ext+Int: Sound is generated for both key-on signals received from an external MIDI device and performance on this instrument’s keyboard.
- Ext Only: Sound is generated only for key-on signals received from an external MIDI device. Sound is not generated when the keyboard on this instrument is played.
- Off: Sound is not generated for key-on signals received from an external MIDI device. Sound is generated when the keyboard on this instrument is played.
Default: Ext+Int
MASTER KEYBOARD
This function is for using the YC61 as a master keyboard. It allows the keyboard to be split into as many as four different zones, each of which can control separate sounds of an external tone generator. For example, you can make a Live Set Sound combining Voices from this instrument and the connected external tone generators, or a Live Set Sound composed with Voices of external tone generators only.
MODE SW
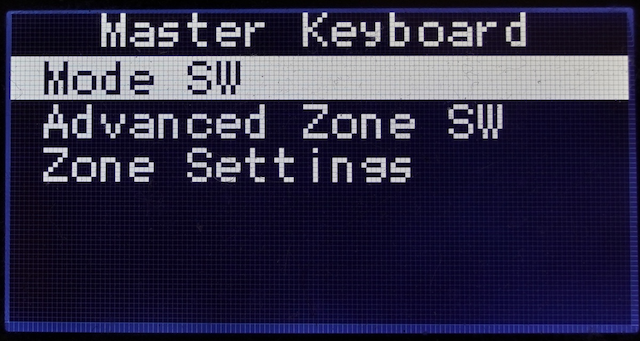
This switches the Master Keyboard Mode settings. When “On” is selected, the Master Keyboard Mode is enabled, and the indication appears on the LIVE SET screen.
When the Mode SW is ON. basic parameters can be set. In the image below I skipped down to “Zone Settings” to view the basic parameters available when the Mode SW is ON:
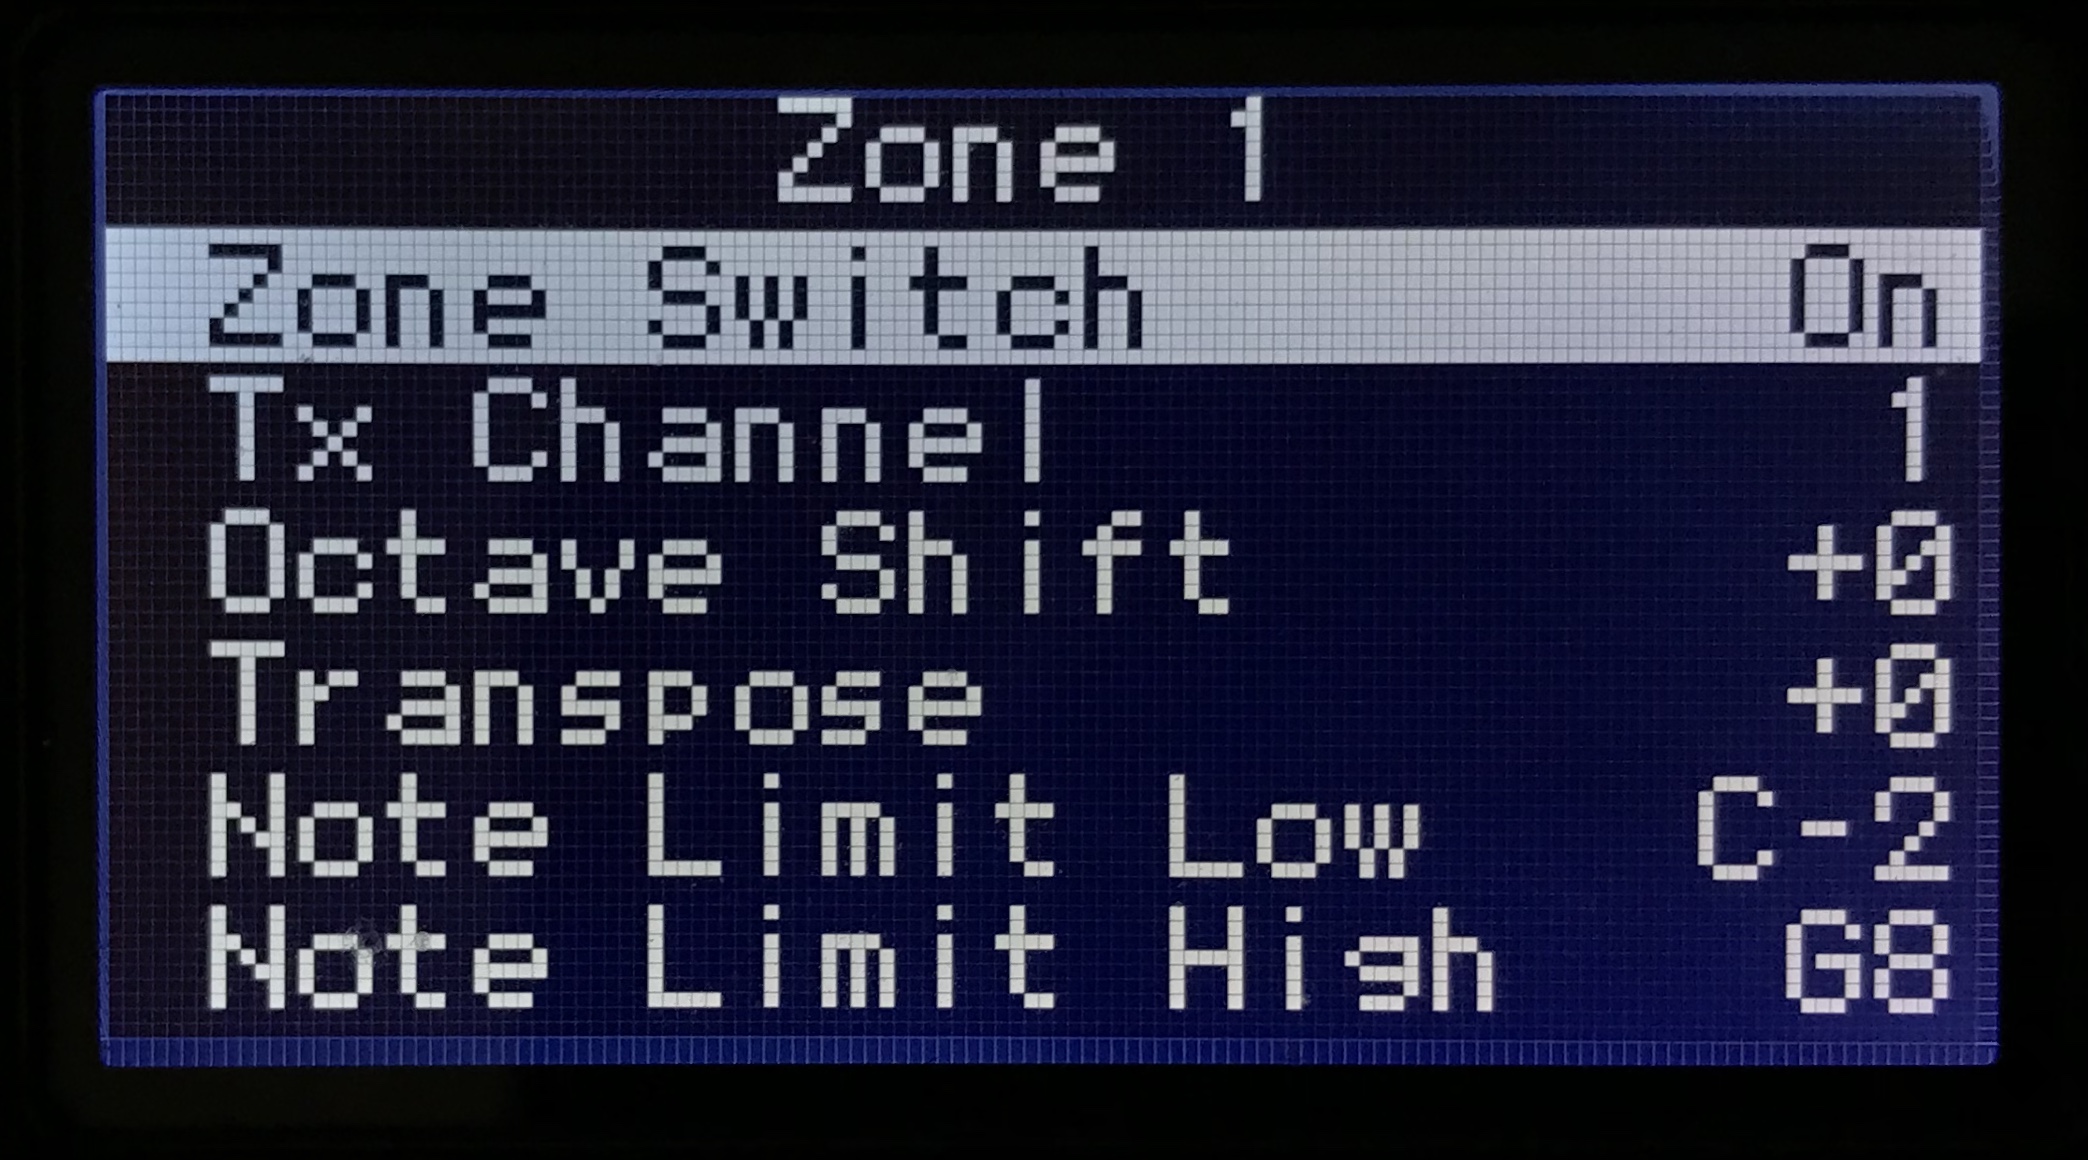
If you want more detailed Zone control, you will want to engage the Advanced Zone SW.
ADVANCED ZONE SW
With the Mode SW ON you get the settings above, but turning the Advanced Mode SW ON allows the following parameters (Advanced Mode parameters in BOLD):
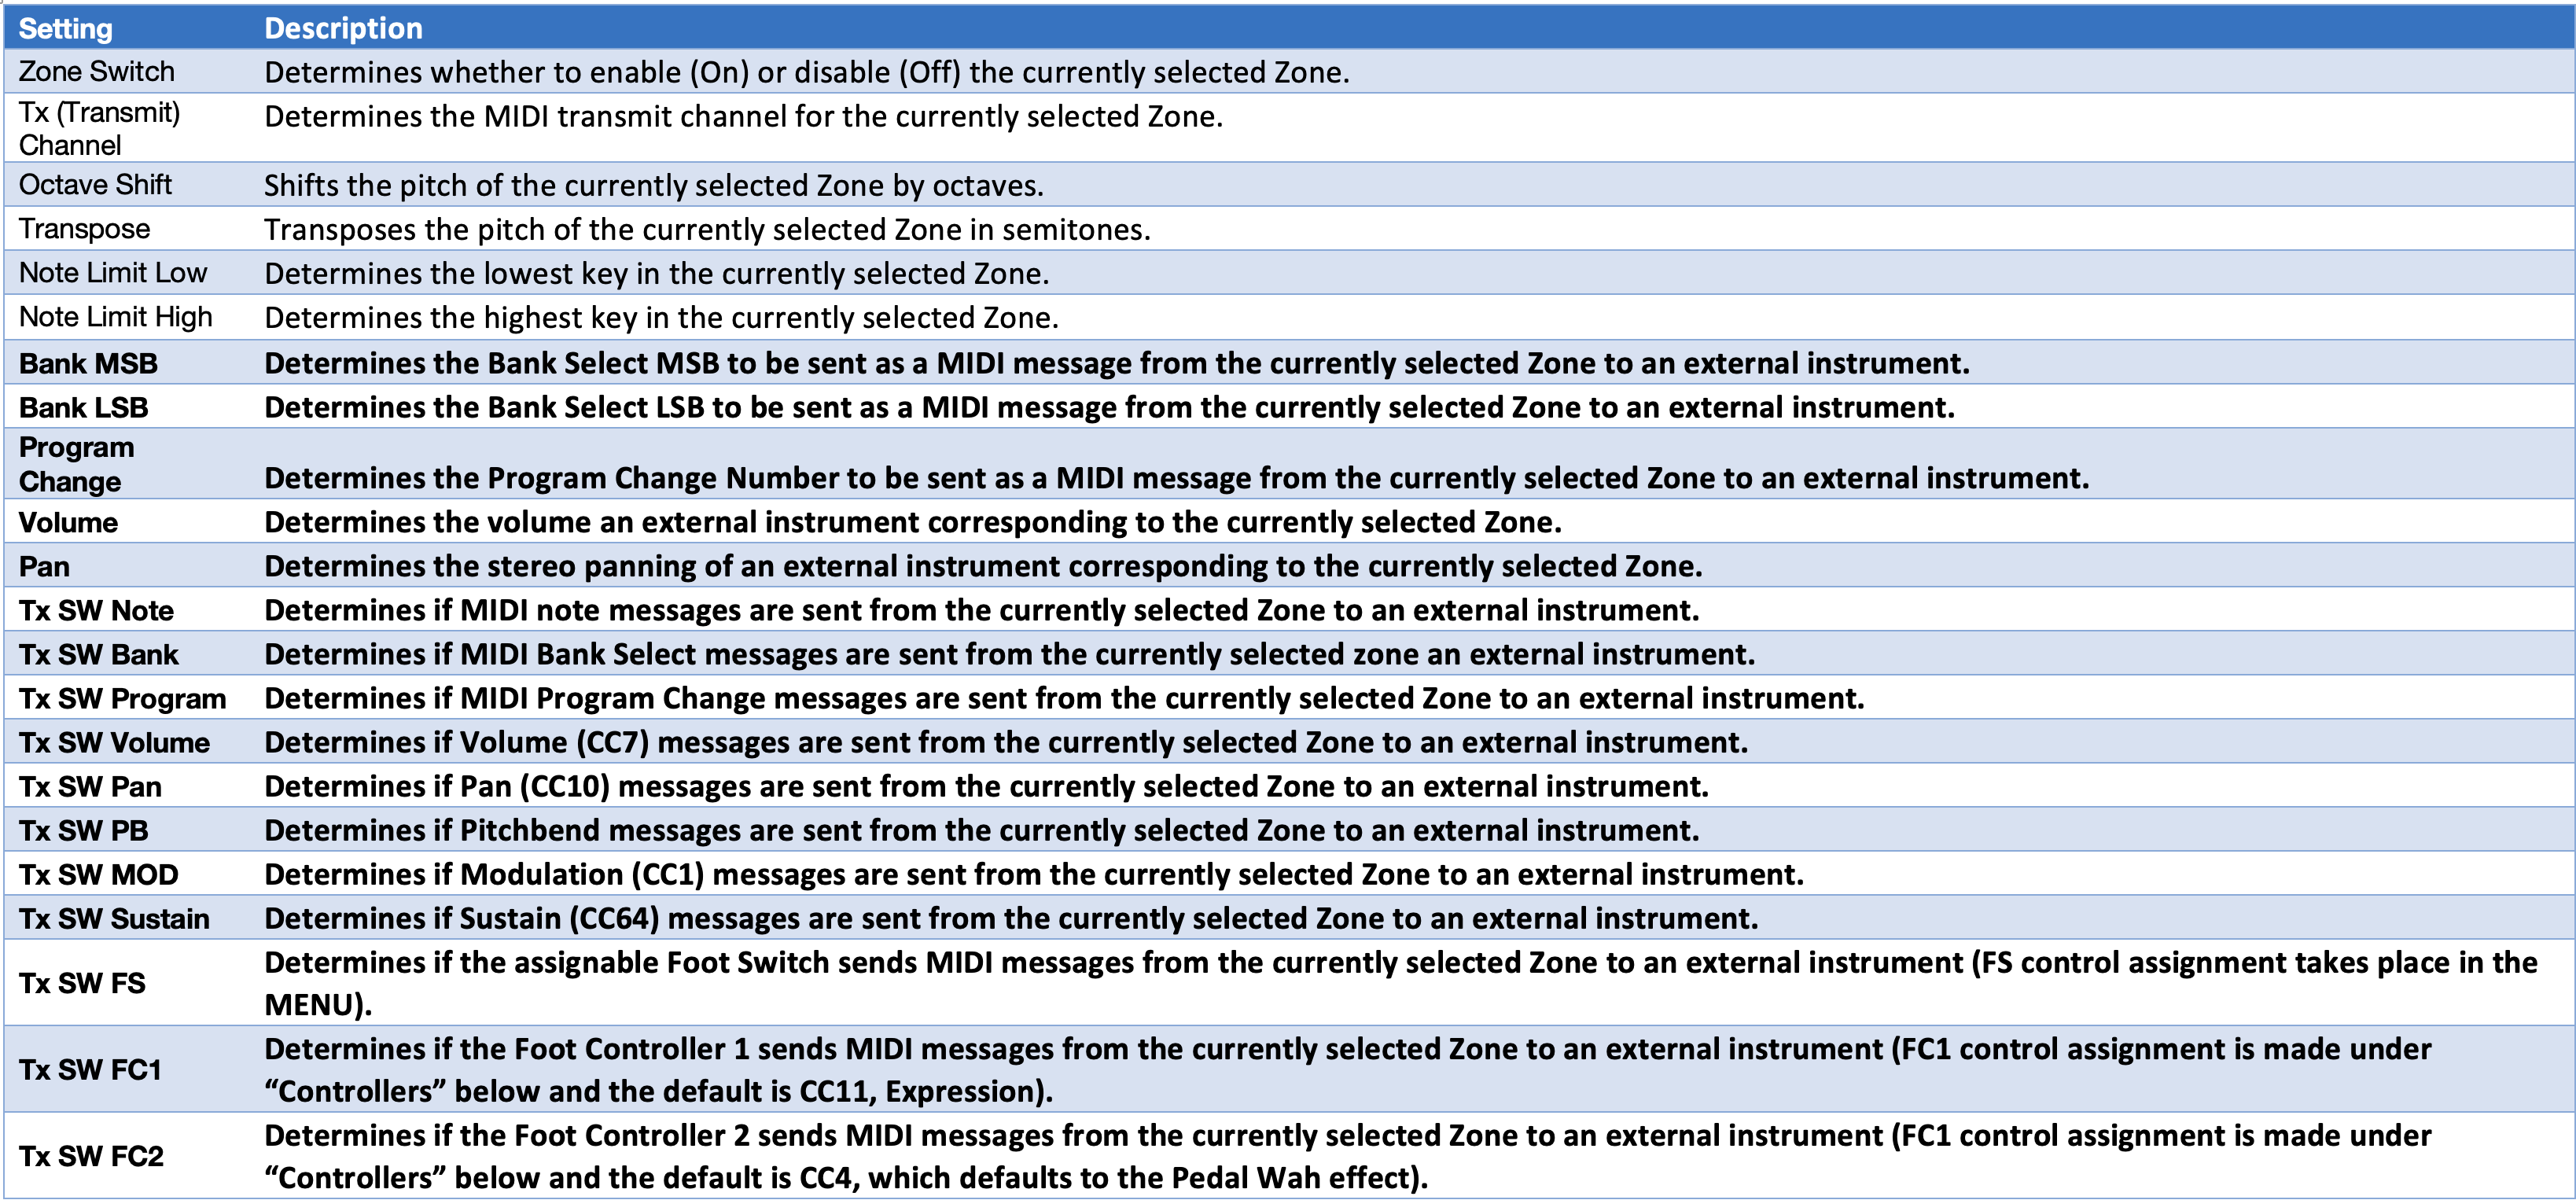
So where do you edit these control settings? That’s what Zone Settings are all about.
ZONE SETTINGS
This is where each of the four Zones are configured. Selecting any of these gives you the parameter selections mentioned above.
CONTROLLERS
Here you can set up physical controllers for each Section. Take a look at the YC61 screen below:
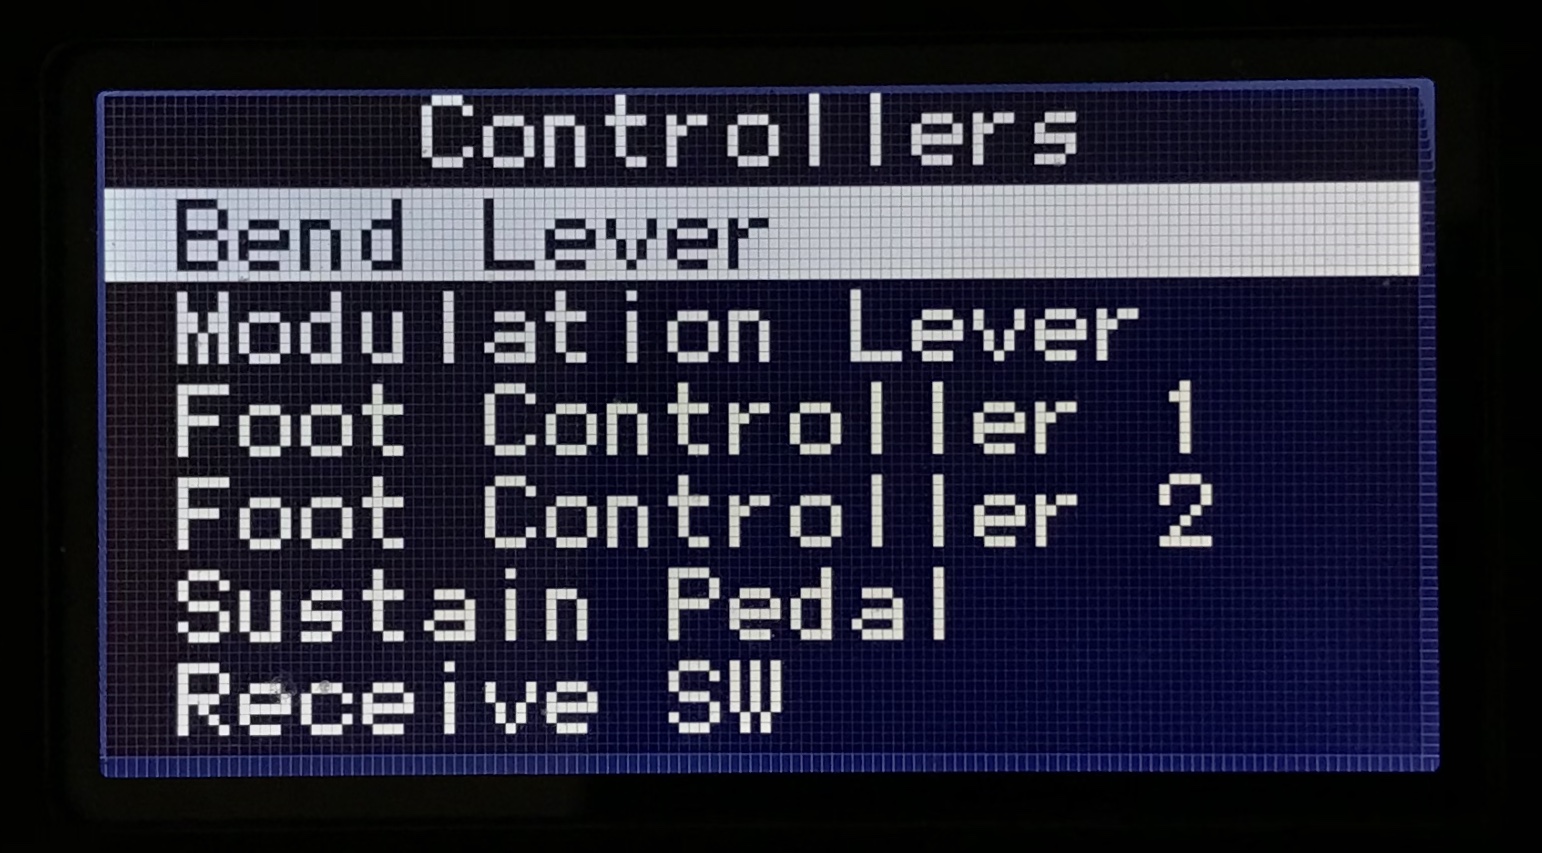
In this screen you can make the following settings for each selection.
BEND LEVER
You can set the pitch bend range for each Section independently +/- 24 semitones. Default is +2 for each Section
MODULATION LEVER
This has several different parameters.
- Assign
- Determines the function to be assigned to the Modulation Lever
- You can assign Control Change numbers 1 to 119 as well as the USB Audio volume.
- Limit Low
- Determines the lower limit for the Modulation Lever values.
- Limit High
- Determines the higher limit for the Modulation Lever values.
- P. Mod Depth
- Determines the depth of the vibrato effect applied to keyboard notes
- This can be set individually for each Voice Section.
- This can be set for the Organ Section only when the FM tone generator organ type (F1 to F3) is selected.
- P. Mod Speed
- Determines the speed of the vibrato effect applied to keyboard notes
- This can be set individually for each Voice Section
- This can be set for the Organ Section only when the FM tone generator organ type (F1 to F3) is selected.
FOOT CONTROLLER 1
This is where you can set the MIDI CC for Foot Controller 1 and a High and Low limit value. Default is CC11, Expression. Default Low and High Limit values are 0 and 127 respectively.
FOOT CONTROLLER 2
This is where you can set the MIDI CC for Foot Controller 2 and a High and Low limit value. Default is CC4, Foot Controller which internally controls the Pedal Wah effect. Default Low and High Limit values are 0 and 127 respectively.
SUSTAIN PEDAL
This allows the sustain Pedal to be assigned to either Sustain, which is the default, or to be assigned to control the Rotary Speaker speed.
RECEIVE SW
Here you can set whether or not Foot Controller or Foot Switch messages are received or ignored for each Section. This works if you are using an external MIDI controller as well. Expression, Sustain, Sostenuto and Soft are can be set to ON or OFF for each section. The default is all ON.
DRAWBAR COLOR
These settings determine the color of the drawbar LEDs. This can be set individually for the UPPER and LOWER parts so that you can tell the difference between the two active manuals by color of the drawbar LEDs.
Settings: White, Red, Yellow, Green, Cyan, Blue, Magenta
Default: Upper = White, Lower = Red
NAME
Last but not least, this is where you name your LIVE SET.
Understanding how the MENU and SETTINGS function will help you get the most out of your YC61. Stay tuned for more articles in the “Master YC” article series coming soon!
Have questions or wnat to share yout thoughts/comments? Join the conversation on the Forum here.