Notifications
Clear all
MODX/MODX+ Series Synthesizers
2
Posts
2
Users
0
Likes
4,381
Views
Topic starter
Can anyone help please? I have recently moved over to using Studio One 4.5 but need help to route everything. The tech side is not my strongest area I'm afraid.
My set up consists of iMac, MODX and a Presonus Audiobox 2 channel and yamaha monitors.
I have balanced left and right outs from my MODX to left and right ins of the Audio box
Then, balanced left and right outs from the Audiobox to the monitors
And finally the USB from MODX to the Mac
The problem!
Firstly, I am getting a horrible signal noise from my monitors and I don't know why (new cables)
Secondly, I don't receive any signal from my MODX when in DAW (I have gone to quick setup and set record from midi to DAW but nothing) I have also downloaded and successfully installed the relevant software.
My aim is to record straight out of the box from the MODX all midi data played into Studio One whilst using the MODX to also play plugins.
Do I need to have left and right outs from MODX to Audio box if using USB? Bearing in mind I want to record midi data from my MODX so I can make changes if necessary then bounce to audio.
P.S. Do I have to disable the sound drivers in the Mac too. I'm new to Mac also..So huge learning curve for me at the moment.
Any help would be appreciated.
Kind regards
:
Kevin
Posted : 22/07/2019 11:00 am

Hi Kevin,
We can offer you general help with getting setup and running.
Let’s start with a review of your gear and how to set it up.
You have a MODX. It has a MIDI and Audio Interface built-in. You will not need the Presonus Audiobox in order to setup and record your MODX. The Audio Interface built-in to the MODX will give you 10 audio bus Outputs and 4 audio returns. The external audio interface will be limited to 2 audio bus Outputs and 2 audio returns.
What that means is if you use the built-in Audio Interface, you will be able to take advantage of multiple stereo Outputs, simultaneously, from the MODX Tone Generator to your computer. This will allow you to do things like separate Drum Outputs, separate Bass Output, separate Outputs on your different Parts (adds great recording flexibility) all at pristine 24-bit resolution. You can even play and sing and record all Parts to their own discreet Audio Tracks!
If you choose to connect the Outputs of the MODX to your external audio interface you will be limited to just two (left/right) Outputs. This is your choice. Which will sound better? You can try both, you should try both. Assume that even though this is not a current strength of yours (setting up etc.,) please assume you will Master this subject... shortly. It has a learning curve...
It is detailed, but it is also very “knowable”. The setup will be similar for any Synthesizer, any audio interface, any studio monitors, any software program. Yes, the specific details will be slightly different — but the general setup will be very very similar. Once you know what your doing, what each component is supposed to do... configuring your System will become second nature. Trust me. And once done correctly, there is usually a way to “lock it in” — so you don’t have to do it again, you simply *store* your configuration (that’s one thing computers do really really well... recall).
If you decide to use the 10-in/4-out audio interface built-in on the MODX... You will need to download and install the “Yamaha Steinberg USB Driver version 1.10.5 for Mac”.
You can find the Driver at this link:
Official MODX Download page.
Note: You will also want to download and install “MODX CONNECT” (a utility that will enhance your MODX computer experience). All Downloads come with instructions — please read through them prior to installation.
Once you have installed the Yamaha Steinberg USB driver” - in your Mac, find the icon on the Dock that looks like a Gear... this is the System Preferences. You should find the “Yamaha Steinberg USB Driver” icon... double click it to open its control panel while connected to the MODX via USB.
If you decide to use the External Audio Interface... check the PreSonus documentation for the appropriate Driver for that Interface.
Extra Credit: A “driver” is a bit of code, usually written by the manufacturer, that translates for your computer what the device in question is sending. The Yamaha gear, if your Interface, needs its Driver to translate for your computer. The PreSonus gear would have their own recommended Driver. Versions of your computer Operating System, and model of your device are important to pay attention to...
You will need to *select* the Audio Driver within your DAW software (Studio One). Read through this portion of the provided documentation. Audio Setup is basically telling your DAW where to look for incoming audio and where to send it. ASIO is a term you may run into. Audio Streaming Input Output... the “Yamaha Steinberg USB Driver” is an ASIO Driver... when selected within the software, you are instructing the software where to look for audio inputs and where to send the audio output.
Connecting the MODX
A simple USB connection from the MODX’s “To Host” port to the computer.
A pair of appropriate length signal cables from the Main L&R Outputs, one to each Studio Monitor.
Explanation: the MODX will generate and send Digital Audio to the computer via USB. The MODX will also send Analog Audio (the kind that can be heard) to your Studio Monitors. You will learn to select which path of audio signal you will ‘monitor’ .
Powering up
In general, your Synthesizer should be powered on when you launch your DAW software (StudioOne). This is because during boot up, it will have your computer scan your ports for connected devices. This is logical (and important). If the computer finds a compatible audio or MIDI device (one that you have previously setup, it will just go ahead and connect. Make sense? So once you are configured remember this power on routine. The computer program should be launched only after connecting your devices.
MODX Settings
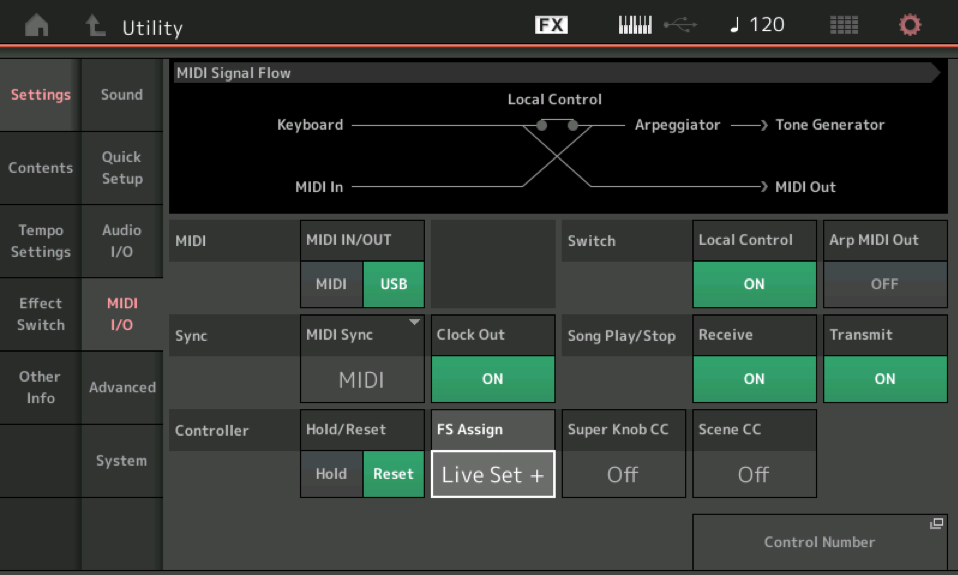
Press [UTILITY] > touch “Settings” > touch “MIDI I/O” > find “MIDI IN/OUT” > Select the port you wish to use for MIDI communication. Your choices are MIDI (5-pin cable), or USB. This is easy... determine how MIDI is being sent and returned from your computer... if you are using the built-in MIDI interface, then select “USB”. If you are using an external MIDI interface, then select MIDI.
Touch “Audio I/O” > here you have option for setting up Audio communication between the MODX and the outside world. The MIC/LINE setting is for an external device you can connect to the A/D INPUTs on the MODX back panel. Mic is for typically weak signals like a dynamic microphone, Line is for more powerful signals from devices like other keyboards, CD players, etc. There is an A/D Input On/Off and Gain Knob on the left front panel of the MODX. Acting as Audio Interface, the MODX will be able to apply Effects and send signal arriving at the A/D Input on to your DAW (Studio One) and because you’ll have 10 Audio buses, you can send that audio to own discreet Audio Track. So it is possible to play and sing and record each Part you are generating to its own discreet Audio Track... each with its own effects!
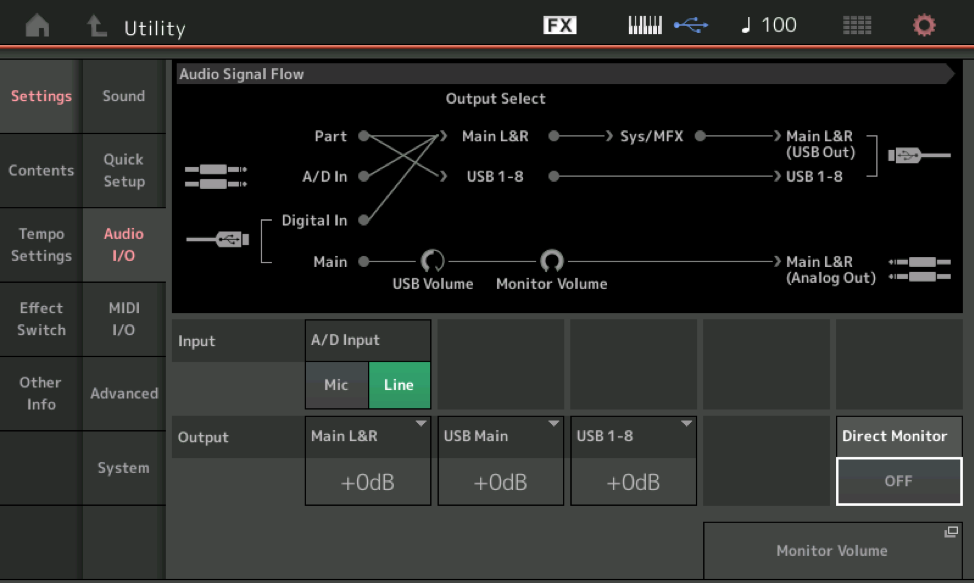
“Direct Monitor” - this connects/disconnects the normal audio path between the MODX Tone Generator and the analog audio Outputs. When “Off” you interrupt the normal connection between the MODX and your speakers (you would do this when you want to ‘monitor’ just the audio that has traversed the computer.
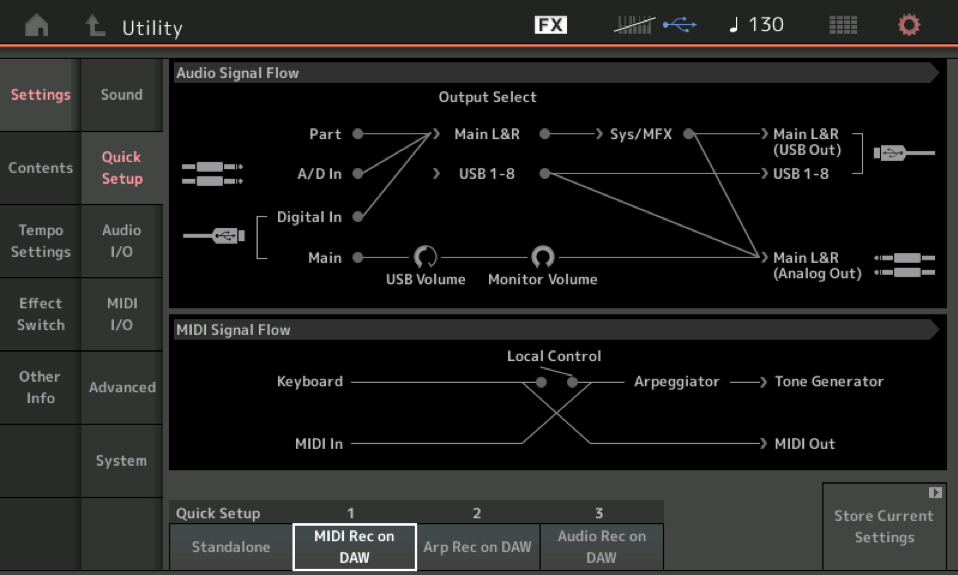
Touch “Quick Setup”. These are macros that can be used to make the 8 or more settings you need to make when recording your MODX to a computer. These are programmable (at least 3 of them are)... but the factory defaults are “MIDI Rec on DAW”, “Arp Rec on DAW”, and “Audio Rec on DAW”.
“Standalone” - is used when using the MODX without a computer.
Extra Credit
The Quick Setups basically handle the most typical things you will be doing with a MODX and your computer. Take your time, they are simply a shortcut. Endeavor to learn each setting... but you don’t have to do it all at once. If your goal is record MIDI data to your DAW... there are two Quick Setups... MIDI Rec and Arp Rec... the difference is complex to explain, but “MIDI Rec on DAW” is for when you are recording your playing directly... while Arp Rec on DAW” is for when the data sorted by one of MODX’s eight Arpeggiators is what you want to record.
This should get you started... if you have other questions, post back here.
Posted : 22/07/2019 12:26 pm
