I'm using the Superknob to crossfade between two parts. However both parts are too loud relative to the rest of the performance.
How do I reduce the overall volume of the parts considering that the volume controls have no effect?
I'm using the Superknob to crossfade between two parts. However both parts are too loud relative to the rest of the performance.
How do I reduce the overall volume of the parts considering that the volume controls have no effect?
It is not that volume controls have no effect, the Sliders have no effect. The difference is that there is more than one place that the output level of the Parts involved, are controlled.
The Slider represents Part Volume, however, within the Part are other parameters that contribute to the Part’s output level. On some of the programs you’ll find the Slider has little, and sometimes it has no effect on the Part. This means that within the Part parameters of this instrument it has been setup for some alternate controller to dynamically control the output level.
In cases where there is another controller involved, the Slider setting might be the initial *minimum* setting for the Part; some or all of the output level control may have been farmed out to a different controller.
Example: Say you have piano and strings layered but you want to recall a specific proportional relationship between them, then using this alternate controller you can swell the strings when performing. You might make it so that when this additional controller was at minimum the string output matched the specific volume that goes with the piano, and as you apply that controller you swell the string output. You do so, not moving the Slider (Part Volume), but by applying this additional controller that is set to change the output level (Element Level) of the string oscillators.
So the Slider‘s initial setting is not silence, rather it is a preset balance you have determined to go with the piano Part. The alternate level control will be set to fade up (swell) and back to the original output level. (You can see how this is different and would *perform* different ly that just two Sliders)
Some times 100% of the output level is farmed to the alternate controller. It will depend.
There are so many different ways that alternate controllers are involved, particularly with output level. Most common is Element Level or Operator Level... but there are several ways.
Find the PART Control Set “Destination” that is set to control “Volume” or “Element Level” or “Operator Level” (as a place to start)
You can determine whether the Control Set is set to increase, decrease, or increase/decrease the output level... the “Curve Type“ and “Polarity” will tell you this. The “Ratio“ setting will be used to set the range of change. It can be used to balance your Parts with the rest of the Performance. It can be done by reversing the direction of control, some times the reversal takes place in the individual Control Set, and some times it is reversed at the Common Assign Knob.
Other possibilities are where the Slider (Part Volume) has been stored a 0 and yet the Part is sounding and Volume is controlled by another controller... you will need to identify the Control assignment and adjust its output from with that Control Set. You might have a sound that only appears when the MW is advanced... the Slider Volume would initially be 0 and you control how loud it can get by the Ratio setting in the Control Set. This is also how you can determine how it balances with the levels of the other Parts.
There are so many programming possibilities... can you post an example so the answer can be more specific?
Or give us a description
If superknob ramps up (i.e. standard curve) one PART and ramps down another PART - you can change the slope so the maximum volume offset is lower, for one PART, at maximum superknob rotation and also lower, for the other PART, at minimum superknob rotation.
I'm still in the dark if this describes your Performance - but that's one way for one type of Performance.
Current Yamaha Synthesizers: Montage Classic 7, Motif XF6, S90XS, MO6, EX5R
Do you mean by changing the ratio?
I couldn't get this to reduce the max volume of the parts,
However, I did find that reducing each Element's level did what I need.
So if I understand this correctly, the Superknob is ramping the the volume from 0 to X on Part 1, and from X to 0 on Part 2, where X is equal to the Element Level.
To gain a better understanding of how the Control Set “Ratio” parameter interacts with Output Level and how you can use this to your advantage when performing. Hope this helps...
At first one may think that having a volume control that goes from 0-127 would be the ideal situation for controlling multiple Parts to affect a balanced mix... until you actually attempt to apply that in real-time while playing the keyboard.
Sure, if your sitting back (playing audio engineer) creating a balance ... but what if you are a musician performing multiple sounds simultaneously. You may need to do musical things like “dynamic swells“, where the sound increases from a predetermined start level, increases over time, and then returns to the original start level. While this is happening with the Strings, perhaps the piano is getting softer, and the brass swell at an even more dynamic fashion... while the drums and bass remain the same. How can you balance all of these with each other..? The following will give you the background on how to approach this:
In this example, you want to accomplish this with a performing gesture that can take care of each change precisely and without requiring both hands (after all, you’ll be playing). This is where the macro control which is the AssignKnob/SuperKnob feature comes into play. Use a Yamaha FC7 sweep pedal plugged into Foot Controller 2 to apply Super Knob/Assign Knob movement.
Let’s use a basic String Ensemble sound — find links to this example Performance below — I use this when doing training sessions, because it is a Single Part, single Element Performance that you don’t inherit more stuff than one can understand (there are less ‘patch cables’ in use)... very basic programming for learning purposes.
Let’s start by setting the Part Volume = 0
select Part 1
Press [EDIT]
Touch “Part Settings” > “General” > set the “Volume” = 0
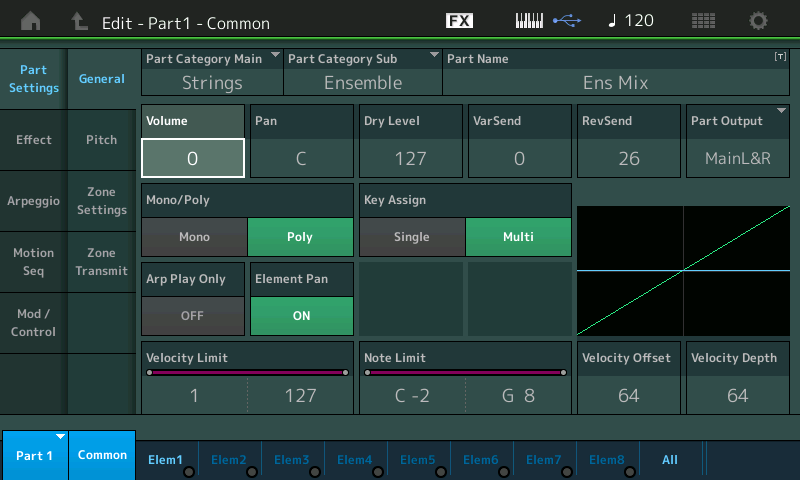
When Part Volume = 0 this is like placing the Part Slider#1 at 0.
Next, we are going to make assignments that will determine the Part Volume... as we’ll see the Slider setting determines the ‘minimum‘.
Each Part has eight Assign Knobs. Those Part Assign Knobs can be linked to the Super Knob and its 8 Common Assign Knobs
With the Part VOLUME parameter highlighted...
Press [CONTROL ASSIGN] -- it glows whenever you highlight an assignable parameter.
You will be asked to move a controller to make an assignment...
__ move the SUPER KNOB
A drop-down will appear briefly notifying you that "MODIFIED: Common AsgnKnob1 --> AssignKnob 1"
Translation: The Super Knob's first available Common Assign Knob has been assigned to control Part Assign Knob 1 (Also first available)
You are taken to the Part 1 - Edit - Common: “Mod/Control” > “Control Assign”
This has found the first available Assign Knob and has made the following assignment
the SOURCE = ASSIGN KNOB 1 and the Part VOLUME has been added as a “Destination“
Now, to understand the Control Set (the set of parameters that will determine how Part Volume behaves).
“Curve Type” = Standard
“Polarity” = Uni
“Ratio” = +32
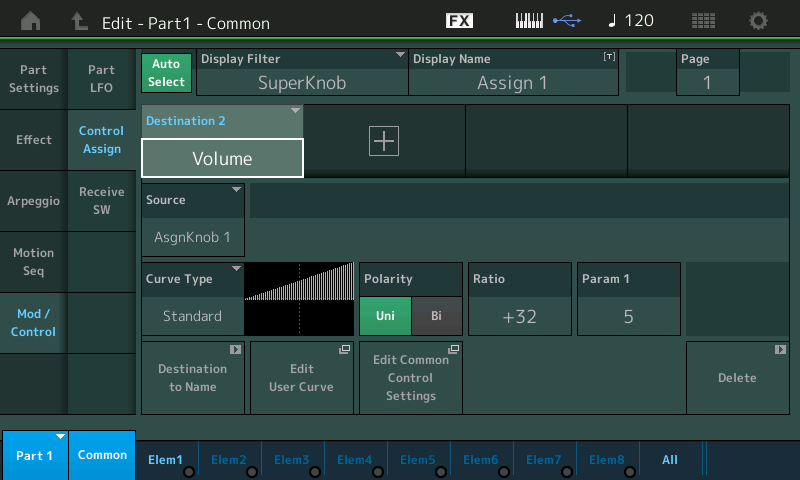
To understand what you are seeing in the graphic. There is an uphill ramp that goes left-to-right. It starts on the centerline halfway up, bottom-to-top, and climbs exactly to the upper right corner.
This indicates exactly how the Part Volume will behave as you turn the Assign Knob 1.
At minimum - sound output is 0 (centerline); as you turn clockwise from minimum, the Volume increases and reaches maximum when you reach the very end of its travel.
Set the “Ratio” = +16
Now when you turn Assign Knob 1 from minimum-to-maximum, you will notice it only gets half as loud when you reach the end of travel.
“Ratio“ is determining “how loud” maximum is for the Strings.
Set the “Ratio“ = +63
Now when you turn the Knob from minimum-to-maximum, you will notice it does NOT get any louder than it was at +32, but it gets louder *quicker*. It reaches maximum output level in half the distance of movement, left-to-right. By the time the Knob reaches its apex, you have reached maximum output. (There can be no increase from 12 o'clock going clockwise).
Negative numbers are meaningless here for “Ratio” — because the original Part Volume is set at 0, meaning negative values will yield volume less than zero... which are meaningless.
Let’s say we want the the Strings to sound when we initially recall this Performance! But we still want to dynamically Control the string Volume - as in the musical swell we mentioned earlier. We want to set an initial minimum that is something other than 0.
Touch “Part Setting”
And this time set the Part Volume to 50
What this does is set the minimum Volume. Now when the Assign Knob is turn down to its minimum point, the String Volume will be 50.
Moving the Knob will ‘offset’ the level we hear. As you turn the Knob now, you will increase the Strings linearly (Standard Curve), by the amount of the “Ratio” setting.
Touch "Mod/Control" to return to the Control Sets.
For this next experiment, change the “Curve Type” = Bell
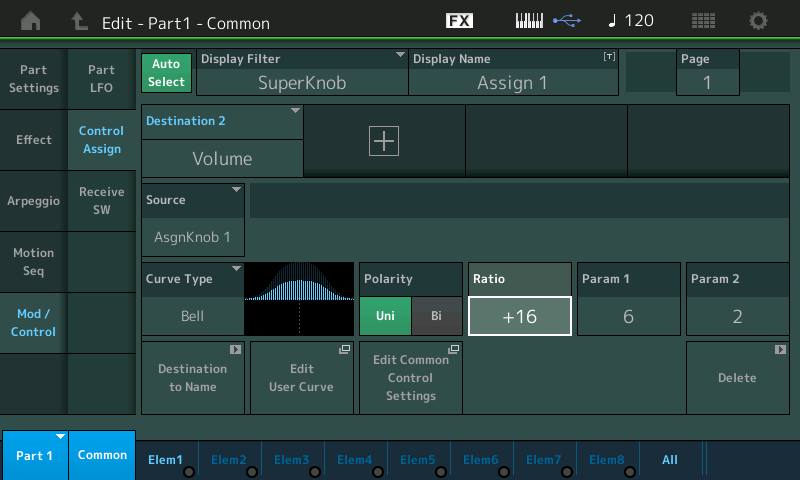
The “Bell” shape indicates how the String Volume will behave as the Knob is advanced
Again “Ratio” determines exactly how much increase there is going to be. At the 12 o’clock position you will reach the maximum level and then if you continue to turn it will drop back to the start value (minimum)
If the Part Volume setting is 0, the Bell Shape will fade up from zero - reach maximum at 12 o’clock - and return to zero when fully clockwise.
Touch “Part Setting” and set the Volume = 0
Return to “Mod/Control” and see how the graphic mimics the response you get. “Ratio” is pivotal in setting the range and output level.
Set the "Ratio" to +12 - try the Bell curve
Set the "Ratio" to +32 - try the Bell curve - it reaches maximum possible when at 12 o'clock
Set the "Ratio" to +63
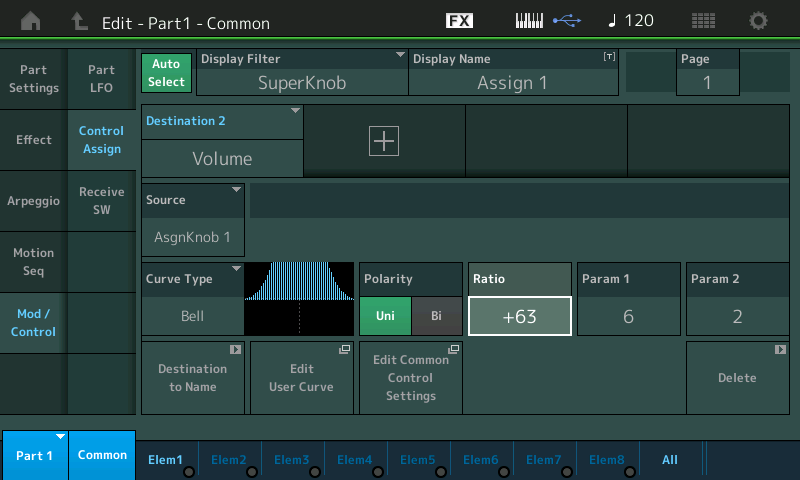
Now when you turn the Knob from minimum-to-maximum, you will notice it does NOT get any louder, it gets louder *quicker*.
Next, try experimenting with “Polarity“ = Bi
Starting the Knob at minimum you will hear no sound until you crossover into the positive range...
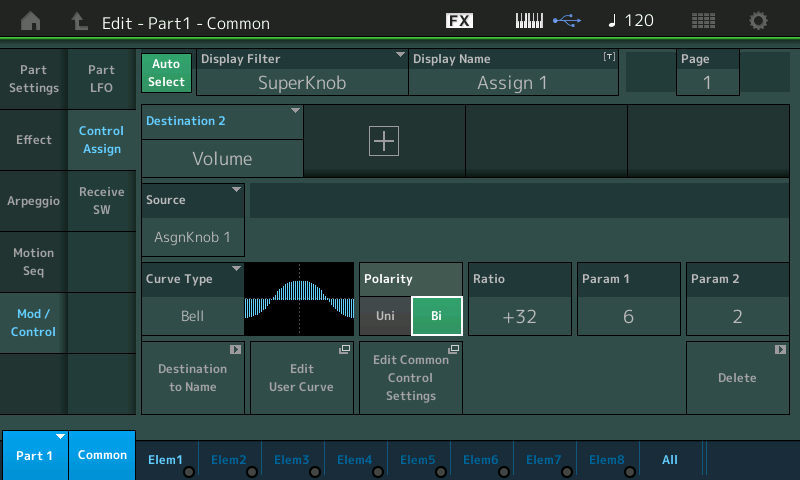
You can see how the "Part Volume" can be used to set a minimum start value and the together with the "Ratio" determine how much change there is.. It also influences how drastically that change occurs.
“Param1/Param2” will change the shape of the current Curve. Depending on the Curve Type you select you may have one or two Parameters for “shaping” the Curve.
ELEMENT LEVEL
When the Control Assign functions are set to do this same thing with Element (or Operator) Levels, your control is over the individual Oscillators within the Part.
When the Control Set “Destination” = “Element” > “Elem Level”, the same kind of thing that we illustrated with Part Volume can be implemented. Partial control or full control of the Element Output Level can be handed to an Assign Knob.
On the Control Set screen, tap the DESTINATION "VOLUME" to see the menu options... Select "Element" > "Elem Level"
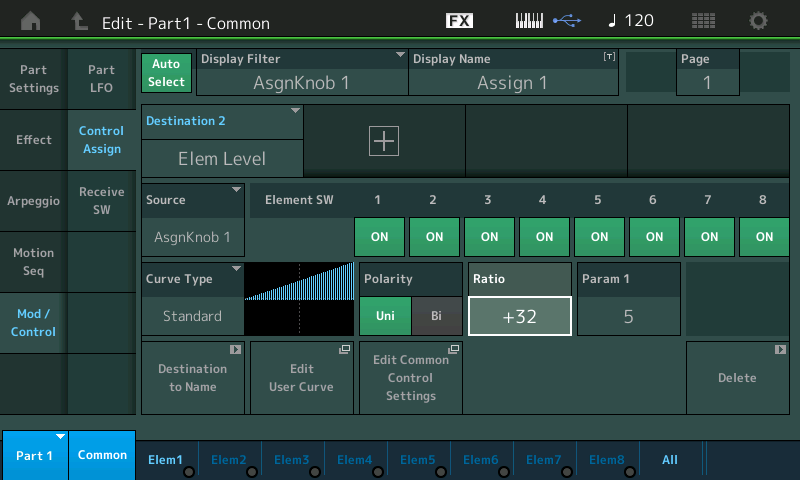
Each Element’s level can be set with the Slider or by navigating to the “Elem#” along the bottom of Part Edit screen, then touch “Amplitude” > “Level/Pan”
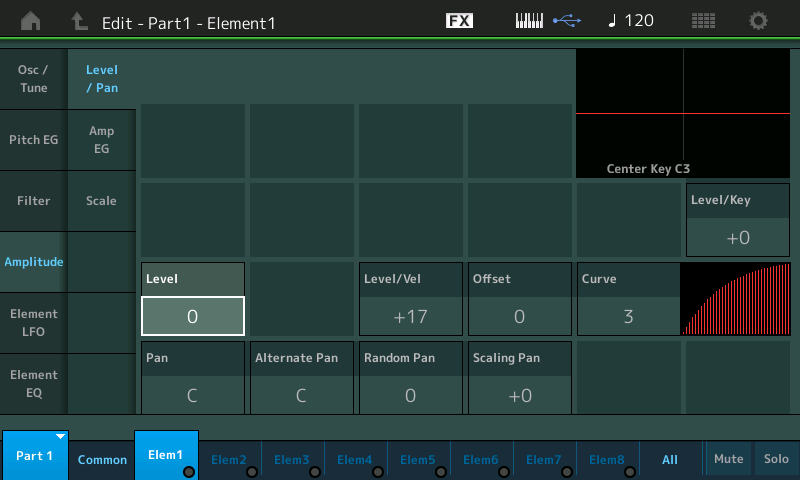
The Value set for each Element’s Level will act as the start point, and the Control Set settings will determine how or if they change. You have a Switch for each AWM2 Element... when ON, the Curve Type, Polarity, Ratio and Param (shaper) features work as described.
The concept is about setting a range of response for each instrument sound. Whether you need full (0-127, minimum-to-maximum) range or some range that increases and returns to fixed value, or does something unique... you can accomplish it with these assignments.
Part Volume - the Sliders send individual to each Part
Element/Operator Level - the Slider send individual output level of each Element.
Ensemble example.X8B -- MODX CONNECT (zipped)
Ensemble example.X7B -- MONTAGE CONNECT (zipped)
Posted on SOUNDMONDO at this link: https://soundmondo.yamahasynth.com/voices/66664
Amazing post. Thank you so much!
Still having a little trouble.
Using the Preset OctoSupreme. I turned off the arpeggiator because I just want the pad sound.
I deleted all of the Superknob assignments from all the parts. I assigned the Superknob to Part Param-->Volume for each part.
Parts 2-4 do exactly what I want. Zero volume with the Superknob at min, and volume ramps so that I can layer this with piano.
Part 1 will not respond to the Superknob. I also tried assigning the Superknob to Element Volume instead of Part Volume and it had no effect.
How do I investigate what's controlling the volume of this part so that I can release it?
I just tried what you did... opened up the Octo Supreme preset and deleted the Super Knob assignments. Then I assigned the super knob (via Part 1->Assign Knob 1) to Part Param->Volume for part 1.
Since the default polarity is Uni and the curve is positive, the control can raise the volume but not lower it, so I had to do 1 of the 2 following things:
1. Turn the volume of part 1 down to 0 using the slider. Then the knob could start at zero and raise the volume, or
2. Change the polarity to Bi(polar), so the control can go negative as well as positive. Then the volume is brought lower as well as higher by the Super Knob/Assignable Knob.
If you think of control assignments as adding a relative offset to the preset value you're controlling, this makes sense. If the preset value (such as part volume) is greater than zero and you add a positive offset, the volume will go up, but it can't go lower than the preset value. To make the volume go lower, you'd have to set the preset value lower, or use a negative offset.
I have all the Part volumes set to zero. In edit mode, when I switch from part to part I can't see any differences. They all have the same settings and curves and the same offsets, the same Superknob assignment and they all have volume of 0. But only Part one won't respond.
I suggest during the reprogramming of this Performance that you make use of the “Solo” function so you know what each Part is contributing.
From the HOME screen “Solo” Part 1
Originally this sound was set to a Controller Arp (Expression) — this means instead of a note-oriented Arp phrase, the Arp was applying cc11 Expression movement to whatever you played. Play Part 1... you will hear a slowly evolving sound (this is due to the Dual Band Pass Filter... so you must hit and hold a chord — it is held notes that will allow Part 1 to develop.
Solo each Part in turn and play it alone, this will allow you to better understand how they will behave under the settings you have created.
The Amplitude EG and the Filter EG both have dramatic impact on the output level of any sound. The Amplitude can be turn up, but if the Filter Cutoff is closed down then it matters not where the Amplitude is set. The Filter must also allow signal through. And vice versa... if the Filter is open but the Amplitude Envelope is not supporting sound, you’ll hear nothing. Then must work together. The Dual Band Pass Filter has two peaks — you will hear the sound of Part 1 change over time... the longer you hold it, you will hear the pattern evolve
Among the settings you deleted were several concerning the Filter (Cutoff, Resonance) so by doing so you are changing how some of the Parts will behave.
Just wanted to piggyback onto this thread here with a question about the Super Knob and Performance volume.
Is it possible to assign the Super Knob to control the overall performance volume (without having to do controller assignments for each Part) while the FC7 is handling expression for certain individual parts?
Example Scenario: I use the FC7 (defaulted to expression for all of my Performances) to control a string layer (other Parts have the foot control off) while the Super Knob adjusts the overall volume of all Parts up or down depending on whether I am taking a solo or playing an intro without the band, etc, etc?
(Yes Bad Mister, obviously I could use the Master Volume knob, but in the heat of battle I often forget to adjust back to default so its important I be able to handle this Performance by Performance)
Is it possible to assign the Super Knob to control the overall performance volume (without having to do controller assignments for each Part) while the FC7 is handling expression for certain individual parts?
See the following post on that very subject, particularly Method 2:
Link — Volume Control Options
Of course, after fading the entire mix out, you will have to remember to turn the volume back up 🙂
