Notifications
Clear all
MODX/MODX+ Series Synthesizers
4
Posts
4
Users
0
Likes
292
Views
Topic starter
I have pored over the documentation and internet and cannot find satisfactory documentation on device capabilities to handle inbound MIDI (other than the CP73 I have hooked in via a USB hub just to play the sounds...).
What I was thinking about was hooking up a generic MIDI controller (Akai Midimix, Launch control XL or similar) to expand the capabilites of my new MODX6+. For example I would like to use pads (rather than the keys) to trigger 'play once' arpeggios to make up for the fact that I have only 2 hands (this seems possible as the pads send note data). In addition to that I was wondering if the additional external sliders and knobs could be used to control all sliders and knobs (8, 8 as the montage has) - as well as adjust other internal parameters.
Thanks!!
Posted : 07/01/2023 4:30 pm
For example I would like to use pads (rather than the keys) to trigger 'play once' arpeggios to make up for the fact that I have only 2 hands (this seems possible as the pads send note data).
One way that burns a part would be to create a user arpeggio on the MODX, assign that arpeggio to a dummy part that has a keyboard range restricted to just one key that you won't use in your performance.
Then the pad can send that one key value to the internal part when you want the arpeggio to sound.
Posted : 07/01/2023 11:23 pm

[quotePost id=119968]I have pored over the documentation and internet and cannot find satisfactory documentation on device capabilities to handle inbound MIDI (other than the CP73 I have hooked in via a USB hub just to play the sounds...).
What I was thinking about was hooking up a generic MIDI controller (Akai Midimix, Launch control XL or similar) to expand the capabilites of my new MODX6+. For example I would like to use pads (rather than the keys) to trigger 'play once' arpeggios to make up for the fact that I have only 2 hands (this seems possible as the pads send note data). In addition to that I was wondering if the additional external sliders and knobs could be used to control all sliders and knobs (8, 8 as the montage has) - as well as adjust other internal parameters.
Thanks!![/quotePost]
All the inbound MIDI Mappings can be found in the Data List Manual, although be warned, it's not easy reading.
I presume you want to hook up a "Bells and Whistles" MIDI Controller to provide you with more Physical Controls than are available on the MODX Top Panel (Sliders, Knobs, Buttons etc).
This has been discussed before. The obstacle is that some Physical Controllers on the MODX (Montage also) need SysEx commands from the MIDI Controller. Bear in mind that many Knobs/Sliders are multifunctional, depending on their assigned "Task". For example, a Slider may be controlling Part Volume, Element Level or FM Operator Level.
To address the MODX Synth Engine (Tone Generator) your MIDI Controller would need to send the correct SysEx commands to achieve similar functions.
It was explained, the reason for using SysEx is that there are more "Functions" than available MIDI CCs.
It is possible to "assign" functions internally to "Assign Knobs" (See Control Assign in Reference Manual), and in turn, the "Common" Assign Knobs will respond to external MIDI CCs.
It's up to you how much effort you want to invest in doing this. If your intent is to emulate the MODX Control Surface, but with 8 Knobs (instead of four) and 8 Sliders (Instead of Four) your MIDI Controller will need to have SysEx capability (and programmability).
Personally, I decided the easier (and cheaper) route was to be more selective per Performance on which "Go To" controls I needed, and use internal Control Assigns to make this happen on the existing MODX Control Surface.
There is also the option of buying a Montage, but even there, you still have to remember to "Select the appropriate function" before the Knob or Slider does what you want it to do.
For what it's worth, the MODX Control Assign options are very powerful, and a lot of it can be automated (Motion Sequencer), or centralised (SuperKnob, Assign Sw buttons, Scene Buttons etc). However, it does take some learning, and even then, you will need to plan out what you want to achieve, and program accordingly.
Posted : 08/01/2023 2:52 am

If you are interested in finding out what each assignable controller is set to Send Out via MIDI, looking in the Data List booklet would not only be the “hard way” but would only give you the default assignments. There are 8 assignable control Knobs per Part x 16 Parts… allowing you to address individual Parts using CC# on the appropriate MIDI channel to address the Part you wish. The Assign Knob CC# are customizable on a per Performance basis.
If, and when, Sysex is sent by a particular Knob, for example, it is because at the moment you are turning it, it is tasked with changing multiple Parts (meaning multiple Channels, simultaneously). As you may know, CC (Control Change) messages are Channel Messages - channel specific messages — meaning: on one channel only). This means a CC# Sent on MIDI Channel 6, for example will only influence the MONTAGE/MODX/MODX+ sound occupying Part 6 when sent IN via MIDI. (There is one exception which we will explain later, when discussing the Super Knob assignment).
The system is context sensitive… you *select* a Part with the [ASSIGN] button illuminated, the Knobs address that particular Part and will generate a CC# messages on the given Channel that goes OUT via MIDI. If, however, you are on common ground (Common vs. a *selected* Part) you maybe addressing multiple Parts from a single Knob. Each Part slot is, typically, on its own Channel.
__When you highlight the Performance Name, on what is the "HOME" screen (referred to as “Performance Common”), the Assign Knobs Send Sysex.
__When you highlight an individual Part (referred to as “selecting a Part”) you are set to SEND MIDI from the 8 Part Assign Knobs on the Channel corresponding to the selected Part's #.
RECOMMENDATION: Rather than struggling with the Data List booklet, try looking up what’s what in the Performance you are working with inside the MODX. The information is easily found within the instrument. And you can customize, if you need to… for the current Performance. Here's how:
From the HOME screen:
Press [EDIT] > "Edit - Common/Audio" appears at the top left... > touch “Control” > touch “Control Number”
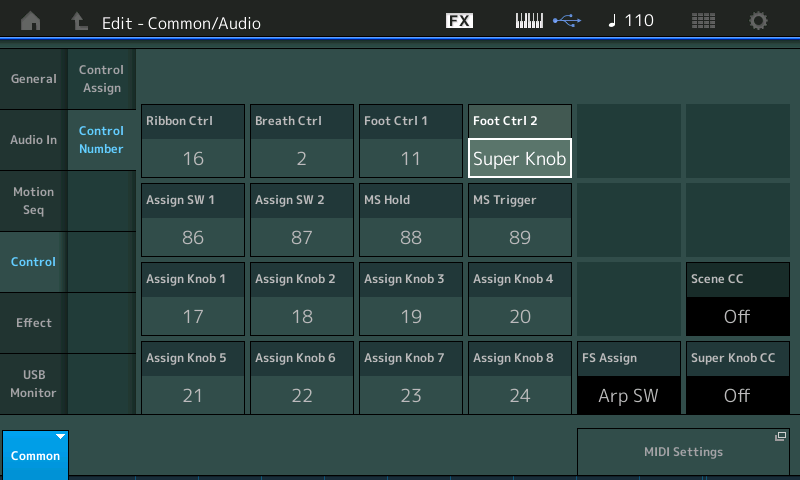
On this screen you can see and manipulate, on a per Performance basis, all of the Assignable (physical) Controllers that a Performance uses to SEND data Out via MIDI. (Exception: The three listed in a black background in the lower right corner -- these are “global” (apply to all Performances) and can be accessed via the shortcut box labeled “MIDI Settings”… FS (Foot Switch), Super Knob CC, Scene CC).
Although the MODX/MODX+ key-beds do not generate Aftertouch, nor do they create Breath Control, or have a Ribbon you can still setup for a Part to Receive it. BC uses CC#2 and the Ribbon defaults to CC#16. Again, assignments are made on a per PART basis using the Part's CONTROL ASSIGN screen.
Insight:
MIDI protocol does not have standard default CCs for every parameter - for example: EQ; those parameters are exclusive to this system - and therefore Sysex is used when accessing a Knob labeled for an EQ parameter.
You can, however, make this system work for you as follows:
How it works using an External Controller device: Any parameter you wish to control, be it EQ or other assignable parameter**, you can program one of the 8 Part Assignable Knobs to that task… then address that Part with the Assign Knob’s CC#; Sending that CC# message IN via MIDI on the correspondingly numbered MIDI Channel will allow your external device to directly address that parameter (without having to *select* the Part to be active).
__For example, if you wish to change the amount of Low EQ Gain of an Insertion Effect assigned to Part 6, you would assign Part 6’s Low EQ Gain parameter ("InsA EQ 1 Gain") to a Part 6 Assign Knob; it will use the same CC number as the Assign Knob you use (CC17-24).
__Part 6 Assign Knob 1 defaults to Sending (and Receiving) CC#17… sending IN CC#17 from your external controller on MIDI Channel 6 will operate the assigned parameter value according to the Control Assign settings (which determine "how much", and in "what directions").
**When you move the cursor highlight over a parameter that is ‘assignable’ the [CONTROL ASSIGN] button will glow to indicate this possibility. There are some 251 Control assignable parameters available in the system (The Data List is a way to see all of them in a list: CONTROL LIST. The actual number of available Destinations varies per Performance.
Not all parameters are available - only those that would be musically useful to change in real-time. In general, if it falls under the heading of 'not available', there is typically a better way to accomplish the goal (musically speaking) - changing the Waveform, for example, is not available; changing a bass into a harpsichord is better handled with program change messages rather than an assignable knob flipping through oscillator waves.
Your external device should be set to Send that CC#17 on MIDI CH 6. It is Part 6’s Control Assign screen that links SOURCE = AsgnKnob1, DESTINATION = Low EQ Gain. Now either selecting Part 6 and turning AsgnKnob1, or sending CC#17 IN via MIDI on MIDI Channel 6 will EQ the sound. The Curve, Polarity, and Ratio settings determine the how much and direction of change. Param1 shapes the application.
Extra Credit:
The MONTAGE front panel is one of the most overlooked differences between the models. Because it has more physical Knobs, Sliders, and Buttons your access to certain features/functions is going to be necessarily different.
__There are 8 Part Assign Knobs for each of the 16 Parts of a Performance. (128 Part Assign Knobs). On MONTAGE 8 Knobs are available at a time. Since the MODX+ has but four physical Knobs it requires a front panel button to switch them to the other group of 4. If your controller has multiple Knobs you can overcome this limitation and gain direct access to all the Assignable Knobs.
__There are 8 Common Assign Knobs that can be linked to Super Knob movement. (8 Common Knobs). The 8 Common Knobs are each directly available on MONTAGE. Again, you maybe able to extend your full time access to all 8 Assignable Knobs directly.
The MODX+ operates so that the internal Part Knob assigned items that you link to the upper Common/Audio level of this architecture will be available without having to individually *select* the Part to be active. They will be available and accessible from the HOME screen.
Because the MODX/MODX+ has but 4 physical Knobs, you must select 1-4, 5-8, 9-12, or 13-16 when using the front panel.
However, when you are sending IN via MIDI from an external Controller, since you designate the MIDI Channel and the CC# you can target any of assignments concerning the 8 assignable devices... because signal coming in via MIDI does not require any Common or Part being selected in order to function.
When you program a Part Assign Knob to a parameter, you must *select* that Part in order for the Assign Knob to function for the assigned parameter unless you additionally link it to the movement of one of the 8 Common Assign Knobs. It is those Common Knobs that are available when you are on the HOME screen with [ASSIGN] illuminated. It is also these Knobs that can be linked to the the Super Knob.
This means you can choose any parameters you want to have access to from the HOME (Common) position by uplinking the PART assignment to the COMMON level of the architecture.
This fundamental arrangement allows the keyboard player, whose hands are typically tied up playing the keys, to consolidate your assigned controls that need to be operated during your performing duties to a single knob… the so called “Super Knob” - it allows you, with a single physical control, to change the volume of Part 1 (swelling the volume), and simultaneously turning down the Volume completely on Part 2, while bringing in Part 3 from silence to match the volume of Part 1, while panning Part 4 left, and Part 5 to the right, while increasing the Reverb Send on Part 6 and so on, the Super Knob even controls Parts not linked by KBD CTRL — you can affect all Parts, including Parts 9-16 or any non-KBD CTRL Part with the Common Assign Knob and Super Knob system.
The Common Assign Knobs default to be linked with the Super Knob, but you can customize via the 8 Scene “snapshots”, which Common Assign Knobs are linked to the Super Knob versus being independent. You might want to control the volume of your lead sounds separate from the volume control of the backing Parts (from Sequencer or Arpeggiators, etc.). This would allow you independent Knobs for leads and rhythm section, as an example.
Additionally, the Super Knob is still a Knob; which means you need a hand to operate it. But this is why an FC7 Pedal is an essential add-on product. It can occupy either one of the Assignable Foot Controller positions; by default, Foot Controller 2 is assigned to operate the Super Knob.
The Super Knob can be assigned a CC#. Default is #95.
If Super Knob CC = Off — it will send Sysex Out via MIDI (The reason you might want to do this is to record its movement and then have separate access to its data on playback from a DAW -- some DAWs, like Cubase Pro, allow you to RECORD System Exclusive messages to their own Track for this purpose.
For your external Controller: If you assign a CC#, like CC95, to the Super Knob, that CC will be Sent (and Received) on MIDI Channel 1. The system will use this assigned CC# for all Super Knob control, overriding other controller assigned the same number on Channel 1… If you see an exclamation mark, you have a conflict that must be resolved. By using CC95 on Channel 1 - that CC number cannot be shared with any other controller.
It is a lot to digest, but you will find it very flexible and coming IN via MIDI you do not have to change the CONTEXT to make a function work. You use Channel # to target the Part you want to influence and you use the internal Control Assign function to determine what happens when a particular CC# is received.
Pads to Trigger Arpeggios
Arpeggios can be triggered via MIDI;
You can determine what Note, or range of Notes, will trigger the Arp Phrase.
You also can set a specific Velocity value for the Note, or range of Notes, that are used as trigger.
When you assign the Arpeggio Phrase to the PART you would use the Arp settings to configure how it is to playback... That is, does it play and repeat, or does it play once and stop; Does it play at the trigger notes velocity or does it playback at the originally recorded velocities; Does it respond to all Keys or just a specific range of Keys, etc., etc.
When you are Editing the PART with the Arpeggio, you will see several screens of parameters (3) that will configure how the ARP Phrase will behave.
Select the PART
Press [EDIT]
Touch "Arpeggio" > the second column has three screen options that configure how the Arp will behave in detail.
Posted : 09/01/2023 11:33 pm
