I'm making a performance. I see the 1st round of adding parts in category search at source -All-.
After some changes I wanted to choose new parts but now I see Part 1 in the source. I read that this is because I made changes. If I want to delete the part and add another, I also see Source -Part 1- . How can I add multi parts again now?
I can select and add only one part from a multipart voice
Add: I do not see Performance Merge, but I choose the + sign to add one.
I found it, but do not understand why. I had part in the slots 1,2 and 8 but than is it not working. I moved the part in slot 8 to slot 3 and now I see the performance merge again.
Sorry, I didn’t answer the initial question… it seemed unclear or some how incomplete information. Now with your second post, we see it was incomplete information. Here’s what likely is going on…
When building a Performance you start with Part 1 — it serves as the ‘anchor’ to the Performance, giving it its Category and Sub Category heading, and giving the entire Performance its BankSelect/ProgramChange address. As you know, the original Performance can have from 1 to 16 Parts. A KBD CTRL Performance can link as many as 8 Parts, 1 thru 8, for simultaneous triggering via the Keyboard.
The factory Preset Performances are 1 to 8 Parts. You can use “Performance Merge” to add Parts to the existing KBD CTRL Parts as long as there are empty Part slots to right of the originally occupied Part slots. You do so by tapping the “+” sign which indicates an available slot — your new selection will occupy empty slots starting with the one you touch and then successively higher numbered slots from there.
Having one or more of the potential landing slots occupied will prevent you from adding (merging) an entire existing Performance. (The landing area must be clear).
You must add additional Parts one-at-a-time if one or more of those slots is occupied. “Merging” will not overwrite an existing or occupied slot. By definition, merge assumes nothing is overwritten.
By having a program occupying a potential target slot, you must add (merge) one Part at-a-time, so nothing is overwritten by accident.
Extra Credit:
If you properly “merge” a second Multi Part Performance to an existing Performance, you’ll have an option to select “All” Parts or a single “Part #” as the “Source”.
All Part programming and Part assignments are automatically brought along, including Part Insertion Effects.
Any Performance Common programming of the “merged” Performance is not necessarily brought along:
—your merged Performance will inherit the current Performance’s System and Master Effects.
—any upper level Knob/Super Knob assignments are held aside until you activate those you wish to continue to use (they are held in a special buffer awaiting your review). Because these relate to your newly “merged” Parts, you will be updating the Part number of each assignment.
If you do not like the first merged Parts - you have not Stored anything as yet, moving away and returning to your initial Performance - this will refresh your programming. Or you can simply tap the Type/Name box of the Part to see the pop-in menu, select “Delete”. You can remove a Part slot you don’t wish to keep.
BTW - The EXCHANGE Job is designed for you to move items to facilitate just this kind of thing. It is a “context sensitive” function. If you have selected a Part or Element when you press [SHIFT] + [EDIT] you can Copy/Exchange, Parts or Elements.
—any upper level Knob/Super Knob assignments are held aside until you activate those you wish to continue to use (they are held in a special buffer awaiting your review). Because these relate to your newly “merged” Parts, you will be updating the Part number of each assignment.
How is this done?
I had presumed Parts and Performances merged into a Performance lost all their Super Knob connections, forever. And that any desire to use the SuperKnob with the newly merged in parts/Performance required recreation.
Thank you very much for the clear explanation Bad Mister. I am very happy that you answer our questions on this forum with a lot of expertise.
A big compliment for how you do that. Answers written as additional guides.
Of course also thanks to all those others who invest a lot of time in this.
Good question Andrew!
I thought you can only do that when you add a part including the parameters and not when you do a performance merge
—any upper level Knob/Super Knob assignments are held aside until you activate those you wish to continue to use (they are held in a special buffer awaiting your review). Because these relate to your newly “merged” Parts, you will be updating the Part number of each assignment.
Naturally, they are deactivated because, as you’ll see, your newly merged Part(s) are no longer in the same numbered Part location. Deactivated, but the critical programming (Curve Type, Polarity, Ratio, etc.) is not lost.
Say we take a Performance that is originally 2-Parts, and we “merge” a second Performance with it, also 2-Part. The merged Performance has upper Common Knob Assignments that refer to “Part 1” and “Part 2” — naturally when it was in its original HOME location, the Parts occupied just Part slots 1 and 2.
In their new HOME, however, the merged data now occupies Part slots 3 and 4. You need to review each assignment and update them to reflect the merged Parts new HOME slots. You do so by simply activating the assignments as Parts 3 and 4.
Here’s how:
First, you will need to determine availability of Control Assignment sets. Even though multiple items can be assigned to a single Knob, you have a maximum of 16 Source/Destination Control Sets. If all Control Sets are occupied you will not be able to add additional upper Common assignments. This is why I say you must review your upper Common assignments so they make sense. All Parts will share one set of upper Common assignments… they all share the Super Knob.
Also if the assignment was to control a System or Master Effect that no longer exists, you may not want to activate it. It is possible that an assignment will no longer make sense - in which case you can leave it deactivated.
Example
Let’s use an example: We’ll keep it simple, but this is just the tip of the iceberg. Each of the 8 Common Assign Knob is kind of a ‘super’ Knob… because multiple Part Assign Knobs can reference them. We’ll show a bit of that as well. Scuba gear ready?
Say we start with the 2-Part Preset: “Seattle Violins 2“
Recall it in its HOME location. Play it and get an understanding of what’s going on here.
Take a look at each of the two Parts, they each have 8 Part Assign Knobs active. The Part Assign Knobs, 1-8, allow you to access the 5-bands EQ, Volume, RevSend, and VarSend, respectively.
But only one AssignKnob from each Part is linked to the upper Common level (Super Knob) — Part Assign Knob 6 in each case (Volume)
Hint: As you get deeper into programming you realize that only the parameters you want real-time, hands-free control over are linked to Super Knob movement. Early on you link everything to the Super Knob… soon enough you get over that. Here, real-time control is used to morph Ensemble violins to Solo violin (and add a bit of detuning)
A quick look at the upper COMMON assignments you’ll find the following assignments to the Common Assign Knobs:
from the HOME screen
Press [EDIT]
Touch “Control” > “Control Assign”
Make sure “Auto Select” is active (green)
Move the Super Knob — the Display Filter will show you all items assigned to the Super Knob
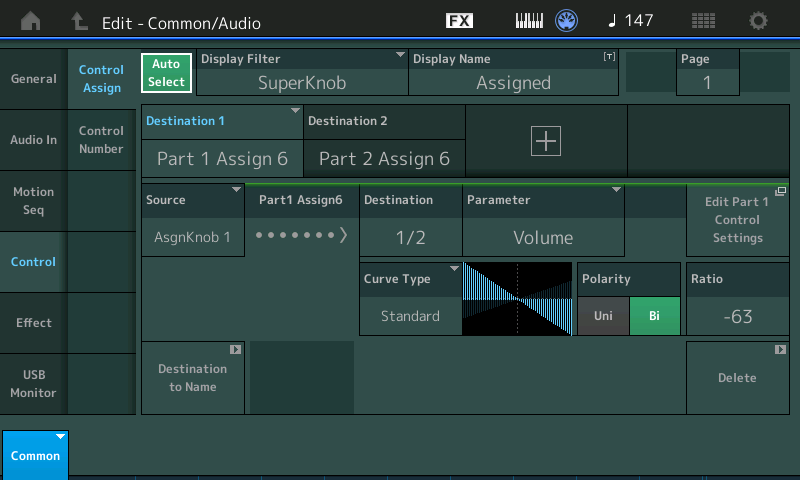
“Part 1 Assign 6” - there are 2 Part Destinations stacked on this Common Assign Knob; 1/2 “Volume” (shown above) and 2 of 2 “Fine” (tuning)… Translation: the Destination 1 has two Part assignments following the position of Common AsgnKnob1. Turning Common AsgnKnob1 will adjust the Volume of the Ensemble violins, turning them down. Also detunes the Ensemble.
“Part 2 Assign 6” - “Volume” (shown below) in the opposite direction (a crossfade, morphing ensemble-to-solo). Here Common AssignKnob1 is also adjusting Part 2’s Assign Knob 6 by turning the Solo violins up.
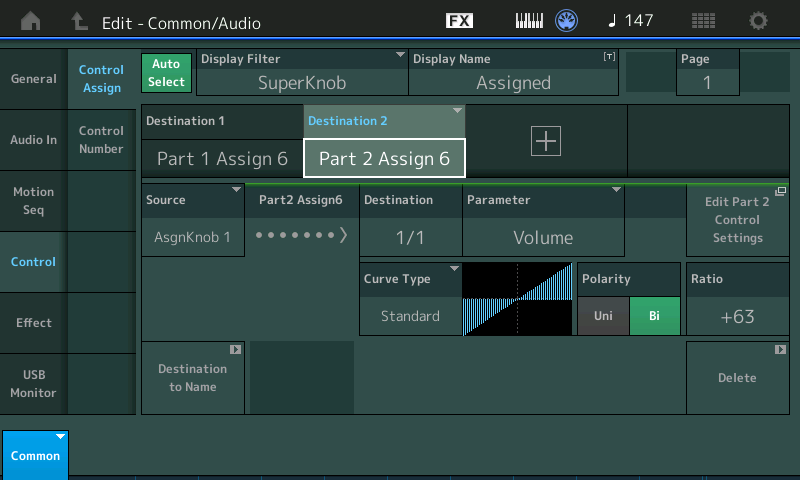
Hint: Use the shortcut box: “Edit Part x Control Settings” to view the Part Assignment. You can return here with the “Edit Common Control Settings” shortcut on the other side.
The Part 1 is the Ensemble Violin section, and Part 2 is the Solo Violin.
Each Part has 8 Part Assign Knobs, but only Assign Knob 6 from each is linked to the upper Common level via Common Assign Knob 1.
When you have Common Assign selected Common Assign Knob 1 turns down the Ensemble Violins Part and simultaneously turns up the Solo Violin Part. And because Common Assign Knob 1 is linked to Super Knob movement… this is how that happens.
Now let’s say we want to merge the 2-Part Preset: “CFX + FM EP 2”
First recall it in its HOME location. Spend a few minutes getting used to what is happening in this Performance.
Notice the acoustic piano (CFX) starts at 127 and is reduced by Super Knob clockwise, while the electric piano (FM EP) starts at 0 and is increased by Super Knob clockwise.
A quick look at its native upper COMMON assignments, you’ll find the following assignments to the upper Common Assign Knob:
Press [EDIT]
Touch “Control” > “Control Assign”
Make sure “Auto Select” is active (green)
Move the Super Knob — the “Display Filter” will show you all items assigned to the Super Knob.
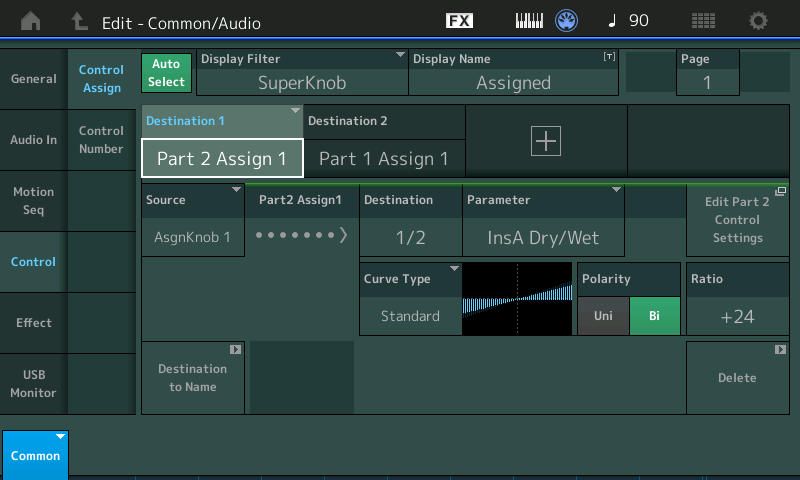
“Part 2 Assign 1” - there are 2 Destinations “InsA Dry/Wet” and “Volume”
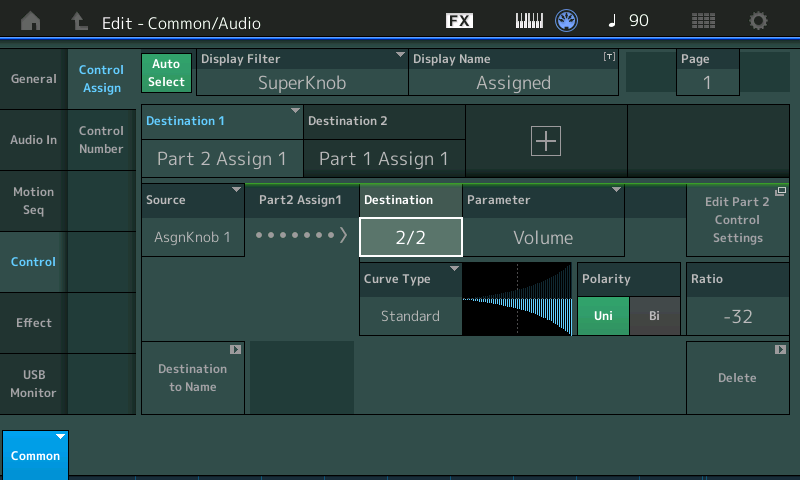
“Part 1 Assign 1” - “Volume”
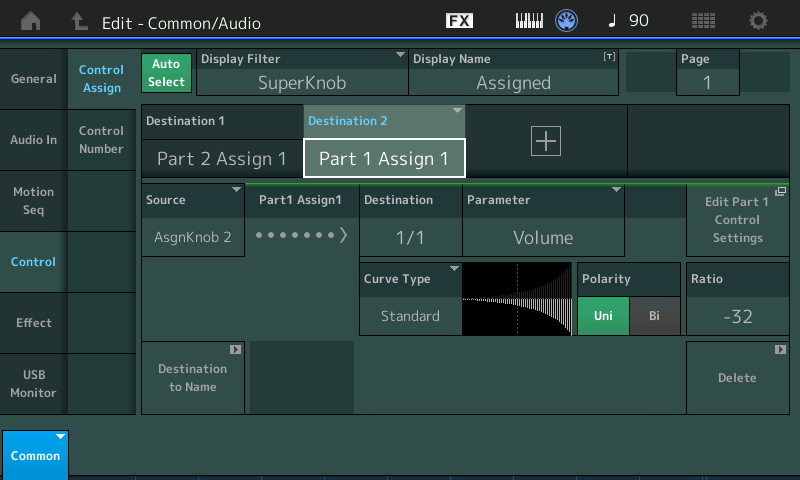
Again a Volume exchange… Here Common Assign Knob 2 turn down the acoustic piano by controlling Part 1’s AssignKnob 1
The Performance Merge
Start with “Seattle Violins 2”
Tap the “+” in Part slot #3 to activate the “Part3 - Performance Merge” search screen.
Select “CFX + FM EP 2”
“Source” = All
This will add the acoustic piano as Part 3 and the electric piano as Part 4.
While the morph between Ensemble Violins and Solo Violin is still taking place, the acoustic to electric morph is missing.
As we mentioned, all Part programming and assignments are automatically brought along. What is brought along but not yet activated are upper Common assignments — the ones that link Part parameters to the Super Knob. In this case, the assignments that are going to morph acoustic to electric piano.
If you look at the Overview screen — [SHIFT] + [HOME]
When “Common” is selected you will see Assign Knobs for Parts 1 and 2, but none exist (yet) for the newly added Parts 3 and 4.
From the HOME a screen:
Press [EDIT] > “Control” > “Control Assign”
Move the Super Knob to recall the current assignments.
If there are assignment Destinations available (there 16 total, 4 PAGEs each with 4 Destinations) you will see a ”+” indicating you can add a new assignment.
Your first “merged” Part (acoustic piano) will now be in Part slot #3.
Tap the “+” to add a Control Assign “Destination”
Tap the default parameter that appears — this will open the Assignment options
Move the cursor down to “Part 3” and select “Part 3 Assign 1”
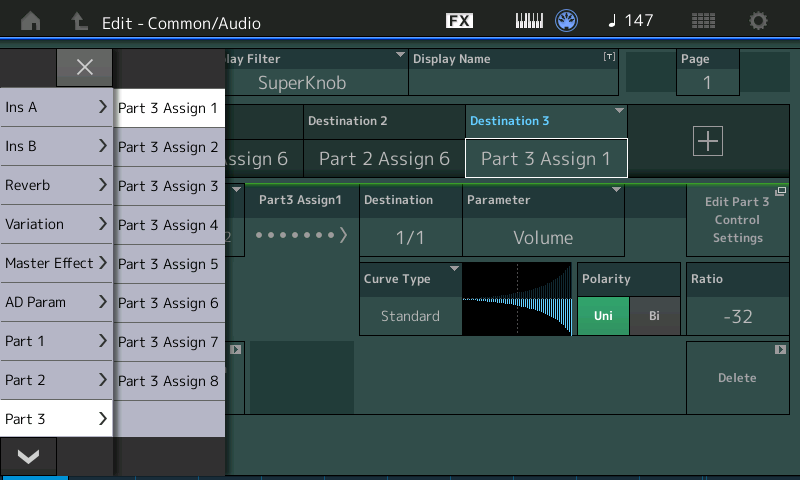
As you highlight each of the eight potential assignments, for example, “Part 3 Assign 1” you will be recalling the Knob assignments made in the original HOME of the “merged” data. It’s now Part 3. This is how you are informing the MONTAGE what was once in Part 1 is now in Part 3. The rest of the Control Set programming is completely intact: Curve Type, Polarity, Ratio, etc. Now, you have re-activated it, updating it with the Part’s new location.
Touch the next “+” to add another Destination. Select “Part 4 Assign 1”
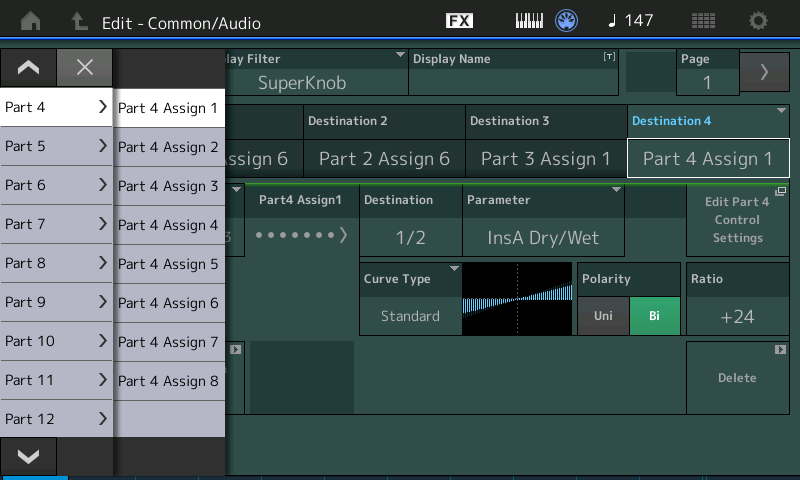
The routine will automatically assign the next available Common Assign Knob.
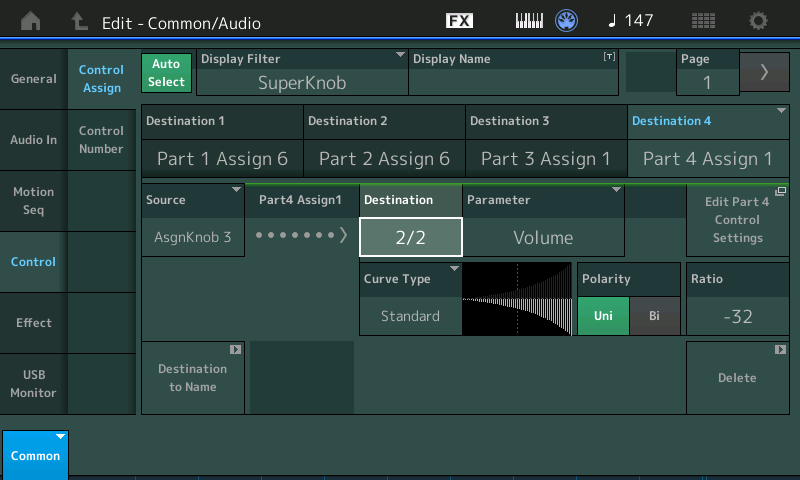
Both the “InsA Dry/Wet” (1 of 2) and the “Volume” (2 of 2) are assigned to Common Knob 3
The routine will automatically assign the next available Common Assign Knob.
Extra Credit: By directly using the “Super Knob” as the “Display Filter”, MONTAGE will automatically seek out an available (empty) Common AsgnKnob… if you prefer to make your own stacked assignments per Common Assign Knob, set the Common Assign Knob as the “Display Filter” target… Source = Assign Knob 1-8
In order to make the CFX active when the Super Knob is at minimum, we can change the direction of application as follows:
Return to the HOME screen
Touch “Motion Control” > “Super Knob”
Here you can determine the range and direction of any of the Super Knobs 8 linked Common Assign Knobs; you can also UnLink an Assign Knob.
Set the minimum-to-maximum range so it is reversed for Common Assign Knob 3 — that is, 127-0 as follows:
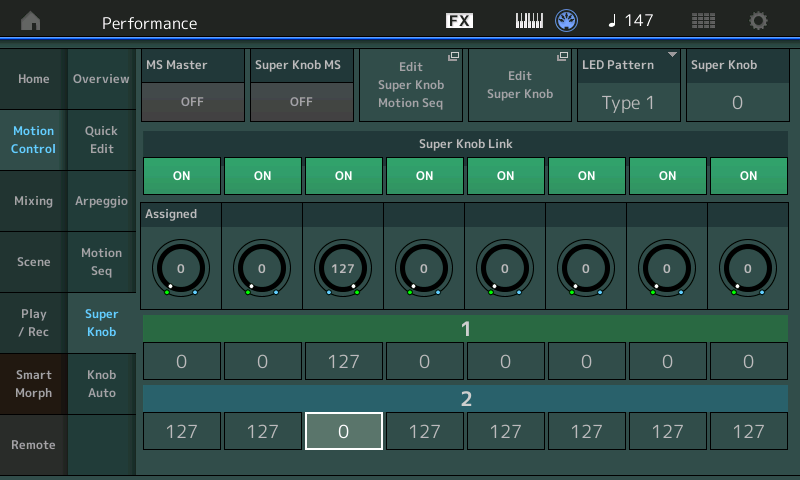
Now when the Super Knob is at minimum the CFX will be at maximum.
Tweaking Tip: Tap “Edit Super Knob” to take the shortcut to the “Control Assign” screen, return here by pressing [EXIT]
Final Thoughts:
Anytime you “merge” programs you need to go over the details. Look for conflicts… example, it may never happen but… the MW is used to change the Ensemble and Solo Violins AEG ATTACK and AEG RELEASE, making a slower attack and slower release for the strings. This is very useful in performing with these strings.
The MW does nothing to the acoustic piano, but is responsible for applying “LFO2 PMD” (Low Frequency Oscillator 2’s Pitch Modulation Depth). Unless you raise the MW and morph the Super Knob to maximum, you may never run into the FM EP’s LFO warbling along with your strings. You may need to tweak the ranges of parameters once combined.
This is where tweaking the amount applied (Ratio) or if a controller is active or not, comes into play.
For real world programming and tweaking tips and tricks (just like the above) I highly recommended the “MONTAGifying Motif XF” series, as it delves deeply into the kinds of possibilities and decisions you will need to learn to make within this new Motion Control Synthesis Engine.
There are 8 Common Assign Knobs. (These are the ones on the same level of the architecture as the Super Knob) — as you can see, you can assign multiple items to any Knob. Generally, you use an empty Knob, but nothing prevents you from turning a Common Assign Knob into a macro controller. Being able to set the precise amount of change and direction for each parameter is what separate this controller matrix from previous synths.
Once you understand why, the “merged” Common Control Assignments are removed and held separately for your review and re-activation, you can see how what we did above is possible. It is quite purposeful, and is one of the major changes from its predecessor (the Motif XF). Playing 8 Motif XF sounds simultaneously was just not about putting everyone on the same MIDI Channel. It was to give the performer ways to control each of the multiple Parts uniquely. This Control Assign matrix is what that is all about.
Thanks for the topic. If you are stuck or have questions, post back here.
It's completely clear to me now. Thanks for the clear example. I've done the steps and then you really get a feel for it.
Excellent.
