Notifications
Clear all
Topic starter
I've had the Montage M 7 for a week now. FInally I feel I master everything I need to master. Except for one thing:
I need the sound Lazerzz (It is in my Motif). But it doesnt work when exported via usb. The elements have changed names. So it sounds to different.
So now I want to build a equivalent part in the Montage. But how do I put together elements of my choice into a part?
I dont think it is described how to do that in the manual. The operation is possible in Motif.
Posted : 08/11/2023 9:02 pm
I need the sound Lazerzz
That is a performance that is already in the M models.
It has one part with 4 elements. You can modify those elements any way you want.
I dont think it is described how to do that in the manual.
Yes, the manual has sections on editing the common area of a part as well as the elements. You select the element you want to edit and make the changes you desire.
https://manual.yamaha.com/mi/synth/montage_m/en/om02screenparameters0070.html
Load that Lazerzz performance and then press the Navigation Button. At the bottom left of the screen you will see 'Part Settings' and that will display the screen for the part.
At the top of that screen you will see dropdowns where you can select the element you want to work with.
Post back if you are having trouble finding something.
Posted : 08/11/2023 9:31 pm
Topic starter
Thanks Andrew:
1:
I have tried to edit element at the place mentioned in the manual:
My experience is, that I hear a sound. Maybe element 1. But when I choose element 2, I still hear the same sound 
The Laserzz sound in the M seems malfunctioned. One part of the sound is extremely weak. But unfortunately my experience is, that I cannot edit either of the four elements in the performance Lazerzz.
2:
Further, would be nice, to be able to save favorites among elements. I see a star at every elementsound, and I feel, that I could fill that out, and thus build a list of elementfavorites. But with what button, do you assign a star to an element?
Posted : 09/11/2023 8:35 am

As was true on the previous models, the MONTAGE M will always identify where you are within the architecture on the very top line of the screen. Use this to help navigate the system. Use the color coding to help ‘know’ where you are and what you are looking at currently.
It should be mentioned - there are several ways to get there…
When you first recall the Performance “Lazerzz” the top line reveals:
“Performance _ Common” as its HOME recall/position.
If you *select* the Part, Part 1 (you can do so by tapping the Part slot number box that shows the individual Part name; alternatively, you can move the cursor down to highlight that box or you use the cyan blue [PART SELECT] button (if illuminated), then press the [PART 1] button under its Slider.
When the Part is *selected* a blue field appears behind the slot number and a white cursor highlight surrounds the Type/Name box in the MainDisplay.
Moving around on the Left Front Panel
[PART SELECT] buttons are always cyan blue. The Part number box in the Main Display will have a blue background behind the number indicating it is *selected*. When the Slider’s background is cyan blue that Slider is a Part Volume Slider.
Cyan blue on the left side of the front panel always denotes PART
Lime green on the left side of the front panel always denotes an individual component (AWM2 Element, or FM-X Operator, or AN-X Oscillator) depending on the technology of the Part. When the Slider’s background is lime green that Slider is individual component Levels of the currently selected Part.
When you *select* PART 1 the top line of the screen will read:
“Performance _ Part 1 _ Common” or “Performance _ Part 1 _ Elem #”
Hold the [SHIFT] button. Holding [SHIFT] means you read functions written in red under the button itself. This switches the cyan blue (Part Select) blue buttons to lime green while you hold it, revealing your Element Select buttons 1-8. Because this program has four Elements, you will see the Common and 1-4 buttons glow lime green - allowing you to select an individual AWM2 Element.. using [SHIFT] + [1-4] buttons.
Select the Element you wish to recall by touching the corresponding number button while holding [SHIFT]. The top line will now show: “Performance _ Part 1 _ Element #”
The # will change to reflect your selection.
Activating SOLO for individual Elements
If you wish to solo an Element: you activate the Solo function as follows:
Hold [SHIFT] + [SOLO]… (also known as the Part Select button)
the button flashes (purple) to denote the SOLO function is now active.
Release the buttons.
Pressing a button under Sliders will select Parts to solo, initially… Shift + a button will allow component selection,
Now press and hold [SHIFT] + a now lime green Element button [1-4] to solo any one Element. The lime green button lights brightly to indicate it is solo’d. The [SOLO] button continues to flash purple all the while letting you know SOLO is active.
An “s” marker will appear by the Element number on the very top line of the screen indicating only that Element is capable of sounding.
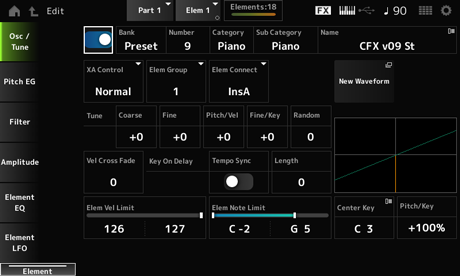
___ If you drop into EDIT (you’ve already navigated there) view the “Osc/Tune” tab… you can now see the settings for: Edit _ Part 1 _ Element # __ followed by a little map marker showing “s” below the Element # that is currently solo’d
If you solo each of the four Parts, one at a time, you can simply select the next Element, the solo function will follow you.
[SHIFT] + [1]
[SHIFT] + [2]
[SHIFT] + [3]
[SHIFT] + [4]
…the Osc/Tune screen will show you the following:
Element 1 is mapped to C3 ~ B4
Element 2 is mapped to C3 - B4
Element 3 is mapped to C-2 ~ B2
Element 4 is mapped to C5 ~ G8
2:
Further, would be nice, to be able to save favorites among elements. I see a star at every elementsound, and I feel, that I could fill that out, and thus build a list of elementfavorites. But with what button, do you assign a star to an element?
You can mark Performances as Favorites. You cannot mark Parts (independent of their Performance HOME), nor the component AWM2, FM-X or AN-X, as Favorites. Favorites can only recall a finished Performance.
What you can do: Make a single Part, one Element Performance and name it carefully.
You can execute COPY/EXCHANGE Job. This function allows you to COPY or EXCHANGE any Part from a Performance to another Part slot of that Performance (containing an Init (AWM2) Element), it allows you to COPY or EXCHANGE any AWM2 Element with any other AWM2 Element in a like kind of structure in the same Performance; COPY or EXCHANGE any FM-X Operator with any other FM-X Operator in the same Performance; COPY or EXCHANGE any AN-X Oscillator with a like structure in the same Performance;
If you have done a lot of work on a component Element, Operator, or Oscillator, all you need do is navigate to that component in the MainDisplay… then [SHIFT] + [JOB] (also known as… the [EDIT] button. You can target any Part slot in the current Performance containing the same kind of Part technology and type.
Example: to keep a copy of an Element you think worth ‘favorite’ status.
Merge an “Init Normal (AWM2)” to any available Part of your current Performance.
Navigate to Edit that source Element.
While on any edit screen concerning that Element, press [SHIFT] + [JOB] (Edit) to launch the COPY/EXCHANGE job.
The left side of the box (source) will self populate — filling in the current Part and current Element, change the settings on the target (right) side to the Part ‘X’ and Elem 1… of your newly added Part
If you wish to archive these separately: You can temporarily STORE this new Part to the Performance, then create a New Performance from just this Part containing your favorite Element. Name it so you understand what it is… when you want to use it, simply add this single Part, single Element, Performance to your workspace and COPY it in to your current work.
Or
Now that you know how to retrieve an Element, Operator or Oscillator you can simply go into any already stored program and grab what you need when it comes to favorite Parts or Elements, etc.
Hope that helps.
Posted : 09/11/2023 11:31 am

In addition, I would suggest building up a custom AWM2 Performance from an initialized (Init Normal AWM2) Performance.
This starts you out with only one element that's a piano sound. There's not much to "look" at so you start out simple.
You can, with this one element, see how to activate mute and solo for this element. And solo would sound the same as if not solo'd (because there are no other elements) and mute would cause the Performance to have no sound.
Then add an element - element 2 and pick any sound you want but preferably pick a sound that's different enough to hear "independently" even with the original piano sound layered. Maybe strings for the classic Piano+String combo.
Now with two elements you can use element mute and element solo to help isolate each element. Something you weren't doing before.
Once you add a 3rd element - now Mute and Solo will be different. Solo makes only one element sound at a time and mute makes only one (or more) element not sound. Solo is probably the most useful isolation tool although there are times when mute makes sense.
Generally, I'm advocating starting small and from a known place before you dive into a relatively more complex sound that you don't "know".
Learning what the initialized Performance gives you (default element, default envelopes, default velocity sensitivity, etc) is a good thing to do. To learn this initialized Performance backwards and forwards. To start experimenting with changing just the default (with only one element) to discover what all of these options do. This will serve you when you're looking at a complex Performance to have done the background of exploring the initialized Performance.
Current Yamaha Synthesizers: Montage Classic 7, Motif XF6, S90XS, MO6, EX5R
Posted : 09/11/2023 4:09 pm
Topic starter
BadMister, Andrew and Jason. Thanks a bunch. This kind of extensive help is deeply appreciated. I am very thankful.
Posted : 10/11/2023 8:57 am
Topic starter
Now one more question.
I have succesfully downloaded a sample. Montage M plays it from the usb. It is shown on the screen. But its not loaded. I remove the usb and the sample is gone.
I have tried to load it. But didn't succed. Cant find how to do it. I can post a photo. (Its the Utility screen).
Posted : 10/11/2023 9:00 am
For drum Parts:
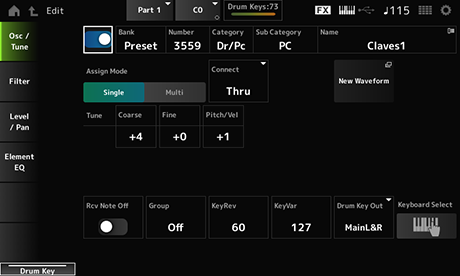
Press "new waveform" then import your audio file from the USB stick
For AWM2:
Same process as above.
If you want a key to play an entire audio file by pressing a key and letting go (and the audio file keeps playing after you let off the key until the end of a sample) then you would probably want to use a drum Part.
Current Yamaha Synthesizers: Montage Classic 7, Motif XF6, S90XS, MO6, EX5R
Posted : 10/11/2023 9:30 am
Topic starter
While working with my Montage M I suddenly experience a scary problem. Only Brass performances chosen in liveset have key ctrl.
If I choose any other sound, piano whatever, og liveset with other than brass. Just silence
Did I unknowingly activate some kind of generel mute function?
OK FIXED
It seems that I accidentilly under MIDI I/O set local control to off.
Posted : 10/11/2023 3:32 pm
Topic starter
Hello BadMister.
About Lazerzz. In my montage M the two elements that I need to hear:
Hop FX1 Element 1 is mapped to C3 ~ B4
Digi8 Element 2 is mapped to C3 - B4
These two waveforms sound different in my montage compared to motif. Thats why Lazerzz sound different.
Maybe a mistake to correct in a update??
Posted : 10/11/2023 5:36 pm
These two waveforms sound different in my montage compared to motif. Thats why Lazerzz sound different.
Two waveforms wirh those names are listed in the Motif XF Sata List doc so they may be used for that perf on the Motif.
The two waveforms on the M may not be exactly the same as those on the Motif even though they have the same name. The M versions may be higher quality or sampling rate, could be stereo intead of mono, etc.
You might try other waveforms in that same category and see if you can find ones you like better. Use the Data List doc to find those waveforms
I see 12 'digi nn' waveforms listed and the same 12 are listed in the Motif XF doc so they are meant represent the same sound.
Posted : 10/11/2023 6:31 pm
Press the audition button and listen if you hear the sound you're after. If so, now listen to the audition while watching Super Knob and the ASSIGN 1/2 buttons and ribbon LEDs and scene buttons and anything else observable which may tell you how to better use the new Lazzerz.
Maybe there is a problem or maybe they just have more things you can do with the new controls available on Montage.
Current Yamaha Synthesizers: Montage Classic 7, Motif XF6, S90XS, MO6, EX5R
Posted : 10/11/2023 6:42 pm
Audition produces no noticeable activity at all: no lights, knobs, super knob. The oscilliscope picture is kind of neat but that is about it.
There are several knob assignments for PEG and one for Course (knob 2) that can affect the sound but only OP knows what sound they expect to hear.
Posted : 10/11/2023 6:49 pm
Topic starter
@andrew: You have now activater audition to the Lazerzz sound, and seen that nothing really happens. In my inears, I vaguely hear in a distant background that "sprawling" Lazerzz sound. Thats really weird, I've been looking looking in order to find some button that could open that sound. Bring it on to the front. But no succes.
So all in all, maybe somethings is a bit rotten in Montage M about these particular elements. Hop FX1 and Digi8.
Posted : 13/11/2023 10:03 am
I don't have an M but I have a Montage classic that has the "same" sound.
There are 3 key regions with different sounds. Lowest notes have a different sound than middle notes that have a different sound than high notes. There are 3 "C"s where you can hear these breaks.
Then ASSIGN 1 and 2 switches change the sound. Each of the regions reacts differently to the ASSIGN 1&2 buttons.
Super Knob changes the "frequency" slightly not a huge impact but turned all the way clockwise changes the sound a lot (not in a positive way to me).
The ribbon changes things.
Mod wheel does something subtle.
All in all there are many dimensions to shaping the sound.
Current Yamaha Synthesizers: Montage Classic 7, Motif XF6, S90XS, MO6, EX5R
Posted : 15/11/2023 3:00 am
