Notifications
Clear all
Topic starter
I have a Montage 8 v3.5 and Cubase Pro 10.5 and Spitfire Audio's Discover plugin.
Please excuse my newbie question, but I have been trying to look through documentation to figure this out but still am very confused.
What I would like to do, is set up recording in cubase to use both Montage internal sounds and the Spitfire VSTi's.
Please be as verbose as you can. I still have not figured out how to set up my Montage to play the VSTi's hosted in cubase
Posted : 05/07/2020 3:40 am

I have a Montage 8 v3.5 and Cubase Pro 10.5 and Spitfire Audio's Discover plugin.
You will also need a Windows or Mac computer, the “Yamaha Steinberg USB Driver“ for your computer type. You’ll also need to plug the Main L/R Output of the MONTAGE to a quality sound system, or connect a pair of headphones. Also download and install MONTAGE CONNECT — a VST Utility that runs in the background and will memorize and restore all your MONTAGE Performance settings for this Cubase Project.
The MONTAGE can act as a 32-in/6-out Audio interface for your computer.
STUDIO > STUDIO SETUP > MIDI
Go to STUDIO > STUDIO SETUP > MIDI > MIDI PORT SETUP
In the column labeled "In All Midi Inputs" mark "MONTAGE 1"
Click APPLY
Click OK
You can, if you have a second controller you wish to use as an input device, connect it to the MIDI In and Out jacks on the MONTAGE back panel. The computer (Cubase) will recognize this as "MONTAGE 3" (port 3). You can select "All MIDI Inputs" as the INPUT on the Track Inspector, when you want to use both devices. This column defines your MIDI sources. Only legitimate sources should be marked in the "In 'All MIDI Inputs'" column.
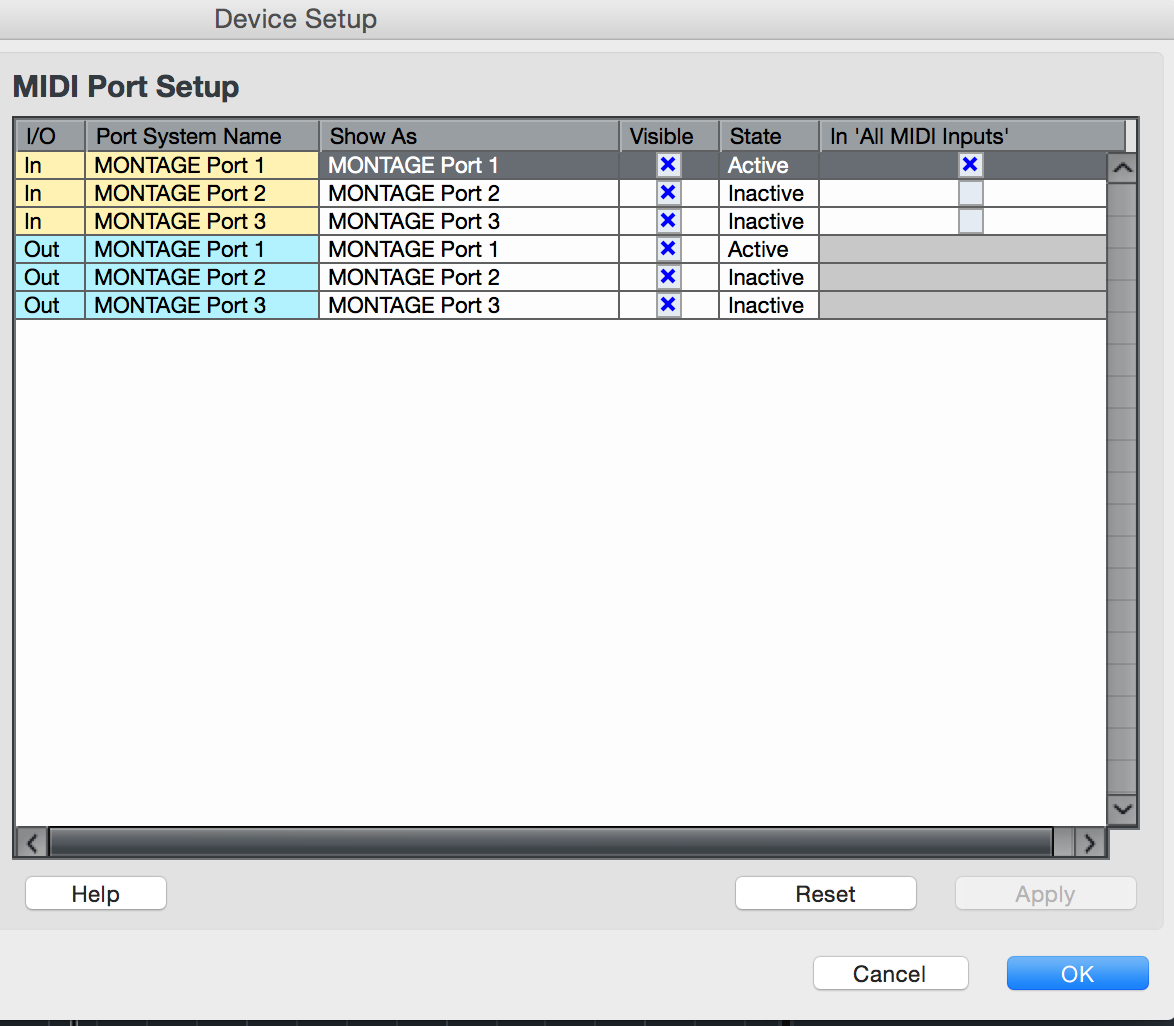
What you see here is the INPUT Ports in yellow and the OUTPUT Ports in blue. A Port consists of an In and an Out, each contain 16 Channels. MONTAGE Port 1 is the MIDI Port on which data coming from the MONTAGE is routed to reach a MIDI Track in Cubase. Port 2 is not used. And Port 3 is reserved for a second MIDI device connected to the 5-pin MIDI jacks on the back of Montage. It can be routed as a controller through the system as well. You can, if you wish, use two different keyboards (even simultaneously). The STATE (or STATUS) column will detect if anything is conneccted. If nothing is connected the port is "Inactive".
Cubase AUDIO SETUP
STUDIO > STUDIO SETUP... > VST AUDIO SYSTEM
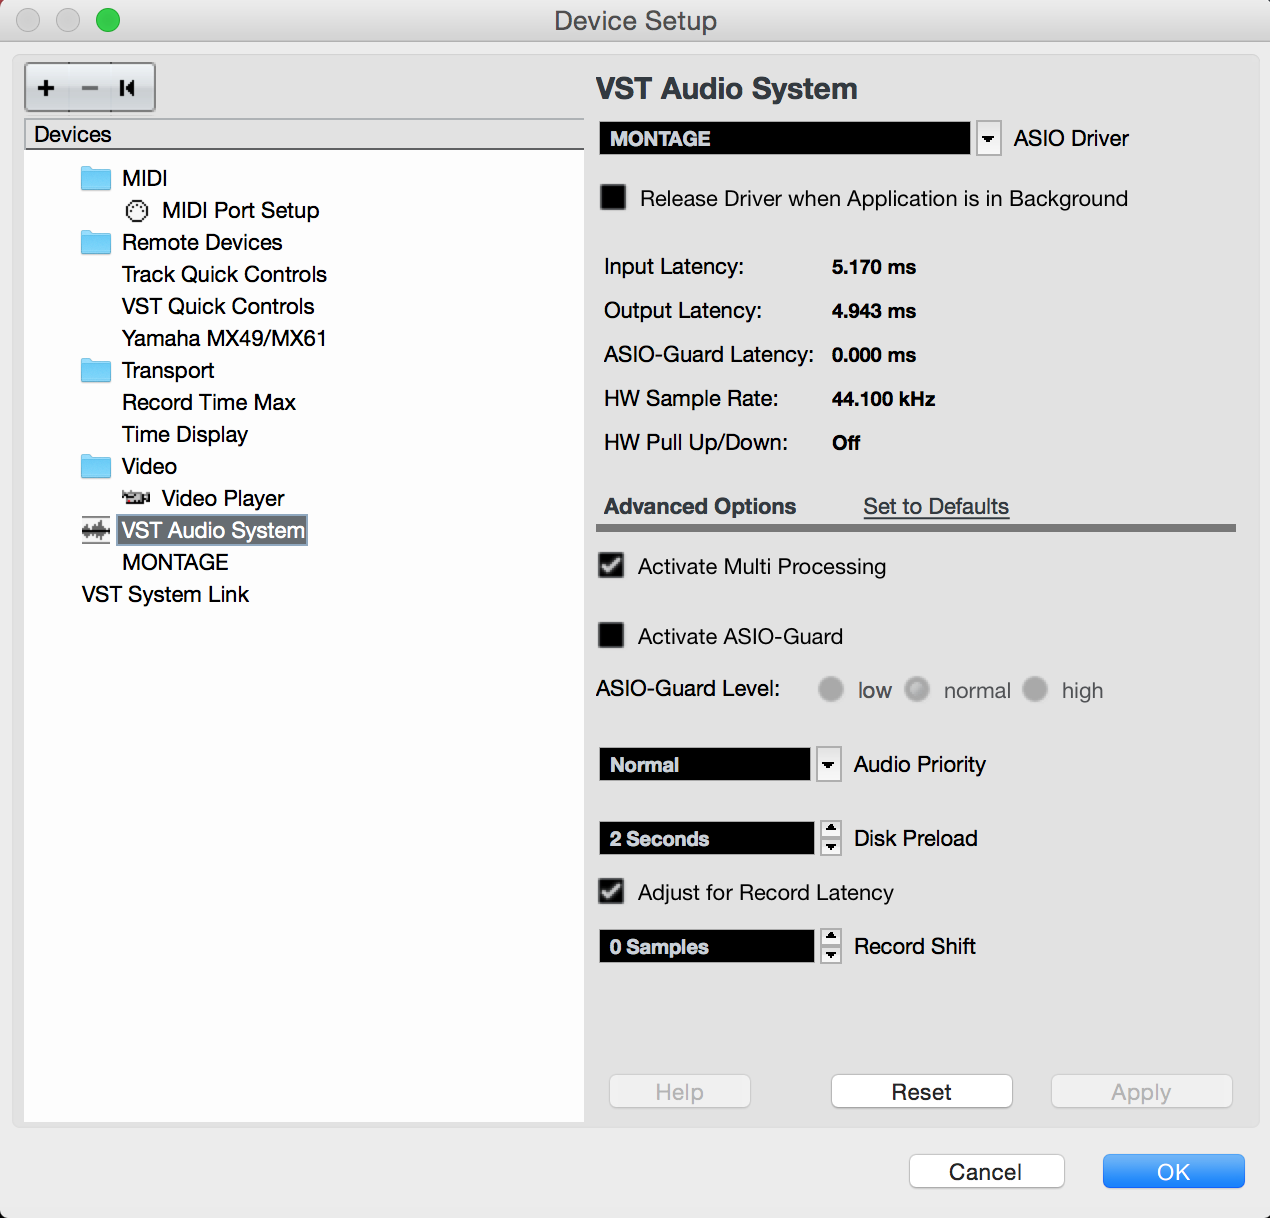
VST Audio SysHere you select the ASIO DRIVER for the system. Shown above is the selection "MONTAGE" on a Macintosh computer... if you are using a Windows computer your option will be "Yamaha Steinberg USB" for the ASIO Driver - this accomplishes the same thing. The Montage is now your computer's audio soundcard.
If you move the cursor down to the selection "MONTAGE" you will see the AUDIO INPUTS (yellow) and the OUTPUTS (blue).
These are the fundamental Audio and MIDI configurations — I’m not sure how much you know about operating Cubase Pro and launching your Plugin...
But to get you started there — in general when working with MIDI in a DAW like Cubase, you set the LOCAL CONTROL = OFF.
Press [UTILITY] > “Settings” > “MIDI I/O” > set Local Control = OFF
This disconnects the MONTAGE Keyboard from the MONTAGE Tone Generator. This allows you to receive MIDI messages from the MONTAGE and you can route them via the Cubase MIDI Track. The MONTAGE is transmitting to the computer via USB, you will use the MIDI Track to route the signal to whatever tone engine you decide. If you send it back to the MONTAGE, then the MONTAGE will sound from the Part corresponding to the MIDI Channel of that Track. If you send the Track’s MIDI Out to a VSTi Plugin synth, then that is what will sound.
Let’s set the MONTAGE as just a Controller, contributing no sound of its own... one way to do this follows:
[UTILITY] > “Settings” > “Advanced” > set the “Zone Master” = ON
Press [HOME]
Press [CATEGORY SEARCH]
Set “Bank/Favorite” = All
Set “Attribute” = All
Touch “Init”
Select “Init Normal (AWM)” — we are selecting this because it is a Single Part and we are going to Switch it Off anyways.
Press [EDIT]
Select Part 1
Touch “Part Settings” > “Zone Settings”
Set the “Zone” = On
Set the “Int Sw” (Internal Switch) = Off
This will silence the internal Part and allow use to setup this Part slot to exclusively control your VSTi
Set the “Transmit CH” = 1
This will be used to trigger your VSTi
To go to the next step, we need to know what your ultimate goal is in terms of the MONTAGE and the VSTi — there are many different workflows you can setup; you can setup simply to play the plugin, you can setup so that you can configure sounds using both units. We know nothing about it — or how it is configured. You want to assign the “MONTAGE-1 (Port 1)” as the MIDI IN when you create a MIDI Track set to trigger it.
Posted : 05/07/2020 8:35 pm
Topic starter
Thank You for the Quick Reply !!
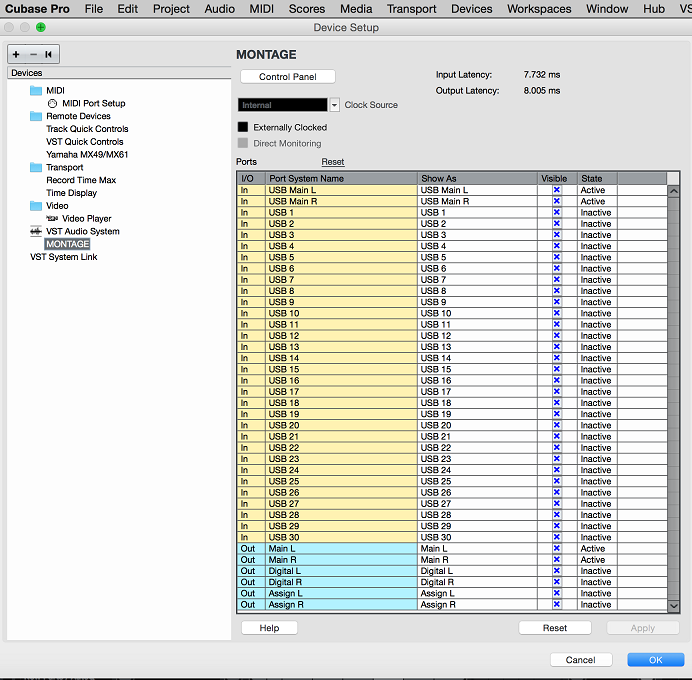
When I go into STUDIO > Studio Setup > VST Audio System > MONTAGE
I get the following screen shows the In port for USB Main R as Inactive. This is different from the screenshot you have. Is there a way to troubleshoot this?

Again Thank You - I appreciate your assistance.
(I am using a Mac Pro 2018 with 16 GB Ram and the Steinberg USB Driver, Montage CONNECT, Audio Output goes through USB to a MG10XU mixer so I can connect a set of Behringer Studio monitors and Yamaha HS5s). I have the output device on the Mac set to MONTAGE
Posted : 05/07/2020 10:28 pm
I get the following screen shows the In port for USB Main R as Inactive. This is different from the screenshot you have. Is there a way to troubleshoot this?
The “State” column shows what Inputs and Outputs are currently in use. They change as you put inputs and outputs to use. Currently you have just one input connected and both L/R Outputs are in use.
Currently, you are sending data to Cubase by just the USB Main Left Output. It arrives as an In to the computer.
The USB Main Right Output is “Inactive”.
On the Cubase menu go to STUDIO > AUDIO CONNECTIONS > INPUTS tab
Here you will see the only the USB Main L is in use.
To maintain stereo make sure you are plugged into the Stereo Channels on the MG10XU, for example, 5/6
This way the Left channel will arrive in your Left speaker and the Right channel will arrive in your a Right speaker.
This way you’ll be able to immediately identify when only one Output of the Keyboard is actively being received as an Input to the software.
Posted : 06/07/2020 12:43 am
Topic starter

my output to the speakers seems to work great, I'm wondering if there is an issue with the usb out on my montage. (I've replaced the cable)
Posted : 09/07/2020 4:06 am
Topic starter

My Audio setup on the Montage
Posted : 09/07/2020 4:14 am
Remove the USB HUB
The MONTAGE USB “To Host” should connect directly to the computer (no Hub)
Make sure the MONTAGE is plugged into a Stereo Channel on the MG10XU, for example, 5/6.
You want to maintain Stereo. Currently you are only delivering one Channel.
To resolve the USB MAIN L = active and USB MAIN R = inactive
Go to STUDIO > AUDIO CONNECTIONS > INPUTS tab
Here your Audio Device should be MONTAGE
Your Device Ports should be both USB Main L and USB Main R
Click on the OUTPUTS tab... verify that your Stereo Out is, again both L and R
Posted : 09/07/2020 10:50 am
Topic starter
I replaced the cable with a usb-c Male to USB 2.0 B cable so I could go directly from the montage to the computer
I have the Montage plugged into Chanel 5/ 6 on the MG10XU


Still seeing the right input not connected
Posted : 15/07/2020 12:43 am
In your third screenshot above, you need to click on the “Not Connected” and set it to “USB Main R”
If you are saying the option is not there then click on “Not Connected” and show us what options are offered.
Posted : 15/07/2020 3:47 am
Topic starter
Works like a charm now !! Thank you for your Awesome Help !!
Posted : 15/07/2020 1:14 pm
