Notifications
Clear all
Topic starter
Is there a way to default part output to USB (1&2, 3&4...) instead of setting them to USB output every time?
Posted : 27/04/2018 1:42 am

Yes, there is. You can store your own Audio Output configuration, which can be applied to any Performance upon selection. [SHIFT ] + [UTILITY] is the shortcut to go directly to the QUICK SET templates.
The default QUICK SETUP template called “Audio Rec on DAW” is explained below... You can customize these Quick Setup templates and store your versions for use whenever needed. The “Audio Rec on DAW” does the following assignments.... (taken from the “LEARN” area here on Yamaha Synth): the article uses Cubase Pro, but it could be used with any DAW.
Audio Record on DAW (Part 1)
Prepare the MONTAGE
Press [UTILITY]
Touch "Settings" > "Quick Setup"
Touch the option "Audio Rec on DAW"
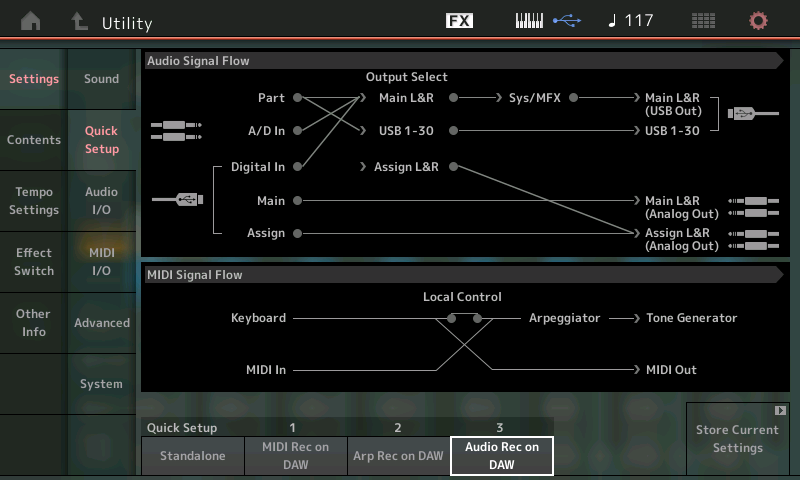
This will set the DIRECT MONITOR SWITCH to OFF. Direct Monitor determines whether or not, signal travels directly to the analog L&R outputs. When it is ON, you hear yourself playing the MONTAGE through the Main L&R (Analog Outputs) - Basically, the sound of the MONTAGE will travel its normal path to your speakers. But when recording on the computer, the default condition is to turn this Direct Monitoring OFF. What you need to take from this is the following: If DIRECT MONITOR is active and you are monitoring through the computer that would be where doubling occurs. The Quick Setup #3 template turns DIRECT MONITOR = OFF. Expect to hear the MONTAGE only after you have your Cubase routing complete - that is, the signal is routed to an active audio track with the Track's Monitor Switch set to ON.
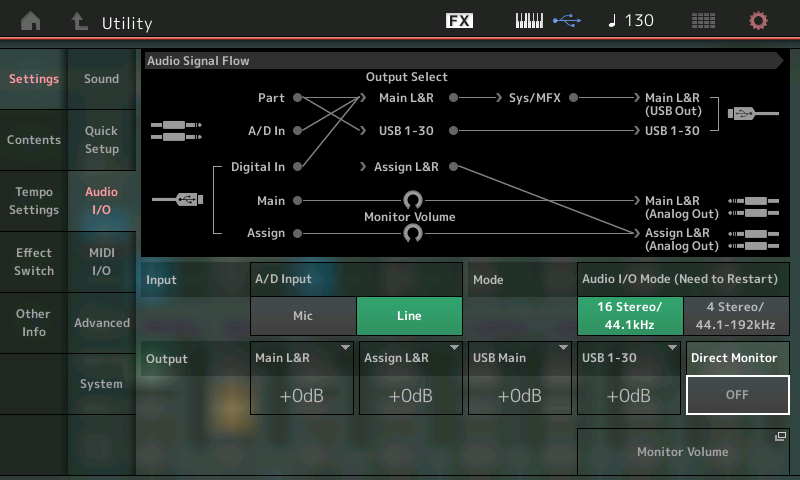
Verify your audio Input/Output setting by touching "Audio I/O" (shown above). We are set to work with all 16 Stereo Outputs at 44.1kHz. If you opt to work at resolutions higher than 44.1kHz (48k, 96k, 192kHz) you will be limited to 4 stereo outputs, simultaneously. (Changing this audio mode requires a reboot of the MONTAGE).
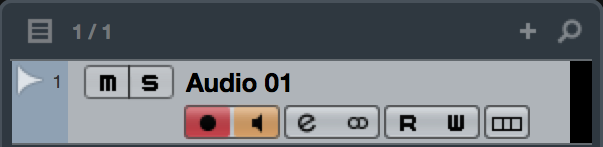
In Cubase, the Track Inspector has a red Record Ready button, and a tan Monitor speaker button. In order to hear the the MONTAGE in a situation where DIRECT MONITOR is OFF, you must be connected to an active audio track with the Monitor speaker icon selected (shown).
Using the "Audio Rec on DAW" Template
This Template is specifically designed to route Parts of the current Performance to specific audio Output buses. It is really just a starting point. Be prepared to make changes to this as you go. What we'll learn here will prepare you to make these assignments as your project requires. It will allow us to send audio on any of MONTAGE's audio buses (MainL/R or any of the 30 assignables) to the computer.
An audio "bus" simply is a means to transport audio from one place to another along a specific route. One or more passengers (signals) can be assigned to ride any bus we choose to the designated destination. In the signal flow chart above, you can see that "PART", the "A/D In" and the "Digital In" (USB) are being routed with Output Select set to "Main L&R" and are being 'bused' to the "Main L&R USB Out" (DAW - Cubase). The PART (any of them) can also be routed to any of the 30 assignable USB outputs. This allows discreet recording on your DAW. When you want to take separate output on a single sound, or drum, you can route it to a single USB bus isolating it for special processing.
The default assignments in this factory Template are as follows:
PART 1 - Main L&R
PART 2 - USB 1&2
PART 3 - USB 3&4
PART 4 - USB 5&6
PART 5 - USB 7&8
PART 6 - USB 9&10
PART 7 - USB 11&12
PART 8 - USB 13&14
PART 9 - USB 15&16
PART 10 - USB 17&18
PART 11 - USB 19&20
PART 12 - USB 21&22
PART 13 - USB 23&24
PART 14 - USB 25&26
PART 15 - USB 27&28
PART 16 - USB 29&30
A Template sets up a specific routing scenario. It is important to understand exactly what it is doing, because you will need to make the final routing decisions and you are expected to customize the default routing to suit your immediate requirements. We will use this template to do the first example - a simple stereo record using a single Part Performance. We will use the sound in PART 1 which defaults to the Main L&R Output. Next we'll learn why this particular template will not work for all audio recording needs (again, you are expected to customize the settings as you require). Then we'll learn to solve routing issue by ensuring that the selected output is properly routed and there is corresponding input in the DAW to receive it. This is a per Part decision.
Posted : 27/04/2018 11:06 am
Topic starter
Thanks, Bad Mister.
Based on the instructions above, I went a bit further and selected the outputs for each part in Edit -> Part Common for Part 1 going into USB1&2, Part 2 into USB 3&$ etc. After this I did Shift->Utility-> Store Settings and made-up a name for this setting. With this the next time I need the outputs go into DAW I will simply select the stored settings. This works for me. Thanks.
Posted : 29/04/2018 4:31 pm
