Notifications
Clear all
Topic starter
Forgive me for I am new to the Montage. I was using a Yamaha Mox6 and decided to make a big jump. I understand the basics of the pattern sequencer, but I can't figure out how to delete, replace or edit just one track. (other than overdub) If I have a pattern with 16 tracks, including 1 drum track, and decide I want to replace or overwrite, or delete part of the drum track, is there a way without messing up the other 15 tracks? I don't understand why I can't punch in or replace a single track. Thanks
Posted : 19/05/2020 1:23 am

You should be able to turn keyboard control off for all tracks not documented. If you go to [PERFORMANCE] (HOME), then each PART has something that looks like a piano keyboard. Green is ON and grey is OFF.
Posted : 19/05/2020 1:38 am
Topic starter
Yes, I see those. I only have the one on for the track I'm working with. Still, when I choose "replace" it overwrites all tracks and not just the one highlighted and with keyboard control on.
Posted : 19/05/2020 2:11 am

Forgive me for I am new to the Montage. I was using a Yamaha Mox6 and decided to make a big jump. I understand the basics of the pattern sequencer, but I can't figure out how to delete, replace or edit just one track. (other than overdub) If I have a pattern with 16 tracks, including 1 drum track, and decide I want to replace or overwrite, or delete part of the drum track, is there a way without messing up the other 15 tracks? I don't understand why I can't punch in or replace a single track. Thanks
Congratulations, Jonathan.
Make sure your MONTAGE is updated to version 3.0
Press [UTILITY] > Touch “Settings” > “System” — the current firmware operating system appears on the bottom of the screen.
Coming from the MOX6 what you need to know that is really different about the MONTAGE, is on the MOX6 in Pattern mode or Song mode, you always transmitted to one Track at a time and you actually selected a Track to be in record.
Notice on the MONTAGE, you never select a Record Track... This is because each Part has its own dedicated Track. If you are playing a Part, or if you are playing multiple Parts, each Part will have its Data documented by its own dedicated Track. When Record is engaged all Track potentially can Record... they do if you *select* them.
Added in version 1.20 (about 3 years ago) and documented in the Supplementary Manual (make sure you download this document — with each firmware update all the added features are described) — the most recent Supplementary Manual contains information about all the features added to your instrument since the Reference Manual was printed in 2016.
On the very top line of the screen, tap the letters “FX” — On this screen, set the “KBD CTRL LOCK” = ON
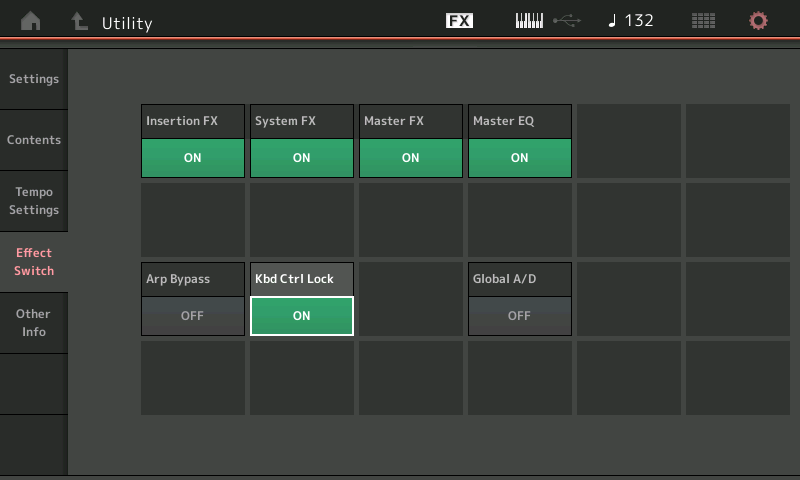
Kbd Ctrl Lock (Keyboard Control Lock)
Determines whether Keyboard Control Lock is active or not. When this is set to ON, the Keyboard Control is turned on only for Part 1 and off for the other Parts. When this is set to OFF, Keyboard Control settings for all Parts are returned to the original status.
Note: When you use the MONTAGE as a 16-part multi-timbral sound module with DAW software, the Keyboard Control Lock function is useful for creating or editing MIDI tracks one by one.
Translation: By locking KBD CTRL to Part 1, this means when you return to the HOME screen, Part 1 will be the one that sounds... but by selecting any other Part directly will allow you to play that selected sound. This allows you to place your “lead” sound, or the sound you want to actually play with this Pattern or Song, ready and available when you recall this Pattern or Song.
Say you are assembling the Pattern as backing tracks for you play along with. KBD CTRL LOCK allows you to set Part 1 as that lead Part.
Parts and Tracks can be Exchanged. This way if you place a Pattern and it’s linked Performance in a Live Set, it will automatically be recalled with the Part you want to play active!
What’s KBD CTRL?
The concept of KBD CTRL (Keyboard Control) is one that is new for MONTAGE. The KBD CTRL icon, available for the first 8 Parts of any 16 Part Performance, allows you to communicate with them all simultaneously. Very similar to how a MOX6 “Performance” — where you could simultaneously communicate with four Parts — Here you can link any of the first 8 Parts to be under your simultaneous control via the keyboard.
Any Part that does not have that KBD CTRL icon active (green), can be played by selecting it directly... you can *select* it by touching that Part slot in the screen, or pressing the [PART SELECT] buttons on the right front panel. So, KBD CTRL does not have to be active in order for you to play and/or record a particular Part (rather it determines which Part, or Parts, will initially sound when this Performance is recalled. What determines what will sound, and get recorded, at any point, is the *selection*).
When KBD CTRL LOCK is On, selecting a Part 1-16 allows you play just that sound directly. This is similar to a “MIXING“ setup in the MOX6 — When you selected a Part you were playing it... and if you were playing, it also was what was going to be recorded.
In the MOX, Part 1 was always automatically *selected* when you initially recalled the Song or Pattern... so it is very much the same).
If when you play the Keys you hear that Part — that is sufficient to Record that Part to its dedicated a Track. You can even move from a Track to Track without stopping the Record. What you hear is what gets recorded.
Here’s what to know about a Record Tracks: when you touch the keyboard — if you can hear that Part, it’s Track will record what you play.
Tip: when using this workflow, it is recommended when using PART CATEGORY SEARCH, that you set the “Bank/Favorites” = All, and the “Attribute” = Single. This will focus your search for MONTAGE instruments that are Single Part programs... you’ll recognize well over 1300 sounds from the MOX, MOXF, Motif XS/XF... updated with new effects and controllers...
I have a pattern with 16 tracks, including 1 drum track, and decide I want to replace or overwrite, or delete part of the drum track, is there a way without messing up the other 15 tracks?
Yes. Work with KBD CTRL LOCK = ON (Let’s you select one Part at a time).
If you recorded a Track and want to Delete it, you have the following options in version 3.00
__Tap the box “Edit/Job” > “Overview” > “Undo Media Record” (this deletes the last recording session)
__For surgically replacing and erasing drums... while in Record you can hold [SHIFT] + the KEY or a KEYS you wish to Erase - the Data is removed as it cycles past. Or tap the box labeled “Erase” — while it is green (active) hold down the Key or Keys you wish to erase... they will be removed as the Pattern cycles. Say you don’t like the hihats you recorded, engage “Erase”, hold F#1, G#1 and A#1 through one complete cycle. (The MOX had a similar feature).
In the current version, after the initial Track is Recorded, all subsequent recording must be done as “Rec Type” = Overdub
I don't understand why I can't punch in or replace a single track.
Punch In/Out is available when recording to the linear MIDI Song function... it is not available in the Pattern Seq (this also is similar to the MOX functionality).
You can move your Drum groove to an empty MIDI Song, (using an Edit/Job) and work on it, then put it back into the Pattern.
Touch “Edit/Job” > “Song” > “Put Phrase” — you can put your Drum Track into a blank Song
While in the Song, you can set “Rec Type” = Punch
Set the measures you wish to replace as your In and Out points, record replacing the data
Return to your Pattern, execute the “Get Phrase” Job to bring the entire Phrase back, including the replaced measures into your Pattern.
EXTRA CREDIT:
Mastering MONTAGE: Rehearse and Erase Functions in Pattern
Posted : 19/05/2020 3:51 am
Topic starter
Thank you so much for all of your help and wonderful information! I had firmware version 2.5. I updated to 3.0 and now everything makes much more sense. The problem I was having was fixed and I see more options available. I will continue to learn what I can and your additional information will be a big help. Thanks again! 🙂
Jon
Posted : 19/05/2020 10:43 pm
