Notifications
Clear all
MONTAGE Series Synthesizers
5
Posts
2
Users
0
Likes
1,522
Views
Topic starter
Can someone point me to anything describing the interaction between the Quick Edit screen and the assignable knobs on a part basis? I am particularly interested in the interaction between common parameters, such as reverb send, variation send, and cut-off. For example, one can use the Quick Edit screen for a given part to adjust the reverb send. You can also set the reverb send as a destination for one of the assignable knobs for that same part and control the reverb send using that assignable knob. However, the amount of reverb send is different depending upon whether you use the Quick Edit or assignable knob for that part.
I read somewhere about the Quick Edit being an "offset" to what is programmed for the part. But sometimes it appears that the Quick Edit provides more/less effect than the assignable knob and vice versa. Just not sure how the Quick Edit actually works or what each of the parameters in Quick Edit use as a starting point. Thanks.
Posted : 08/11/2020 10:25 pm

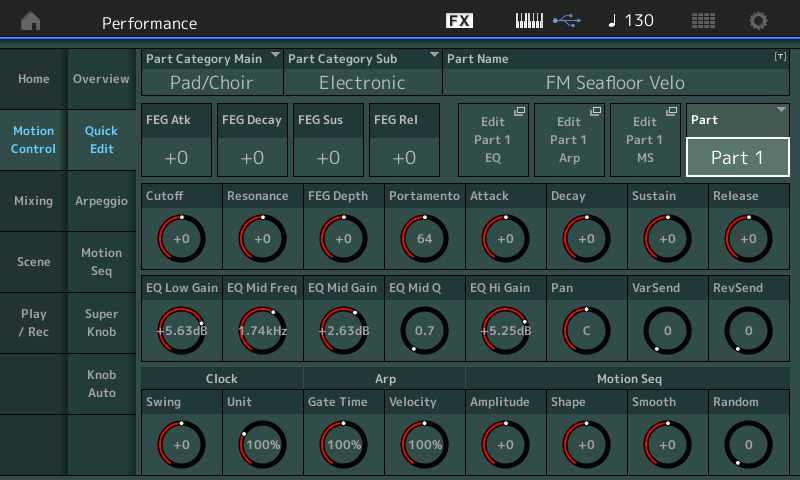
“Quick Edit” Part Parameters
Those parameters where the default setting is “+0” are the offsets. The offset parameters: “FEG Attack”, “FEG Decay”, “FEG Sustain”, “FEG Release”, “Cutoff”, “Resonance”, “FEG Depth”, (AEG) “Attack”, “Decay”, “Sustain”, “Release”... will be effective to all 8 Oscillators of the selected Part. They offset by adding to or subtracting from the stored value. Because each of the eight Oscillators can have their own independent value in the “deep edit” area, these “Quick Edit” offsets can be understood as, just that: a quick method to adjust a sound.
FEG (Filter) changes the timbre/tone over time
AEG (Amplitude) change the loudness over time
Example: in an AWM2 Part, each of the possible 8 Elements in a string sound has its own multiple stage Envelope Generator... Say you simply want to adjust the Attack to slow it down for the Bridge of the song you’re playing. You could navigate to the “Amplitude” > “AEG” screen for each Element and adjust the AttackTime for each of the eight Oscillators one-by-one — not very handy while performing. Having a Quick Edit control that “offsets” the Attack of all 8 Elements together is extremely handy for performing. Literally, Quick Edit.
“Portamento” is basically the exact *direct* setting for Portamento Time for this Part, as are the “Pan”, “Rev Send” and “Var Send”. These parameters affect the entire Part and when you change them here, the parameter is changed wherever it appears. You are seeing the actual direct parameter (not an offset). These go from 0 to 127, except for Pan which is C for Center, L for Left, R for Right.
If you change the RevSend amount here to 55, it will appear as 55 in all screens where you have direct access to the Part Reverb Send amount... namely the “Mixing” screen, and in the Part “Effect” > “Routing”, and on the “Part Settings” > “General” screen... etc.
Those Quick Edit screen parameters that are listed in “dB” (Equalizer Gain) and “Hertz” (Equalizer Frequency) are directly controlling the Part 3-band EQ (the EQ just prior to the Part’s two Insertion Effect blocks).
The bottom row of Quick Edit functions deal with adjusting the Arpeggiator and Motion Sequencer that may be assigned to the Part.
Here you’ll find Swing - which offsets the even numbered musical sub-divisions, either delaying when they occur (+), or anticipating ahead of the beat (-).
Those parameters defaulting to 100% (Unit Multiply, Gate Time, Velocity) are not changed. 100% = the normal value, you can offset (increase or decrease) the value by percentage. When Unit Multiply is set to 200% an Arp Phrase or Motion Seq will take twice as long to play through once... when set to 50% the same Phrase will play in half the time (twice the tempo).
The Motion Seq specific “Amplitude”, “Shape”, “Smooth” and “Random” are used to alter the application of the assigned parameter change. These are “offsets” to the stored Motion Sequence values.
You will notice on the Quick Edit Part screen you have three shortcut boxes, “Edit Part EQ”, “Edit Part Arp”, and “Edit Part MS”... these take you directly to the Edit screens for these deep Part edit components. Pressing [EXIT] will bring you back to the Quick Edit screen.
Conclusion:
As you can see each of the parameters on the Quick Edit is not treated the same. Some are offsets for the convenience of manipulating all eight Filters, all eight AEGs, all eight FEGs, etc together... others are directly in touch with the Part parameters (Portamento Time, Pan, RevSend, VarSend) basically because these effect the entire Part as a whole.
The concept of the eight Part Assign Knobs is so that you can, on a per Part basis decide which parameters you want to have direct access to... see the Data List booklet’s Controller Box Destinations for all the potential parameter Destinations. When you *select* a Part, and the [ASSIGN] button is lit... the eight Assign Knobs will display the eight parameters you want to have access to for this Part... and when you are in a situation where you have “linked” multiple Parts using the KBD CTRL function, you can link the Part Assign Knobs to one of the eight Performance Common Assign Knobs. This allows you to have whichever parameters you need to control at you fingertips - even when you are controlling multiple Parts simultaneously.
The Quick Edit parameters and your selected Assign Knob parameters are available while playing and working with the Sequencer.
Additionally the MONTAGE gives you options to turn the eight rotary encoders into side-by-side Pan, VarSend, RevSend Knobs.
Working the left front panel buttons can make these different functions available to you.
The Super Knob, being “super”, does not need any specific item be *selected*, nor does it require any special button to be lit... anything assigned to be controlled by the Super Knob will always be accessible, at all times. This is how you determine which items you link to it... do you need access to it at all times.
Extra Credit:
See the following article for more details:
__Mastering MONTAGE: Navigation Tips
Posted : 09/11/2020 3:22 am
Topic starter
Thanks, BM. I understand now the Quick Edit settings. So, while playing, you can adjust the RevSend (an exact direct setting) for a given Part using Quick Edit and that setting will show up on all screens. That said, how do you view the Assignable Knobs for a given Part while playing? For example, if you assign RevSend for a given Part to an assignable knob, it seems that you have two ways to adjust RevSend (Quick Edit and that Part's Assignable Knob). However, it seems there is more control over the adjustment made using the Assignable Knob since you can adjust the curve, etc. Maybe it is just that simple--two different controls over RevSend for a given Part. But, I am interested in how you perceive the use of Quick Edit and an Assignable Knob for the same parameter. Thanks again.
Posted : 09/11/2020 4:32 pm
Topic starter
I also note that when adjusting RevSend with an Assignable Knob, that change does not show up on the screens on which a change via Quick Edit does.
Posted : 09/11/2020 4:34 pm
how do you view the Assignable Knobs for a given Part while playing?
There are three Views to the HOME screen (as of the latest firmware). On the HOME screen to the left of the Performance Name is a box that indicates the current View screen, 1, 2, or 3.
Repeated pressings of the [PERFORMANCE (HOME)] button will toggle the views, as well.
_ View 1 will show you the rotary encoders position/value and can show the assigned parameter. It shows the eight rotary encoders, which can be showing the eight “Common Assign” Knobs (when the upper [COMMON] button is lit). You can opt to input the parameter name on any of the Common or Part Assign Knobs, as you may desire).

_ It can show the eight rotary encoders for the currently *selected* Part. If you select Part 1, and the [ASSIGN] button is lit, for example, “Part 1 Assign” will appear to the left of the Knob icons. And you can see the 8 parameters selected for the Assignable Knobs for Part 1

_ It can show you the left front panel Knob Functions, depending on which of three rows of functions is selected, TONE, EQ/FX, ARP/MS... These are the Quick Edit functions. You may see “Common Tone”, “Common EQ/FX”, “Common Arp/MS” or “Part Tone”, “Part EQ/FX”, “Part Arp/MS” --depending on what you have selected.


Press the associated button to view the eight dedicated parameter Knobs.
It can be, when using the Performance with a Multi Part program, eight side-by-side Pan, VarSend, RevSend Knobs for Parts 1-8 or Parts 9-16 depending on which you have selected... press the [MULTI] button repeatedly to toggle the selections. Useful when sequencing or when you quickly want to rebalance your mix.
I also note that when adjusting RevSend with an Assignable Knob, that change does not show up on the screens on which a change via Quick Edit does.
Adjusting the Rev Send with an Assign Knob is not directly controlling the parameter, you are offsetting it using a non-direct method.
The direct RevSend parameter can be stored at the value you want the program to begin with, while the Assign Knob set to control Reverb Send can be used to OFFSET that value above and/or below the stored setting by a specific pre-programmed amount. Say you want to store the Guitar sound with Reverb at 25 (direct value)... with an Assign Knob assigned to also control the offset of the Reverb Send amount, I can, in real time, increase or decrease the RevSend by the precise amount I desire. The Control Set value is expressed as RATIO... where the stored value is the original (direct) value, and the Control Set is offsetting the value.
In “Proximity Effect” - they are moving the position of the listener. When Super Knob is down, you are extremely close to the guitarist... as you raise the Super Knob you move farther and farther away... this is accomplished by pre-determining how much each parameter is going to change (a minimum start value through to the exact change you wish to implement)... the bass (EQ Lo) rolls off, the highs (EQ Hi) also become less defined, the Reverb and Delay increase. The RevSend is not increased linearly as it would be if you moved the direct Send, the Curve, Polarity, Ratio, and Parameter Shape settings determine the application of change. By the time you reach about 3 o'clock with the Super Knob you are pretty far away from the guitarist... Tremolo comes in beyond that...
Notice how turning the Super Knob will move some parameters clockwise others counterclockwise, some a small amount, others a large amount... each offset is extremely programmable so that the single gesture of moving the Super Knob changes multiple parameters the predetermined distance. Contrast this to the direct 0-127 you get when you directly control the parameter itself.
In “Proximity Effect” the Reverb on Part 1 is stored at 25... moving the Super Knob will increase the Reverb radically once you’ve moved the Knob past 4/5 of the way, then it rapidly increases... this is defined by the Control Assign Curve, Polarity, Ratio, etc.
You can also reach up and turn a Knob directly — the Super Knob may only change a setting a small amount, but grabbing individual Assign Knob can change the parameter a great distance. This is what the whole Assign Knob system allows. During the performance when you move the Super Knob while playing this acoustic guitar, you are positioning the listener in an infinitely expanding hall...
See the Mastering MONTAGE articles on Super Knob to get more background on this concept.
Posted : 09/11/2020 8:52 pm
