Notifications
Clear all
Topic starter
How do I set up A/D inputs to use the Montage as a controller for my MOXF8? Please walk me through the process of how to hook up the other keyboard to the Montage and then set it up to add sounds from the MOXF8 to a performance on the Montage. Your replies are greatly appreciated.
Posted : 27/06/2019 2:06 am

Hello Rick. Your MOXF8 is driven via MIDI - the A/D inputs are only for plugging the main outputs of the MOXF8 into. So you first need to connect the MIDI Out on Montage to the MIDI In on the MOXF8 with the appropriate MIDI DIN cable. Then check the Montage is in MIDI mode - in 'CATEGORY SEARCH; press the 'UTILITY' button and from the options on the left of the screen tap 'MIDI I/O' and check that the 'MIDI' pad on the top line is lit up green. If it is not the USB pad next to it will be - just tap the MIDI pad to switch it on and turn the USB pad off. Then press 'EXIT' to return to 'CATEGORY SEARCH'.
Connect the main L/R audio outputs of the MOXF8 to the corresponding A/D inputs of the Montage - this switches the MOXF8 to using the Montage speakers. Press the A/D button to switch the connections on (it lights up orange). Below that is a volume knob to adjust the signals received from the MOXF8 - play the MOXF8 to get the volume about right. Now play any note on the Montage, and the selected sound on the MOXF8 will also play. The Montage now controls the MOXF8.
In my case I have a Tyros 3 driven by the Montage - and it works for me! Hope it works for you ...
Posted : 27/06/2019 9:37 am

Thanks for the question... *(please note that the majority of MOXF VOICEs already exist as Single Part MONTAGE Performances.)
You would use the Zone Master function any time you are connecting via standard 5-pin MIDI OUT to other synthesizers or MIDI modules, and you wish to control and manage them from your MONTAGE. In short, when using the MONTAGE as your Master Keyboard Controller via MIDI.
Activating ZONE MASTER and Setting the MIDI I/O Mode (global)
Press [UTILITY]
Touch "Settings" > "Advanced"
Set the Zone Master = On.

Here you can both set the Zone Master to On, and select the MIDI I/O Mode that will apply overall when you have not configured a specific Zone setup for a Performance. You will need to understand these two settings and how they work together.
• The "Zone Master" is all about what gets transmitted from the MONTAGE as the master MIDI keyboard from your current Performance. This can be configured on a per Performance basis.
• The "MIDI I/O Mode" is about what is both transmitted from and received by the MONTAGE, globally. If/when there are no Zone Switches active within a Performance your MIDI I/O Mode setting will apply and determine what goes Out via MIDI and how the tone generator is set to receive MIDI coming In.
When the I/O Mode is Multi the MONTAGE is able to transmit (8) and receive (16) on multiple channels simultaneously; when set to Single it transmits and receives on a single, selectable channel. You can use either I/O Mode as best serves your particular system setup requirements.
When the global Zone Master function has been activated, all 2,655 Factory Preset Performances start with a neutral setting - the local Zone Switches in each Part are set to OFF, by default. There is no data setup for the "Zone" functions in any Parts of the Factory Performances. Changes can and must be stored to USER locations.
The ZONE Parameters defined
Turn the Zone Switch On within a Performance. It is going to be a Part parameter. There are 16 Parts.
• Press [EDIT]
• Press the [PART SELECT 1] button to view its settings
• Touch "Part Setting" > "Zone Settings"
If you do not see the Zone Settings option in the second column, you must activate the ZONE
MASTER in Utility: go to [UTILITY] > "Settings" > "Zone Master" > set to ON.
• Press [EXIT] to return to Part Edit
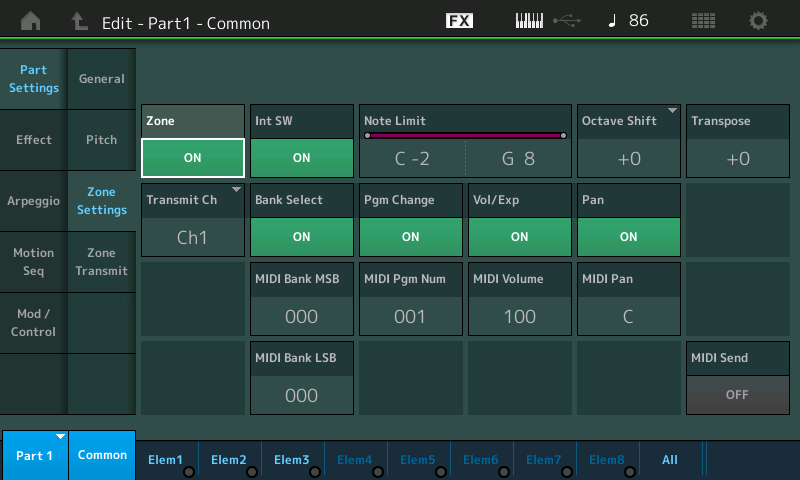
Int SW - this is where you designate whether or not the internal MONTAGE Part assigned to this slot is going to sound. If you set this to Off, the slot becomes available exclusively for an external device. An internal Part must occupy a Part slot for it to be used as a Zone - you can then disconnect the internal Part with this switch.
Note Limit - this sets the range of notes transmitted by this Zone. Setting the High Limit lower than the Low Limit sets up a "no-fly" zone where notes in between are silent. This parameter affects both Internal and/or External transmitting. This parameter defines what gets transmitted - not to be confused with the Part's own Note Limit which define what gets received.
Octave Shift - +3/-3 octaves
Transpose - +11/-11 semitones
Transmit Ch - this is where you activate this slot to control an external device by selecting the MIDI channel. If Transmit Ch = OFF, the Slot will not transmit OUT via MIDI at all.
Bank Select - if you wish to send MSB/LSB set to ON, and enter values. If you do not wish to send Bank Select set to OFF
Program Change - if you wish to send PC set to ON, and enter the value. If you do not wish to send a Program Change set to OFF
Volume/Expression - if you wish to send/control the zone cc7/11. If you do not wish to send Volume or Expression set to OFF
Pan - if you wish to send a pan position message. If you do not wish to send a Pan command, set to OFF
MIDI Send - when active (green) the Program Change, Volume/Expression, and Pan Settings are sent in realtime from this screen. When inactive, the values are only sent when the Performance program is initially recalled. (Note: Bank Select changes are not sent until the Program Change is selected... This means: changing just the MSB and or LSB does nothing until a Program Change value is selected).
Extra Credit: Frequently Asked Questions concerning Zone Master and MIDI I/O Modes:
MONTAGE MIDI ZONE MASTER FAQ
Posted : 27/06/2019 9:52 am
Hi Rick! I suspect, from the nature of your question, that you may be new to all this stuff. BM has laid it all out for you to have full control of all channels and all functions via MIDI, just as he did for me maybe a year ago. I struggled with it, and of course it works - but it was way beyond what I wanted to do - I'm an old dog and new tricks don't come easy! So I reverted to what I wanted to do - just add the Tyros voice to my mix. Unfortunately, Yamaha did not make the Montage compatible with Tyros, so I can't import anything. You could - though the MOXF uses pretty well the same sound set as Montage, so you could actually produce the same sound without the MOXF at all. But two instruments playing as one does have a unique timbre, which is why I do it in the first place. My maxim is to do what I comfortably can, and creep up on Montage gradually ... it has many more tricks up its sleeve than I will ever use ...
Posted : 28/06/2019 3:07 pm
Topic starter
Thanks so much, gentlemen, for your replies to my post. Rod, you are correct that I am a newbie when it comes to using a keyboard as controller for another. I have always had to use someone else's keyboard and only in the last two years have been in a position to purchase the two keyboards for my own use. I am attempting to go deeper into the Montage, but like you said, the instrument is much deeper than my capabilities right now. I really do enjoy playing the instrument and experimenting with the multitude of sounds it can produce. I am preparing to play with a live band in September, so I want to learn as much about the Montage as possible before playing on stage.
Posted : 29/06/2019 3:47 am
That's impressive, Rick! To play live to a paying audience is another planet altogether ... your set up could BE the band! Study and practice Bad Mister's instructions on Zoning - that's the key to being an entire band, rather than one player. Though my guess is that playing in concert with other musicians is a whole new ball game and an end unto itself. My very best wishes to you ...
Posted : 29/06/2019 8:50 am
I suggest that you form a specific question. If you ask a general question, the answer must be generic rather than specific.
Choose a simple MONTAGE Performance (one that you like and understand) then pick a MOXF Voice that you wish to play through that MONTAGE Performance. This way you can learn how to do specifically proceed.
Pick a Single Part Performance in the MONTAGE,
Pick a Voice in the MOXF
I highly recommend you start with a simple item in each. Having taught people to use complex synths for over thirty years, I’ve found that most people bite off more than they can chew because they don’t plan a strategy to learn, they start by trying to jump right into being creative.
Example, you must learn to “Layer” before you learn to “Split”.
The important thing about the above shows an understanding of the procedures.
This is why when learning to create your first “Split”, it would be wrong to start with a four Part “CFX Concert” Acoustic Piano. Reason, the four Parts of that program, are themselves a “layer”... and if you don’t understand how it is layered, trying to create a split becomes problematic.
The first step in combining two keyboards via MIDI, is one is the master (MIDI Out) the other is the slave (MIDI In).
The MONTAGE as master uses the Zone Master function to control what it sends Out via MIDI.
If you were to go the other direction, the MOXF has MASTER mode to control what it sends Out via MIDI.
Does the MONTAGE send stuff Out via MIDI without the Zone Master?
Yes, it does. But wisdom will teach you... that what it sends Out without the Zone Master is MIDI information only it can interpret coming back In. It is MIDI information meant to reproduce someone performing on a MONTAGE.
The poor receiving device will not be able to handle all of the data sent by the MONTAGE (which can easily transmit via the Keyboard on eight MIDI channels simultaneously). Enter the Zone Master. It allows you to intelligently determine what exactly goes Out via MIDI, by setting only specific data to go specifically to your slave device.
We’d be happy to help you but for it to be helpful, it should be something you have thought about... decided it is a good task from which to start learning... attempt it yourself.... if you get stuck post a specific question outlining what you are trying to accomplish, and where you got stuck.
Most times if you do, your ability to succeed increases. This is not the only way to learn, it simply one way to organize your thinking.
Once basic MIDI communication is accomplished... the next step would be returning the audio of the slave device to the A/D Input of the MONTAGE. Then the final step is establish Control over the A/D In as apart of your new MONTAGE Performance. This will all require you to create a scenario where you are accomplishing a goal. Layering, splitting, morphing between them, etc., etc., etc.
The problem with non-specific questions is that there are so many possibilities.
Posted : 29/06/2019 12:51 pm

use the Montage as a controller for my MOXF8
I imagine this denotes they want the Montage as master and MOXF8 as slave.
Physical connections:
1) Connect MIDI OUT of Montage to MIDI IN of the MOXF8.
2) Optional: Connect MOXF8 OUTPUT L/R to Montage A/D Inputs L/R
#2 is optional because what this does is allows for you to consolidate your audio to one output to one set of speakers (monitors). Montage will be connected to speakers and the audio from MOXF8 will flow through Montage arriving at the speakers. You can also either connect both keyboards' outputs to a mixer which is connected to one set of speakers or you could have two sets of speakers and have both keyboards connected to their own pair. It's up to you how you want the audio routing to work.
One side benefit of routing through Montage's A/D input is that you can apply another set of what will essentially be a "Master FX" for the MOXF8. You get two insertion effects you can apply to the A/D input where MOXF8 is plugged into in this scenario. You can also quickly balance the two keyboards directly on Montage by using the A/D input gain as a quick boost/cut knob. This may be more difficult to manage if you have two different keyboards independently controlling volume or if you have a mixer since its controls may not be in close proximity.
That's the basic starting point. The rest are settings and knob pushing.
If you connect the MOXF8's outputs to Montage's A/D input, the first step in the non-physical setup would be to press the [A/D INPUT ON/OFF] button so it lights up and turn the A/D gain knob so you can hear MOXF8. Presets already have Montage A/D inputs routed through to the Main L/R output - so you shouldn't have to do anything else to start to hear MOXF8's outputs come through Montage and out your monitors.
For all setups, you'll need to ensure Montage's MIDI In/Out setup has its MIDI mode set to "MIDI" (as opposed to "USB" ). These are under the [UTILITY] menu (press the [UTILITY] button, then navigate to the "Settings" -> "MIDI I/O" screen).
At this point, mashing down on the Montage should make the MOXF8 make noise assuming the MOXF8 is set to MIDI Channel 1. All Montage presets have at least one PART and the first PART is always MIDI Channel 1 (assuming your keyboard is in multi-channel mode). So setup MOXF8, at first, to receive on MIDI Channel 1 (set BasicRcvCh on MODX to 1 or Omni, UTILITY then [F6] MIDI on MOXF).
Using zones you can tell Montage which MIDI channels each PART will use. This may be helpful to refine your setup - but probably not necessary as a first step.
Using the above as a starting point, you should be able to play any of the Voices on MOXF fully by selecting any Preset on Montage and also manually recalling any Voice on MOXF (by pushing buttons on MOXF). Going beyond this will require more setup on Montage and possibly on MOXF as well.
Posted : 29/06/2019 5:58 pm
