Notifications
Clear all
Topic starter
I am still new to Montage and i own a Kronos and i love how my Kronos has a split and layer button that will quickly do this job, does the Montage have something similar to this or what is the easiest method?
Posted : 03/04/2018 6:10 pm

Hi. If you have a Performance chosen and there are empty channel slots, just press the + symbol in one, and you will be immediately taken to a screen where you choose your layer sound! You can also, from there, choose the type of sound, or the Bank it is in, if you want to. After the 2nd sound is selected, you tell the Montage which note range you want it to be on the channel strip(s) it/themself (That's if you desire a SPLIT. If you desire a LAYER, you're done.) And already on the screen are channel faders to Balance the Layer. Take note -there may be more than one channel strip for the new sound you have chosen. Each will have its own Channel volume fader. More flexibility this way.
Posted : 03/04/2018 8:09 pm

https://www.yamahasynth.com/forum/need-help-bad
More videos for other topics:
https://yamahasynth.com/forum/request-training-video-for-montage#reply-13628
Posted : 03/04/2018 8:27 pm

JOSUE wrote:
I am still new to Montage and i own a Kronos and i love how my Kronos has a split and layer button that will quickly do this job, does the Montage have something similar to this or what is the easiest method?
you can create a Layer as quick as you can think about it.
It requires you master one skill: Category Search - which will help find the specific sounds you want to work with. Here's a step-by-step that will show you the basic concepts:
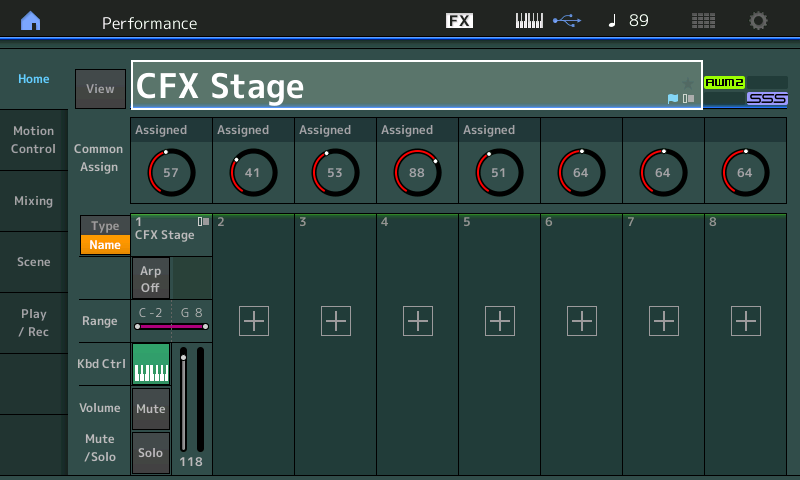
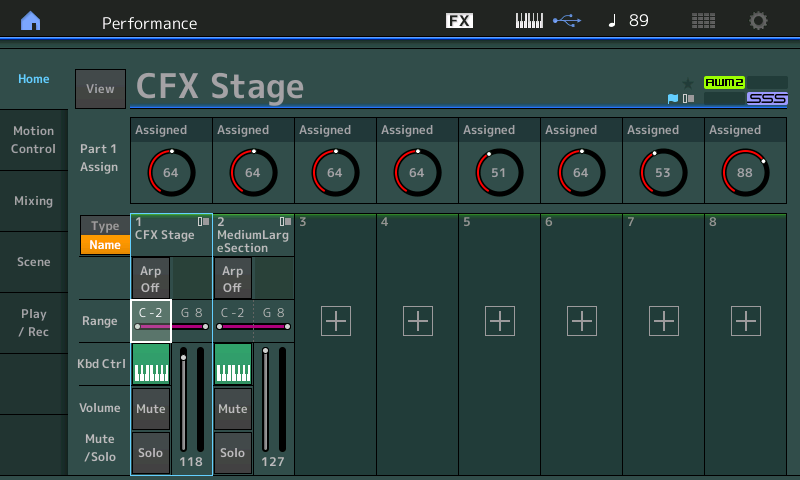
Recall "CFX Stage" - a single Part Performance.
Touch the "+" in Part 2 to search for a Layer Part
You are taken to the CATEGORY SEARCH "Performance Merge" screen
You can refine your search by Bank, Attribute, Source Part
Touch a program, you have created a Layer.
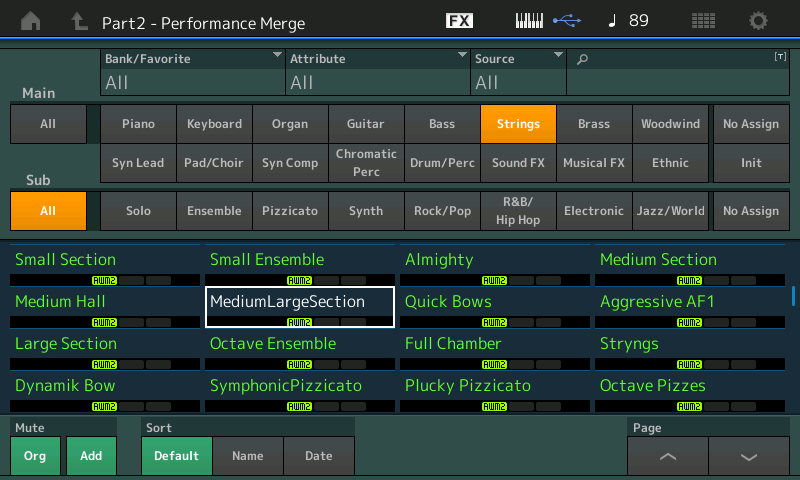
You can immediately try them while in Category Search (use the MUTE function in the lower left of the screen to hear the "Org" (original) Performance and/or the "Add" (additional) Performance you are adding. Green is active, grey is bypassed.
Press [HOME]
To create a Split, you do so on the HOME screen by touching the "Range" area Low and High Limits.
The cursor highlights C-2 in the screenshot above
Just FYI C-2 is the lowest note on the mythological MIDI Keyboard, G8 is the highest. Acoustic pianos are A-1 through C7, just for reference. And Yamaha uses C3 as "middle C"
These Note Limits can be set with the Data Dial or by touching the box and using the Keyboard pop-in for direct data entry.
Many of the 2,143 Factory Performances are already Splits, Layers.
We recommend that you start - as we did in the example above, with SINGLE PART programs. It is counterintuitive to learn by jumping into MULTI programs when first learning Splitting and Layering... because you have no idea how the MULTI PART programs were built. By starting with Single Part programs you can begin to see how MULTI Part programs are created.
Later you can easily split and layer multiple Part programs, but learn the basics first (highly recommended).
In the Category Search area for PERFORMANCEs and PARTs of PERFORMANCEs, Single Part programs are shown in green font, Multi Part programs are shown in blue font. The beautiful thing about Layering and Splitting on the MONTAGE is you never have to hit the EDIT button to create a basic SPLIT or LAYER.
For more on CATEGORY SEARCH please see the following (one) tutorial:
Mastering MONTAGE: Using Category Search
Posted : 04/04/2018 1:21 pm
Topic starter
Thanks for all your help guys, BAD MISTER, thanks for the illustrations, this helps out a lot. I will continue to explore this beast has some great sounds and features. Thanks.
Posted : 05/04/2018 6:05 pm
