Notifications
Clear all
MONTAGE Series Synthesizers
7
Posts
4
Users
0
Likes
303
Views
Topic starter
Hi, I’m trying to control an iOS sound by sending a MIDI CC from the Superknob, and while I can set the CC numberthat is sent, it seems the SK is limited to transmitting on Channel 1. Is there a way to arrange for the Superknob to control one of the assignable knobs, which can send CCs on their corresponding channels, so that I can, for example, turn the Superknob and have it cause Assignable knob 4 to send the MIDI CC assigned to knob 4? I see in the Control Assign menu where I can set the SK to control an assignable knob, but I haven’t been able to figure out how to get it to do what I’m describing. Thanks in advance!
Posted : 22/08/2023 6:29 pm

Superknob only internally addresses the Part assignable knobs. The Part Assignable knobs won't transmit any MIDI when being controlled by Superknob.
Maybe try setting the mode to single channel and choose a different MIDI Transmit/Receive channel.
An alternative solution may be to use DAW remote mode. I can't recall what SK does in remote mode in terms of CC and channeling options.
Posted : 22/08/2023 7:17 pm
Hi, I’m trying to control an iOS sound
Can you describe in more detail just what you want to do? What do you mean by 'control an iOS sound?
What command is the remote device expecting to get?
When you turn the super knob it will send a Control Change (CC) nessage with a data byte that represents the new knob position. Values are from 0 - 127.
When you turn an assignable knob it will send a SysEx message with the new knob posistion as the value for the assignable knob.
The receiving device would need to interpret the SysEx message and the value being sent.
There is no on-board facility for sending generic SysEx messages.
Posted : 22/08/2023 7:28 pm
Topic starter
Thanks, Jason and Andrew. More specifically, I am trying to control the overdrive parameter in the iOS app B-3x, which can be set to any CC number. Regarding the assignable knobs: In addition to sending sysex, they send CCs, but only when the part corresponding to the knob is selected. So I can sort of achieve the result I am looking for with an assignable knob, but it is not ideal to have to select a specific part during live performance. On the other hand, I can use the super knob to send the CC number in question, but it appears limited to sending on Channel 1. Maybe I’ll explore Jason’s suggestion of setting the single MIDI channel to a different channel, corresponding to the channel on which I am controlling the iOS app. Thanks.
Posted : 22/08/2023 9:55 pm
Note that using zone control you can defeat single-channel mode on a Performance-by-Performance basis. If there are situations where you need multi-channel and some when you need single then this is the way to accomplish this.
Posted : 22/08/2023 10:44 pm
Topic starter
Thanks, Jason. Yes I actually use that approach. I have a Montage/MODX set to USB MIDI and single mode, and I use a second board connected via 5-pin MIDI to play either all Montage parts, or only Parts 9-16, which I can control on a per-Performance basis using the Zone switch method you describe to turn MIDI multi mode on or off. I also connect an iOS device to Montage via USB and run the Midiflow app in iOS to handle re-mapping of channels, and as a bonus I can incorporate iOS sounds into my Performances. It’s a pretty slick setup and very powerful for live performance!
Posted : 22/08/2023 11:19 pm

As you have discovered, the Super Knob is primarily designed to control the “local” synth engine (MONTAGE/MODX/MODX+) — The message it normally sends is designed to address the internal synth engine, AD IN and/or a device connected directly via 5-pin MIDI (when you additionally route its audio through the MONTAGE/MODX/MODX+).
If you wish to control an external (iOS or computer-based) synth, Yamaha has designed the REMOTE (Control Surface) function to provide the type of flexibility required for controlling an external plugin synth device in addition to navigation and control over your DAW.
From the HOME screen:
Tap “Remote”
This will place the front panel in a mode where it can address computer based Plugins and even operate functions in the host DAW software.
The REMOTE feature can address various DAW software programs (using USB Port 2, via Mackie Control). You have templates for Cubase, Logic Pro, Pro Tools, Ableton.
Once you enter REMOTE Mode
You can select a DAW and establish communication with your Host software.
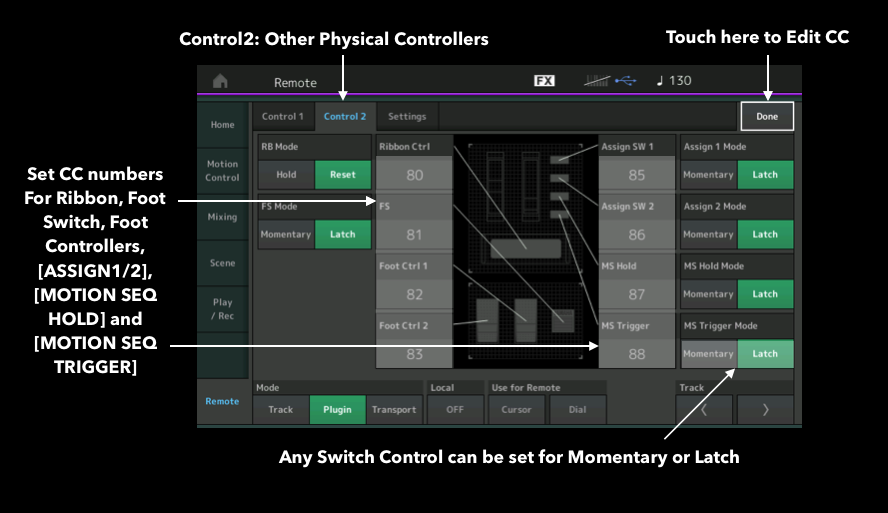
You can tap “Plugin” and the “Edit” options (use “Control 1”, “Control 2” tabs to set the various control #s) in the screen.
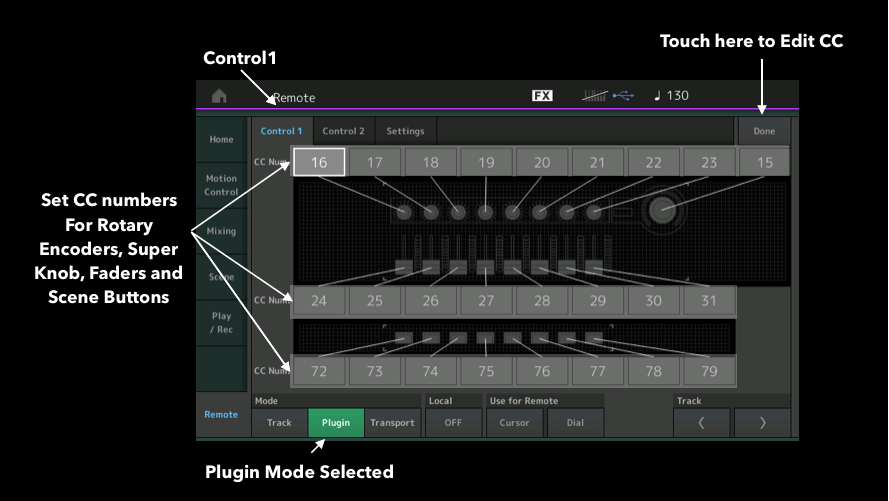
You can customize the Sliders, the Switches, the Knobs and even the Super Knob to any CC number you desire or require for the target device.
You have options to quickly switch the entire front panel from controlling your Remote device, to controlling the MONTAGE/MODX/MODX+… You can do so while in the REMOTE layer by simply touching the “Transport” option.
When the “Transport” tab is selected (while still in the REMOTE layer), not only do the Start/Stop/Rewind/FF and Return to Top buttons work your DAW, but while Transport is selected you can operate the internal synth front panel, normally — The Super Knob (and other controllers) work normally to control the internal engine.
__ This is convenient when operating your DAW - Say you want to select a Track and put it in record - you can operate your DAW from the front panel of your synth, yet quickly be setup to record your performing on the internal synth. And if you are recording a plugin you can quickly fully operate the situation from the front panel of your Yamaha synth.
Tap “Plugin” to return the Sliders, Knobs, Super Knob, et al, back to control your USB synth.
Hint: The front panel of the MONTAGE/MODX/MODX+ is primarily used to control the internal synth and things you connect to it via standard 5-pin MIDI (external modules) — if you connect via standard 5-pin MIDI, the front panel functions can be extended to that external device via the ZONE MASTER function if you return the Audio of that external synth to the AD IN, however, when you are transmitting to a Hosted device (computer, laptop, Tablet, etc) via USB-MIDI, it is highly recommended you use the REMOTE control function.
A 5-pin MIDI connection is fixed as PORT 1… while USB-MIDI is a multiple port communication vehicle. We can use a separate Port to control the plugin.
(It is not that you can’t use the Zone Master function as others have suggested, but as you have discovered, it has its drawbacks… Super Knob data is documented on MIDI CH 1 only, for example).
Yamaha uses PORT 1 for “local” control.
And PORT 2 for “remote” control.
These are discreet communication buses and allow maximum flexibility for operating both internal and external devices.
This allows you to build an entire front panel scheme specifically to control that USB Plugin synth.
To the “Plugin” layer, the Super Knob, is just a ninth assignable Knob that you can assign (cc#) as you see fit. All communication between the REMOTE layer and your iOS device will take place on the MONTAGE/MODX/MODX+ USB port #2. The “Remote - Plugin” assignment will only affect the Plugin and will only affect it when the REMOTE layer is active.
Hope that helps.
The Zone Master is a one Port system so best used for the internal engine and items connected to the internal synth via standard 5-pin MIDI connection.
Use the REMOTE layer when attempting to setup intelligent control via USB-MIDI.
Posted : 23/08/2023 9:08 am
