I've been playing around with the Cello Solo voice (PRE4 A05), trying to make notes last longer when I release the key. (I save the modified version in USER1).
I've been able to get part way there by setting the Release Time of each element of the voice to 127. This gives me a nice longer fade when I release the key, but only if I've held the key down for a few seconds. If I hit the key and release it right away, I don't get that same longer fade.
I've looked in the Reference Manual for a setting to make the fade longer even on staccato notes, but I haven't found anything. I suspect there must be such a setting and I'm hoping to find out what it is.
Thanks…
Hi, Michael,
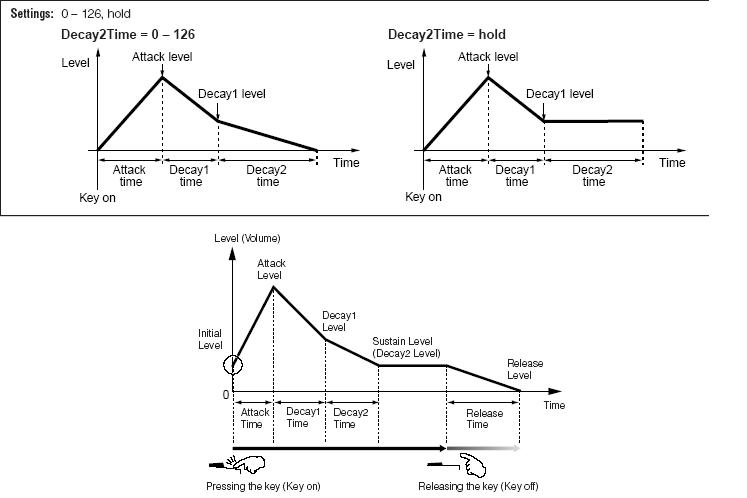
There is a TIME factor that must be considered when addressing the Amplitude Envelope Generator (AEG). Below is the basic envelope types you will find in the Motif XF. The first is a typical Drum Voice Envelope, the second is a Drum Voice Envelope where 127 will simply leave the gate open, indefinitely (until the "silence detector" shuts the audio channel) This one is good for Audio Loops. The third envelope graphic (bottom) is the typical NORMAL VOICE Envelope, like the one you would be dealing with in the Cello Solo Voice.
Commonly called "ADSR" on analog synthesizers, but expanded on the Motif XF - instead of just four parameters is defined by:
"Initial Level" determines if the audio starts immediately or climbs to a set volume
"Attack Time" controls how fast the envelope reaches maximum volume "Attack Level" (attack)
"Decay 1 Time" controls how fast it moves to "Decay 1 Level" (initial decay)
"Decay 2 Time" controls how fast it moves to "Decay 2 Level" (sustain)
"Release Time" controls how fast it disappears when the key is released (release)
A Release setting of 127 would (should) give you a very, very, very long Release... If the AEG RELEASE TIME is set at maximum it rings for almost a minute, if not more. If you are getting some what less than that amount then something else may be acting on the Elements in question.
In our recent article on "SYNTH BASICS: Sound Experiments" we discussed the overlap of AEG and the FEG as it relates to TIME. If you program Filter movement that takes place before or after the Amplitude Envelope does its thing, you will not hear it... The converse is also true, if the Amplitude Envelope is programmed to a long Release Time, but Filter closes the sound down prior to the AEG's settings, the result will be no sound. Like the tree that falls in the forest with no one to hear it, your long release goes unheard.
The Yamaha Editor shows you your PEG, FEG and AEG on an overlay graphic so you see how they relate to each other in terms of time. Each is color coated.
In the Cello Solo Voice, Element 1 is the main body of the Cello, so we'll look at this Element.
The FEG (blue) is closing causing the shortness of your AEG Release (AEG shown in red). The Filter is simply closing and is indeed closed before the Release Time parameter can take effect.
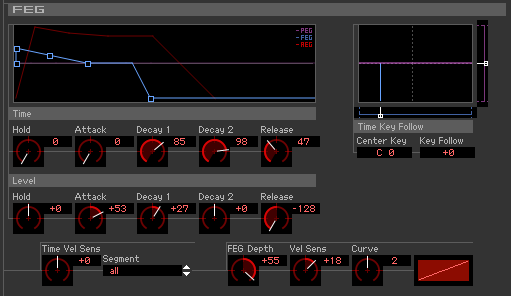
You can remove the Filter EG (set the FEG DEPTH to 0) or you can simply extend the last Filter Level (It's that -128 FEG RELEASE LEVEL that is really killing your AEG Release Time). Sorry, about the graphic: the AEG (red) comes out so faint on the internet - it is clearer when viewing the Editor on your computer than when transferred to a screenshot.
The Filter also affects overall loudness... It can remove some or all frequencies, and this quite naturally affects overall Volume.
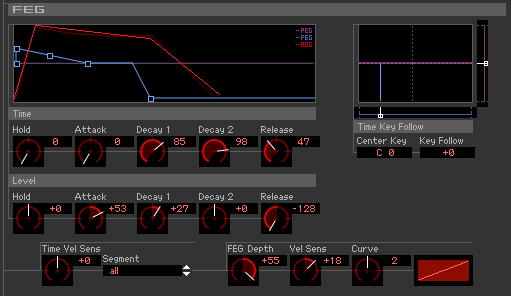
Here below... I "Painted" the AEG in red, you can see that the FEG (blue) closes completely before the Release of the AEG. Fix that Filter EG and then you'll find Release Time of 127 is way, way, way, way, too long! 🙂
That did it!
I'm curious about why the FEG cuts off staccato notes but not longer notes.
My theory is that the longer notes are held past the time when the FEG cutoff would happen, but this theory seems slightly iffy to me, and I'd love to get the real story.
There is a "time" factor in play - the distance the envelope has to travel between the Levels as set can influence the result, also envelopes are influenced by Velocity Sensitivity and velocity can be directed to specific areas of the different envelopes. Next time I'm seated at my XF, I can dig into it deeper to perhaps show you what is causing the behavior. The Filter is velocity sensitive, so right away the key-on velocity will be in play. There are multiple Elements in this Voice - if I recall there is a "Spiccato" Element in Element 7 that accentuates attack on quick staccato notes, it will play its quick bow articulation under certain circumstances.
I took a look at this Voice and as you can see it is a solo Cello but there is a lot more going on in this Voice... I did determine that Element 1 is the Waveform covering the basic solo Cello range and I recall one of the upper Elements was the Spiccato _ take the Voice apart and take a look at what each is contributing _ I'm sure the Spiccato Element's AEG is so short that it is gone long before the FILTER LEVEL reaches (-128). So your question is a valid one... Not sure what other changes you've made to the Voice.
I just edited this to indicate that the Release Times I changed were AEG.
So you can be sure what we're talking about, just now I started from scratch with Cello Solo (PRE4 A05). I changed the AEG Release Time on all 8 elements to 127. I made no other changes.
I used G4 to test what the release sounded like. If G4 is held for 2 seconds or more, I get the slow release. If G4 is held for less than 2 seconds, I get an abrupt release.
One other question:
When selecting a Filter Type (Reference Manual, p. 74), there are two parameters named "HPF Cutoff" and "HPF Key Follow." On p. 76, we learn that "HPF" stands for "High Pass Filter." But the description of "HPF Key Follow" says:
When a filter type “LPF12” or “LPF6” is selected, this parameter is available.
What does something about a high pass filter have to do with a low pass filter?
I just edited this to indicate that the Release Times I changed were AEG.
So you can be sure what we're talking about, just now I started from scratch with Cello Solo (PRE4 A05). I changed the AEG Release Time on all 8 elements to 127. I made no other changes.
I used G4 to test what the release sounded like. If G4 is held for 2 seconds or more, I get the slow release. If G4 is held for less than 2 seconds, I get an abrupt release.
Again, in good conscience I cannot set the AEG RELEASE TIME on all 8 Elements to 127, for the reasons I mentioned in my previous post. It's like turning the volume knob all the way up, when you know some other setting is going to prevent it from behaving properly. But in the interest of understanding what is going on...
Element 7 (Spiccato bow stroke) with a Release Time of 127, why? Not to worry, we'll take a look - and it will explain itself (hopefully).
If you wish to learn how the parameters work, I recommend you work it from an entirely different approach. First understanding the normal behavior and then the unusual behaviors or tricks can better be understood.
A note will follow the envelopes as programmed - if you are playing "G4", then let's start with which Element (or Elements) could possibly be sounding:
Element 1 Yes, all velocities, all notes between C1-A4
Element 2 No, only sounds below B0 (not a cello, but a contrabass)
Element 3 No, only above A#4 (not a cello, but a violin)
Element 4 No, only used when "AF1 On"
Element 5 No, only used when "AF1 On"
Element 6 No, only used when "AF1 On"
Element 7 Yes, all velocities, all notes
Element 8 No (not used at all by this Voice)
So to narrow our focus and so we adjust only the Elements we are actually playing - and not editing Elements we are not even engaging in this articulation state. Clearly only two of the Elements are available to sound when you strike the NOTE "G4". It is counterproductive (and actually destructive) activity to edit the Elements that are NOT assigned to play in this state (for example, the "AF1 ON" Elements - are a completely different behavior and articulation status). Edit those separately - as a set!
Again Element 1 is your Cello; concentrate on just it. It covers the range of the titled instrument.
Again Element 7 is your Spiccato Element. And only sounds on quick note strikes (velocity)
Press [EDIT]
Turn OFF the Elements not in use by extinguishing [10]-[14] they are not used at all when you strike G4
Now listen separately to how your Release Time setting affects Element 1, and Element 7
Isolate each individually.
Temporarily turn OFF Element 1 by extinguishing [9], play just the Spicato Element 7.
AEG Release Time on Element 7 is meaningless. See what happens to the graphic as you increase this from 59 towards 127. Even your eyes will tell you this is a meaningless edit.
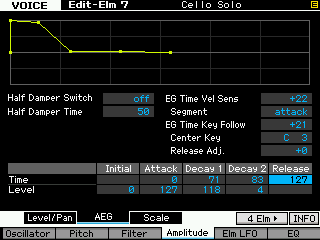
The sound has already reached zero long before the Release Time is reached. Time is read left-to-right in the graphic, loudness goes up, less loud goes down.
As you can see your focus should be JUST on Element 1, period.
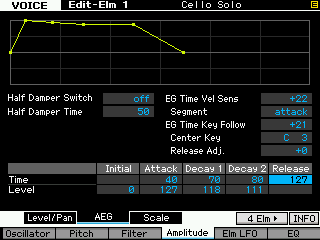
Element 1's AEG, it takes more time to travel left-to-right. The higher the TIME value the longer it takes. Each dot that is to the right represents a point later in time. If you let a note go almost immediately (staccato) it sounds short, and plays short. But once the duration of a note reaches beyond the Attack, but at some point before it reaches the "Decay 2 Level", the Release portion of the envelope becomes available to take over. If "Decay 2 Level" is NOT 0, the sound will continue until you let go of the key (or release the sustain pedal). This is how string sounds continue "bow" movement - the string will continue to sound (as if being bowed) as long as the key is held. "Decay 2 Level" can be understood as the "Sustain" portion of the envelope.
You will notice in playing the Motif XF that velocity can influence greatly how a sound responses, both in loudness and in timbre and this response changes as you play in different regions of the keyboard (Scaling).
It is a natural acoustic behavior that the more energy applied to playing an instrument, the richer it becomes in harmonic content.
Also the lower the pitch the longer the envelope, the higher the pitch the shorter the envelope.
These are the reasons that Low Pass Filters and Key Scaling are so often used. LPFs allow low frequencies to pass, and as you play with more energy (harder) the Cutoff Frequency is adjusted higher to allow a brighter timbre. This is also the reason Key Scaling is used... So that lower notes will have a longer slower response to the Time functions within an envelope, while as you go up the scale the envelope does its thing a bit more rapidly.
These functions are programmable (and even reversible), and make a huge difference in how a Voice responds to your playing. So in order to get the response of the Release Time, a Key must be held long enough for that AEG to climb from 0 and traverse the Initial Decay ("Decay 1 Time" towards "Decay 1 Level"). If you release the key before it has time to get to this point it will not engage the AEG Release Time. Now the programmer here is using that Filter RELEASE LEVEL = -128 right there in this time slot. A short key strike will articulate individual bow strokes, yet when a key is held, as in a longer slower phrase the Cello will sound as if the bowing is natural and the length of note is controllable.
The Spiccato Element (7) is programmed to only occur when you physically attack the key... It's velocity, to be sure, but not a swap (Velocity Limit), but a matter of velocity sensitivity. By setting the "Level Velocity Sensitivity" of this Element higher than +32 (linear), this means that a low velocities there will be no sound. Values above +32 work for cross-fading the Volume.
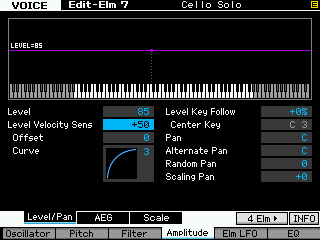
It is set to +50 so not until you give this Element sufficient Velocity will it begin to come in at all - this is how the quick bow stroke attack can be achieved by simply attacking a key. Element 1 will play at all times and its behavior is independent.
So the "Solo" in the name of this Voice is earned because you can, with your "playing style" generate several different musical articulations just with your touch (how you approach phrasing), it changes even by where on the keyboard you are playing.
The Filter trick here, as you can tell, has a large role here. Set Filter RELEASE LEVEL = 0, now explore the behavior of the length of time before the AEG allows the Release Time to take over...
When selecting a Filter Type (Reference Manual, p. 74), there are two parameters named "HPF Cutoff" and "HPF Key Follow." On p. 76, we learn that "HPF" stands for "High Pass Filter." But the description of "HPF Key Follow" says:
When a filter type “LPF12” or “LPF6” is selected, this parameter is available.
What does something about a high pass filter have to do with a low pass filter?
The HPF or High Pass Filter is the opposite of the LPF. It allows high frequencies to pass so it blocks low frequencies - this allows you, when you are using a LPF to control (attenuate) low frequencies. It is not part of the LPF it is a separate Filter that is made available when you are using the LPF12 or LPF6 - it allows you to create a situation where you have control over an Elements contribution - you can attenuate (filter out) high frequencies with the LPF and attenuate (filter out) low frequencies with the HPF - creating an area that is specific for what you want to contribute from this Waveform. Often the frequencies above or below an area of concentration need to be eliminated (FILTER completely OUT) - thus a separate speciality Filter!
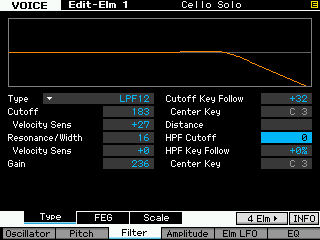
The HPF Cutoff, as you raise this value, will start attenuating low frequencies in the Element
The HPF KEY FOLLOW, as you can imagine allows you to Scale this response across the keyboard. They always give you a Centerpoint or KEY around which you can begin scaling the response.
Here's an example of how to explore this
Set the HPF Cutoff to about half way (128)
play the low end of the Cello _ Cellos go down to G1 so listen as you raise the HPF Cutoff, how it cuts off the low end.
The Key Follow of 0% will make the response the same across all keys. 100% is scaled linearly from lowend through the Center Key toward the highend. -100% is reverse this... and the 200% are simply steeper curves both positive and negative.
Now that was an education! I just spent the afternoon going through all of it. Things make sense when you get down to the concrete details. Thanks!
With regard to the HPF settings for LPF12 and LPF6, when these are in use how is that different from a band pass filter? When would you use one vs. the other?
Now that was an education! I just spent the afternoon going through all of it. Things make sense when you get down to the concrete details. Thanks!
Well, thank you for the question!
With regard to the HPF settings for LPF12 and LPF6, when these are in use how is that different from a band pass filter? When would you use one vs. the other?
When you select either the LPF12 or LPF6, the Scaling parameter "Key Follow Sensitivity" appears allowing to adjust the HP filter across a range of keys.
This is different from what is available on the BPFs (Band Pass Filters)... both methods allow frequencies in the middle to pass, but the LPF12/LPF6 and the separate HPF have "key scaling" capability.
BPF12D and BPF6 have a single Cutoff Frequency. The LPF12 and LPF6 with their separate HPF has independent Cutoff Freq for the LPF and the HPF.
BPFw (wide) features a variable "width" parameter, which allows you to simultaneously change (opposite directions) the Cutoff for the high and low pass, as opposed to the scaling across the keys.
So each is unique and creates an entirely different response/purpose.
I was thinking about how the XF Cello Solo voice could produce a short release time for staccato notes and a longer release time for legato notes (my original question), and I had a thought which might be of interest:
Given that the XF is computer-based, the release time mechanism must be implemented in the form of code. What might that code be, and how might that explain the staccato/legato behavior that I observed?
Here's a possibility, written in pseudocode (an English-based way of writing code for people to read):
[list] keyDownTime = how long key was held down
when a key is released:
if keyDownTime is within FEG Decay2 interval
apply FEG release parameters
otherwise if keyDownTime is within AEG Decay2 interval
apply AEG release parameters
My original attempt was to set the AEG Release Time to 127. But the FEG is set up to shut a note down relatively quickly. If the code in the XF is written something like my pseudocode, then a staccato note would be captured by the FEG part of the code purely because that question is asked first. On the other hand, a legato note would not satisfy the FEG condition and then the AEG condition would apply, activating my increased AEG Release Time.
The code might actually be more complex and for a particular keyDownTime it might look at all the conditions (FEG, AEG, and PEG) and choose the "best" thing to do. From the behavior I observed, it could be either way…
keyDownTime = how long key was held down
when a key is released:
if keyDownTime is within FEG Decay2 interval
apply FEG release parameters
otherwise if keyDownTime is within AEG Decay2 interval
apply AEG release parameters
Sorry, my brain does not work like this 🙂
The Filter EG thing is a programmer's "trick". To fully understand how the AEG works, as I suggested, you should remove this FEG trick and study the AEG without the Filter EG. What is going on is not really defined by the FEG nor the AEG but at a much deeper level in a sample playback-based synthesizer. These basic behavior setting take place at the Sample Keybank.
The Motif XF Waveform differs from a regular .wav. Your computer can playback a .wav and it does so the same every time. It does not change its volume with how hard you click it, it does not change the timbre over time, it does not pitch it across the musical range, it does not apply changes - it simply plays it from Start-to-End every time exactly the same.
When a .wav becomes a Motif XF Waveform it can be controlled in a myriad of ways (as I'm sure you are aware). Significant to this discussion is how it deals with behavior. Within the Waveform is the individual Sample Keybank. This is where the sample is directed to fundamentally behave (play forward, play in reverse, etc). To understand how the Motif XF (sample-playback synths) address this, lets look at some of the historical synthesizer methods.
The voltage controlled analog synth typically had one EG that it sent its Oscillator through - so all notes shared the same behavior. If you set the ADSR to a staccato behavior - every note was staccato. If you had a long sustained behavior - every note was forced to this behavior. One size fit all...
When early sample playback synths address this - take the Mellotron - taped recordings of bowed strings - if you released a key before the time limit was reached you could articulate a short note; There were 7 seconds of tape before - clunk-clunk - the tape had to reset itself. So you had a 7 second limit. Theory was - Don't hold notes longer than the limit!
Modern sample playback synths utilize a Start > Loop > End paradigm. Where there is a defined START POINT, a defined LOOP POINT and an END POINT. This is assigned at the Sample level!
When you trigger a key, the audio plays from the Start Point, if you release the key almost immediately (staccato) the sound will proceed forward. If, however, you wish to musically hold the note, then the audio plays through to the Loop Point which defines a somewhat smaller region of the entire waveform - it repeats this region again and again until you KEY OFF;
But initially you have Start audio - reach Loop Point (remain in loop until keyoff) - KEY OFF.
All the Element parameters (AEG, FEG, PEG, etc., are applied later - on another whole level of the architecture.
While in the LOOP portion it will play the same thing forever... unless you have your AEG or FEG act upon it. Those parameters are applied by the VOICE programmers.
But the fundamental behavior of continuing to sound is setup in the Sample Keybank. In the [INTEGRATED SAMPLING] area is where you can find the (USER) Waveforms - the Samples that make up the Waveform - the Key Range and Velocity Range of the individual Samples - you can also look at the Start Point, Loop Point, and End Point parameter setting - you can also set whether the sample plays forward/reverse, as a OneShot, etc.
There you decide how the wave will play... a ONE SHOT without a LOOP will simply end - like a drum hit. A ONE SHOT with Loop Point setup will sound forever - you shape what it does with the AEG (and FEG).
hope that helps.
It's good that your brain "doesn't work like this." One programmer in the conversation is more than enough. It's much more valuable to me to have a musician/sound engineer in the conversation.
That's interesting about the sound samples, how they're used, and when the various EG's are applied. I'm sure that knowing this will come in handy…
