Notifications
Clear all
MONTAGE Series Synthesizers
30
Posts
5
Users
0
Reactions
1,754
Views

Topic starter
I'm currently really struggling with the following montage task which I'm 'presuming' IS readily achievable:
Rather than physically change the different blue scene buttons with my left hand I want to be able to cycle back and forth from say a 'verse scene' to a 'chorus scene' or a 'bridge scene' by using a seperate foot controller pedal (I guess that would be somehow using the control assign function...yes?) or.... alternatively, I could perhaps achieve the same result using just a single scene but use the foot controller to turn on or off whole parts within that scene (again using the control assign functions?).
The purpose here is to free up my left hand to keep the tune moving and not have gaps in my playing.
I have read a 'massively complex and detailed' article on this ('mastering montage 13 by Phil Clendeninn) but I'm really struggling to follow this 'deep dive' article as it covers a multitude of complex assignment options in including editing individual elements within a part....which I just find a minefield of terminology which I just can't follow....although he does seem to suggest that you CAN turn off/on complete parts of a performance.
Obviously simple switching of scenes using the foot controller assignable outputs seems a much easier route to achieve what I want...if it's possible?
Can anyone show me a clear route to achieve what I want here?
Mr Shrimper
Posted : 23/01/2022 7:48 pm

My initial thought is that you would likely need MIDI SysEx commands, and a MIDI Foot Controller to achieve what you want.
Look in the Data List Manual for SysEx controllable functions (it starts around page 157 in the MODX Manual, with Bulk Dump commands).
Next, have a look at the website for MorningStar MIDI Controller. I suspect you would need something like the MC6 or MC8, then program it with relevant SysEx strings.
Posted : 23/01/2022 8:05 pm

Posted : 23/01/2022 8:40 pm

If scenes do what you want but you would prefer not to press the scene buttons - then certainly having a MIDI foot controller "press" the scene buttons would be "easier" than reorienting all of that work to be done using control assignments - which is a different collection of items offset vs. scenes. And programmed in a different way so it's double work in terms of the assignment setups along with dealing with using levels as opposed to keyboard control. These two methods are not equivalent in terms of what can be offset/toggled.
It's also some amount of work to setup a MIDI controller - but it's a one-and-done situation where once you get it done you don't have to do that again. It's not that tough because it's a matter of a single CC number sending different data values to "press" each scene button.
Like so many other things - there are lots of ways to achieve an end result. Which route you want to take after doing some reading on the footswitch/scene option would carve out a different set of things you would need to accomplish.
Current Yamaha Synthesizers: Montage Classic 7, Motif XF6, S90XS, MO6, EX5R
Posted : 23/01/2022 11:34 pm
Topic starter
Jason,
I'm possibly in danger of 'overcooking' the core issue that I really have here:
my real problem arises when I want to simply switch to a scene that introduces an arpeggio drum loop... but I am currently finding that (due to Seamless switching I guess) the drums start too early (i.e. they are picking up(commencing) from the sustain from the previous scene whereas I want the drum to commence from the next keyboard note/chord I press.
Any work around for this..such as turning off seamless switching of the drum part only?
Mr Shrimper
Posted : 24/01/2022 8:32 am
Try Setting "Sync Quantize" to 480 / Qarter Note.
Posted : 24/01/2022 11:12 am
Topic starter
Try Setting "Sync Quantize" to 480 / Qarter Note
Unfortunately, that doesn't seemed to have worked
My current 'workaround' is to record a 'chain' using the pattern sequencer ...but that's not really ideal so still looking for a better solution.
Posted : 24/01/2022 2:06 pm
Just FYI - Seamless Sound Switching (SSS) doesn't happen when you switch scenes. It can only happen when you switch entire Performances (and not always depending on the properties of your previous/next Performance).
If the drum arpeggio was activated before you press the scene button - then changing the scene will change the ARP number (as I'm sure you've programmed it) and so you are telling a running ARP to change the arpeggio used either instantly or on the next measure depending on how you have this part of the ARP setting setup.
Is there a way to press the scene button just shy of 1 full measure before you want the loop to change (instead of expecting the next chord to trigger this)?
Say your time signature was 4/4. Then this would have you press the scene button on beats 2, 3, or 4 of the preceding measure from where you want the drum pattern to change. And for this to work, you would set the arpeggio to change by measure.
If you really did want the drum pattern to change only on the next chord pressed - you could do this but, as I would accomplish this - this would take a lot of doing and, for me, not preferable to enforcing "proper" timing of pressing the scene button.
Current Yamaha Synthesizers: Montage Classic 7, Motif XF6, S90XS, MO6, EX5R
Posted : 24/01/2022 2:43 pm
Topic starter
Jason,
Could it be possible that the ARP I created (although intended to be a fixed note drum Arp and which sounds like drums) is actually not a drum ARP at all but is a 'musical instrument Part (note/chord intelligent)' ARP and that's why its fireing as soon as I press the scene button ...even though I have set it to 'Change Timing Measure' ??
To be honest ..I'm not sure I understand what the box 'Change Timing Measure' actually means ??
Posted : 24/01/2022 5:57 pm

Rather than physically change the different blue scene buttons with my left hand I want to be able to cycle back and forth from say a 'verse scene' to a 'chorus scene' or a 'bridge scene' by using a separate foot controller pedal (I guess that would be somehow using the control assign function...yes?)
The thing about using a Foot Controller (sweep type) pedal is that is hard to accurately choose a specific value. If you are sending a CC# to make the Scene selections each of the 8 Scenes has a range of 16 values. Compared to your other human physical attributes your feet are not the most articulate for this task.
If it is just two Scenes then you could use FC7 in heel down position to recall Scene 1, and toe down position to recall Scene 8. This you can easily navigate and since Scene 1 requires a CC value 0-15, and Scene 8 requires a CC value 112-127... the extremes can be accurately recalled with your foot... (but I'd hate to have to change from Scene 3 to Scene 7 with just my foot).
Scene selection is not a function that can be setup in the PART Control Assign area.
or.... alternatively, I could perhaps achieve the same result using just a single scene but use the foot controller to turn on or off whole parts within that scene (again using the control assign functions?).
This you can do, and since it involves Part parameters, this is a function that can be setup in the Control Assign area. The Assign Knobs and the fact that you can link whatever they are assigned to do to the Super Knob, means you can affect all the changes using an FC7 pedal set to act as “Super Knob”. This may work for what you are trying to change and it may not, there are too many possibilities to simply say everything you want to do can be accomplished without knowing what those things are.
Things like recalling different Arpeggio Types (Phrases) will not be possible. But things like volume changes (what is sounding/what is silent), and other mix settings...are available.
You will need to take ‘deeper dive’ and address each of the Parts you wish to deal with — merging them into a Performance, and use the Motion Control features to morph the conditions. There are many possibilities.
To be honest ..I'm not sure I understand what the box 'Change Timing Measure' actually means ??
The "Change Timing" parameter setting has to do with when an Arp is recalled... If set to "Realtime" as soon as you make a selection that Arp Phrase will begin to play... If set to "Measure" the selected Arp will begin to play precisely at the top of the next measure... meaning it will complete the measure it is currently playing before switching to the next Arp selected.
Realtime means you want the Arp phrase immediately
Measure gives you time to make the selection and ensures smooth timing by referencing MEASURE lines.
Most [SCENE] mix functions will happen as soon as you press the [SCENE] button... However, Arpeggios and Motion Sequences (those that use clock) can be instructed to wait until the top of the next measure - this ensures smooth rhythmic continuity (as long as your press the [SCENE] button before the downbeat. When you are feeding chord intelligent instructions to the Arpeggiator you can be anything but late (behind the beat)...
Posted : 24/01/2022 8:02 pm
Topic starter
If it is just two Scenes then you could use FC7 in heel down position to recall Scene 1, and toe down position to recall Scene 8. This you can easily navigate and since Scene 1 requires a CC value 0-15, and Scene 8 requires a CC value 112-127... the extremes can be accurately recalled with your foot...
This sounds like an option. Are you able to point me to either the manual section or an article which shows how to program this using the montage?
Posted : 25/01/2022 6:53 am
Topic starter
The "Change Timing" parameter
Realtime means you want the Arp phrase immediately
Measure gives you time to make the selection and ensures smooth timing by referencing MEASURE lines.
I just cant seem to make this drum arpeggio timing work using the 'measure' option being suggested...it still commences immediately I change scene...seems to be as a result of the sustain from the previous chord I play from the previous scene.
Maybe my user ARP settings were'nt created correctly?...how do you EDIT a user ARP..i.e so I can check the settings or even just rename it if I wanted?
Posted : 25/01/2022 7:41 am
Some highlights regarding ARPs. (EDITED for Clarity based on BMs corrections below - Thankyou BM)
You need to set the Keyboard Range in the Arpeggio menu of the Part you want the Arp to play. This defines both the Note Range the Arp is allowed to "Play In" but also the Keyboard keys that will trigger the Arp.
The Arp can be triggered by GATE or TOGGLE.
GATE, the Arp will only play if you hit and hold a key or keys within the Arpeggio Key Range (Arpeggio Note Limit) and the Arpeggio Velocity* Range (Arpeggio Velocity Limit).
TOGGLE means you only need to press a relevant key within the Arpeggio Key Range (Arpeggio Note Limit) and the Arpeggio Velocity* Range (Arpeggio Velocity Limit) and the Arp will start playing, and only Stop when you press that key again, or hit another key in the Range. In OrgNote (Orginal Notes)
* You can use the Arpeggio Velocity Limit such that Arps will only trigger if you hit the keys "really hard". For example Edit- Part-Common-Arpeggio-Common:- Velocity Limit = 100-127, The Arp will only trigger/sound if you hit the keys at Velocity = 100 or higher. This allows you to play "normally" without triggering the Arp, but trigger the Arp "on demand" by playing harder.
I recommend also taking note, at this stage, of the parameters in Hold, Key Mode, Arp Play Only, Change Timing, Loop and Sync Quantise. Particularly HOLD, and LOOP because they can change "expected" behaviour based on just the definitions provided by Trigger Gate and Trigger Toggle.
In the Arp World - Root Note means the first note of the Arp Pattern, if it is of Original Notes Type (OrgNote). The Pattern will play from that Root Note. In User Arps, you will be asked to define the Root Note, for OrgNotes type... in effect the first Note you play when recording the Arp.
Take an example that both ascends and descends in the musical key of C. The Arp Pattern from the first played note is E(Maj3rd of C), up a minor 3rd to G(5th of C), down a 5th to C(Tonic), down a minor 3rd to A(6th), down a Major 2nd to G. So E +G -C -A -G.
In Arpeggio Land, the ROOT NOTE is E. Not C - The musical key. Not G - The lowest Bass Note. E is the first note reference of the desired Arpeggio Pattern/Sequence. If you wanted to transpose that same sequence of "intervals" to a different tonal centre, you just play a different/relevant piano key. Care should be taken to know where the "Arpeggio 'Root' Note" lies within the sequence, especially when it comes to setting Keyboard Limits in MultiPart Performances.
In Fixed Arps, the Pattern played will be as per the original "keys" played... it will not transpose to whichever key you used to trigger the Arp... Drums are a classic example where you would use FIXED, but Drums are not limited to using FIXED. Example, you have a range of percussive sounds, lets say "coconuts", if you use OrgNotes, you can vary the Timbre of the percussive rhythm, it maybe atonal, but the rhythm stays the same while the Timbre can be changed by triggering from different Keys. Others... Sound FX, Musical FX etc
If your experience turns out to be similar to mine, you will quickly learn it is better to separate out Arp Parts from normal "Finger" Playing Parts, by giving them different Keyboard Ranges that do not overlap, or at minimum, keeping your Arp KB Range separate from your "Finger Part Ranges". It's like fitting together a chinese Monkey Puzzle, they can interlock on different levels.
In the case of making a Rhythm (not Drums) from a Normal AWM2 Part, assuming pitch is not a factor, then you can create a FIXED User Arp, or use a FIXED Factory ARP. This way you could set the Trigger Note/Root Note and Arp Range away from other Parts (like the one that is sustaining and accidentally triggering your Arp).
Something you might want to consider. Drum Parts don't just play Drum Samples (waveforms). They can play any AWM2 Samples (waveforms)... Sax hits, Bass Notes, Glass Smashing... whatever. You can set what sample (waveform) is played per Key in a Drum Part. To try it, start with a Drum INIT and just experiment. Your goal would be to create a narrow keyboard range, that is separate (KB Split) from other Parts (Piano, Strings etc), that can be Arp'd and play what you want it to play. So DRUM Parts are unique in that you can assign a different sample PER KEY... this can come in very useful.
There is a pretty steep learning curve with Arps. You just have to jump on it and start experimenting.
Posted : 25/01/2022 8:59 am
I just cant seem to make this drum arpeggio timing work using the 'measure' option being suggested...it still commences immediately I change scene...seems to be as a result of the sustain from the previous chord I play from the previous scene.
Let's deal with a Factory Performance w/Arpeggio so that you can understand exactly how the "Change Timing" parameter works... Then you can determine whether or not the User Arp you created fits the criteria for working properly.
Recall the Factory Performance: "Smooth It Over"
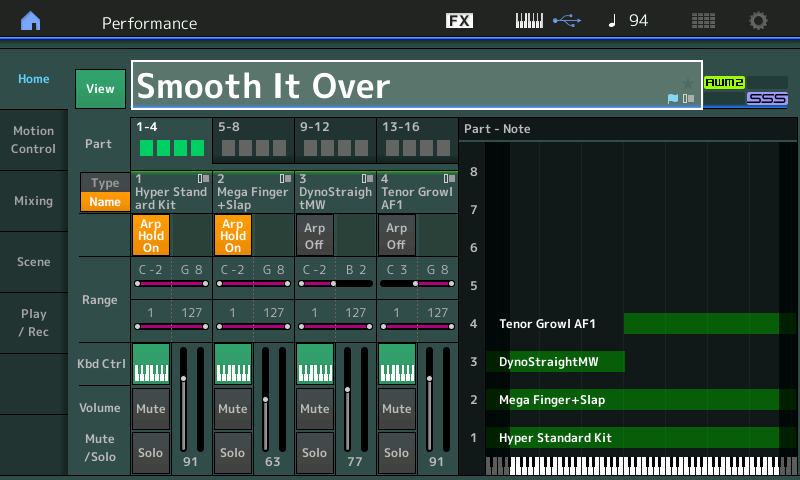
Four Parts -
PART 1 = Drums _ ARP HOLD = ON
PART 2 = E.Bass _ ARP HOLD = ON
PART 3 = E.Piano _ Split left
PART 4 = TenorSax _ Split right
On a MONTAGE when [PERFORMANCE CONTROL] is lit, you have dedicated right front panel buttons to ARP SELECT (bottom row of 8 buttons)...
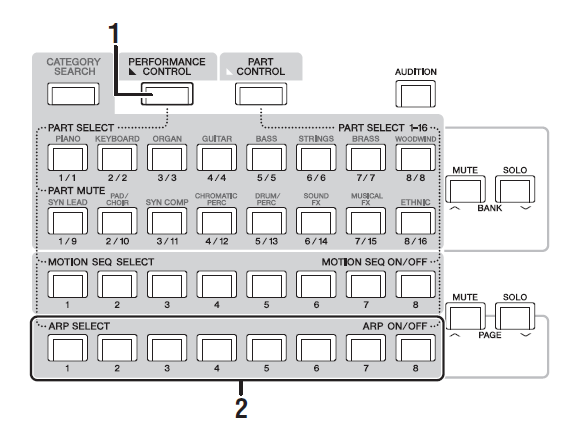
...or as the case is here, the ARP Selection has additionally been linked to the [SCENE] buttons... in this case SCENE 1 through SCENE 5 can be used to move from ARP SELECT 1 to ARP SELECT. 5.
Experiment 1
Press a Note in the lower region of the Keyboard, say F... when [SCENE 1] is selected, the Drums and Bass will start the basic groove. Since both are set to ARP HOLD, that is all we will need to do, for now. The groove is in 4/4... in order to illustrate what "Change Timing" means, I want you to always hit a SCENE button (or ARP SELECT button) on Beat 2. This way it will be very clear when/if there is a difference when we alter "Change Timing" from "Measure" to "Realtime"
First, we'll concentrate on the Drums in Part 1
Select PART 1
Press [EDIT] > touch "Arpeggio" > "Common"
you can see (cursor is highlighting the setting) that the "Change Timing" parameter is set to "Measure" (green means it is currently active)

SCENE 1 is the main groove, and SCENE 5 is a Fill-in complete with Toms and Crash Cymbal
Let the main groove play a few times while you mentally count the beats... when you are ready for the Fill-in to play next, press [SCENE 5] on beat 2
Notice how only when it completes beats 2, 3 and 4 will it bring in the one measure Fill-in with the Tom-Tom roll and cymbal crash.... Let it play the Fill-in a couple of times so you recognize what it sounds like. It is a one measure fill-in phrase...
On Beat 2 I want you to press the [SCENE 1] button
Notice how it will complete the tom roll and crash on Beats 2, 3 and 4 before the Drum's Arp Type changes back to the main groove. This executes a smooth drum fill that returns to the main groove. Easy enough to understand - you cannot mess this up as long as you press the return to SCENE 1 before that next measure line. In other words, it does not have to be Beat 2, -- I used Beat 2 just as an example... but the point being made is the ARP Phrase will not Change until the NEXT Measure line.
Now repeat the same SCENE recalls with "Changing Timing" = Real-time (green is active)

Again, using Beat 2 as the beat on which you are going to press the SCENE buttons (or ARP SELECT button)
Notice how the Drums now change immediately and your Bass player thinks the Drummer has lost their mind (they fall out of sync)... because now the Drum Arp has been told to change immediately upon request... while the Bass does not Change Timing with the Drums because, as you might imagine, Part 2, the Bass Part is still set to "Change Timing" = Measure. And will continue to change as it is instructed (ie, at the top of the next measure line)
Hope that helps.
@Antony- important corrections
Some highlights regarding ARPs.
You need to set the Keyboard Range in the Arpeggio menu of the Part you want the Arp to play. This defines both the Note Range the Arp is allowed to "Play In" but also the Keyboard keys that will trigger the Arp.
No, actually there are two separate parameters that define the NOTE RANGE. The PART NOTE LIMITS determine the Notes that are allowed to sound in response to the KeyOn events whether they come from the keyboard or from Arpeggio phrases or IN via MIDI... and the ARP NOTE LIMITS determine the Notes that are used to trigger and control the Arp's behavior. These are found in two separate places. And should not always be set to the same settings.
If, for example, you only want to use the Latin Percussion from a specific Drum Arpeggio Phrase... You could NOTE LIMIT the PART so that only the region between C3 and B4 are set to sound. Meanwhile, the NOTE LIMIT for the ARP could be restricted to just the lowest note on your keyboard (such that the Latin Percussion will only start when that NOTE, the lowest key, is pressed).
The Arp can be triggered by GATE or TOGGLE.
GATE allows you to set a Velocity - the Arp will only play if you hit a key (in the Arpeggio Key Range) above that velocity. For example, you only want the Arp to trigger when you hit a key "really hard"... so you might set the trigger gate velocity to 110.
No, not at all. If you have an ARP assigned to a PART - as in the example I gave above, and you set the ARP HOLD = OFF this is when you can see/hear and understand what GATE and TOGGLE do.
Set the Drum ARP in PART 1 above so that ARP HOLD = OFF
Now navigate to the "Arpeggio" > "Advanced" screen...
GATE will make the ARP Phrase behave such that only when you are manually holding the KEYS will the ARP trigger the assigned sound, Let go, the ARP does not trigger sound.
TOGGLE will make the ARP Phrase behave such that on first press the Phrase plays and continues until you press the keys again - literally, toggles On and Off
Posted : 25/01/2022 10:56 am
Topic starter
Re last message from @Bad Mister:
Thanks for that info...I will try to go through your example.
Meanwhile, did you have a poss response for me re:
If it is just two Scenes then you could use FC7 in heel down position to recall Scene 1, and toe down position to recall Scene 8. This you can easily navigate and since Scene 1 requires a CC value 0-15, and Scene 8 requires a CC value 112-127... the extremes can be accurately recalled with your foot...
This sounds like an option. Are you able to point me to either the manual section or an article which shows how to program this using the montage?
Posted : 25/01/2022 12:23 pm
Page 1 / 2
Next
