I love the Tenor Max sax sound on my MODX. It has a great raspy tenor sax growl. The problem is that the Tenor Max sound has too much growl to use all of the time. I use the PUSH2 touchpads to play midi notes that play the MODX. I think the growl sound is a function of key velocity. The PUSH2 has velocity sensitive pads, but they make too much growl all of the time, or if you try to play light, you don't get any volume. The same thing happens with the MODX keyboard.
Is it possible to control the Tenor Max growl sound with a foot pedal?
I was thinking assign Velocity to the Super Knob, then assign that to a foot pedal. But, I don't think that Velocity is an assignable parameter, so I could not make that work.
After reading the manual many many times, I can't even find how to assign the Super Knob to the foot pedal. Help Wanted.
Any help or ideas appreciated. The MODX is great for creating sounds. But anything beyond adding and changing effects is very difficult to understand....
Is it possible to control the Tenor Max growl sound with a foot pedal?
Absolutely. Thanks for the question.
One of the most powerful features of the MONTAGE/MODX and the Motion Control Synthesis Engine is the ability to control timbre change in real-time.
In the traditional sample playback engine, Velocity switching was used to change the character of a sound. As you point out, ‘sax growl’ would be a separate sample set (Waveform) which could be triggered by exceeding a set KeyOn Velocity. In order to change the articulation you needed to retrigger the note. This is the very traditional method of velocity switching used in “Tenor Max” — the soft, medium and hard Waveforms that form the smooth tone max out at 125; to get the growl Waveform you must hit the key at 126-127.
What this does not allow is the ability to change from a normal tone into a growl during a held note (as a wind player would be able to do), nor does it allow you to ‘growl’ at lower output levels.
The Motion Control Engine can tackle this issue by creating alternate methods of switching between sample sets. For example, by setting the normal (smooth) tone Waveform(s) to trigger simultaneously with the growl tone Waveform(s) at all velocities, the Motion Control Engine will allow you to ‘morph’ between the Element Output Levels via the Super Knob Control matrix. In other words, you can, at any velocity, change the timbre from normal to growl and back, in real time by simply moving the Super Knob... (which, as you know, can be assigned to the movement of the FC7 pedal). Plug a Yamaha FC7 pedal into Foot Controller 2... this is typically used to Control the Super Knob.
This level morphing can be used to great effect in brass horn, and woodwind instruments, where the harmonic content and resulting timbre of the instrument can radically change during a held note... By controlling Element Level we are allowing for radical timbre change at any velocity, at any time.
There are other methods to switch Elements in real-time, for example, using XA CONTROL (Expanded Articulation)... Which method you choose is a matter of approach and can vary with the type of result you’re looking for...
I was thinking assign Velocity to the Super Knob, then assign that to a foot pedal. But, I don't think that Velocity is an assignable parameter, so I could not make that work.
Velocity is a controller, not a destination... You may still want to use Velocity to control how loud, as keyboard players it’s one way of increasing output level, as you’ll see you can use Motion Control to change the timbre independent of the Velocity!
After reading the manual many many times, I can't even find how to assign the Super Knob to the foot pedal. Help Wanted.
Which is why we have tutorial articles that get deeper into the programming aspects of the instrument. Please see the MODX specific articles in the “Learn” area of this site.
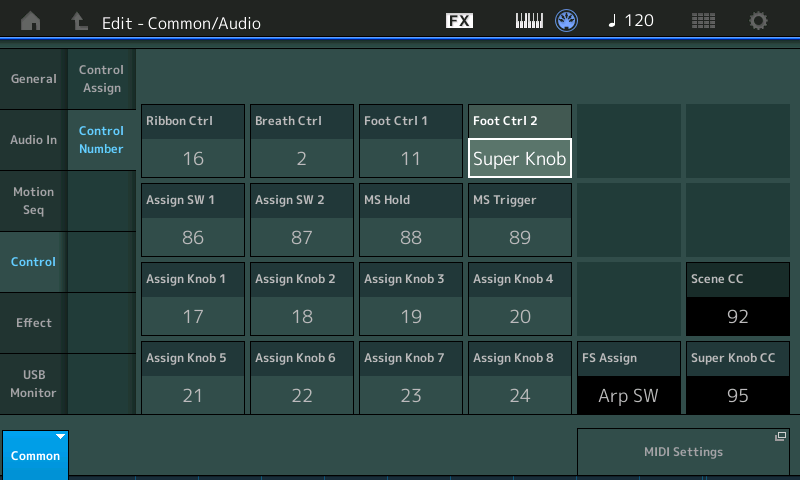
The Foot Controller 1 or Foot Controller 2 can be assigned, on a per Performance basis, to control the “Super Knob”. From the HOME screen:
Press [EDIT]
“Common” will appear in blue in the lower left corner.
Touch “Control” > “Control Number”
Here you can determine what each of your controllers is set to send.
Either one of the Foot Controllers can set to be “Super Knob”
Download Example
Hopefully, you have downloaded and installed the MODX CONNECT utility for your computer... find attached to this post, an example of the Tenor Max with Super Knob growl control... “Tenor Max SuperGrowl.X8B” — a quick example Performance — editing the “Tenor Max”... it is attached as a zipped file. Unzip it and open it with MODX CONNECT. This will bulk it via USB to your instrument’s Edit Buffer. It will not overwrite anything... while in the Edit Buffer you can play it, explore it, Edit it and even store it to your internal User Bank or just keep it on your computer.
I’ve taken Element 3 (the ‘growl’ Waveform) and mapped it to all velocities 1-127. I extended the Hard Waveform, Element 4, to cover 111 through to 127.
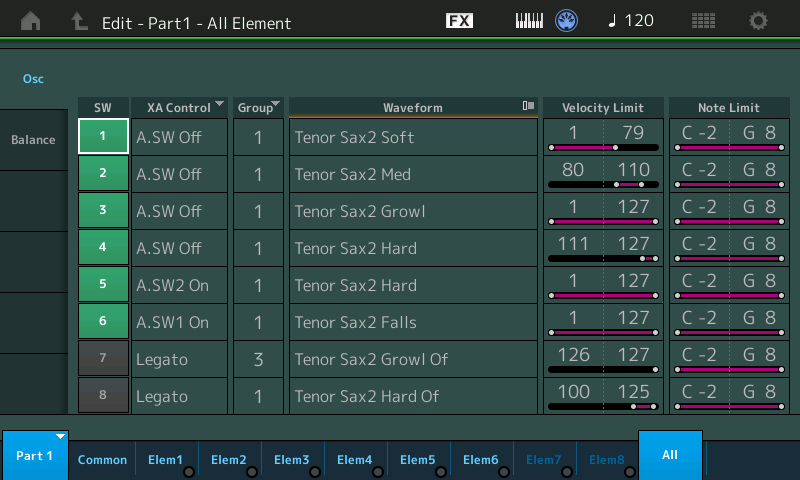
This has the ‘smooth’ Elements 1, 2, and 4 and the ‘growl’ Element, Element 3, covering the full range... we can now set the ‘growl’ Element so that we Control it’s ‘Element Level’ with a Part Assign Knob. We want to setup a response so that at minimum there is no growl, as the Knob is turned up it brings up the amount of growl... we then set the normal (smooth) Elements to fade out as the growl is brought in.
From HOME
Press [EDIT]
In the lower left corner touch "Common" and then select "PART 1"
Touch "Mod/Control" > "Control Assign"
Make sure "Auto Select" is active (green) and the [ASSIGN] button is lit
Turn Assign Knob 1 to view its assignment. The DISPLAY FILTER will show just what is assigned to PART Assign Knob 1
Turn Assign Knob 2 to view its assignment.
Turn Assign Knob 3 - it is empty
touch the "+" to Add a control set.
Select ELEMENT > Elem Level
Here you can select which Elements you are going to control and how you are going to control them.
The Curve, Polarity, Ratio, and Parameter 1 settings are used to create the crossfade of Element Level.
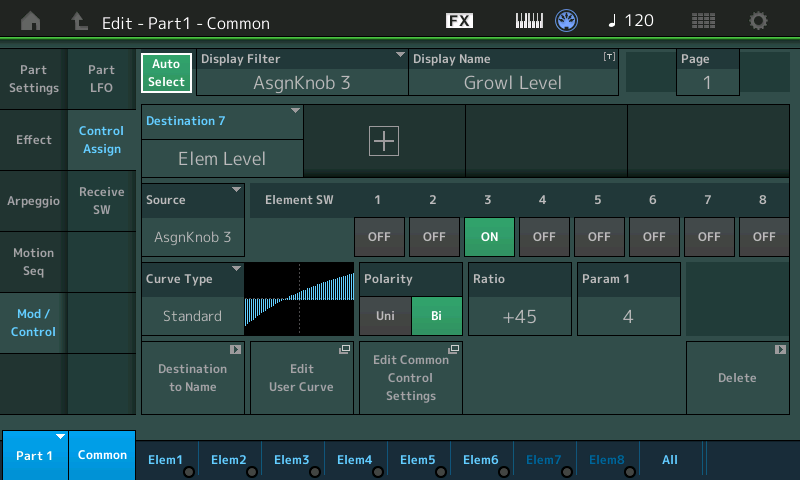
Above Element 3 is faded in with the Knob movement
(Please feel free to tweak this to your liking). Using the Standard “Curve”, I’ve opted to use Bi-directional “Polarity” - setting the “Ratio” so that there is no growl (Element 3) when the Knob is at minimum.
Turn Assign Knob 4 to view that it is also empty... ADD a Control Set for the smooth Elements.
For Elements 1, 2 and 4, a negative version of level graph is created.
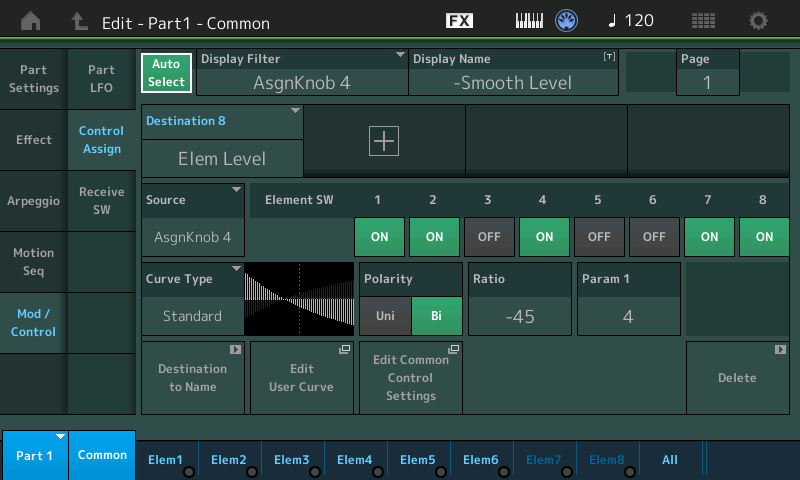
You can reverse the application of the Control by either creating a Negative Curve/Ratio, or you can reverse the direction of movement of the Common Assign Knob. Which you choose is really contingent on what else you may wish to accomplish.
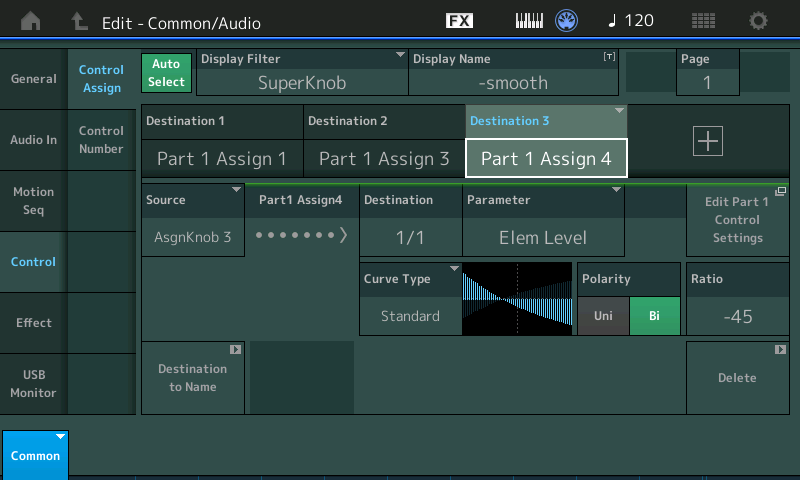
By touching the box that is the short to the "Edit Common Control Settings" will take you to where I've added the link to the Super Knob. The Super Knob (by default) will control the 8 Common Assign Knobs. ADDing ( "+" ) a Control Set where "PART 1 ASSIGN 3" and "PART 1 ASSIGN 4" are the links to the PART ASSIGN KNOBS
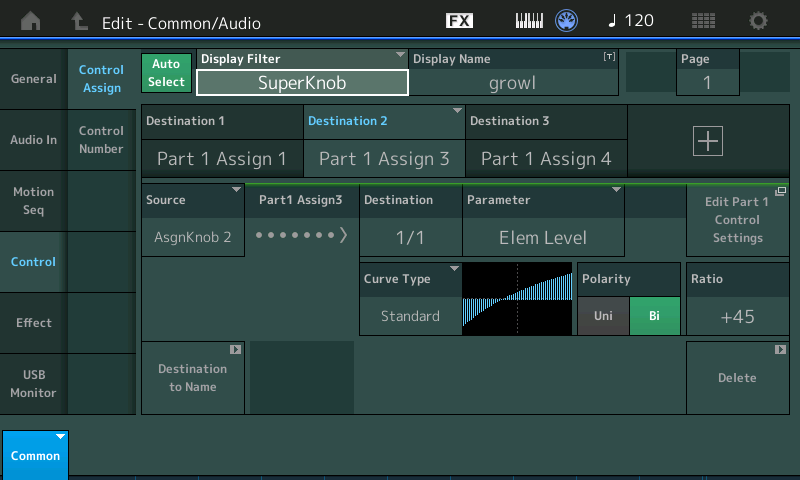
When working with just a single instrument you can freely program the direction within the Part’s Assign setup or you can reverse the direction of the Common Assign Knob (it’s very flexible); as you begin to build more instruments into a Performance you will find good use for these different options. For example, it is possible to use a Performance to house multiple lead instruments, Saxophone, B3, Synth Lead, Rhodes and a Horn Section. When you are playing the Sax, naturally the controllers will work for that sound, but those same controls can be mapped and scaled entirely differently when you are playing the B3 sound,or the synth lead... and so on. Since each Part has its own relationship with the Assign Knob System, you can get very creative based on what you need to accomplish.
Cool!
Way Cool ! Excellent. I thought that was possible, but didn't know where to start. Thanks Bad Mister, you gave me the direction, and the whole road map.
Now I know what to study to develop the sound I'm looking for. Will let you know when I get there.
YES BAD !! Once again, you are amazing. I was able to download the Performance, that is beautiful 
