

Tagged Under
The video below is a great accompaniment to this article. Check it out:
The MONTAGE features a built-in AUDIO Interface. The Yamaha Steinberg USB driver enables the MONTAGE to act as a 32-in/6-out USB audio interface for your computer system. This allows the MONTAGE to act as your computer’s soundcard, and affords you the opportunity to do high quality digital audio recording to your comptuer.
BASIC AUDIO RECORDING
Let’s connect the MONTAGE to your computer and learn about how audio is being routed from MONTAGE to the computer and how to ensure that the signal is properly received on an audio track of Cubase. For this basic tutorial all you need are the following:
The MONTAGE connected to your computer via a USB cable.
Install the Yamaha Steinberg USB Driver version for your particular computer operating system:
* Windows currently at version 1.9.9 (or later)
* Mac currently at version 1.9.9 (or later)
* Cubase AI8, Cubase Pro 8 (or later) installed and updated
* A pair of quality Studio Monitors connected to the Main L&R analog outputs of the Montage
* Make sure your MONTAGE is updated to firmware 1.11.x (or later)
We will keep this first tutorial very basic. This way you can see, learn, and understand how the signal is being routed.
In this “signal flow” tutorial we will route audio to Cubase from a MONTAGE PERFORMANCE (simple basic) and we will use it to record a stereo audio track to Cubase.
Prepare the MONTAGE
Press [UTILITY]
Touch “Settings” > “Quick Setup”
Touch the option “Audio Rec on DAW”
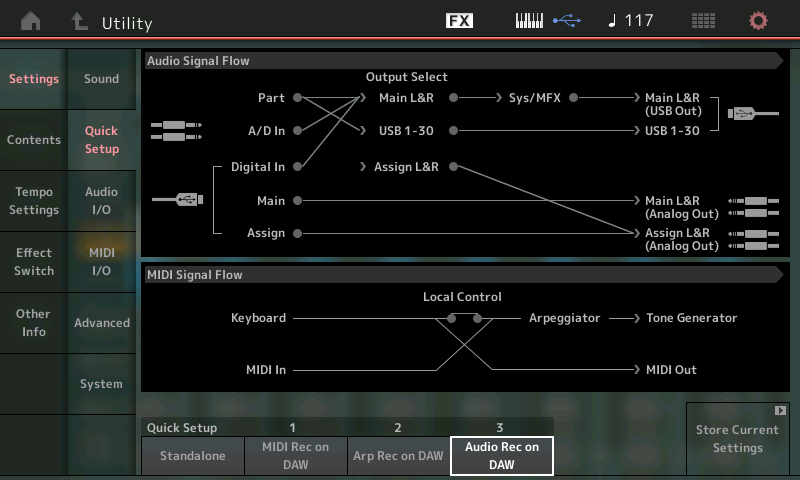
This will set the DIRECT MONITOR SWITCH to OFF. Direct Monitor determines whether or not, signal travels directly to the analog L&R outputs. When it is ON, you hear yourself playing the MONTAGE through the Main L&R (Analog Outputs) – Basically, the sound of the MONTAGE will travel its normal path to your speakers. But when recording on the computer, the default condition is to turn this Direct Monitoring OFF. What you need to take from this is the following: If DIRECT MONITOR is active and you are monitoring through the computer that would be where doubling occurs. The Quick Setup #3 template turns DIRECT MONITOR = OFF. Expect to hear the MONTAGE only after you have your Cubase routing complete – that is, the signal is routed to an active audio track with the Track’s Monitor Switch set to ON.
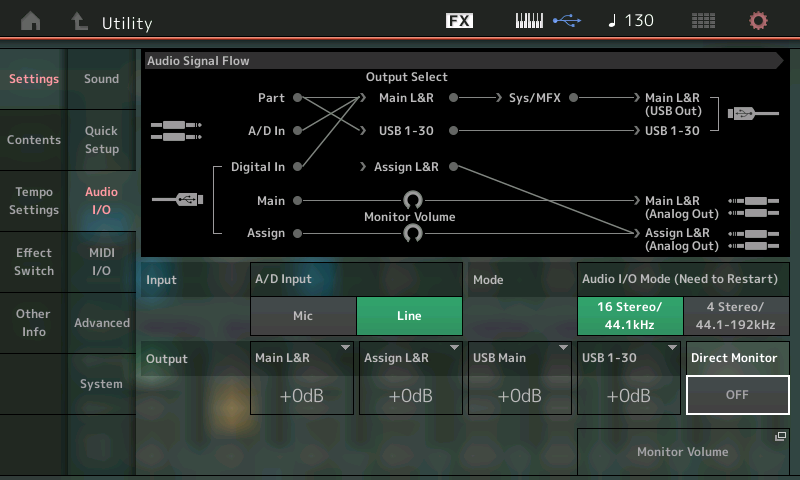
Verify your audio Input/Output setting by touching “Audio I/O” (shown above). We are set to work with all 16 Stereo Outputs at 44.1kHz. If you opt to work at resolutions higher than 44.1kHz (48k, 96k, 192kHz) you will be limited to 4 stereo outputs, simultaneously. (Changing this audio mode requires a reboot of the MONTAGE).
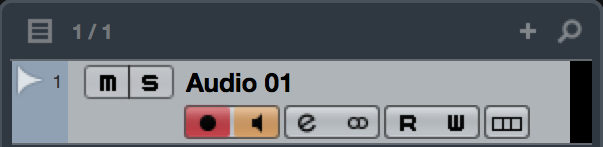 In Cubase, the Track Inspector has a red Record Ready button, and a tan Monitor speaker button. In order to hear the the MONTAGE in a situation where DIRECT MONITOR is OFF, you must be connected to an active audio track with the Monitor speaker icon selected (shown).
Using the “Audio Rec on DAW” Template
This Template is specifically designed to route Parts of the current Performance to specific audio Output buses. It is really just a starting point. Be prepared to make changes to this as you go. What we’ll learn here will prepare you to make these assignments as your project requires. It will allow us to send audio on any of MONTAGE’s audio buses (MainL/R or any of the 30 assignables) to the computer.
The default assignments in this factory Template are as follows:
PART 1 – Main L&R
PART 2 – USB 1&2
PART 3 – USB 3&4
PART 4 – USB 5&6
PART 5 – USB 7&8
PART 6 – USB 9&10
PART 7 – USB 11&12
PART 8 – USB 13&14
PART 9 – USB 15&16
PART 10 – USB 17&18
PART 11 – USB 19&20
PART 12 – USB 21&22
PART 13 – USB 23&24
PART 14 – USB 25&26
PART 15 – USB 27&28
PART 16 – USB 29&30
A Template sets up a specific routing scenario. It is important to understand exactly what it is doing, because you will need to make the final routing decisions and you are expected to customize the default routing to suit your immediate requirements. We will use this template to do the first example – a simple stereo record using a single Part Performance. We will use the sound in PART 1 which defaults to the Main L&R Output. Next we’ll learn why this particular template will not work for all audio recording needs (again, you are expected to customize the settings as you require). Then we’ll learn to solve routing issue by ensuring that the selected output is properly routed and there is corresponding input in the DAW to receive it. This is a per Part decision.
In our first example, we are simply going to be playing the MONTAGE while in PERFORMANCE and show how to route the signal to the computer and record to Cubase Audio Tracks – in its simplest form: A Stereo Track.
For this basic experiment we want the MONTAGE to run on its own clock (later we will deal with synchronizing the MONTAGE’s MIDI clock to the MIDI clock of Cubase)
Call up a PERFORMANCE: CFX PopStudioGrand or Full Concert Grand
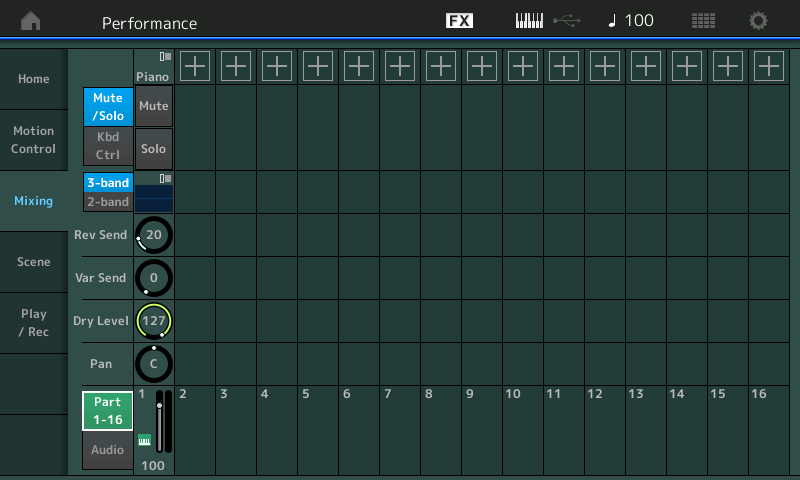
These are single PART acoustic piano PERFORMANCEs (green). We are working with a digital mixer, our piano occupies one channel of our mixer:
From the HOME screen, touch “Mixing”
Press [EDIT]
Press [PART SELECT 1] to view PART 1 parameters
Press the lower [COMMON] button or touch “Common” in the lower left corner of the screen
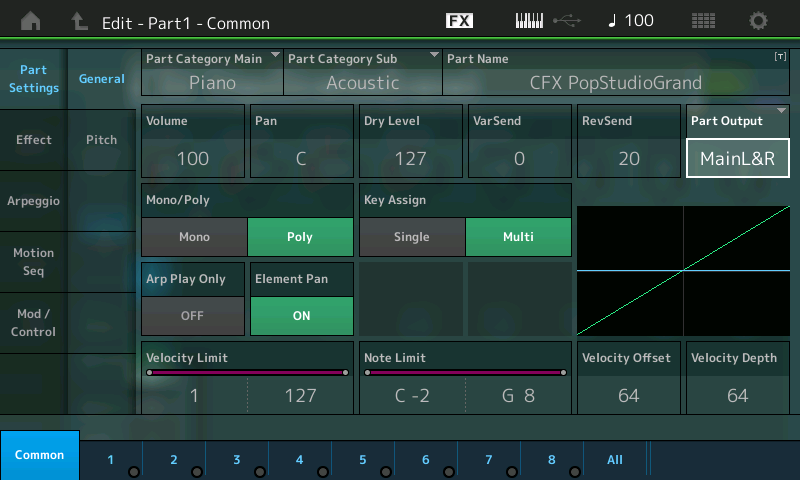
Touch “Part Settings” > “General”
“PART OUTPUT” is set here:
Touch the box to see the various options… We want “Main L&R”
Cubase Project
We will use Cubase in our example but you can pretty much substitute any professional DAW software that can utilize ASIO protocol (the Yamaha Steinberg USB driver is an ASIO driver).
Launch Cubase
During the launch you maybe asked if you would like to use the MONTAGE as your Master ASIO device (this will depend on what you have already installed on your particular computer) – as Cubase boots up it scans all available drivers for audio and MIDI and is why it is important to have your Montage powered On and connected to the computer when you launch the application. Confirm that you do.
Select the EMPTY Template (found under the “MORE” options). This will create an empty Project for this experiment.
Click CREATE.
Verify Port Setup
DEVICES > DEVICE SETUP > VST Audio System: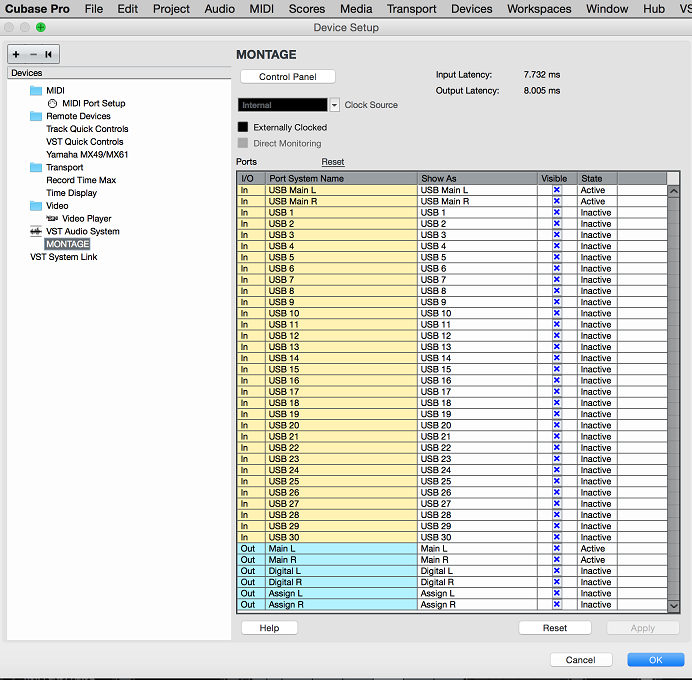
If you are using a Windows computer the option for ASIO DRIVER will be listed as “Yamaha Steinberg USB ASIO”.
If you are using a Macintosh computer the option for ASIO Driver will be listed by the product name “Montage”. This is the equivalent setting. The MONTAGE is acting as the Audio Interface for the application.
The Inactive/Active status column – this will always indicate what resources you are currently accessing. It is not a setting you make here (on this screen) as much as it is a status report for each of the ports and whether it is currently being used to bus signal. For example, currently it is showing that only the MAIN L/R IN and the MAIN L/R OUT are active. The others are activated when you add the INPUT and connect the MONTAGE OUTPUT.
Making the Connections
Next, let’s create a specific connection between the computer and Cubase so that audio we are sending on the “Main L&R” stereo bus from the Montage can be received in the software on an Audio Track. This is done as follows:
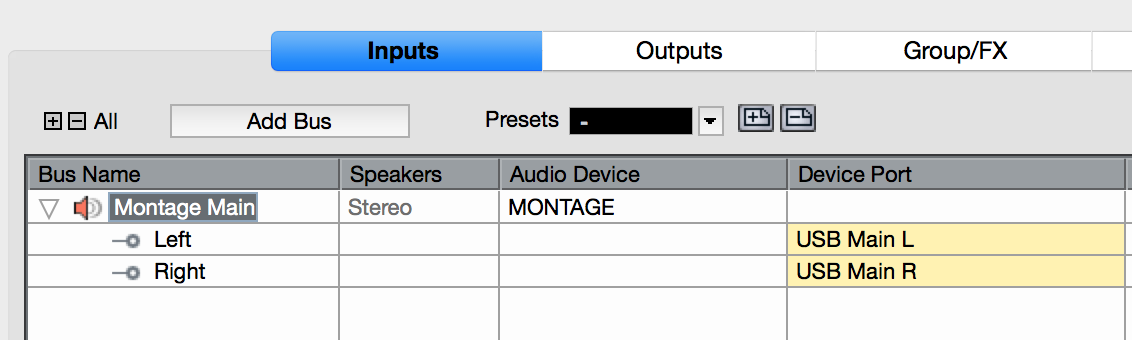
Go to DEVICES > VST CONNECTIONS > INPUTS Selecting the INPUTS tab makes sense, because we are connecting the Montage’s “Main L&R” stereo USB bus OUTPUT to Cubase’s INPUTS.
Typically, there is already a “STEREO IN” created and assigned (we see this in the VST AUDIO SYSTEM > Ports view it is listed as “Active”). This is fine – we can use it.
Ports are considered ‘active’ when they have been assigned here on the INPUT and OUTPUT tabs. Active simply means “in use”.
The Cubase “STEREO IN” is set to receive audio from the Montage (the Audio Device) on “USB Main L” and “USB Main R” (the Audio Device’s Device Ports)
This is audio coming from the Montage arriving at Cubase. You can double click on the name “Stereo In” and rename it “MONTAGE Main”.
 We can now set up an Audio Track, with this Input, and complete our journey to an Audio Track.
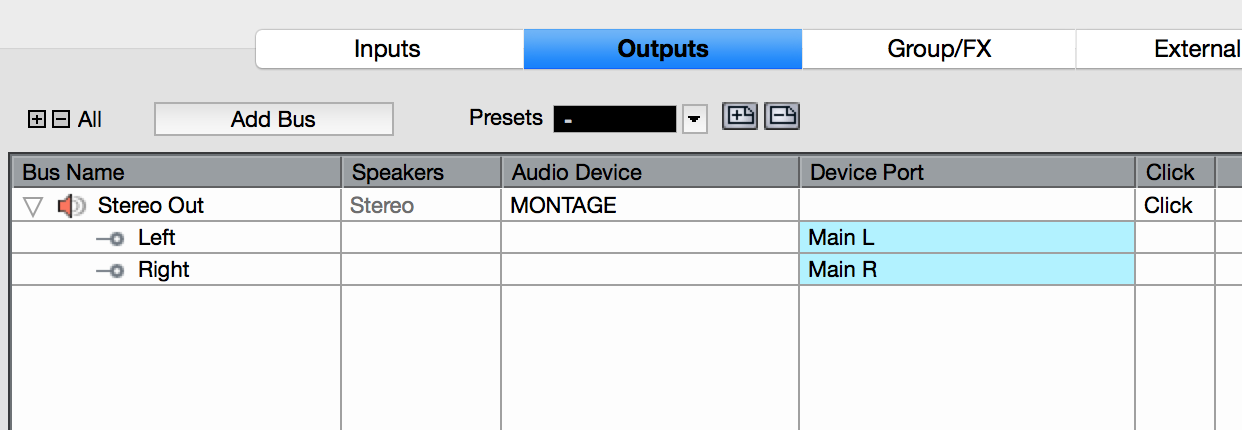
Before we return to the main Track view, click on the OUTPUTS tab. This is where Cubase is set to route audio OUT to its audio interface (which is the MONTAGE).
Return to the main Cubase Track screen.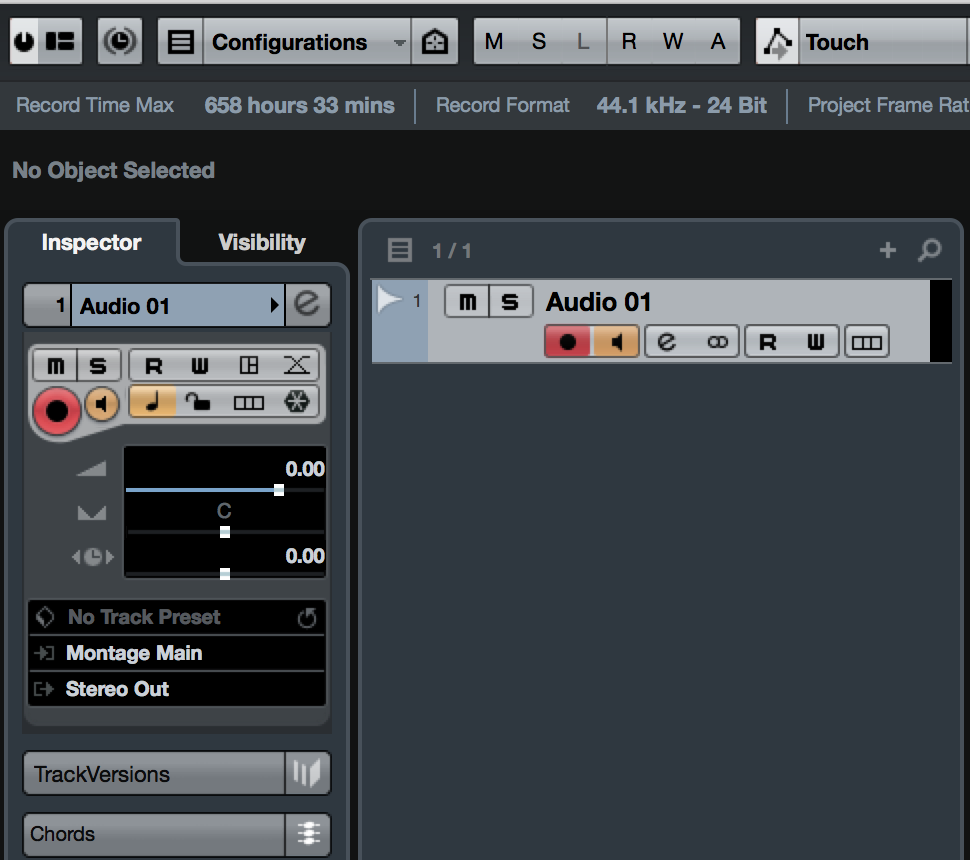
Next we will need to create an AUDIO TRACK… You can do so by right clicking in the darker grey area on the Track View screen or by going to PROJECT > ADD TRACK > AUDIO
Add “1” Stereo Track
Create the Track
On the Track Inspector you can see the input that we renamed, “MONTAGE Main”, appears as the Track INPUT… and “STEREO OUT” appears as the Output. This ensures the signal path to and from the computer.
The Record Ready and Monitor icons when activated will ensure we can hear what we are doing (remember: Direct Monitor is Off, by default, in this template).
This is all that is required to begin recording. The basic recording does not have to involve a metronome or any clock reference – you can simply set Cubase in record and play. (Using the Click and Metronome can, of course, help you add other parts later… but in this basic recording you can just record as if the DAW was an old style tape recorder – which didn’t count measures or keep track of beats!)
You can set Cubase to read out in SECONDS (regular minutes/seconds of clock time) for the length of your recording. You do so by either right clicking in the Timeline area that runs the length of the Track Record area, just above the first track; then select “Seconds” or you can go to PROJECT > PROJECT SETUP… > Set the DISPLAY FORMAT = “SECONDS”. (Until we establish MIDI communication, the computer best count in minutes and seconds).
Select the Audio track, as you begin to play the PERFORMANCE you should hear your playing and see the audio activity meter for Track 01 respond. The RED Record Ready icon routes audio to the track, while the TAN Monitor Speaker icon sends audio back to the Montage (as audio interface) via USB.
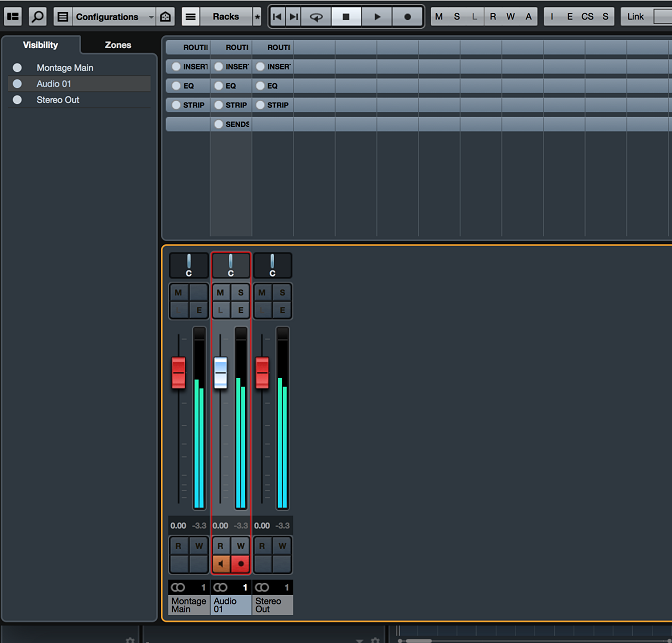
You can open the Cubase Mixer and check your record levels – Go to DEVICES > MIXER or touch F3 on your QWERTY (Fn+F3 on a Mac)
You will see the MONTAGE Main (Audio Input), the Cubase Audio Track, and the Main Stereo Out. In this situation they all read the same because we are seeing the MONTAGE signal arriving in Cubase, Cubase delivering it to an Audio Track, and the Audio Track outputing data back to the Audio Interface.
RECORD and PLAYBACK to get a feel for operating the Transport and feel of recording.
In our next setup we will introduce you to multiple audio bus recording.
If the TAN Monitor Speaker icon is activated, audio that is returned from Cubase will arrive back in the MONTAGE and pass through the “Monitor Volume” parameter setting.
The Faders will be set at nominal 0.00. This is typical when recording, the fader is set “open” 0.00 – input gain is set at the source (in this case, the MONTAGE). Do not touch the Faders in Cubase, set the record level for this channel by increasing or decreasing the OUTPUT level of the source (MONTAGE).
The Mixer will show you the maximum “peak” level reached
Level adjustment for this is not made with the main VOLUME Slider on the MONTAGE – in fact, you can pull the main VOLUME Slider all the way down and audio signal is still arriving in Cubase.
Below all signal travels left to right; we have colored in the signal flow so you can follow it to and back from the computer: YELLOW is the signal traveling from MONTAGE to the computer… BLUE is the signal returning from the computer and going to the speakers.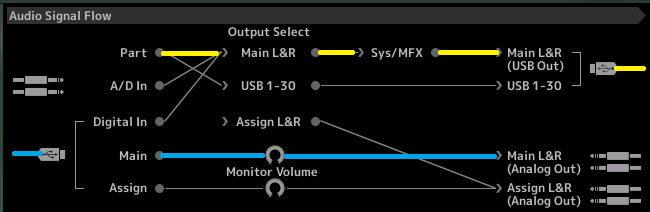 _You play a PART (yellow line) which is assigned to the MAIN L&R Output, which means it travels through the SYSTEM and MASTER EFFECTS before being routed to the MAIN L&R USB Output… the USB cable (yellow) is going TO the DAW (Cubase).
_Along the bottom left audio returning from the DAW (Cubase) via USB (blue) is returned to the MONTAGE’s MAIN travels through the MONTAGE’s Monitor Volume and goes to your speakers via the MAIN L&R (Analog Output)
Conclusion: The audio that is routed via USB OUT to the computer does not go through the main VOLUME Slider before it arrives in the computer. So “how loud” your speakers are has nothing (whatever) to do with what gets routed to the Cubase audio recorder. It will have no affect on the record level. We are making this rather basic and obvious point for a good reason – it is fundamental to understanding signal routing. The audio that is controlled by the main VOLUME slider is on a different signal path.
So how do you adjust the overall output level of the MONTAGE in this case?
There are actually several places you can affect the overall recorded OUTPUT of the MONTAGE. You adjust the main OUTPUT VOLUME of the PERFORMANCE:
Press [EDIT]
Press [COMMON]
Touch “Part Settings” > ” General
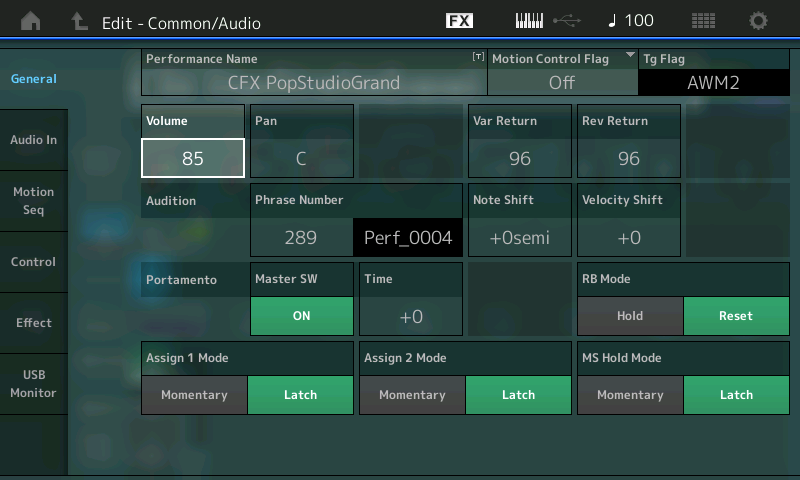
Here you can see the OUTPUT VOLUME of this PERFORMANCE was stored at 85 (on a scale of 0-127). This is where you set the overall output volume of this PERFORMANCE for recording purposes. Try it. Lower this VOLUME and see how it affects the levels arriving in Cubase. Raise this OUTPUT VOLUME as necessary to set your record level. Always use METERS to judge record gain. Always use your EARS to judge the quality of the signal, but not the gain – gain must be set with a METER.
You may have noticed that there is both a PERFORMANCE (overall) Volume for the CFX PopStudioGrand, and there is a PART Volume (individual) for each of the sixteen PARTS. The PERFORMANCE Volume obviously controls all PARTs together, and a mix of the individual PARTs makes up the total overall Volume. Trust your Meters to set your level. “How Loud” something is is irrelevant to the amount of signal that is being recorded. Piano is a percussive instrument – leave plenty of headroom (room between the maximum output level and maximum record level) – “noise floor” is not an issue in MONTAGE.
MULTIPLE OUTPUT SETUP:
Many of the PERFORMANCES in the MONTAGE can take advantage of multiple audio outputs. As you go along you can start to take advantage of this powerful feature. You have enough audio buses to carry each MONTAGE PART on its own stereo feed to your DAW. And because you can multi-track audio, you can do them all simultaneously and repeat the process again and again. Assigning PARTS to OUTPUTS and then setting your DAW to receive them as INPUTS is what we’ve just covered. Adding to this basic setup is just a matter of repeating the process for each MONTAGE OUTPUT: create a Cubase INPUT and assign that INPUT to an AUDIO TRACK. It is a bus route… you can place one or more passengers (Part signals) on a particular bus, that bus is being routed from point A to point B to point C. Let’s create the first Assignable Output Bus:
In Cubase, go to DEVICES > VST CONNECTIONS > INPUTS tab > Click “Add Bus”
“STEREO IN 2” set to receive audio from Montage on “USB 1” and “USB 2” (See graphic below)
And so – in this fashion you can ADD new Buses for additional routing. Each Bus that you add creates a discreet path between the MONTAGE and Cubase. Remember we can have a total of 16 stereo pairs (later we’ll learn that you can setup mono pathways as well). This will come in handy when recording MULTI PART Performances where we may want to isolate each PART on a separate AUDIO TRACK!
_ In this case, add STEREO BUSES, as you require. (Screenshot is from a Macintosh)
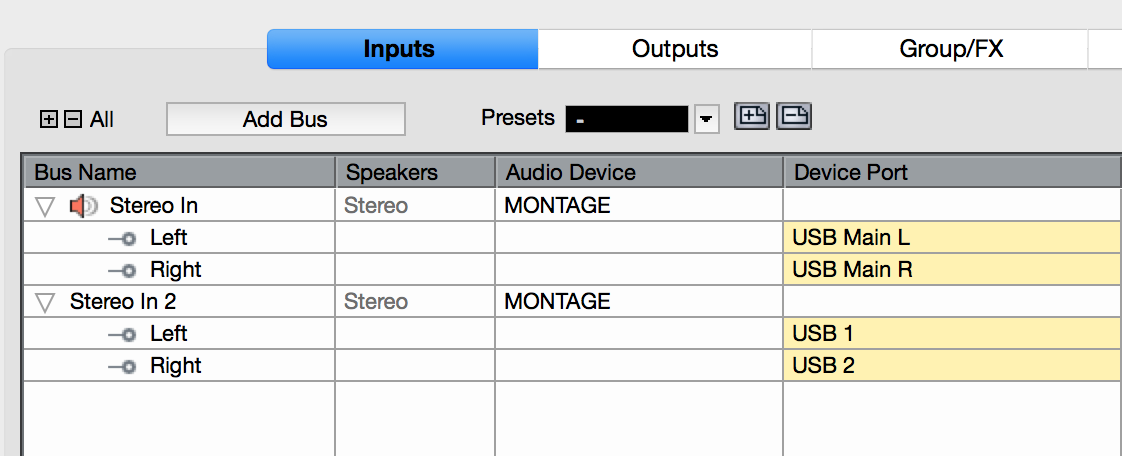 Any time an AUDIO TRACK is set to receive signal from “STEREO IN” it will be receiving audio from the MONTAGE’s “Main L&R”
Any time an AUDIO TRACK is set to receive signal from “STEREO IN 2” it will be receiving audio from the MONTAGE’s USB 1/2. And so on, for each Audio Device/Device Port pairing you create.
NOTE: The “USB Main L”/”USB Main R” contain both the SYSTEM EFFECTS and the MASTER EFFECTS, the thirty assignable (USB1-30) outputs go to those outputs without passing through the System (Reverb and Chorus) and the Master Effects.
What to take away from this: Recording MONTAGE PARTS to separate audio tracks in your DAW, would be done when you wish to further process the PARTs with plug-in Effects within your computer environment. Those PARTS that are fine just as they are can be bused on the “MAIN L&R” to a stereo track and utilize the MONTAGE’s Reverberation and Variation effects (in addition to their own 2 Insertion Effects). You can choose which Parts you wish to record separately… You may opt to record just the featured instruments to separate tracks. Your mileage will vary per the project… It’s your choice!
Want to join the conversation about this lesson? Post your comments on the Forum here.
Next time: Basic Audio Record PART II
Didn’t catch the previous lesson in this series? Catch up with “CUBASE SETUP GUIDE WORKFLOW 2: ARP REC on DAW“