In anticipation of the new firmware we’ve been studying the programming of these four Part Performances, a process we like to call “MONTAGification! We got a head start on what to expect with all this new (but familiar) content. Not everyone wants to start sound designing with an INIT program. By starting with the data from the Motif XF, it allows us to jump start the process of sound design. Be sure to update your firmware and download the new version of MONTAGE CONNECT to be able to load our example.
Let’s have fun and MONTAGIFying some MOTIF Performances!
You will find the file containing all 512 Factory Performances of the Motif XF on the Official MONTAGE Download page. This can be found by going to your regional Yamaha website (here in the United States of America, that would be www.usa.yamaha.com), navigate to the Synthesizer/Music Production area where you can find the MONTAGE product page. As if you were going to find information out about the MONTAGE series:

There, listed with the Overview, Features, etc., is “Downloads”. This will take you to all the Downloads that concern the MONTAGE – including the Brochure, the various Manuals as PDFs, Firmware and Software updates, as well as, “Other Downloads” which currently includes the Compatible Device list (USB drives) and the Motif XF Performance Content.
The download file is zipped – download it to your computer and unzip it. It contains a folder named “Motif XF Performance” – this folder contains a total of four Files: two (2) MONTAGE Files plus two (2) “Readme” text files, one in English and the other in Japanese. The two files are “Motif XF Performance.X7L” and “Motif XF Performance.X7U” – these can be loaded as a Library or to your USER Bank, respectively. Copy these two files to a USB stick you use with your Montage. Read, the ReadMe File.
These files have already been converted to MONTAGE format. If you are working with a custom Motif XF ALL data file (.X3A) File, please be aware that MONTAGE cannot translate older compression schemes (LPC, WXC), nor can it import 8-bit data. If you have any orphaned Waveforms (Waveforms that are not used), or incompatible data, you will receive a message that some Keybanks may not have been found/loaded. The orphaned Waveforms will be loaded and found in the UTILITY > “Contents” > “Data Contents” > “Waveform” Folder, if you direct the file to the USER Banks.
Converting a .X3A Motif XF ALL Data File, will take longer than loading the same data already in MONTAGE file format. So when converting files yourself, be sure to SAVE a file in MONTAGE native file format for future use.
LOADING the PERFORMANCES:
Place the USB stick with the “Motif XF Performance.X7L” and “Motif XF Performance.X7U” into the TO DEVICE port on the MONTAGE back panel. Within seconds the screen will recognize the drive: “Connecting with USB device…”.
Press [UTILITY] > touch “Contents” > “Load” > set the CONTENT TYPE = either “USER File” (if you want to load the data to the USER Bank) or “LIBRARY File” (if you want to install the data to a Library). Let’s load the data to the USER Banks.
If you load to the User Bank you will receive the warning screen:
“Current user data will be overwritten by “Motif XF PERFORMANCE.X7U”
This is to remind you that if you have not SAVED the data currently in the USER Banks, you should STOP, and create a File. If you are not sure, STOP, touch “Cancel” – and SAVE your data to a USER File, before loading new data to the USER. This is normal and should be apart of your routine – knowing what you have saved and what you have not yet saved. If you have already saved a file for the data in the USER Banks, simply proceed by touching the “Load” option.
This will place the 512 (Multi PART) Factory Motif XF Performances into your MONTAGE.
FINDING the PERFORMANCES you just loaded
Don’t laugh… We are to the point in synth technology now that you can actually load 512 Performances and not be able to find them. Managing the 32 sounds that I loaded into my original DX7 (back in the day) I knew I only needed to press one of the 32 buttons on the front panel to find them. When you add 512 Performances (almost 2000 PARTS), they can actually “hide” inside this instrument. Well, you realize we have reached a point virtually undreamed of back in the day. You can archive all kinds of sounds, with all kinds of variations. The memory here is huge when it comes to creating variations of sounds – that is what synthesis is all about. Knowing where to look for them will be important.
The cloud of programs in the MONTAGE is huge: as of Version 2.00, you have 2143 Preset Performances. You may know a Bank of Normal program Changes is 128. The catalog of Program in MONTAGE uses this 128 layout. Each of your Libraries could be an additional 640 (5 sets of 128). And the USER Bank, itself – which is where you construct MONTAGE Library files – can hold 640 more (5 sets of 128) at any time.
In a future firmware update, Yamaha has announced that it will add these 512 Performances to the Factory Presets.
From the HOME screen:
Press [CATEGORY SEARCH] repeatedly to toggle through your current MONTAGE Bank headings. Initially, the ‘search’ is through “All” Banks, if you press it again you can view just those you have marked as “Favorites”, press it again to view just factory “Presets”, etc. The toggle cycle is as follows:
All > Favorite > Preset > User > Library 1 > Library 2 > etc.
Hint: If you hit and hold the [CATEGORY SEARCH] button it will take you back to “All”
Each Library will be identified by its name.
When you press [CATEGORY SEARCH] to select Bank = “User”, you will be looking at a field containing just the Motif XF Performances.
If you installed them to a Library, press [CATEGORY SEARCH] to select Bank = “MOTIF XF PERFOR…”.
Alternate Method:
– Press [CATEGORY SEARCH]
– Touch “Bank/Favorite” to view a pop-in menu of the Bank headings.
– Touch the Bank you want, then [ENTER]
The programs in these files have not been given MAIN or SUB Categories (they are all “No Assign”). Because you are to edit these, you can assign the Main and SubCategory, if you so desire. Performances take on the Main and Sub Category assigned to Part 1.
Please use these programs as starting points to create your own customized sounds. If you have been following this series, you should be pretty adept at navigating the MONTAGE architecture.
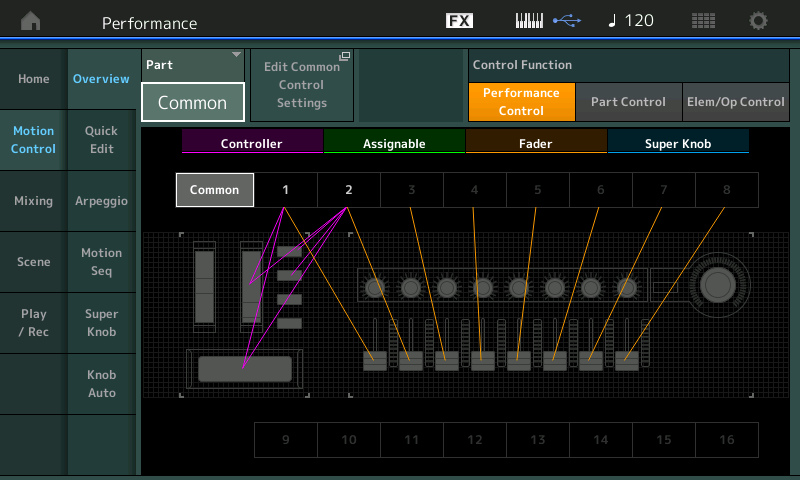
First, using the OVERVIEW screen and its shortcuts to the Control Settings, you can quickly study what the original programmer assigned to the controllers. This way you do not wind up fighting against some inherited programming. You know that a maximum of four PARTS are programmed, you also know that a maximum of two of the eight AssignKnobs are assigned to anything per Part, you also know that nothing on the upper COMMON/Audio Level (Super Knob and it’s eight Assign Knobs) has yet been programmed. This is the case because the Motif XF did not have these features.
New for Version 2
We can anticipate questions about how to get the SUPER KNOB “to do something”. Take your time… first, figure out what you would like to do with the Super Knob. By now you probably have a good idea of how it can be used from having worked with the MONTAGE Factory Performance programs. The Super Knob can be used to morph one sound into others, it can fade in/out drums or fade in/out entire musical instrument Parts; you can change effect amounts which change the setting, for example, the “proximity effect” (where you are altering both EQ and time delay effects to simulate distance from the stage), etc., etc., etc.
Let’s try something simple to grasp how the new Super Knob assignment implementation makes it easier to get going Programming your own:
MOVIE STRINGS
From the PERFORMANCE HOME screen:
– Press [CATEGORY SEARCH]
– Set “Bank/Favorite” = the location of your “Motif XF Performance” Bank; If you loaded as User File, set to “User”, If you loaded as Library File, set to “MOTIF XF PERFORMA..”
– Under the Magnifying Glass type “Movie”
This narrows our ‘search’ to just Programs containing the letters “Movie” in the MOTIF XF data.
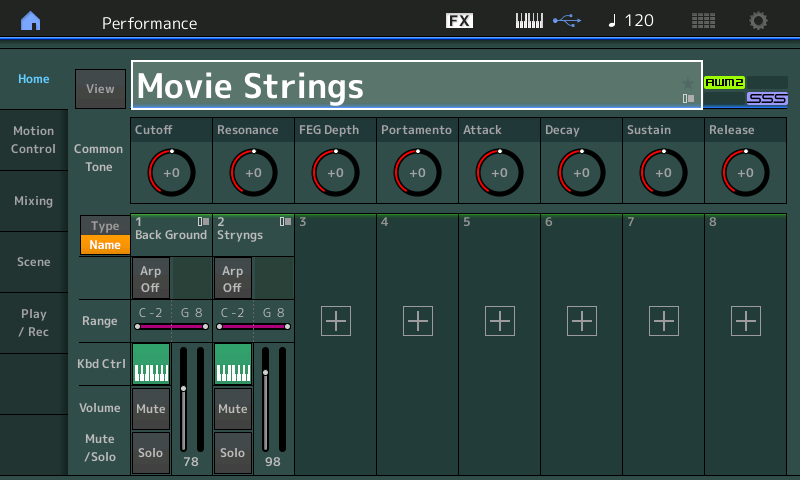
Recall “Movie Strings”:

Here we have a simple layer of two distinctly different strings ensemble sounds. PART 1, “Background” are very smooth and stately – aptly named because that is how they function. PART 2, “Stryngs” are bigger, closer and definitely more bow articulation is heard. Take the time to play them individually, and together. Use the upper [MUTE]/[SOLO] buttons – and play each enough to get a feel for how they play (that is, discover how they have been adjusted to respond).
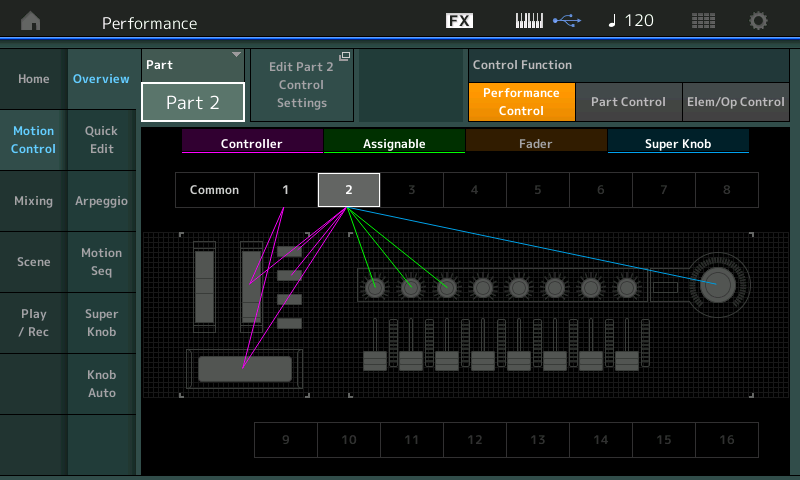
To see an overview of the controller assignments: Press [SHIFT] + [HOME]:

Change the PART = COMMON so you can view PART 1, and then, finally, PART 2. You will discover that only Assign Knob 1 and 2 are assigned. (This is typical of Motif XF Performances as they only had two Assign Knobs per PART). As you may know, the Super Knob can be moved “hands-free,” allowing you control its movement via a Yamaha FC7 sweep-type pedal. If you have not experienced this Super Knob/Foot Controller Function… run, don’t walk to your local Yamaha music store and try it out — they have one connected. It makes a huge difference in being able to perform with the Motion Control Synthesis Engine. Accept no substitutes, get a genuine Yamaha FC7 (at least one).
GOAL: Let’s quickly assign the Super Knob to control the volume of the brighter, closer, bowed string ensemble in PART 2:
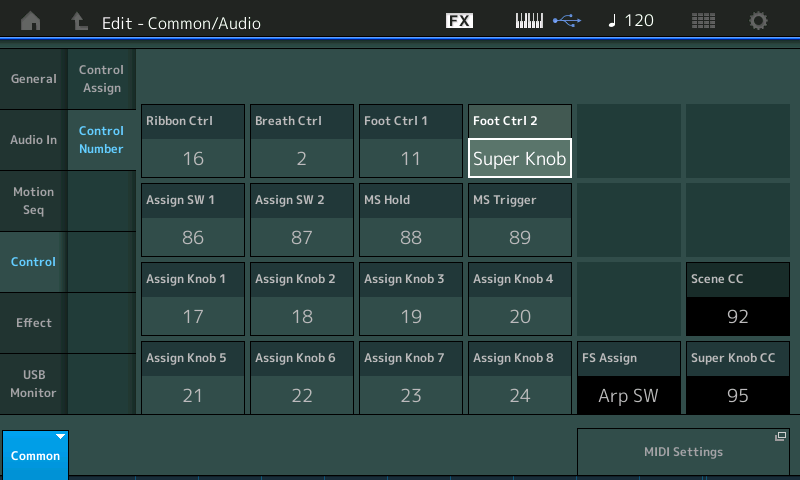
– First, because the Motif XF did not have a Super Knob, you can bet that all of the Motif XF Performances default the Foot Controller sweep pedals to FC1 = cc11 and FC2 = cc4.
– We will need to assign the SUPER KNOB duties to FC2. The CONTROL NUMBERS can be set on a per PERFORMANCE basis.
We should know how to do this already but in case you forgot:
– Press [EDIT]
– Press the upper [COMMON] button
– Touch “Control” > “Control Number”
Here you can change the Foot Ctrl 2 = Super Knob — turn the Data Dial fully clockwise to select “Super Knob”:

We want to next navigate to the PART VOLUME parameter of the “Stryngs” in PART 2:
– Press [PART SELECT 2]
– Touch “Part Settings” > “General”
– Move the cursor to or touch the “Volume” box: currently set to “98”.
– By highlighting a parameter that is assignable the [CONTROL ASSIGN] button will be glowing (located to the lower left of the screen, next to the OCT -/+ buttons).
– Press [CONTROL ASSIGN]
– The new version 2.00 “Destination Parameter” screen appears – it simply says the next controller you touch will be assigned.
– Turn the SUPER KNOB – the assignment is made! It is literally that easy now.
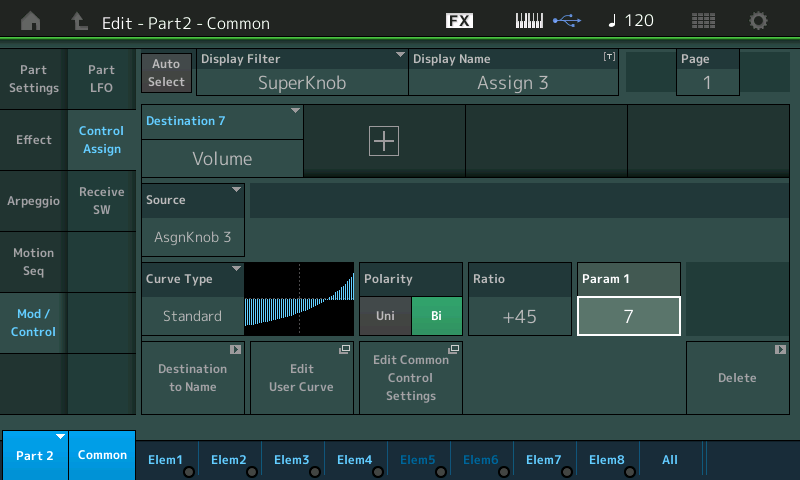
You are taken straight away to the PART 2 – Common – “Mod/Control” > “Control Assign” screen.
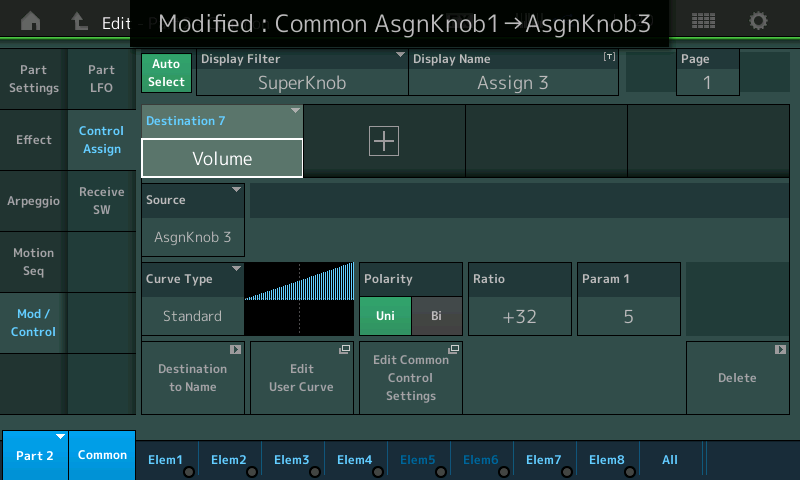
A drop-down message briefly appears informing you of the work that has been done in the background by MONTAGE: Modified: Common AsgnKnob1->AsgnKnob3:

Translation: Previous to version 2.00, to make this assignment we would have had to go to PART 2, assigned the control of Volume to the first available knob, which we know for a Motif XF PART would be Assign Knob 3. Then we would have had to go to the upper COMMON Control Settings and then linked the first available COMMON ASSIGN KNOB (1) to control PART ASSIGN KNOB #3.
Instead… we simply highlighted the parameter we wanted to control, we touched the [CONTROL ASSIGN] button, moved the SUPER KNOB and MONTAGE does the rest. The brief drop-down (screenshot above) tells you that the upper COMMON AsgnKnob 1 is linked to control the movement of PART 2’s Assign Knob 3.
It opts for the first available PART Assign Knob (which was 3, all XF converted programs will only ever use a maximum of 2 Assign Knobs) – and it opts for the first available COMMON Assign Knob (which was 1, because the Motif XF did not have any Common Assign Knobs/Super Knob). All of the Motif XF Performances will have but two Assign Knobs used, and will have nothing programmed on the upper COMMON level.
This shorter method is not only quicker but it saves the “brain-game” of assigning then linking. We just think: I want Volume on the Super Knob (from there it is pretty much “touch and go,” done). MONTAGE does the heavy lifting. But you know what is taking place and you have the knowledge to see how this is an improvement.
Extra Credit: Why does it go to the first unused Assign Knob in each case? Can’t you assign multiple items to a single PART or COMMON Assign Knob? Well, yes you can. But you will need to do this manually. Obviously, you will want to tailor the response of each parameter assigned to a controller, particularly, when more than one thing is assigned to a Knob. You want it so that each responds, as you require. When more that one parameter is assigned to any Assign Knob, each assignment has its own set of parameters that allow to control what happens to that particular assignment. We’ll take a look into multiple assignments in a future article. For now you have sixteen Source/Destination Control Sets, so spread out.
Lets deal with the response of this “Stryngs” layer to the movement of the Control: By leaving the PART Volume set at “98” (the stored value), we can setup the CURVE, POLARITY, RATIO, PARAM1 to shape the movement of this control the way that we want it to respond.
CURVE = Standard _ a straight line curve (is that an oxymoron?) great for turning up or down.
POLARITY = Bi _change the Polarity to “Bi” so that we can move up and down from the “98” stored setting with movement of the Super Knob. “Bi” POLARITY means that at 12 o’clock the volume of PART 2 will be the stored value “98”. Clockwise to increase, counterclockwise to decrease the stored value.
If the PART Volume was set to “98” and “Uni” was the POLARITY, then we could get louder from “98” and return to “98”. 98 would be minimum – and 127 of course, maximum.
RATIO = +45 _ How to set the “minimum”: Turn the Super Knob all the way to minimum. MUTE PART 1, so you can only hear PART 2. Raise the RATIO from +32 slowly until you can no longer hear the “Stryngs” – this is how you can set the minumum for no sound output. At approximately “+45” the PART is basically gone from the mix. Now turning the Super Knob you have 0 volume at minimum, “98” volume at 12 o’clock, and maximum 127 volume at Super Knob all the way up.
PARAM 1 = 5 (range 0~10) _ Adjust this setting to taste… it controls *when* the PART 2 gets loud in response to movement of the Super Knob. If you lower the number from 5, the graphic shows the sound get louder earlier in the SUPER KNOB travel, as you raise the number towards 10, the SUPER KNOB will take longer before it begins to apply significant volume change to PART 2. A setting of 5 will be linear:

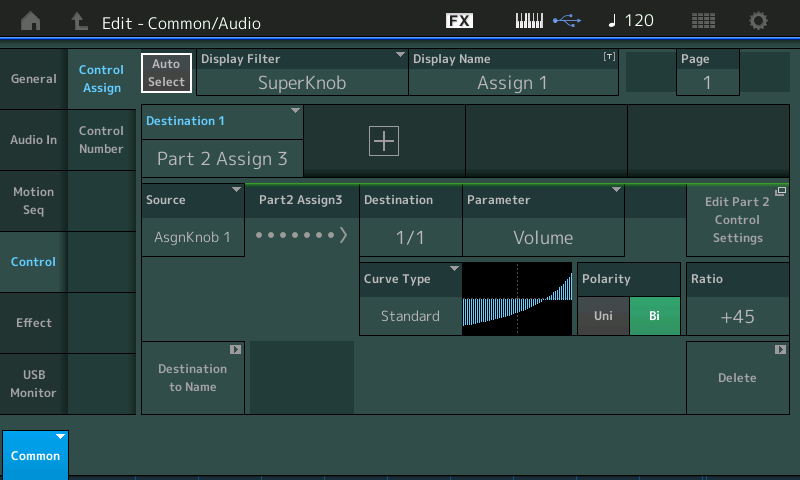
Touch the shortcut box that appears in the screenshot above “Edit Common Control Settings” – this is like a “wormhole” that takes you to the upper COMMON level where the COMMON Assign Knobs settings are made. And as shown below you can see a summary of the assignment that we just completed:

SOURCE = Common AsgnKnob 1
DESTINATION = PART 2’s Assign Knob 3 which is currently the only Destination for AsgnKnob1. It is set to control PART 2’s Volume, Bi-directional polarity, with the CURVE as shown above. Notice the return ‘wormhole’ – “Edit Part 2 Control Settings” to whisk you back to Part 2’s Control Set.
Below: The OVERVIEW for PART 2 shows its ASSIGN KNOB 3 and SUPER KNOB assignments now added to the view:

Nice.
Creepn Worm study
Last time we took a look at “Creepn Worm” and some of the different Filter Types (Dual BPF, Dual BEF, Dual High Pass, etc.). Let’s see how the some of the new features in version 2.00 impact our look at the MONTAGE.
You will want to pick a PERFORMANCE that is of interest to you, and while exploring it, come up with something you want to try. Some Performances feature arpeggio phrases, some do not, some include drums, some do not. We’ve looked at both kinds – there are no rules. In the last article we were looking at the Motif XF Performance called “Creepn Worms” which was a study in HIGH PASS FILTERING. Let’s continue with this one.
At the bottom of this article, please find a download .X7B example called “Creepn Worm study”. I’ve added a Drum Kit with arpeggios and the Drum Kit fades in via the Super Knob. This data requires a MONTAGE with firmware 2.00.x and MONTAGE CONNECT v1.0.3 (both available from the Official Yamaha MONTAGE product page).
You can change the ARP Type by either using the blue SCENE buttons, which will recall also the Super Knob position or you can change the ARPs manually using the [ARP SELECT 1-8] buttons, row four of the right front panel.
“Creepn Worm” was made up of three PARTS: Long HiPa, High Wire, and 5th Atmosphere. You can review the last article for the details, but MW, RIBBON, and the ASSIGN SW 1/2 play a role in ”moving” this sound.
I added (merged) “Trap Kit 2” into the empty PART 4 — this is one of new “crunchy” Drum Kits, it’s edgy!
– This was accomplished on the [PERFORMANCE (HOME)] screen by touching the “+” in PART 4 to ADD a new PART. This will automatically take you to “Category Search – Performance Merge”
– Part 4 – Performance Merge: touch “Drums/Perc” > select “Trap Kit 2”
I am using the Drum Arps (PART 4) to modify the “High Wire” PART (2). Setting up the Envelope Follower in version 2.00 has been simplified, again, through a series of ‘wormholes’ (shortcuts) between pages you would normally have to know how to navigate to. Here’s the scenario. If you remember “High Wire” was the PART that was using the XA CONTROL (AsSW1/2) to determine which of the 3 Elements was going to be sounding at the time. Element 1 played when both “AsSW Off”, Element 2 played only when “AsSW1 On” and Element 3 only sounded when “AsSW2 On”.
I wanted to control the Volume of this PART with the rhythm of the Drum Arp phrase. Since it is a very heavy Drum pulse, it seems the perfect modifier to make movement in PART 2. So again my goal is to influence the VOLUME of this PART (2) with an Envelope created by the Drum groove (Part 4):
– First, navigate to the PART VOLUME for PART 2
– Press [EDIT]
– Press [PART SELECT 2]
– Lower COMMON should be light or PART2/COMMON should be showing in blue in the lower left corner of the screen
– Touch “Part Settings” > “General”
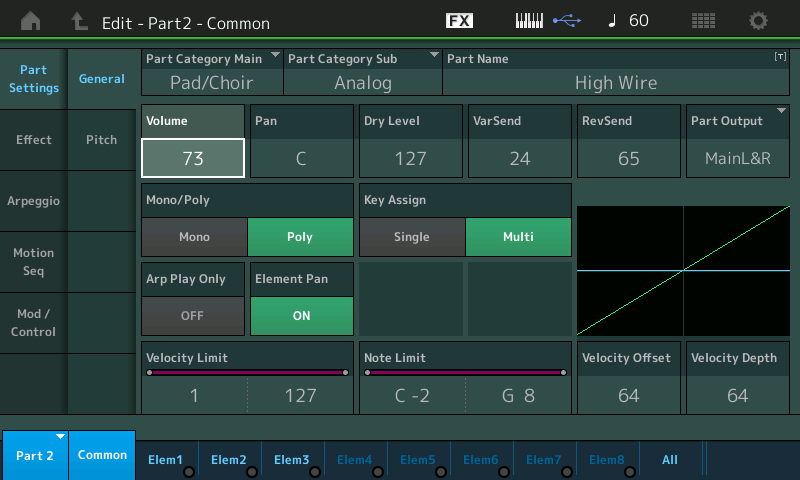
– Move the cursor to highlight “VOLUME” (currently set to 73):

– Press the glowing [CONTROL ASSIGN] button – the new “DESTINATION PARAMETER“ screen to assign PART 2’s Volume appears:

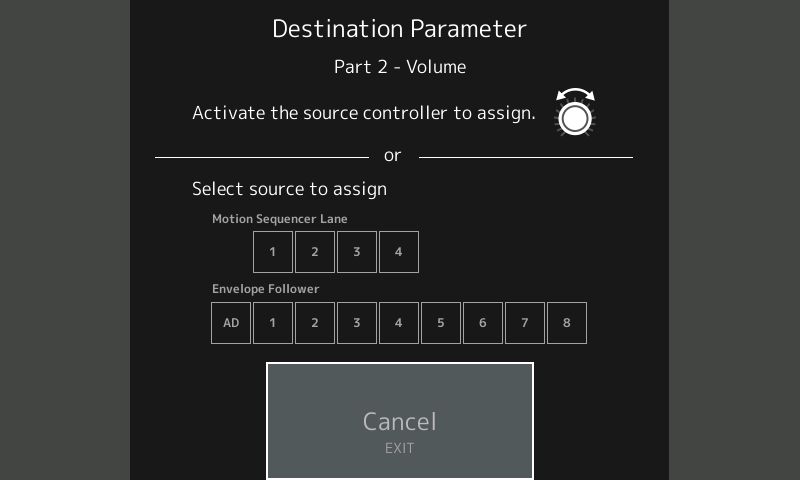
– You can now, in Version 2.00, select an Envelope Follower (or Motion Sequencer Lane) as the control from this quick assign screen – we want the Drums PART 4 to create the Envelope for PART 2 to Follow – touch “Envelope Follower 4”
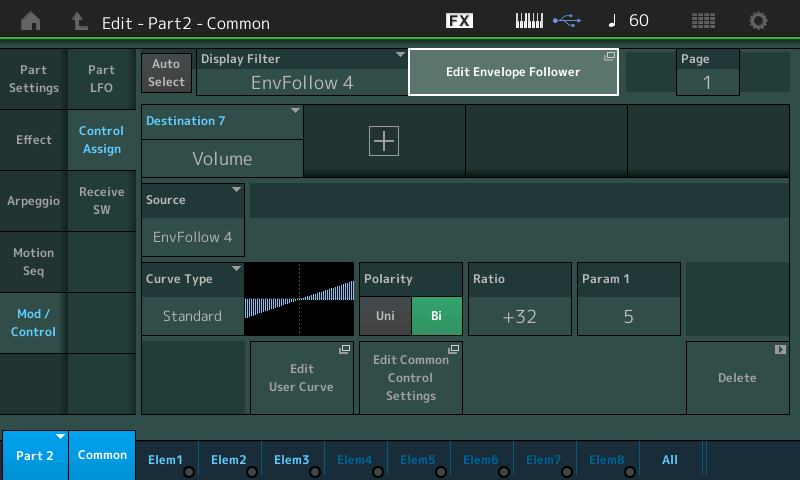
– You are taken straight away to the CONTROL ASSIGN screen for PART 2 where VOLUME has been assigned to “EnvFollow 4”, and you can setup how it is going to be applied using CURVE, POLARITY, RATIO, PARAM1:

Also on the screen at the top is the ‘wormhole’ shortcut to travel directly to the Envelope Follower…
– Touch “Edit Envelope Follower” to travel straight to the Envelope Follower:

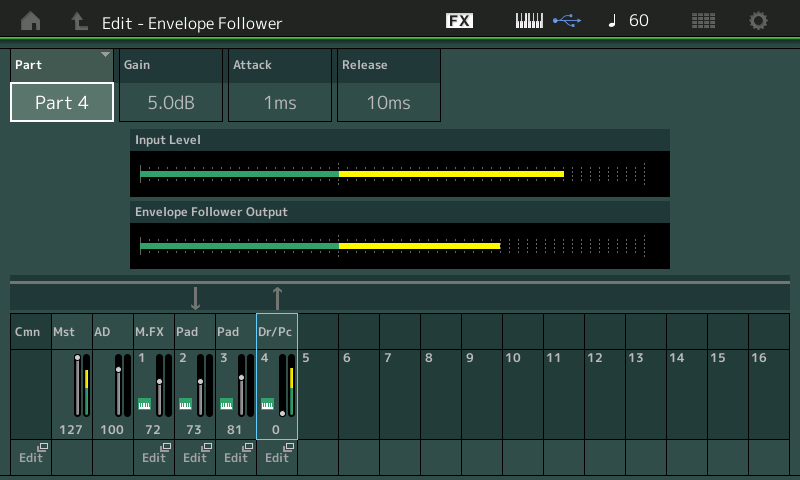
Here at PART 4, you can see that Dr/Pc (drums/perc) are feeding (arrow up) and PART 2 (Pad) is receiving (arrow down).
GAIN is audio output created by the DRUM ARP phrase as it plays.
ATTACK – this is drums so you want a quick attack. Set too high and you will miss the event entirely.
RELEASE – this is how quickly the envelope disappears and prepares for the next ATTACK. If set too long you will miss the next Attacked percussion note.
So with Drum/Percussion sounds in creating the Attack/Release envelope you want to be aware of the time. Purposefully, set the parameters too slow to get an understanding as to why this “breaks” what you are trying to accomplish. Punch-punch, jab, jab, jab, this is stick and move, percussion like a boxer. Quick stab like. But experiment: you may find that a slower ATTACK might create an interesting change in how it works. The only rule is: you have to like what it does, if not, change it.
Notice the little “EDIT” shortcuts below each of the MONTAGE synth PARTS and the COMMON. Again speeding the setting up of the Envelope Follower – often you need to go back and forth between the CONTROL ASSIGN page and this page while getting the exact response you are looking for.
Okay that’s enough for now. If you have a favorite Motif XF Performance or if you have an area of the Motion Control Synthesis Engine you would like to see us dissect in this Scuba diving expedition, let us know! MONTAGE is an incredibly deep instrument but programming it is a matter of getting used to navigation (which is getting easier all the time) and a matter of your willingness to explore and try things. Study the original assignments, then dive in. Don’t just layer sounds — anyone can do that — get creative. Until next time… enjoy!
Bad Mister
Have a favorite Motif XF Performance you would like Phil “Bad Mister” Clendeninn write about and help you bring to your MONTAGE? Suggest it here on the Forum.
And stay tuned for more!


