We take your Privacy very seriously.
MONTAGifying MOTIF: “Creepn Worm”

Tagged Under
Sound Designing Opportunities
Once MOXF or Motif XS/XF four Part Performance data is loaded (converted) into MONTAGE, create a file in native MONTAGE format for much quicker load times. At maximum, a converted Performance will have four Parts; each Part will have a maximum of two Assign Knobs active and six Control Set (Source/Destination) assignments.
In the MONTAGE, you can add four more realtime controllable KBD CTRL Parts. Each Part will have its own eight AssignKnobs and sixteen Control Set (Source/Destination) assignments. You can begin to expand on the programming, integrating it into the Motion Control Synthesis Engine. You can combine them with FM-X Parts to create entirely new musical creations:
– Every Motif XS/XF and MOXF VOICE is already available in the MONTAGE as a Single (green) Part Performance. In fact, all of the Factory Presets are already available as ”Single Part Performances” in the MONTAGE factory set.
– Each Motif XS/XF and MOXF Arpeggio phrase is already available in the MONTAGE.
New with firmware version 2.00, you can opt to convert User VOICES to MONTAGE “Single Part Performances”, or you can opt to convert the entire bank of four Part PERFORMANCES. Motif XS (.X0A), Motif XF (.X3A) and MOXF (.X6A) Files can now be converted, resulting in you being able to have your XS/XF or MOXF data available in MONTAGE.
For example, opting to Load “PERF” from a Motif XF .X3A All Data File will result in MONTAGE converting all 512 User Performances – including all the Voices, Arps and Waveforms that make them work. Each Motif XF Voice will occupy a Part 1-4 in the appropriate Performance filling 512 of the 640 Performance locations in the User Bank.
If you opt to load as “VOICE”, each XF User VOICE (512 Normal, 32 DrumKit) will be loaded as a “Single Part” Performance, filling 544 of the 640 Performances in the User Bank.
Perspective
After studying the individual Parts as originally programmed, you can better decide what its role will be in the new combination of sounds. As a sound designer, each layer you choose should have a purpose – you want to avoid just stacking sounds willy-nilly -anyone can do that. Each PART you *merge* should have a role that you design for it. In previous articles we saw how you can morph between layers, and how you can use XA CONTROL to have some PARTS strategically change the size of the ensemble during your play (as we did with the String Orchestra Parts). You also gain perspective on what to change to accomplish the sonic results you require.
A Normal Motif XS/XF/MOXF VOICE (now a Single AWM2 Part) has eight Waveforms, one per Element, and alone is capable of being a fully playable sound – complete with its own set of Filters, Envelope Generators, EQs and Effects. It is a waste of resources to just layer 8 KBD CTRL PARTS and play all the layers at all times. While some folks will do that, hopefully, you will find that it is not a contest of how many you can play at once – it is the access to how you can make the sound change, evolve, behave and move! This week we’ll delve a bit more into those fantastic Filters.
“Creepn Worm” is made from the following three PARTS:
PART 1: Long HiPa
PART 2: High Wire
PART 3: 5th Atmosphere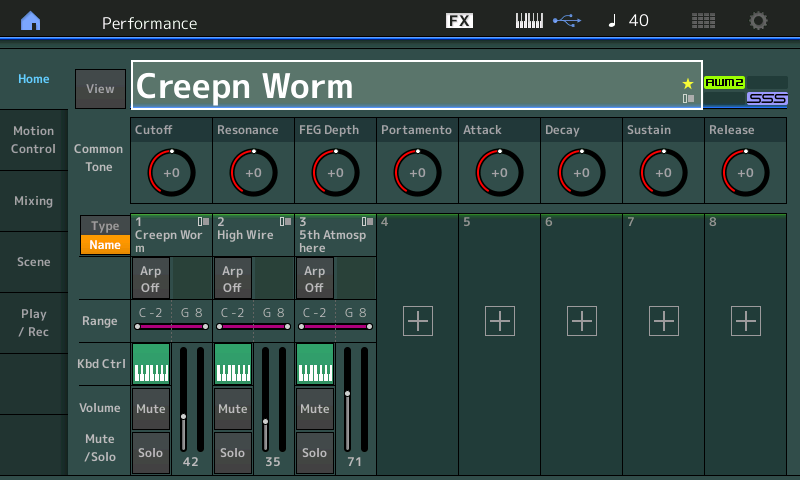
This is a multi-layered synth pad sound. Each of the three PARTS are layered across all keys and respond at all velocities. One would describe this sound as very synthy. It is a Pad sound but not particulary string-like, nor is it particularly brass-like, but we describe it as very synth pad-like. It is clearly not trying to emulate any acoustic instrument, so much as it is a synth sound for it’s own sake. The filter movement – if you had to describe it – is atypical, and we will see why. Let’s break it down. We’ll do so by playing the original Single Part as a separate entity: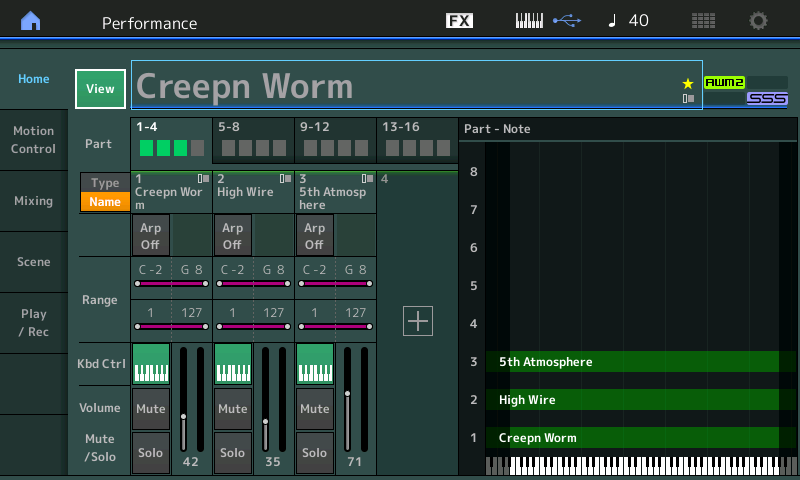
Let’s begin our tour this week by recalling the Single PART PERFORMANCE called “Long HiPa” used in PART 1 of “Creepn Worm”. We want to hear and study the original programming – the sound was a VOICE in the XS/XF/MOXF and is one of the Single Part Performances (green) in the MONTAGE basic factory ROM.
“Long HiPa”
– Press [CATEGORY SEARCH]
– In the Search area type in “Long HiPa” to find the Single PART PERFORMANCE: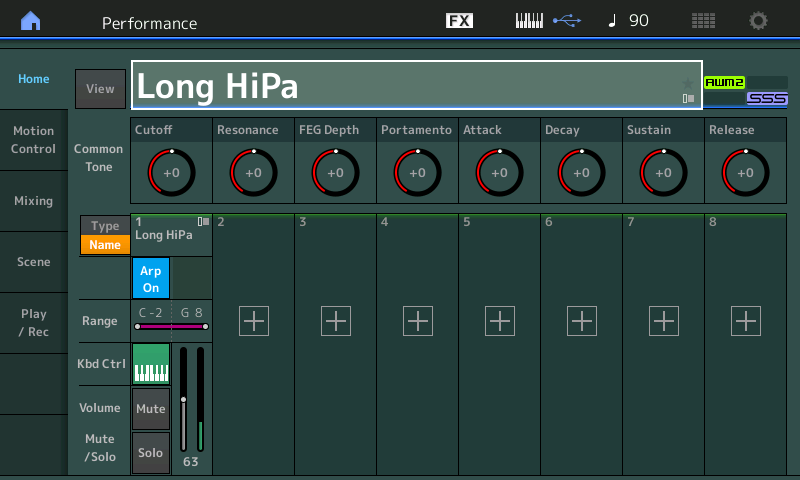
If you are listening in stereo, (and we sure hope you are) the first thing you should notice is that the filter movement is such that the high frequencies are heard first and as time goes on we hear more low frequencies being allowed through. We are hearing the result of the Amplitude Envelope Generator (loudness) and Filter Envelope Generator (timbre change). And there seem to be several distinct areas moving within the stereo field. You can feel it come from the center and split down both sides of the stereo field.
The “HiPa” spelling is revealed as a hint that this is using “High Pass” Filtering. A High Pass Filter is one that initially allows high frequencies to pass and blocks low frequencies. Why this sounds “synthy” and “atypical” to us is because in the emulative world of sound designing, it is the Low Pass Filter that does the lion’s share of work when attempting to mimic instrument behavior. This is because, in general, the harder you hammer, strike, pluck, blow or bow a musical instrument, the more high frequencies it produces. Therefore, an LPF made sensitive to Key-on velocity is most often used to create this effect – and the harder you play the brighter the sound. Velocity is used to raise the Cutoff Frequency of an LPF, which means the timbre gets brighter. Here however, we are using the Envelope Generator to create movement of the Cutoff Frequency and the movement is in the opposite direction. An “envelope” describes movement over time.
The HPF24D translates to High Pass Filter 24dB per octave, Digital. For every octave you go below the Cutoff Frequency the signal will be down 24dB. This means that if you play an A440 and it is 0dB on the meter, the “A” at A220 is -24dB relative to the A440. Frequencies below the Cutoff Frequency are reduced by 24dB for each Octave you go down. This is consider a steep curve (also called a 4-pole Filter).
Later we will take a closer look into the FILTER TYPE.
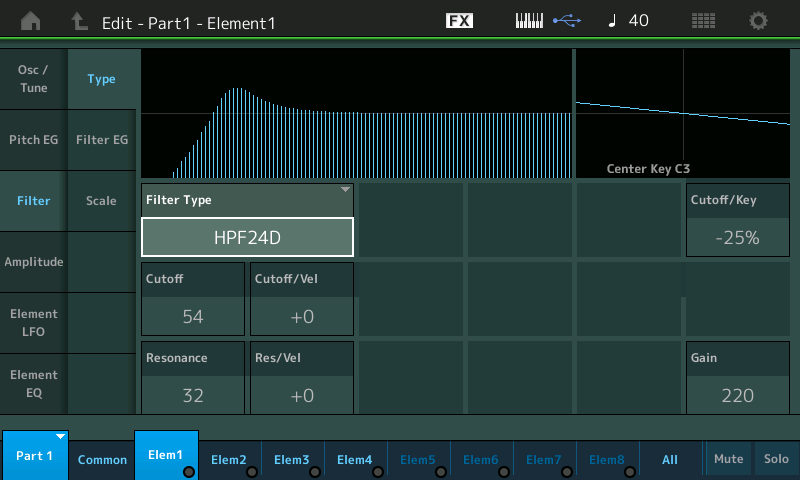
The High Pass Filter TYPE, shown above, is the one that can be very top-down revealing (pun intended). If you hold a chord you can hear the filter frequency move. That “rip the sky” type sound that is so familiar is accomplished by revealing High Frequency content first and allowing the sound to fill-in harmonically over time. Elements 1, 2 and 3 all use the same HPF24D Type (24dB per Octave High Pass Filter). The typical LPF (as used in Element 4) works in the opposite direction (shown below):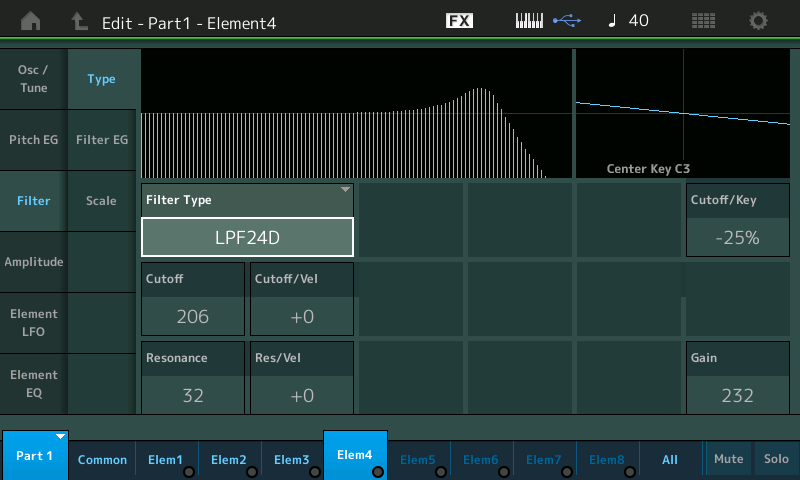
– From the ”Long HiPa” HOME screen.
– Press [EDIT].
– Press [PART SELECT 1].
Extra Credit: Begin to see the lights:
Observe your right front panel lighting:
– The [PERFORMANCE CONTROL] button is lit brightly.
– > the [PART SELECT 1] button in row 1 is lit brightly indicating we have selected PART 1 for editing
– > the upper [MUTE] button is lit brightly – this means a lit PART in the PART MUTE row 2, is sounding. [PART MUTE 1] is lit brightly to indicate it is currently sounding.
– > and on the bottom half of buttons, you can see the lower [COMMON] button is lit – indicating we are looking at parameters related to all Elements together.
– Row 3 is Element Select 1-8 they all glow, Row 4 reveals, however, that there are only four Elements in this PART – revealed by the brightly lit ELEMENT/OPERATOR buttons along the bottom row. (Four of the possible eight Elements are active).
– Finally over on the extreme right side, the lower [MUTE] is lit to indicate that bright lights in row 4 means active Elements.
More to Explore:
Using the row 4 MUTE 1-4 buttons you can listen to different combinations of the four Elements. If you isolate each Element and play a bit you will discover that Element 1 and Element 2 are ‘bookends’ – both use the same Waveform type, Filter Type, one is panned Left and the other Right, slightly detuned from each other, to create balance in the mix. They both happen to be made from a Waveform named “Fat Saw Mn” (A fat analog sawtooth waveform, mono). Element 3 is made from a Waveform called “OB Mod Saw” (an Oberheim type modulated sawtooth waveform) – tuned an octave down and panned dead center. In stereo, you should feel that spacing as the movement is taking place in three distinct areas of the panorama. You can hear/feel that there is a Cross Delay happening, as well. The repeats Pan from side to side as they fade away.
Element 4, stands away from the others – a Waveform called “Dark Light” is used, but what is different about Element 4 is that its Amplitude (AEG) has a slow attack, while as you play the other three Elements have a rather immediate attack in Amplitude, but they have a slow reveal of frequencies due to filter movement. The three HPF Parts come on immediately with just the thin sound of filtered lows; by contrast Element 4 is very full as it comes in but rises in amplitude slowly – so it is no surprise that it is using a Low Pass Filter.
Navigation: Some Things to Explore
Compare the FEG and AEG of Elements 1, 2, 3 versus that of Element 4. Amplitude Envelope Generator determine how loudness changes over time. Filter Envelope Generator determines the timbre/tone (harmonic) changes over time:
– Touch “Amplitude” > “Amp EG”.
– Select each Element in turn, to compare the graphic representation describing loudness: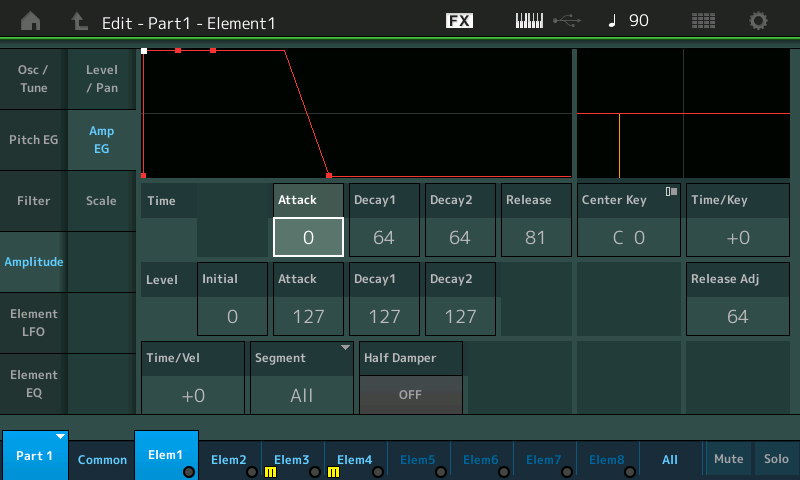
– Touch “Filter” > ” Filter EG”.
– Select each Element in turn, compare the graphic: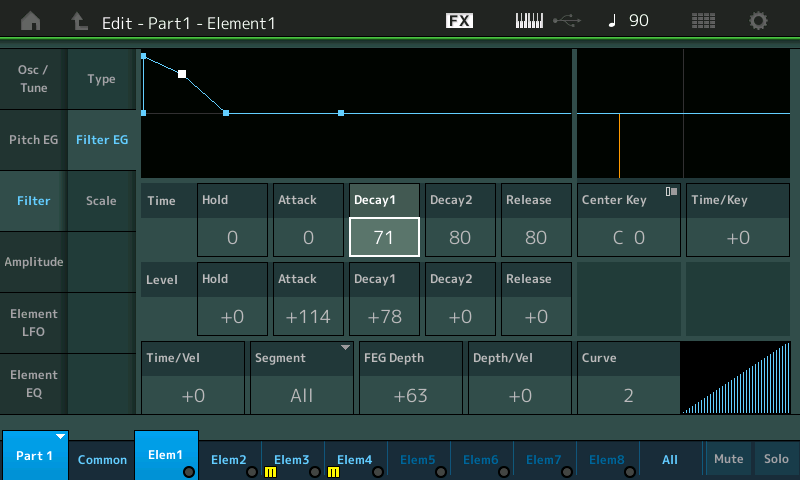
Understanding the role of Ampitude and Filter is fundamental to how sounds behave. The Envelope literally, shapes the outcome. If the Amplitude is not available to support sound, any Filter movement would not be heard. In other words, if the Amplitude EG is not there to support sound while the Filter is being swept, you will not hear it. Recognize that each Element has an individually programmable Filter and Amp. There will be times you want to control them all together and there will be times you want to control each individually – MONTAGE is powerful enough to offer you that control.
When you want to begin studying the CONTROLLER ASSIGNMENTS, we have learned that a good place to start is the OVERVIEW screen:
– Shortcut: [SHIFT] + [HOME] = INFO (Overview).
OVERVIEW
MW – moving the Mod Wheel will immediately allow you to observe (hear) that it is controlling Filter Cutoff. As we look deeper, we will see it is also doing Element Level for Element 4 and the Dry/Wet balance of the Tempo Cross Delay. We have seen that there are three HPF24D and one LPF24D active in this PERFORMANCE. As you move the MW Up and finally reach maximum, you will notice the different segments disappear, as the delayed echoes are the last to disappear. Rapid movements of the MW while playing will reveal these delayed repeats and the complete ‘cutoff’ of all frequencies as the MW reaches the top. (MW is also Element Level for Element 4, so it is turning Element 4 down the higher the MW; Try it: Solo ELEMENT 4 and use the MW to Fade it out).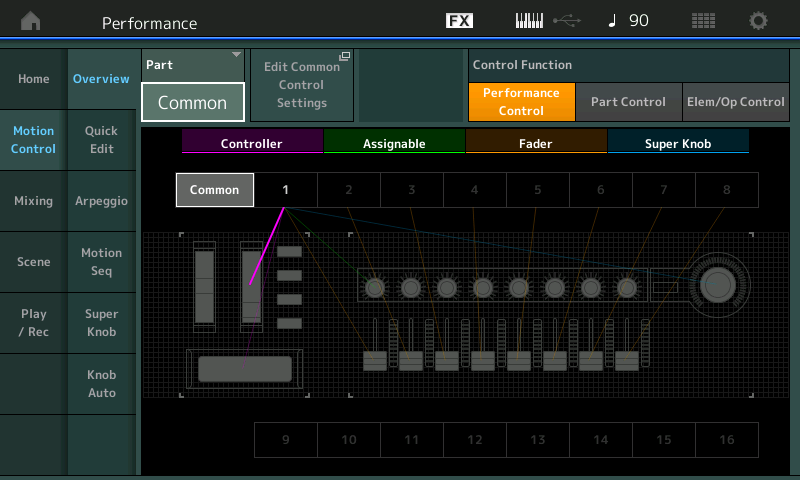
Moving the MW will highlight its assignment. You can see (above) that it is assigned to PART 1. We can view what it is assigned to by setting the PART from “COMMON” to “PART 1”, then touching the “Edit Part 1 Control Settings” box: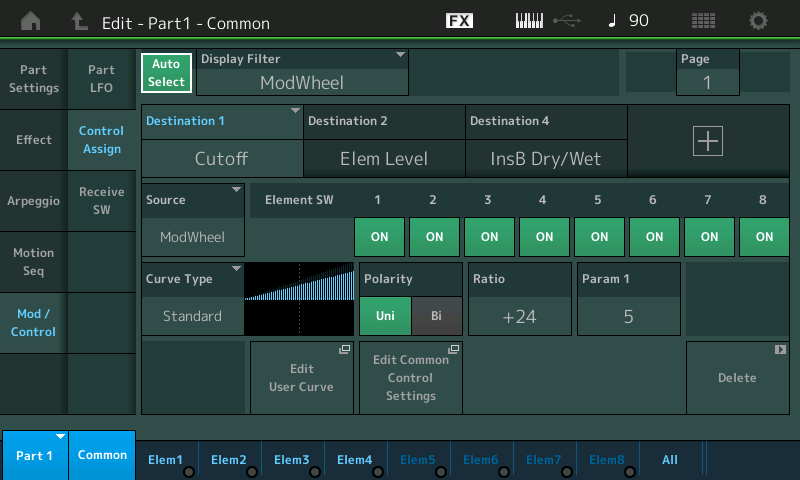
Make sure “Auto Select” is active (green) allowing you to move a Control and view its assignments.
Move the cursor to highlight the different DESTINATION boxes, this will allow you to view the individual settings for each assignment. You would view the above screen as showing: The MW (Source) is assigned to three Destinations 1, 2 and 4 in this PART. “Destination 1” is written in blue indicating you are currently viewing its Curve, Polarity and Ratio settings. It is changing CUTOFF for the Elements selected (Element SW); highlight “Destination 2” to discover it is changing ELEM LEVEL for Element 4. And highlight “Destination 4” – it is also changing the Dry/Wet balance of the Tempo Cross Delay. The single gesture of moving the MW can be scaled so it addresses each parameter as much or as little as you might require. This aspect is important in customizing sound behavior; you can move the MW a certain distance and have that gesture make each of these assigned parameters change the exact amount you desire. Scaling the response of controllers to your playing/performing style is what your personal goal should include.
Hint: use the RATIO parameter to set the maximum depth… you can do so by moving the MW the distance you find comfortable for maximum, set the Ratio to match your expectation for that maximum. Use PARAM 1 to shift the weight of how the depth is applied. For example, currently shown is the “Standard” CURVE, the higher the value for “Param 1” the later in the movement of the MW the change is applied.
RIBBON – the Ribbon is responsible for increasing (to the right) and decreasing (to the left) Filter Resonance. The Resonance occurs at the Cutoff frequency of the filter, and it is that frequency that is louder (more pronounced) than all others. You see the Resonance as a “peak” or mountain in the filter graphic at the Cutoff Frequency. It indicates that this frequency is extended (louder) that all others at this moment. You understand resonance from your basic elementary school science – where every object has a resonant frequency – you place a glass that resonates at a particular frequency in front of a speaker – and when you match that frequency at the appropriate Amplitude, you can break the glass. Every room (unfortunately) has a frequency that seems to resonate (or is naturally louder than all others) – as a musician you try to avoid rooms with too much resonance (like gymnasiums). We often describe too much resonance as a “howl” – “…that one frequency was so much louder than the others, it absolutely was howling!” Microphone feedback is a runaway resonant peak. Always be careful with “resonances” they can be startling – just like a microphone feedback, they can get away from you and run wild… “a little dab will do ya…”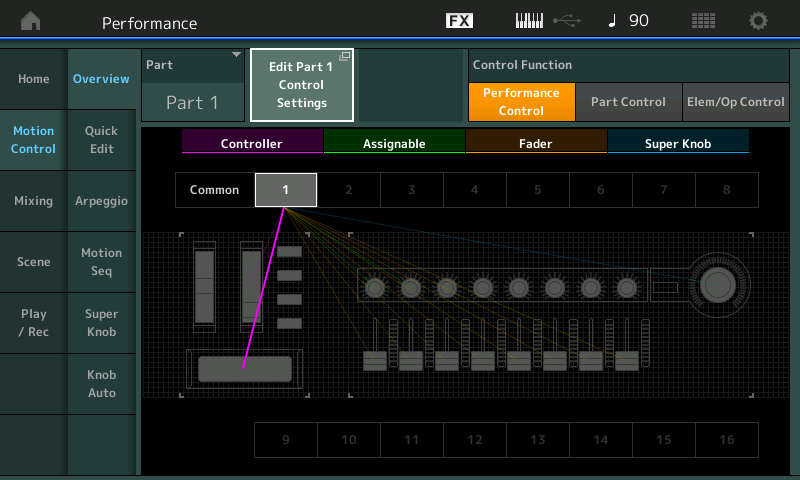
ASSIGN KNOB 1 – E.LFO PMD (Element LFO Pitch Modulation Depth) – when using AUTO SELECT to view the Assign Knobs remember the [ASSIGN] button must be lit to allow the Rotary Encoders to represent the ASSIGN KNOB function.
ASSIGN KNOB 2 – FEG Decay 1 (Filter Envelope Generator Decay 1) – here you are controlling the envelope, or shape, of the movement of the Filters. This parameter is assigned to all four Elements (Element SW is ON) – so this means that all the Filters (the 3 HPF and 1 LPF) are all affected by this setting.
Let take a look at one of the Element FilterEG: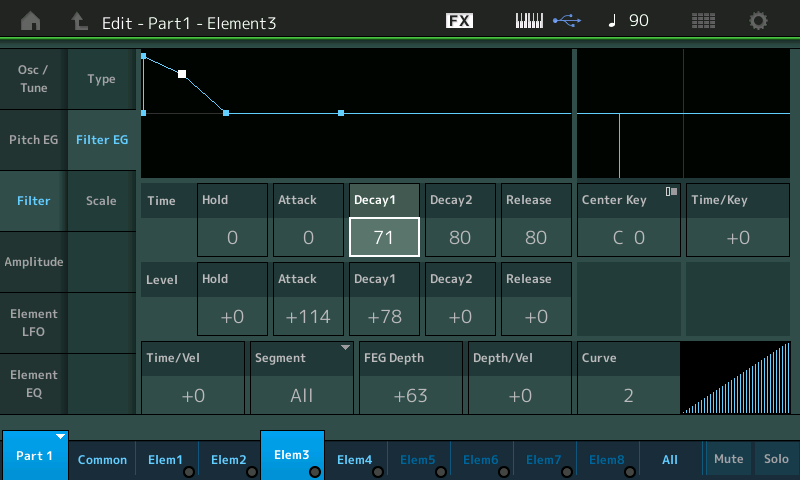
– Navigate to Element 3 and let’s SOLO it so we can hear exactly just what is happening.
– To SOLO an Element while in EDIT use the lower SOLO button (extreme right front panel) and press an ELEMENT Select 1-8 button (third row of buttons). Or alternatively, you can simply MUTE Elements 1, 2, and 4.
– Touch “Filter” > “Filter EG”.
– “FEG Decay 1” is set to 71 (shown above). As you move the highlight to this parameter notice the white square in the graphic moves to indiciate exactly where in the “Filter Envelope Decay 1” is currently. If you increase this towards 127 using the DATA DIAL – the filter movement will take a longer time to release the Low Frequencies. As you decrease it from 71, you will notice that the movement is much quicker. The programmer decided that the value 71 was the speed at which they wanted to initially have the filter movement take place. Reset the value to 71.
”Long HiPa” – the name now fully revealed: a long Filter Envelope moving a High Pass Filter.
This will also be the case for the HPF24D in both Elements 1 and 2, as well. Because the Assign Knob is set to control all Elements and their Filter Envelopes, together. This would be true even if the settings of the individual Element’s Filters were different Types – the Assign Knob works to OFFSET them all in a proportional manner.
When this parameter is assigned to a Controller (as it is to ASSIGN KNOB 2) moving Assign Knob 2, when the PART is “selected”, means you will be offsetting the “Filter Envelope Generator DECAY 1” parameter for each active Filter: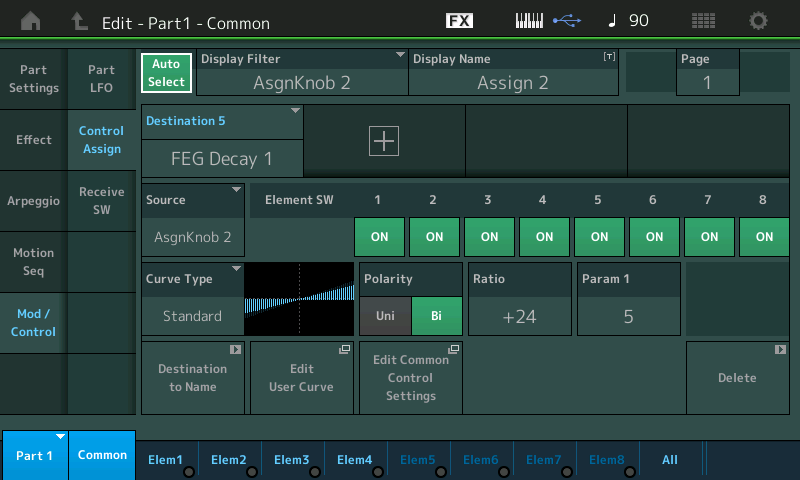
Above you can see that when viewing the ASSIGN KNOB 2 Control Set, you see each of the Element Switches is ON – meaning its Filter Envelope will respond to this change: Clockwise to increase time and counterclockwise to decrease the time.
To understand the use of POLARITY = BI – we know that this bipolarity allows us to work both above and below the initial stored value. So we know that the “FEG DECAY 1” was set to a value of 71 (done by ear, programmer’s choice for the starting point); now we know that the Assign Knob 2 at 12 o’clock posision will represent the stored value (71), and turning it clockwise will increase the time – exactly like raising the value for each of the Filter’s Decay 1 towards 127. And that turning the Assign Knob counterclockwise from the 12 o’clock position will be exactly like taking the 71 value for each of the Element Filters and reducing the Decay time.
Note: don’t place too much emphasis on the value as a number – it is just a number on a non-linear scale from 0-127. A Time value of 0 is immediate, and a Time value of 127 is a significantly longer time. It is not a linear scale and is to be set “by ear”.
Non-linear means the distance between any two integers is not always equal. The Time between 20 and 21 is not at all equal to the Time between value settings of 89 and 90. Music is best performed by ear and so is sound designing!
“High Wire“
“High Wire” is the name of the sound in PART 2 of the “Creepn Worm” Performance and is made with three Elements.
Using [CATEGORY SEARCH] let’s recall the original program as a Single Part Performance. Remember each Part is available in your MONTAGE as a separate Single Part Performance. By recalling it as a Single you can learn what the original programmer was interested in getting from this sound: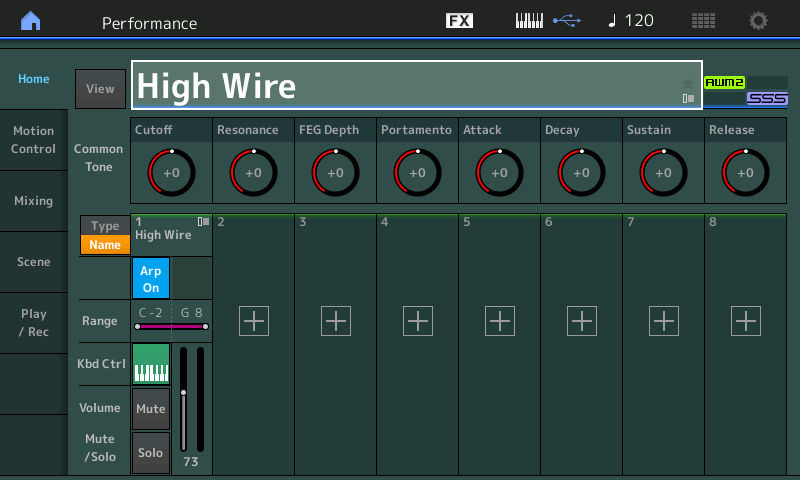
– Element 1 = Fat Saw St (AsSW1 Off).
– Element 2 = StrongDetuned Pad St (AsSW1 On).
– Element 3 = P5 SawDown 0 dg (AsSW2 On).
Each is assigned to only sound under specific conditions (according to the Element’s XA CONTROL setting). Element 1 will only sound when both Assign Switches are OFF. Element 2 will only sound when Assign Switch 1 is ON, and Element 3 will only sound when Assign Switch 2 is ON. This means you can have Element 2 and 3 both sounding when both Assign Switches are lit brightly: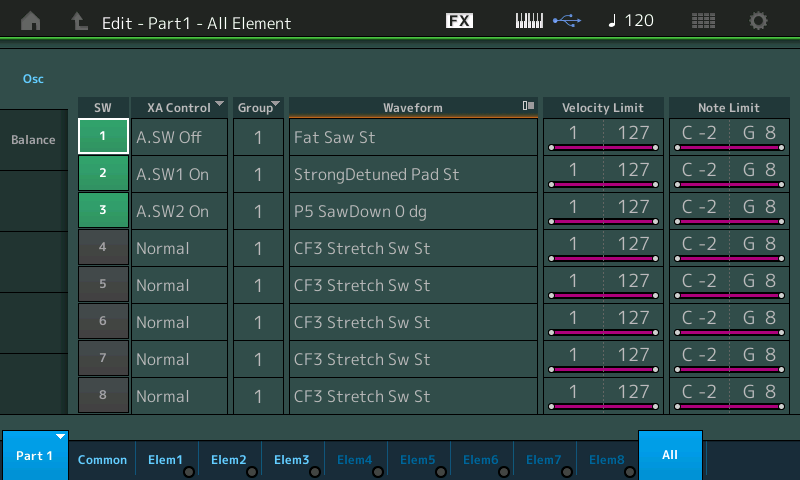
– From the HOME screen: Press [EDIT] > Press [PART SELECT 1] > touch “All” > touch “Osc”.
– Play while viewing the flashing Element activity indicators (Elem1, Elem2, and Elem3) along the bottom of the screen until you are clear about how XA CONTROL allocates Elements. Rather than just layering these three Elements, the original programmer’s idea was to provide tonal variation – a choice. An Element only uses polyphony when it is requested to sound: when it’s parameter requirements are met (XA Control, Velocity Limit and Note Limit).
The other important thing to know about XA CONTROL is that it is always “sonically invisible”: when an Element is activated or deactivated you will not hear any interruption or glitch in the sound. Although XA CONTROL is responsible for having a particular Element make sound or not make sound, it is a thoroughly musical control – unlike Element On/Off or even the [MUTE] buttons, which are NOT “sonically invisible”. An ON/OFF switch is immediate and therefore cuts off the sound. A MUTE similarly, disconnects audio. They interrupt musical flow. XA CONTROL does not!
Instead of using the [MUTE/SOLO] buttons to isolate Elements, use the ASSIGN SWITCHES. The Switches will determine which Element is sounding. If you use the SOLO button, you still must meet the requirement of the Assign Switches to activate an Element.
Let’s navigate to the PART 1 Element screens and look at the “Filter” > “Type” screen:
Element 1 – Dual Band Pass Filter: (AsSW Off)
When you initially recall this Single Part Performance, you are hearing just Element 1 alone. The Waveform is called “Fat Saw St”, well… your ears should be telling you that this sounds anything but “fat” – it sounds very filtered. Thin, in fact. You will not be surprised that Element 1 features some filtering. It has a Dual BPF (or “Dual Band Pass Filter”). A Band Pass Filter is one that filters both high frequencies and low frequencies and allows only a band of frequencies in the middle to pass. The “Dual” means you have two independent Cutoff Frequencies, each with its own “resonant peak”. The “Distance” parameter is used to separate the two peaks: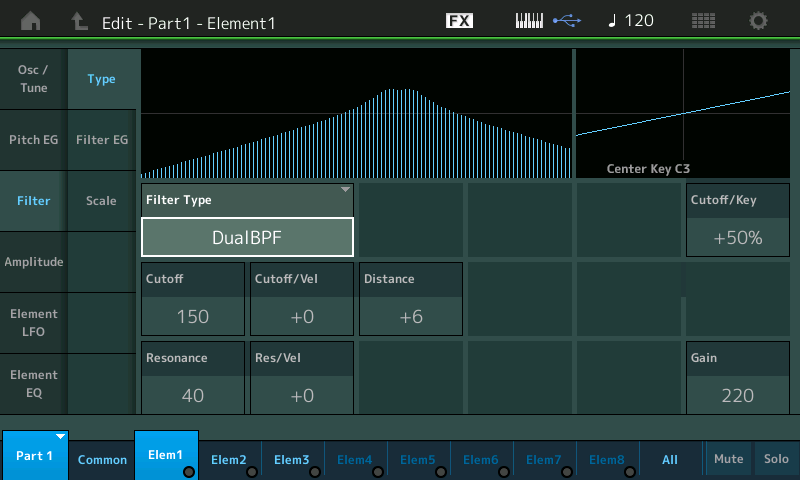
– Move the cursor to highlight the CUTOFF parameter (currently set to 150 on a scale of 0~255).
– Using the DATA DIAL raise and lower the CUTOFF Frequency while holding a chord. Observe the graphic.
– Change the DISTANCE between the Resonance peaks, then, again, move the CUTOFF up and down. You can hear the two distinct sweeps.
– Play-Listen-Learn: Play with it, Listen to the results, Learn by doing.
– If you press the [EDIT] button while in EDIT, you get the COMPARE function which will show you the original value for each item (in case you want to ‘put it back’ after experimenting). You cannot change any values while in COMPARE mode (the button will flash to indicate, it is read only) – you view the stored setting, disengage the EDIT/COMPARE feature, and then you return the value to its previous state.
Element 2 – Dual Band Elminate Filter: (AsSW1 On)
When [ASSIGN SW 1] is ON, Element 2 sounds. The Waveform is called “StrongDetuned Pad St” and features yet another Filter Type, the DUAL BEF (or “Dual Band Eliminate Filter”). A Band Eliminate Filter is one that filters two specific areas by reducing those band‘s Outputs. Like having two notches to remove frequencies in two separate areas of the spectrum. The “Dual“ means you have two independent notched Frequencies: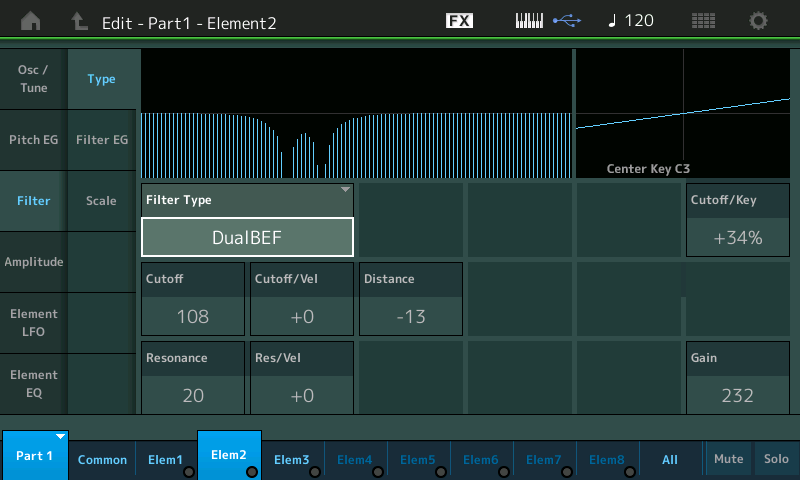
The Dual Band Eliminate Filter has two valleys and is in contrast to the Dual Band Pass Filter. The parameters are the same but the results are to remove two frequency bands. As the CUTOFF is varied you should hear the two valleys of frequencies eliminated. A lot of the filter movement in this sound is due to the Filter Envelope Generator (FEG) and there is a small amount of control also applied by the MW.
Element 3 – Low Pass Filter: (AsSW2 On)
When [ASSIGN SW 2] is ON, Element 3 sounds. The Waveform is called “P5 SawDown 0 dg” (a Prophet 5 Sawtooth wav, the ’down’ is the direction of the teeth, the zero degrees is the phase of the wave). Your ears should immediately recognize that the fullness of the initial sound probably means some type of LPF is being applied to this Element. And sure enough, it is a LPF24D. As we know, a Low Pass Filter allows lower frequencies to pass and initially blocks the higher harmonics: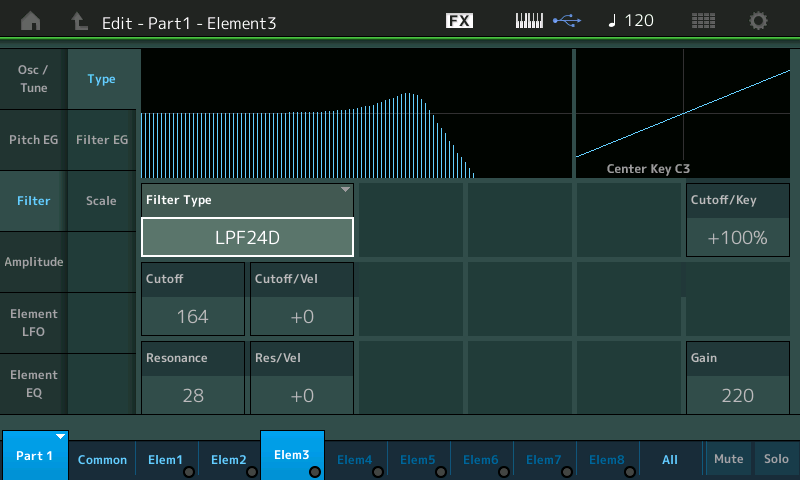
The more familiar LPF on Element 3. Apply your same experiments here – Move and observe CUTOFF. Raise and lower “Resonance” to understand what is meant by “resonant peak”. With a prominent peak showing move the CUTOFF up and down again with the DATA DIAL… listen.
The CUTOFF/KEY parameter is an offset that is centered around middle C and can attenuate the filter’s application. When Cutoff Key Scaling is at 0%, if the Resonance peak is boosting the frequency “A440”, then by the time you play up to the “A” at 880Hz, the signal will have died down by a cool -24dB (and will be hardly audible). If the Cutoff/Key is set to 100%, then as you go up the scale, the filters reduction of higher harmonics is offset.
When extreme high frequencies are “out of control”, you can shape the control with SCALING paramters – the CUTOFF/KEY is addressing the effectiveness of the filter across the keyboard scale.
Experiment with CUTOFF/VEL and RES/VEL. The higher the value the more Velocity will influence the result. This means as you raise this value, it will take MORE velocity to get the filter to open. You are moving the target farther away, so more effort is necessary. When no velocity is needed, it is easy to get the filter to behave. A positive value makes it harder (requiring more velocity) to achieve the result. (To some this is backwards, but it is not, it is how it works!)
Experiment and Learn
Select an Element situation using the Assign Switches, which via the Element’s XA CONTROL, determines which Element is sounding. On the Element’s “Filter Type” screen, play with the Cutoff, Resonance, Velocity and Scaling parameters to get a feel for what each of these three Filter Types can offer. The “TYPE” screen graphic represents Frequency spectrum on the x-axis (left-to-right), the shaded areas are the Frequencies allowed to passed through. The Amplitude or how loud the frequency is represented (up/Down) on the y-axis. The Resonance occurs at the Cutoff Frequency and is represented by peak at that point when increased. As you raise and lower the “Cutoff” value you are changing where along the frequency spectrum the filter starts to be active in its role of removing frequencies. Play with shapes, experiment with Cutoff and Velocity Sensitivity.
Play across the keyboard – get a sense of the Frequency (left-to-right) and Keyboard octaves (left-to-right). An acoustic piano can play fundamentals starting at the lowest “A”, A27.5 Hertz through to the highest “C”, C4186.01 Hertz. The graphic changes on your screen can better help you visualize what is happening to the sound. Play across the keyboard – make sure your eyes see what your ears are telling. For example, if you create two frequency peaks or two valleys, do you hear that as you play a scale up and down the keys? Start to relate a Frequency to the notes you are playing. Knowing what to listen for will help you when making your own decisions in sound designing. By having different Filter Types active with your sound, means you can create “Motion” by finding ways to move one sound into the other. Controllers and controller assignments should be seen as your personal interface with “performing” the sound.
Just FYI: the normal frequency response for humans is 20 Hertz to 20,000 Hertz… meaningyoucan hear about 2 1/2 octaves above the highest note on the piano (subtract high frequencies due to age, and how much loudness abuse you have subjected your ears to…)
Extra Credit: Fun stuff
Even before MONTAGE introduced us to the Motion Sequence in this engine, the XS/XF and MOXF had a special type of Arpeggio called the “Ctrl” Type, which instead of featuring Note data, they included only Controller data. In order to have an Arpeggio work that only has Controller parameters, you must apply it to a sound. In the normal Note Arps, your Direct Key press is not heard, it is used to “instruct” the phrase. A “Ctrl” Arp PART should be set so the KEY MODE = “Direct”: this allows you to hear what you trigger with Key-On while the controller data is applied to the sound.
Among the 10,231 Arpeggios are “Ctrl/Hbrd” Types (Controller/Hybrid) – fun stuff!
Let’s return to the “High Wire” [PERFORMANCE (HOME)] screen:
– Press [PART SELECT 1].
– Make sure the [ASSIGN] button just to the left of the SUPER KNOB is lit.
– Your screen should show the “Part 1 Assign” Knob icons: 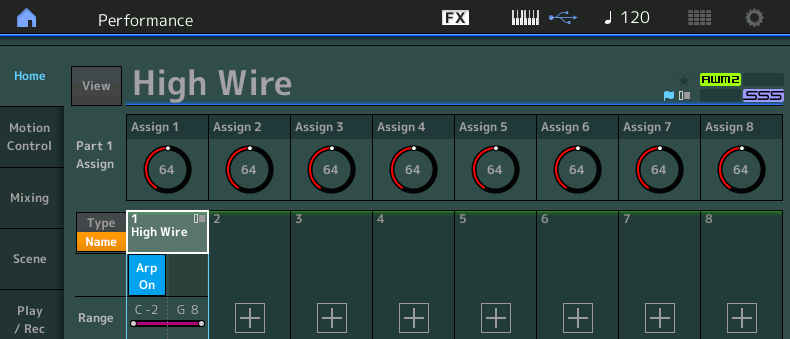
As you play notice that Assign 2 is in motion. It is following the “control” arp. It is applied only when you are triggering notes on the keyboard.
See below: These are the Arp Types assigned to this “High Wire” Part: You can use the [ARP SELECT] buttons to preview the movement types.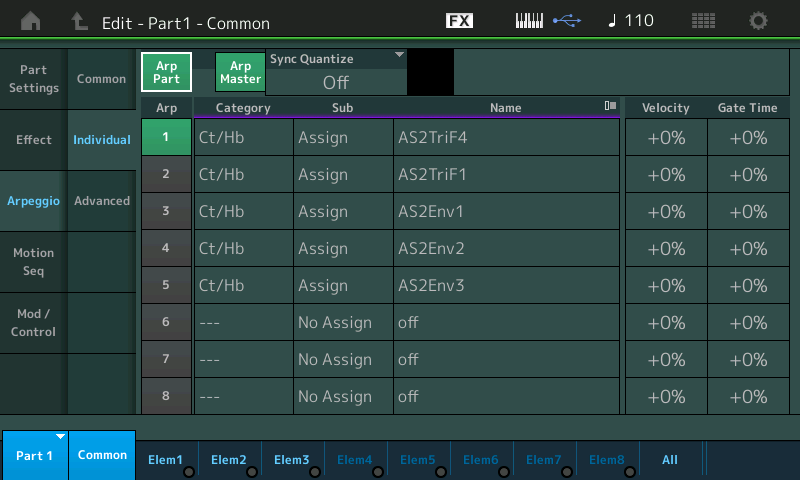
The “Category” is Ct/Hb or Controller/Hybrid type Arpeggios. These do not necessarily contain the normal Note data, and some are velocity-zoned so that only specific Elements will be triggered by the data.
“AS2TriF4” and “AS2TriF1” – move the Assign Knob from 0 through 127 via a Triangle Wave, so as soon as it reaches maximum, it starts back down 127 to 0. The F4 and F1 are fairly obvious: the speed control where F4 takes four times the amount of time as F1.
“AS2Env1-3” are different shapes of movement, thus the Env (envelope). These are different shapes to create shimmering and rhythmic effects.
What you apply them to is really a creative decision. You can choose to change almost any assignable parameter. The AS2 Knob defaults to sending cc18 – this is used to animate the movement of the knob so this is recordable to an external DAW.
On the “Arpeggio” > “Common” screen (shown below), the KEY MODE = Direct.
This allows the keys that you press to trigger the MONTAGE Tone Generator, directly; at the same time the ARP is apply a CONTROL message to move Assign Knob 2 in various ways: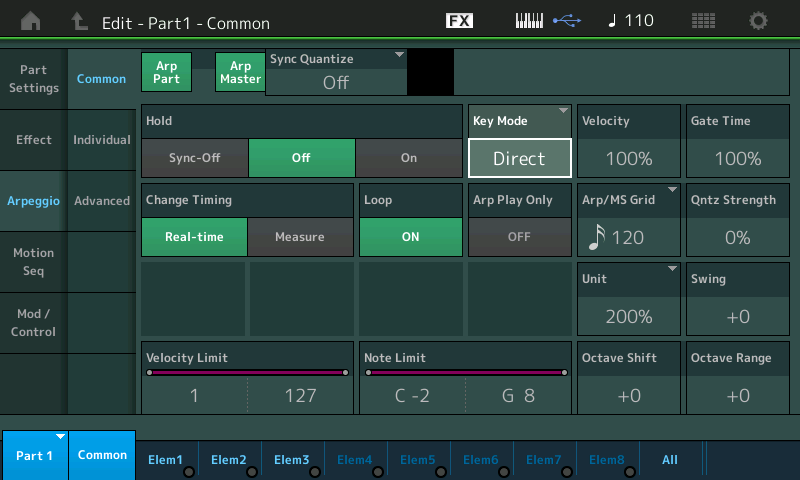
This is necessary for this type of ARP. Since there are no note-on events in the arpeggio data, you must provide the note-ons; the Controller data is then applied to the notes that you play. You can, hopefully, now begin to see the similarity between ARPS of this “Control” Type and what we now know in MONTAGE as Motion Sequences. Motion Sequences are Control messages that can automate movement of parameters – but with much more control over the details of that application.
In this Single Part Performance, the Arp is assigned to such a set of Control Type arpeggios. Ok, let’s have some fun:
– From the HOME screen.
– Press [PART SELECT 1].
– Make sure the [ASSIGN] button is light (this means the 8 Rotary Encoders will function as 8 Assign Knobs.
You should be able to see the “Part 1 Assign Knobs” in the screen just below the Performance Name “High Wire”.
If the master [ARP ON/OFF] and the Part Arp Switch are active, Assign Knob 2 should be in motion. It should do a smooth sweep from minimum (as soon as you ‘key’ a note) toward maximum, 0-127. As long as you hold down a key the motion will continue. You are hearing the keys you play “direct”, and the Assign Knob is applying a change to a parameter Destination.
Currently, the Assign Knob 2 is assigned to the VAR SEND (”Ensemble Detune”); the Arp phrase is increasing and decreasing the ‘send amount’ to this effect. This gives the sound a slowly varying pitch change.
press [EDIT] > lower [COMMON] > touch ”Mod/Control” > “Control Assign”
While viewing the Control Assign page let’s learn how you can go about changing an assignment:
– With “Auto Select” active, touch AssignKnob 2 to recall its assignment: VAR SEND.
– By touching VAR SEND in the Destination box, you recall a pop-in menu allowing you to see potential Destinations. These include parameters from the currently assigned Insertion Effects, Part parameters, and Element parameters: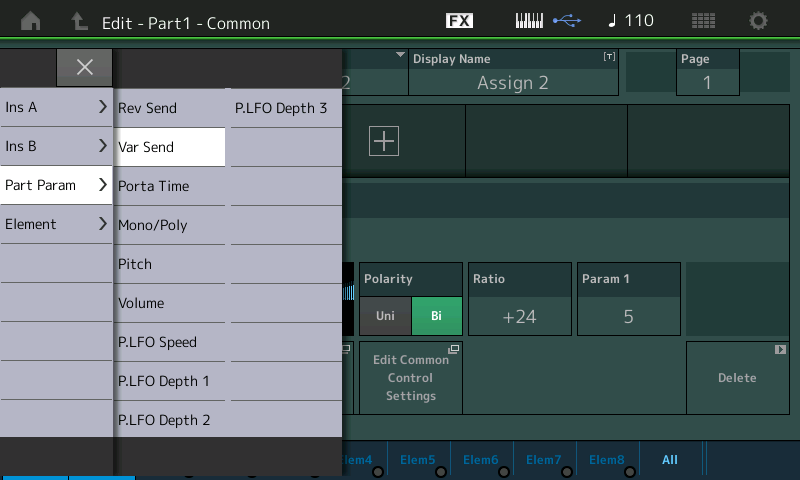
– Select a Destination – some will make more sense than others. For example, “Pitch” will, as you can imagine, sweep up and down, the tuning of the held notes.
– Play around with the “Ratio” and “Param 1”
– Then apply a different “Curve” to see just how far you can take this signal control.
Explore. You do not have to come up with anything inparticular in this kind of exploration. Often you are just looking to see what happens. The “Ratio” is going to affect how far a pitch variance you get. Sometimes “less is more”, especially with Pitch – intense movement in a small region can be just as, if not more, interesting than pushing everything to the maximum at all times. But it depends on if you are going for subtle madness or absolute maximum insanity… its a synth, go for it. Be sure to try both. There are no rules except those you set for yourself.
The “Curve” can be one of those doorways, that when you start down the hallway, you may be there for quite a while. I highly recommend you thoroughly explore the “Preset Curves” before you start making your own. Reason: get an idea of just how much you can bend and shape the movement of this Controller using the already made Curves. Each Curve can be shaped by the “Ratio” + “Param 1“ settings. “Param 1” weights the movement early or later, experiment with its influence on the Controller movement. If you come up with something interesting – please let us hear it!
Try “Part Param” > “Volume”.
Try “Element” > “Cutoff”, “Element Pan”, etc.
While experimenting, don’t forget to move the MW – it is also controlling those CUTOFF Frequency settings of each Filter.
Each [SCENE] button will recall a different ARPEGGIO and therefore a different AssignKnob 2 movement.
Extra Credit: Those who are more advanced with synthesis, you see that you can use this automated Arpeggio to change the Speed of an LFO that you have assigned to perform a task. Say you’ve assigned an LFO to modulate Amplitude at a fixed rate, you can use this Arp Control Type to speed up and slow down the application of that Modulation, or create unorthodox movement for speed change. Because the XS/XF/MOXF were based on just two physical Assign Knobs, you will only find Arp Types assigned to Control AsgnKnob 1 and 2. When you’re ready, you can create your own Control Arps.
“5th Atmosphere”
Part 3 of the “Creepn Worm” is a sound we have worked with before: “5th Atmosphere” – it was the “Pad” Sound in the conversion “Second Breakfast”. This program has the musical fifth tuned Elements, chosen as Part 3 of the “Creepn Worm”: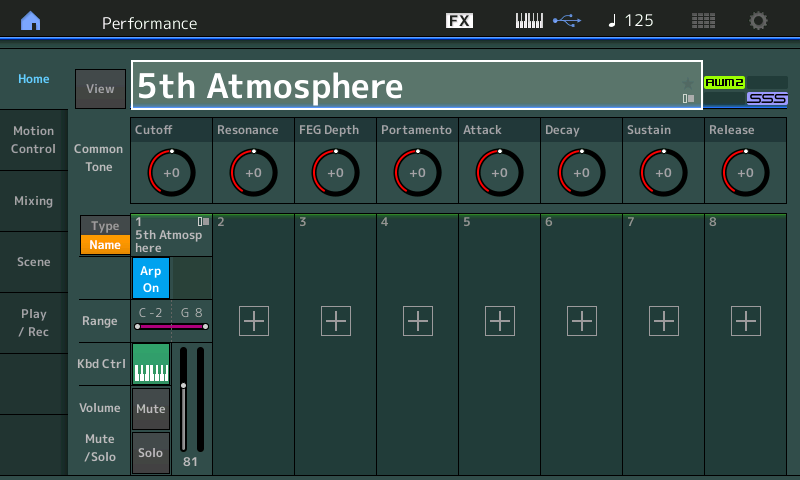
Rather than post the download .X7B MONTAGE CONNECT file this week, try *merging* these three Single Part Performances yourself – using your own imagination about what things you wish to bring out when they are merged in a Performance.
Methodology: Build your own Multi Part Performance
Recall “Long HiPa”, then touch “+” ADD, merge the “High Wire” PART to PART 2. Work on making these two work together… get creative. Remember what we’ve learned in previous articles in this series: use the ”Mod/Control” > “Receive Switch” to deactivate controllers you would rather not have working, if any. Blend these two sounds into something – see what you can come up with.
Later, if inspiration hits, go to PART 3 and “+” ADD, the “5th Atmosphere”. Have some fun while learning synthesis – it is what it is all about!
Be sure to download the new Version 2.00 on February 7th. To avoid any confusion and incompatibility, we will not include a download with this article. Use the Single PART Performances as found in the Factory Presets. Build your own PERFORMANCE – then after 2.00 comes out we’ll compare what you’ve come up with to the original! Enjoy! — Bad Mister.
Stay tuned for more from Bad Mister. And in the meantime, join the conversation about this lesson on the Forum here.
Keep Reading
© 2025 Yamaha Corporation of America and Yamaha Corporation. All rights reserved. Terms of Use | Privacy Policy | Contact Us