

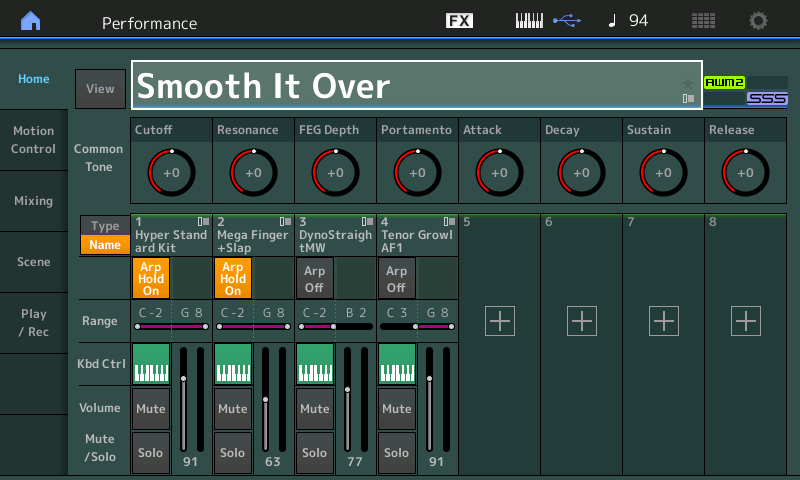
Part 1 – Hyper Standard Kit (Drums w/Arp Hold)
Part 2 – Mega Finger + Slap (Bass w/Arp Hold)
Part 3 – DynoStraightMW (left hand chords)
Part 4 – Tenor Growl AF1 (right hand lead)
Shown below are the two [PERFORMANCE (HOME)] screens – pressing the button toggles between the two screens.
“Smooth It Over” Performance on MONTAGE:
HOME = VIEW

HOME = MAIN
We will see a practical application of how parameter settings, once changed, remain in that changed state until new commands force it to change again. When this Performance is initially recalled, the [PERFORMANCE CONTROL] button is lit. This means that the right front panel is divided into four rows of eight buttons:
- PART SELECT 1-8
- PART MUTE 1-8
- MOTION SEQ SELECT 1-8
- ARP SELECT 1-8
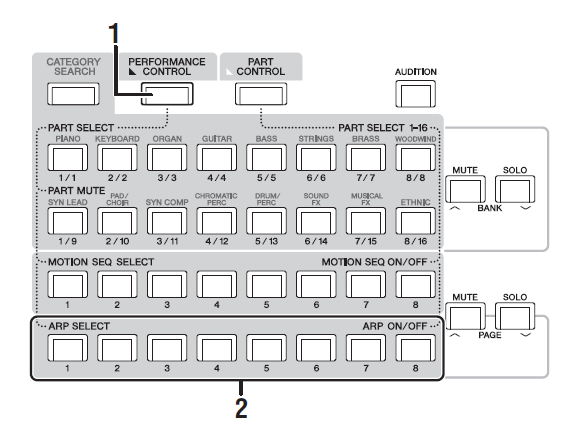
When [PERFORMANCE CONTROL] (1) is lit, you read the items as listed down the left side of the front panel buttons for their current function. Row 4, ARP SELECT 1-8 (2) recalls the assigned Arpeggio phrases. If no phrase is assigned the ARP function will simply STOP.
Let’s play with this PERFORMANCE as it is and discover a couple of things. You can see that the “Tenor Growl AF1” (PART 4) is in the right hand, while you can trigger chords below middle “C” on a Rhodes sound. You can use the first five [ARP SELECT 1] – [ARP SELECT 5] buttons on the right front panel to move to different musical sections. These represent different ‘sections’ of a musical composition. ARP 4 is clearly a break, and ARP 5 is a fill-in, for example.
We can control the overall Drum Kit PART Volume using FADER 1 when we are on common ground – meaning the upper [COMMON] button is lit. But we can use the FADERS to control individual levels of the prinicipal Drum Kit sound (BD, SD, HHc, HHp, HHo, etc) by going to the PERFORMANCE (HOME) > “View” screen and selecting PART 1 (as shown below):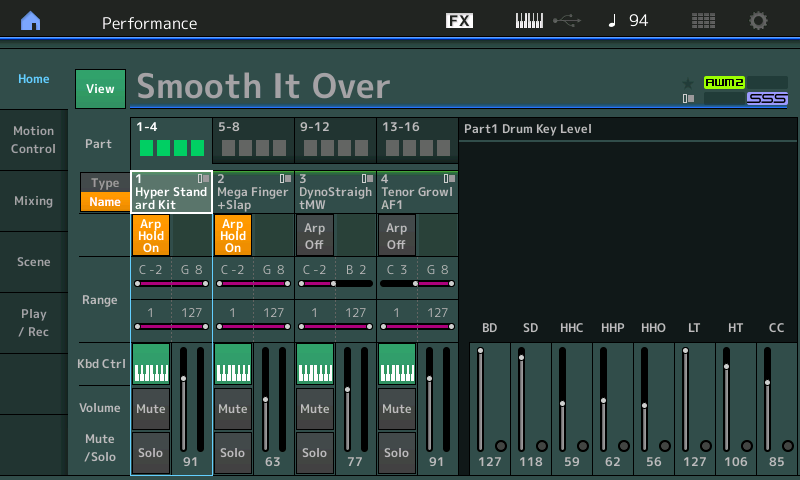
You can adjust the principal Drums using the FADERS as long as they are assigned to the following KEY Mapping:
- BD (Bass Drum) = C1;
- SD (Snare Drum) = D1;
- HHC (High hatclosed) = F#1;
- HHP (High hat pedal) = G#1;
- HHO (High hat open = A#1
You may notice that certain Arp phrases do not use the prinicipal Drum Key assignments. In this example, the phrase does not use the Snare (SD) controlled by the FADER (D1). You can either use the ELEMENT EXCHANGE function to swap KEY assignments, placing the SD you want on D1, or, you can try the FIXED SD/BD function – which substitutes C1 and D1 for Kick and Snare:*
- Go to [EDIT] > [PART SELECT 1] > Lower [COMMON] > “Arpeggio” > “Advanced”
- Activate the “Fixed SD/BD”:
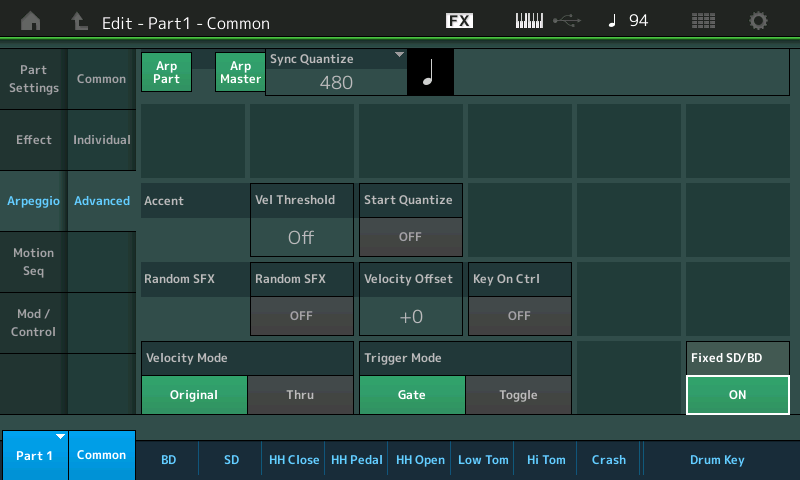
This will allow you to use the BD/SD and HH levels. Adjust the balance of Bass Drum, Snare Drum and HHC/HHP/HHO that works for your taste. You can choose to use any KICK and SNARE you prefer… remember once you identify which NOTE number is playing a particular sound you can swap it with the principal KYES: C1 and D1, then using this “FIXED SD/BD” function you will have control over those drums via the Faders.
You will notice that Drums and the Bass Arps have some groove quantize happening. Adjusting the Clock parameter for swing can make a huge difference to how an arp phrase “feels”. Just playing along with this Performance you get a sense of this feel… now, lets take closer look. To do so, let’s go the [PERFORMANCE (HOME)] Main screen, then:
- Press the [PART SELECT 1] button
- Press the [ARP/MS] button on the left front panel so we can view the 8 Rotary Encoder assignments in the screen (PART 1 ARP/MS):
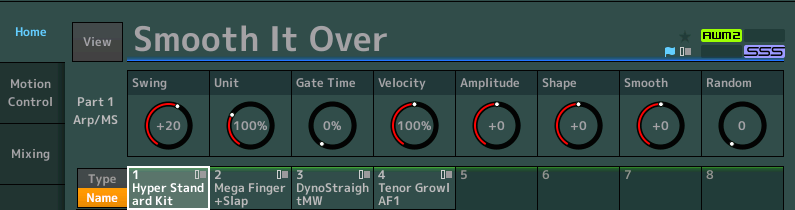
- SWING = +20
- UNIT MULTIPLY = 100%
- GATE TIME = 0%*
- VELOCITY = 100%
The first four offset parameters affect the arp timing:
1) The SWING = +20 gives this particular drum groove a little bit of attitude. Swing is a real time quantize grid that offsets the position of the offbeats. A positive value delays the even numbered counts. SOLO the Drums (You do so by pressing the upper [SOLO] button on the right front panel.
2) UNIT (MULTIPLY) changes how the Arp phrase references the current Tempo. 100% means the phrase plays at normal tempo; while a setting of 50% would cause the phrase to complete in half of the time (musicians refer to this as “double time”), and a setting of 200% would take twice as long to play the same phrase (cut time)… and so on. Please notice changing this time reference can easily cause the phrase to become badly out of sync with the downbeat. This is why this parameter is ideally changed by storing the exact setting in a “snapshot” by storing the reference to a Scene; allowing the change to occur instantaneously.
3) *GATE TIME on Drum Kits will only apply to Drum Elements that are set to “Receive Note-Off.” Drums sounds typically are set to ignore Note-Off, so you do not have to hold the key down for it to complete its envelope.
4) VELOCITY allows you to offset the original phrase velocity. When triggering principal drum kit instruments, you can switch between samples stacked on a particular Key. And while Velocity is akin to Volume, we’ll discover just how they are differently interpreted by our ear/brain. Each Part can have its own Arp Play FX offsets.
Select PART 2 and view the Bass PART: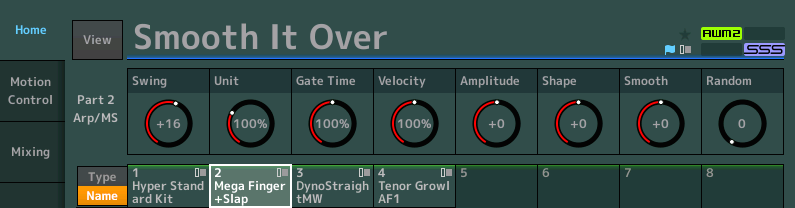
Swing = +16
“Swing”, is altering the timing of the offbeats. In a situation when a mega program and mega Arp phrase data are paired, the “offsets” to timing are best heard in the ghost notes and articulations. Feel is all about subtlety.
Here the “Gate Time” parameter is applied to a normal (non-drum kit) sound and works this way: to keep the original note duration, as originally played, set it to 100%, and either lengthen or shorten the note duration by increasing or decreasing this setting, respectively. Very useful in applying “attitude” to a bass line. The Bass Part (“Mega Finger + Slap”) and the Arp are designated “Mega” – these Mega instruments are constructed with as many as 8 Velocity Zones, each being a different bass articulation. The so-called “Mega” Arp Phrases are specifically created to use the corresponding “Mega” program – allowing thumb slaps, muted notes, finger noises, etc. precisely triggered by the Arp phrase. Adjusting the Velocity up or down you can create some very interesting variations. You will not know until you try!
Arps and Scenes
You can recall an Arp directly using the dedicated right front panel [ARP SELECT 1-8] buttons. Additionally, the currently selected ARP can be associated with any of the blue SCENE buttons. In fact, you can link a specific ARP and any Motion Sequence to a particular SCENE (we’ll take a look at that in another article), you can mix and match them as you desire. This was originally a Motif XF Performance with five associated Arp phrases and just five Scene snapshots. Let’s take a look at how these five ARPS are linked to the SCENE buttons:
- From the [(HOME)] screen:
- Touch “Scene” to recall the Scene Memory screen:
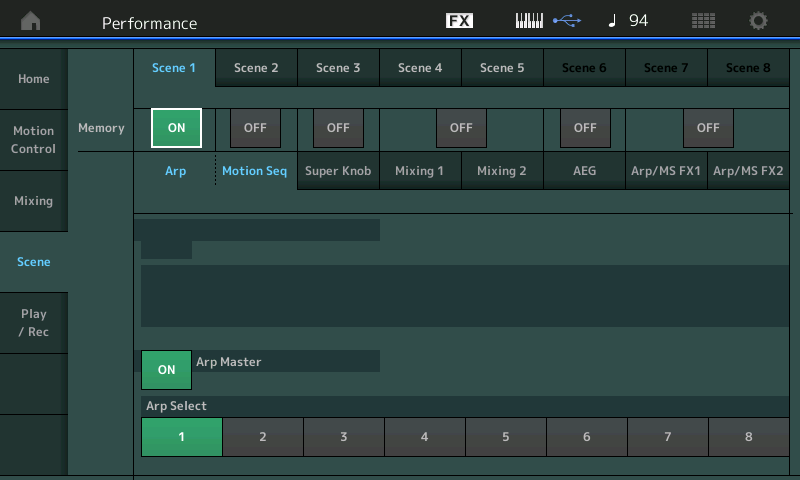
Screen translation: In this PERFORMANCE there are five Scenes (out of eight possible Scenes). “Scene 1”, highlighted in blue, is currently selected – from the top line we can see that Scenes 2, 3, 4 and 5 also contain data. Scene 6, 7 and 8 are currently not used (greyed out).
On the MEMORY ON/OFF line, you can see that the “Arp” Memory Switch is ON. But although it could be shown here, the “Motion Seq” Memory Switch is OFF. (This particular Performance has no Motion Sequences – Arps and Motion Seqs appear together so you can mix and match any Arp and any Motion Seq in the same Scene). Only when the Arp Memory Switch is activated does it cause a change – in other words, if no particular Arp Select number is memorized, the currently playing phrase will continue; meaning that the phrase current selection will remain playing and we can apply other changes to that phrase.
At the bottom: The ARP MASTER is ON and “ARP SELECT 1” is linked with SCENE 1.
None of the other Memory switches (Motion Seq, Super Knob, Mixing1-Mixing2, AEG, or ARP/MS FX1-FX2) are active. So only the fact that “ARP SELECT 1” should be recalled in SCENE 1.
If you were to select SCENE 2, you would discover that what is different about SCENE 2 is that ARP SELECT 2 is associated with SCENE 2.
If you were to select SCENE 3, you would discover that what is different about SCENE 3 is that ARP SELECT 3 is associate with SCENE 3, and so on.
What we will learn next is how you can creatively use SCENE memory to recall different situations. Here they are only recalling an Arp Select number.
What’s in a Scene:
Memory Switches when ON (green) means that you can memorize (take a snapshot) of the current condition of the parameter position for recall with the particular SCENE:
- ARP SELECT / MOTION SEQ SELECT can be independently set to On, but are treated together allowing you to link any Arp phrase with any Motion Sequence. This can be seen as a way to have a noted phrase (Arp) treated with particular controller movement. Imagine a guitar Arp phrase that in one Scene plays straight, and in the next Scene has a Motion Seq applied to it that sends it flying around the stereo field.
- SUPER KNOB position is recallable. The Super Knob can be responsisble for a myriad of parameter changes… from Filters, to what sound is active, to changes in EQ, Effects, orchestra size, etc., etc., etc., etc. (In future articles, we will deep dive into this area).
- LINK (Super Knob) you can store which Assign Knobs are currently “linked” to the Super Knob
- MIXING 1 memorizes your “Rev Send”, “Var Send”, “Dry Level” and “Pan” position. Amazing effect transitions can be recalled instantly
- MIXING 2 memorizes your Filter Offsets for “Cutoff”/”Resonance”, “FEG Depth”, and “Mute” status. Instrument and sonic conditions can be instantly recalled
- KBD CTRL you can store which Part(s) are active from the Keyboard — allows to to change which KBD CTRL Parts without cutting off the sound (seamless transition)
- AEG – is Attack-Decay-Sustain-Release Offsets to the Amplitude Envelope Generator for the PART
- ARP/MS FX 1 – Swing*, “Unit Multiply*, “Gate Time” and “Velocity“ offsets that affect Arp Phrases.
- ARP/MS FX 2 – Amplitude, Shaper, Smooth, Random. Offsets applied to Motion Sequences.
*Swing and Unit Multiply are functions of the Clock functions; Gate Time applies to the Envelope of non-drum arpeggiated sounds and Velocity applies to the note-on strength of the arpeggiated notes. The Amplitude, Shaper, Smooth and Random parameters apply only to Motion Sequences: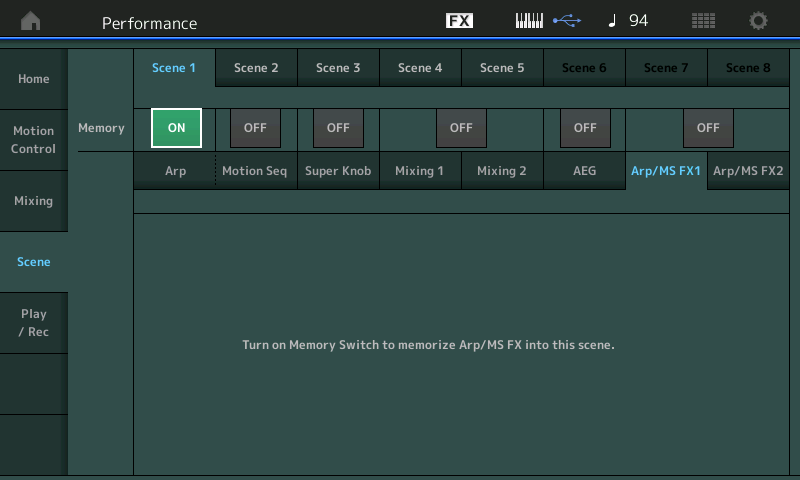
Above, I have tapped “ARP/MS FX1”. Let’s turn ON the Memory Switch to add these Arp Play FX parameters to SCENE 1: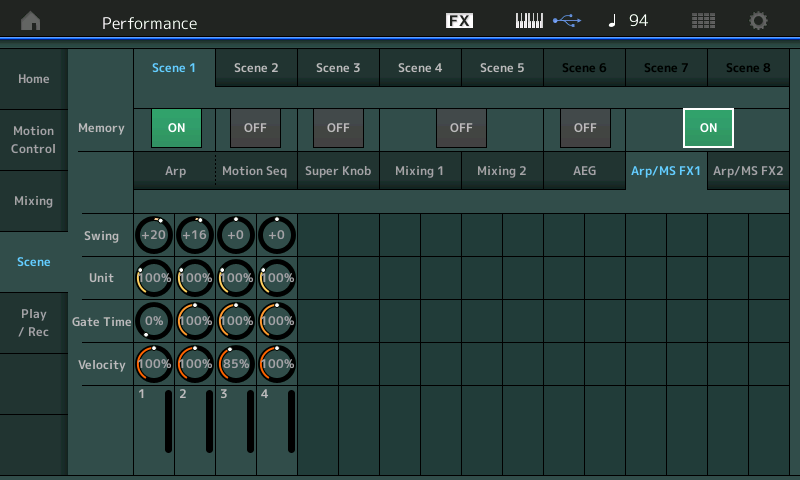
The Settings shown are now memorized into SCENE 1. Nothing more need be done – these settings are now apart of the SCENE 1
Before we begin adding more Scenes, we need to state one of the things you need to know that will affect what you do: MIDI settings persist.
What that means is, if you change the value of a MIDI setting, like Volume, Pan, Filter Cutoff, etc., it will remain at the new value until it gets another command to change it again. The last setting you make remains, until a Controller Reset is sent, or a new value is sent for that parameter.
We can make use of that fact when working with Scenes. In playing with the five currently stored SCENEs you can conclude that:
- SCENE 1 could represent the Main groove
- SCENE 2 would be the “B” Section or Chorus groove
- SCENE 3 would function as the “C” Section or Vamp
- SCENE 4 = a Break
- SCENE 5 = a Fill-in
You can name about thousand songs that use just 3 main sections, a break and a fill-in. With SCENEs 6-8 I want to establish several different intensities and feels for the exisiting five sections. Instead of using them to create a “musical section”, we are going to use the three Scenes to create changes to the “feel and attitude” of whatever Arp phrase happens to be playing.
Here’s how to activate SCENE 6:
- Press the blue button for [SCENE 6]
- There is currently absolutely nothing memorized in SCENE 6 (all Memory Switches are OFF) – and all I want to add is the “ARP/MS FX1” functions… to do so turn the MEMORY switch above “ARP/MS FX1” = ON:
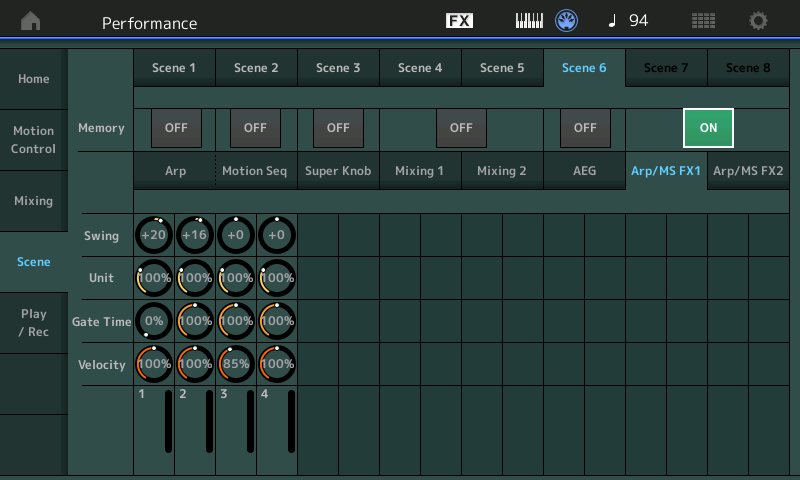
- Currently, this will be the only thing that is active in SCENE 6. Significantly, the SCENE is NOT associated with a specific ARP number, which means we can use this SCENE to simply apply changes to how the current ARP phrase feels using the “Play Effects” parameters (Velocity, Gate Time, Unit Multiply and Swing).
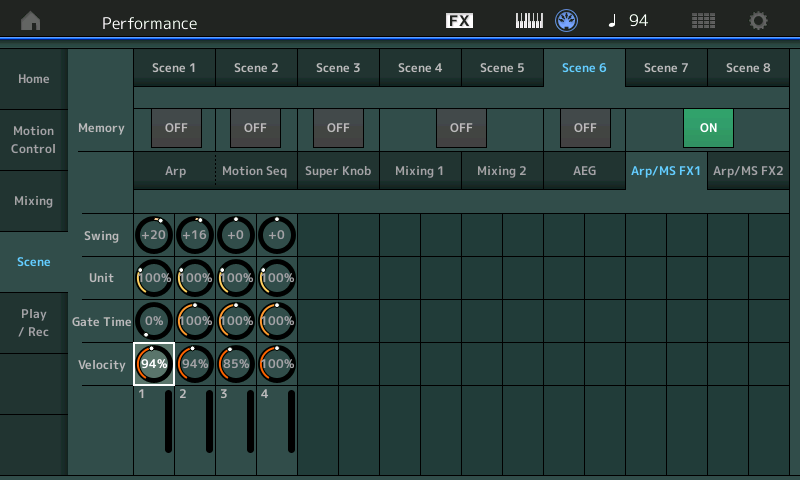
- Touch the “Velocity” setting for PART 1 and using the DATA DIAL, turn it down so that it starts to trigger the less intense snare (this Kit features a 4-way Velocity switching Snare Drum) – when you reach a value of 94%, you will hear the third of four different snare drums samples stacked on KEY.
- Lower the Bass in PART 2 to 94% as well:
- Next, activate SCENE 7
- Again, initially there is absolutely nothing stored in this SCENE as yet. Turn the “ARP/MS FX1” switch = ON
- Lower the “Velocity” until you reach the 2nd of the four snare samples stacked at about 77%
- Lower the Bass in PART 2 to 77% as well. Try changing the GATE TIME on the bass; values below 100% will shorten the notes and change the feel of the bass line. I’ve reduced the Gate Time of the Bass in Part to 88%:

- Next, activate SCENE 8
- Again an empty SCENE. Turn the “ARP/MS FX1 Switch = ON
- Again, lower the “Velocity” of PART 1 until you get to about 55%.
- Lower the Bass in PART 2 to 55%, as well.
Since all that we have stored in Scenes 6, 7 and 8 is the change in Drum Kit and Bass Arp “Velocity” and “Gate Time,” we can now apply these different intensities to any of the five original Scenes.
Start with SCENE 1, play by triggering a left hand chord:
- You get the #4 (hard) snare
- Press [SCENE 6], the same groove plays with Velocity reduced
- Press [SCENE 7], the same groove plays with the Velocity further reduced – and the bass notes shortened
- Press [SCENE 8], the same groove plays with the Velocity further reduced – and the bass notes shortened
Because we did not activate a specific ARP SELECT button with any of our additions, our Velocity reduction will apply to any subsequent selections. So once you hit Scene 6, your groove will play with snare #3; if you go to Scene 2, Scene 2 will play with snare #3. It will remain at snare #3 in all Scenes 2, 3, 4 and 5, because MIDI commands persist, so the Velocity value will reamin where it was last set… until you select a SCENE that specifically tells it to change. If, for example, you select [SCENE 1], you are back to the most intense groove – with the #4 snare.
So at any time while performing you can bring the band down. Yes, you could do much of this by changing the channel VOLUME level (which can be memorized in SCENEs under the MIXING1/2 Memory Switch), but as you can hear/feel, Velocity changes the snare hit, which gives a more dramatic change in the feel. Velocity does affect volume, but by switching to a different snare drum hit, you get more of a feel of a real drummer on a kit.
Experiment and see what you can come up with – controlling the backing band’s “groove” in this manner is often more useful than trying to come up with a completely different SECTION. You can experiment with the SWING – positive (+) values delay the even numbered beats (you detect it most in the Hihats).
ARP “Easter Egg” – Chord Voicings
One of the things that separates the ARPEGGIATOR engine that Yamaha has implemented in the synthesizers (MONTAGE, Motif XF/XS, MOXF) is the lack of adhering to any strict set of rules about chord voicing that universally applies. In many keyboards where chord recognition is used you must follow specific chord voicing rules in order for the ‘tech’ to know what you intend. For those new to chord recognition we’ll mention that there is no perfect system for all chords to be recognized by a computer chip. In the very elementary modules they work where you must include the lowest note for the Bass phrase to play properly – meaning it recognizes the ROOT note and builds the chord from that position. It can recognize some (but not all) chord inversions. This typically works because the direct notes used to trigger the chord intelligence are not heard. But in this instance we are going to hear the chord on the electric piano sound and control the bass phrase recognition of key.
For example, Dminor7 (D-F-A-C) can easily be recognized in any inversion, except when the flat 3rd (F) is in the bass. When the flat 3rd is in the bass (F – A – C – D) the technology has to see this as an F6 chord.
It is because of this (musical theory) conundrum, only certain specific chord voicings can be used in “chord intelligent” systems relying on real time input from just the keys. Therefore, when using the chord intelligent Arpeggio phrases, you must experiment to determine what is going to happen. Not all Arp phrases behave the same way. When a genre or style of music suggests that certain type of chords are commonplace, you may find that a phrase has a hidden gem or two – you have to play with an arp to understand how you can use it. You may find this less disciplined that the typical Arranger STYLE System where the chord rule strive for consistency – the synth is flexible.
Playing with this PERFORMANCE you have a drummer, and a bass under arp control, the electric piano is “live’ in the left end of the keyboard, therefore you can voice any chord you like and it will sound, directly. Notice the “bass player” (arp) must recognize what you are playing and choose a note or series of notes from the chord you are voicing – it then uses that data to control the generated bass phrase. Bass phrases that contain the 3rd, 5th and 7th will have the bass line adjust based on the chord quality you voice. In SCENE 2 (ARP 2) the phrase includes a 7th – whether it plays the major 7 or the flat 7 will be defined by the chord you play. If you only provide a single note in the left hand, the bass will only play the root.
You do not always have to have the root note as the lowest note.
If you play a C major triad, in any inversion, the ‘bass player’ (arp) will recognize you want the bass line rooted in C.
If you play a C minor triad, in any inversion, it recognizes and adjusts the bass phrase
If you play a Cmajor7 (four notes) you will find any inversion will work.
But again the minor7 will not work with the b3rd in the bass – the conundrum.
Because very few songs ever use the Major7b5 chord quality in this particular genre/style, this chord voicing triggers an entirely different (but not completely unexpected) result. For example, if you play EbMajor7b5 voiced: Eb – A – D the technology here will see this as you voicing an F7/6 or F13. Now jazz players will immediately see this as a hip voicing for the 13th (7th on the bottom, followed by 3rd, and the 6th on the top). You can also voice the 13th as F6/7, 6 on the bottom and 7 on the top: D – A – Eb would be result in the root “F”. So even though you are not hitting an “F” at all, the ‘bass player’ will play an F as the root. If you ever played with a bass player, doing funk, jazz or disco, there is nothing more they hate than a keyboard player stepping on the root all of the time. You can play this in any inversion and the tech will see it as an “F”.
We should mention again, this is not universal – so do not expect every Arpeggio phrase to behave in this manner. This is a “hidden” feature or exception – depending on how you look at it. How will you know when an Arp Phrase behaves this way? You must explore and discover it. (This is what we mean when we say the rules are not as strict as they might be in some chord intelligent systems).
Notice that the Velocity value changes immediately when the SCENE is changed but the ARP Phrases always start at the top of the ‘next’ measure (following Change Timing = Measure setting for the ARP).
Summary:
As you can see, you can choose to use a SCENE in other ways. They do not always have to be linked to a specific Arp, instead you can choose exactly which parameters are memorized. Just because there are 8 SCENE buttons does not mean you have to have 8 Sections in your song. Thinking outside of the box, learn to use the Scene Memory Switches to surgically apply just the changes you desire. When you consider that Super Knob position is a function that can be memorized and recalled, you can let you imagination roam. If you are new to “snapshot” memory, it is called this because it freezes the parameter settings much like a photograph documents a scene. When you understand the type of memory it is, you can appreciate what types of things can be captured and recalled. It does not memorize everything, but can be used very effectively as mixing and remixing tool when performing “live”.
This type of snapshot memory was used in recording studio consoles as an important part of mix automation. It was developed as a sort of “program change” for your mixer settings. Implemented here in the synthesizer engine, the concept includes offsets to specific synth settings. Scenes can bring (morph) in your A/D Input PART, which could be your vocal mic, triggering the Vocoder, or could be control of an external synth you are processing in the MONTAGE’s Motion Control Synthesis Engine.
The Download Data
The Download data below are the edits discussed above with “Smooth It Over” as a Quartet. Next time we’ll take a look at adding additional PARTs.
PART 4: “Tenor Dynamic AF1” has been substituted for the original “Tenor Growl AF1”.
Pressing [AsSw1] will ‘latch’ the Saxophone in mono play mode.
Pressing [AsSw2] ‘momentary’ will darken the Sax timbre via the FEG Depth
The Ribbon (reset) will control the balance of the Tempo Cross Delay on the Saxophone.
PART 3: “Dyno Straight MW” is a late model Fender Rhodes for left chording direct (also controls the chord intelligence for the Bass arp phrase). The Sustain pedal will work to hold the Chord and the Chord Intelligence.
So test it out! And if you have questions or comments, join the conversation on the Forum here.
And there are a variety of other Performances that have undergone MONTAGification – so check out the list and access to them here.
Download files here:
Smooth_It_Over_4.X7B