

Tagged Under
The video below is a great accompaniment to this article. Check it out:
In the last article (Cubase Setup Guide Workflow: Audio REC on DAW) we introduced you to the basic Cubase configuration and we learned to follow the routing from the MONTAGE PART (OUTPUT) to the Cubase VST CONNECTIONS > INPUT, and finally assigned that INPUT to an Audio Track. This time we will begin with more details on the MONTAGE OUTPUT assignment side of things and discuss MULTI PART PERFORMANCES.
In our first installment we saw that the QUICK SETUP #3: “Audio REC on DAW” template mapped out PARTS 1-16 so that all thirty-two Outputs are in use. You may never actually use them all at once, but they are mapped this way in the default template. In a situation where you are building a multiple part composition in your DAW, where you are using the MONTAGE as your principal multi-timbral tone engine, you may have different instruments in each PART of your PERFORMANCE. Let’s recall such a PERFORMANCE and take a look at the impact that the template has when applied.
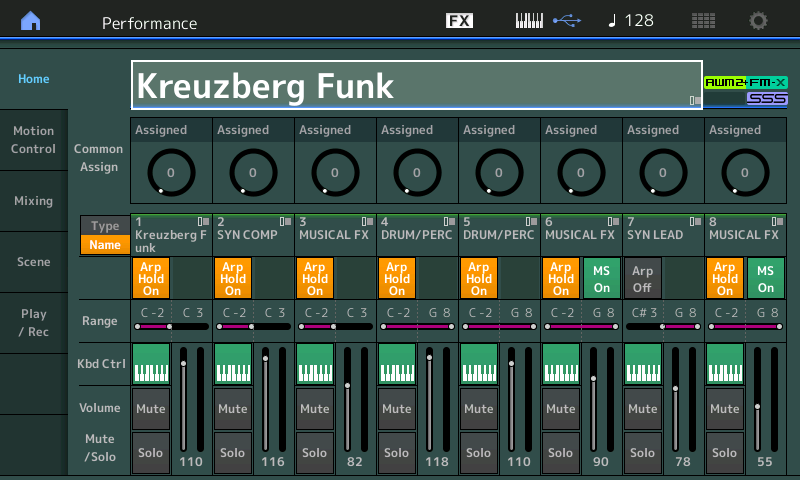
This 8 PART Performance is using 7 Arpeggios, which you control with the left side of a split keyboard. The Lead Synth is mapped C#3 ~ G8 for right hand play. Notes C3 and below will control the arpeggio backing… The Super Knob and MW are in play. The 8 [SCENE] buttons switch both Motion Sequences and Arpeggio Patterns making for different musical Sections. If you don’t know what to do (in terms of “playing” this, simply press the [AUDITION] button to observe what happens with the SCENES and the Super Knob, et al). You can still use the [MUTE] and [SOLO] functions to hear what each PART is contributing
PART 1 – Electronic Line _ Main L&R
PART 2 – Bass _ USB 1&2
PART 3 – Musical FX _ USB 3&4 (only present in Scene #5)
PART 4 – Drums _ USB 5&6
PART 5 – Percussion _ USB 7&8
PART 6 – pitched Musical FX _ USB 9&10 (only present in Scene #4)
PART 7 – Synth Lead _ USB 11&12
PART 8 – noise FX _ USB 13&14 (only present in Scene #4)
When the Quick Setup #3 Audio REC on DAW template is applied with this PERFORMANCE each instrument is bused to its own discreet Output, initially. This may or may not be what you want to do, but we just want you to see how these PARTS are routed:
within each PART you can see the assignment on the “Part Settings” > “General” screen:
From HOME
Press [EDIT]
Press [PART SELECT 1]
Press the lower [COMMON] button or touch “Common” in the lower left of the screen
Touch “Part Settings” > “General”
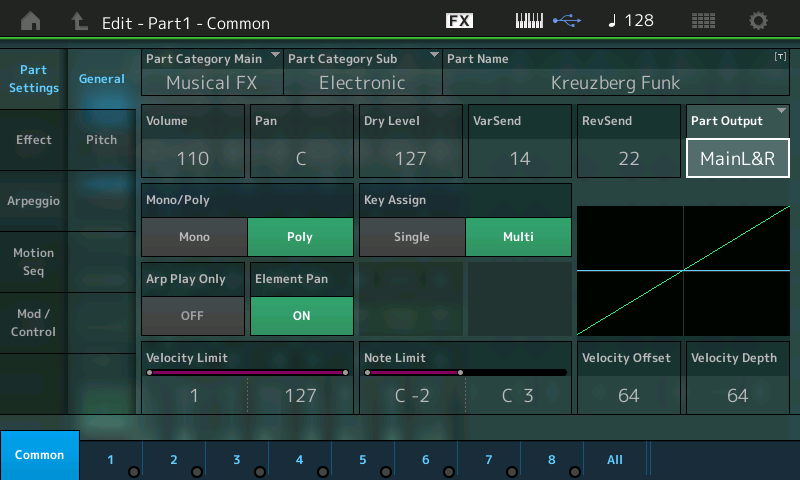
The fact that PART 1 is the only one going through the MAIN L&R Output means it is the only one that is taking advantage of the REVERB and VARIATION Effects, in this default setup. You may wish to change this; again, this is a production decision that needs to be considered.
The OUTPUT assignment for any of the PARTs can also be seen when you navigate to “Effect” > “Routing”.
The Synth Comp sound in PART 2 is functioning as the Bass line sound for this Performance – you can see that PART 2 is assigned to USB1&2 (as per the template)

PART 3 happens to be an FM-X sound effect. It, too, will be routed to a discreet Output on its “Part Settings” > “General” screen:
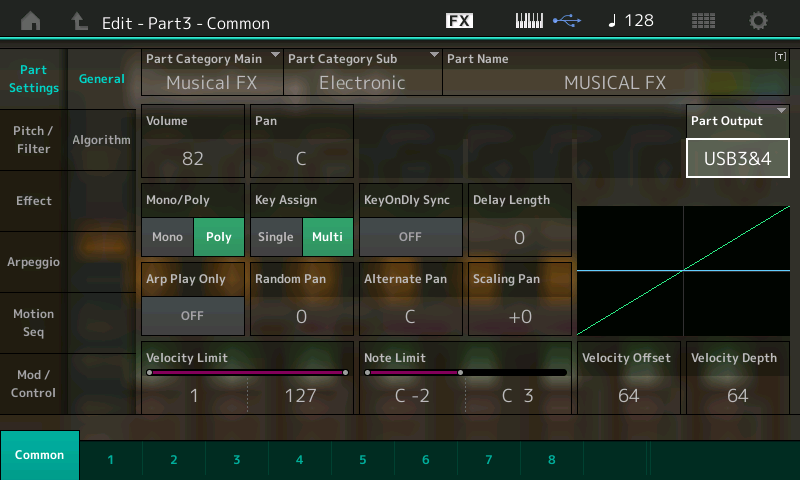
And so on, go the OUTPUT assignments. You can clearly understand that you might want to record each to its own discreet stereo track. Why Stereo? And this is a good question, it will depend on what you are doing within each PART. For example, does the sound in the PART take advantage of the stereo panorama within what it is tasked to do. Remember, things like Motion Sequences can move items around in the stereo field. You can SOLO each PART and listen as you explore. Is the instrument a stereo sampled instrument? Does it use an Insertion Effect that requires stereo to reproduce the effect? There are many reasons why you might want to assign a single PART to a stereo bus > route it to a stereo Input > recorded on a stereo Track. These are the production decisions you can (and need to) make on a per project basis.
To receive this in Cubase it will be necessary to create the appropriate number of INPUT buses.
Navigate to DEVICES > VST CONNECTIONS > select the INPUT tab > click on “ADD BUS” and create the appropriate number of INPUT Buses:
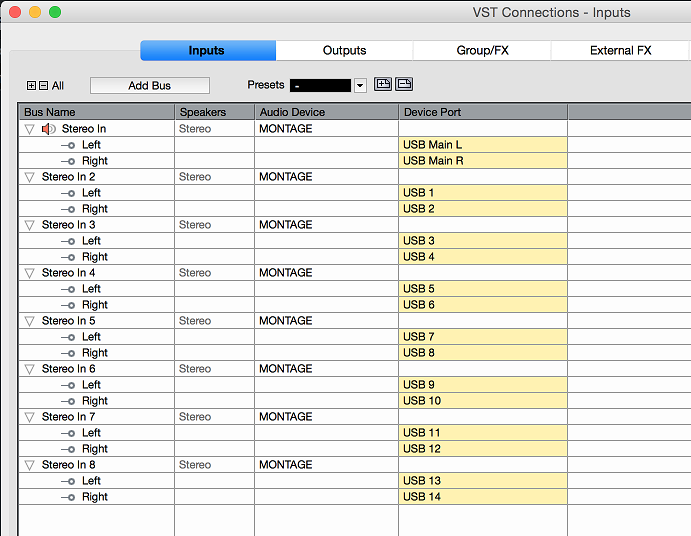
In Cubase, on the main Track view screen, create the appropriate number of AUDIO TRACKS and assign, each-by-each, to the designated Input. Track 1 (AUDIO 1) will use the “Stereo In”, Track 2 (AUDIO 2) will use the “Stereo In 2”, and so on through to Track 8 (AUDIO 8) which will use “Stereo In 8”
 If you always think in terms of signal flow, from SOURCE to DESTINATION, you cannot go wrong. The SOURCE is the Montage PART, which you set on a specific OUTPUT assignment. You then receive that OUTPUT to a VST CONNECTIONS INPUT in the DAW. Then you connect it to the DESTINATION, the AUDIO Track which set to the designated Input. Once you can follow this signal flow you can see that it is logical and actually very easy to use. It’s not more difficult than plugging analog cables between devices in the real world.
You can name each INPUT (if you so desire) but as you can see, it is not mandatory. The default names for the buses is just fine, as long as you stay organized. You can, of course, name the Tracks. Track Names are more important than Bus Names – the reason: Once the signal has be transferred from Source to Destination, the Bus is open to now transport other passengers and can do so to different Track destinations. So the Bus Name is less important than the Name you place on the Track because the track represents a permanent home for the recorded audio. (The Bus was just how it got there)!
You, of course, can customize the OUTPUT assignments coming from the MONTAGE to suit you needs, and that is just what we will do in the next example. Please recall the PERFORMANCE “CFX + FM EP”.
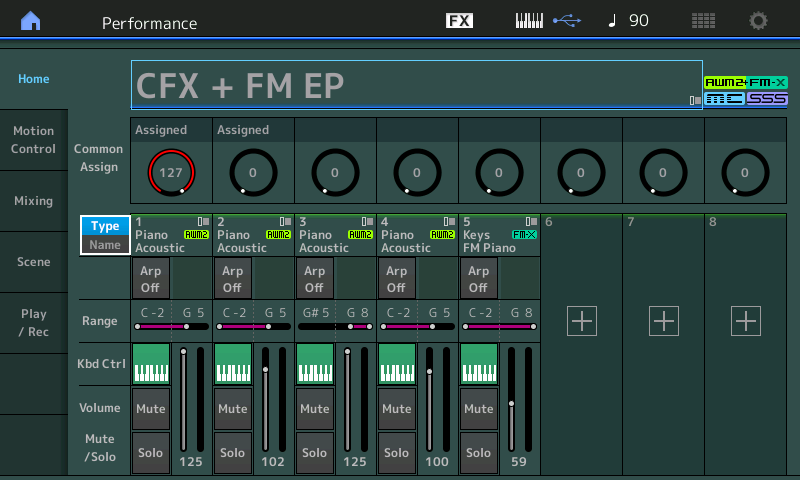
This is a 5 PART PERFORMANCE where four of the PARTS make up the acoustic piano sound and the fifth PART is the FM Electric Piano. Let’s analyze and decide just what would be the best way to record this PERFORMANCE. Playing this PERFORMANCE, you can hear that it is a stereo piano and the FM electric piano is using a stereo Chorus effect. If you have been ‘getting’ how the routing flow of the default “AUDIO REC on DAW” template works, you quickly realize that it will not work for this PERFORMANCE. Four of the PARTS belong together – so if we think of these four PART’s audio signal as the “passengers”, we can put them all on the same bus to a single stereo Destination. And if we wish, we can record the Electric Piano on its own stereo pair or it can also be placed on the same bus with the four acoustic piano PARTS. But we certainly do not want to record each of the five PARTs to its own stereo audio track – that would make no sense (in this case). When you have a multiple PART PERFORMANCE that is using the multiple Parts as building blocks, you must adjust your thinking about your routing decisions. As Producer, you must make these production decisions based on the bigger picture that is your Project.
Experiments to try with “CFX + FM EP”
Setup and record as a basic stereo program – all Parts going through the System Effects and recorded as a single Stereo Track. (Arm a single audio track; Record the AUDITION data and play it back). Navigate to each Part and ensure the PART OUTPUT assignments as follows:
PART 1 _ Main L&R
PART 2 _ Main L&R
PART 3 _ Main L&R
PART 4 _ Main L&R
PART 5 _ Main L&R
“PART OUTPUT” is always found:
Press EDIT]
Press the PART SELECT button corresponding to the PART you wish to view
Press the lower [COMMON] button to select PART COMMON parameters or touch the blue “Common” box in the lower left of the screen
Touch “Part Settings” > “General” > find the PART OUTPUT
In Cubase, using a single Stereo Bus, record a Piano performance to a single Stereo Track.
Setup and record with the acoustic piano (Parts 1-4) bused via the “Main L&R” while the FM piano is routed to a discreet audio pair. (Arm two audio tracks)
PART 1 _ Main L&R
PART 2 _ Main L&R
PART 3 _ Main L&R
PART 4 _ Main L&R
PART 5 _ USB 1&2
In Cubase, using two Stereo Buses, record a Piano/E. Piano performance recording to two tracks.
SYSTEM and MASTER EFFECT, to be or not to be?
If you wish to record without the SYSTEM EFFECTS and MASTER EFFECT, you can simply use the FX Bypass feature – found on the the top line of the screen, touch “FX” and select to turn OFF System Effects and the Master Effect. (Shown below)
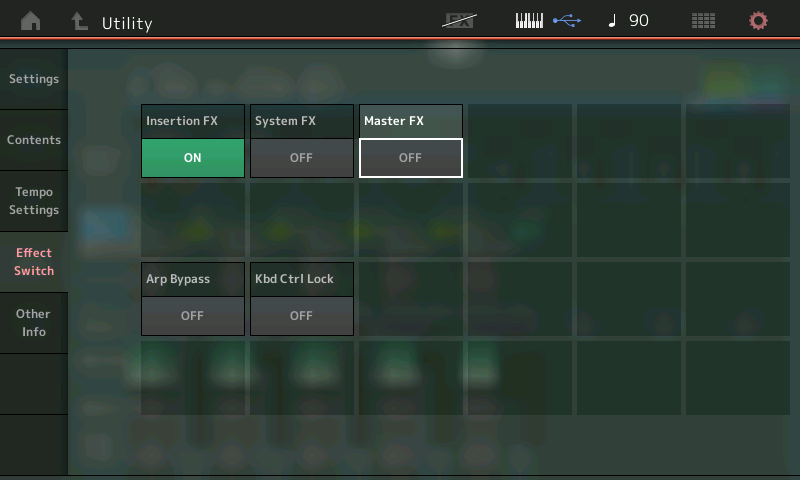
The only difference between the “USB 1-30” Assignable Output pairs and the “Main L&R” stereo pair is the SYSTEM and MASTER EFFECTS are applied to the “Main L&R” Outputs. By turning the SYSTEM EFFECTS and MASTER EFFECT OFF: No System Effects are recorded to the DAW – You would use this scenario when you are opting to add a plugin Reverb during mixdown*. (Arm two audio tracks).
*It is often preferred to leave adding Reverb Send amounts until you have assembled all the musical components. It is another “production” decision.
You can also setup the Montage as an external effect, routing audio signals from the DAW through the MONTAGE effects.
Again, you can use the [AUDITION] function during these routing experiments to provide music content so that you can concentrate on the signal flow and assignments, rather than splitting concentrating on ‘what to play’ and how to route it. Later, after you have become comfortable with routing and assigning, you can play/record something meaningful.
Not to repeat myself, but just to stress the fundamental point: Any Template, and specifically this “AUDIO REC on DAW” template, is just a starting point. You will, more often than not, have to make changes in the routing to match what you have selected to record.
Why did they default it as it is – with all thirty-two Output ports assigned as stereo pairs for the 16 PARTS? Because if you ever need this, it would be the one that takes you the longest to setup… and for when you need separate assignments, this one covers the most bases.
Please take the time and learn to use the OUTPUT assignment function on the MONTAGE. It’s as easy as 1-2-3:
1) Montage PART OUT >>> 2) DAW INPUT configuration >>> 3)connect the input to an AUDIO TRACK: RECORD
Have questions or comments about this article? Join the conversation on the Forum here.
Need to catch up on the first part of this lesson? Check it out here.
And stay tuned: our own “Bad Mister” – Phil Clendeninn – has more in the works for all you MONTAGE fans!