We take your Privacy very seriously.
Part I
(Links to Part two is here and Part three here.)
As its name implies, subtractive synthesis is a means of creating sounds by removing unwanted components. You can think of it as the musical equivalent to sculpting, where the artist starts with a block of stone and chisels away at whatever is unneeded to create a statue. The same kind of thing happens here, only the block of stone is a waveform and the chisel is a filter, with other sonic tools such as envelopes, velocity sensitivity and keyboard scaling (all of which will be discussed in future installments) employed to further refine the sound.
In this three-part series, we’ll cover the basics of subtractive synthesis and tell you what you need to know in order to create sounds using this technique. While we’ll be referencing two specific Yamaha instruments that have extensive subtractive synthesis capabilities (MONTAGE and MODX), the information presented in these articles will be applicable to other synths too — just check your instrument’s owner’s manual for the equivalent button-pushes.
Ready to get started? Here we go …
What Is A Sound?
At first glance, this may seem almost too basic, but the question of what makes up a sound is actually a lot deeper than it may appear. At its essence, a sound is anything we hear as a result of vibrations in the air. These vibrations in turn, cause our eardrums to vibrate in a similar fashion. The back-and-forth movements of the eardrum are converted by tiny bones in our inner ear into electrical signals that travel up nerves into our brain, where they are finally perceived by us as a sound.
Obviously, there’s an enormous gamut of sounds in existence — everything from a violin to a jackhammer, the wings of a butterfly softly beating to a crack of thunder. What is it that differentiates sounds from one another?
Actually, there are three factors:
- The sound’s degree of loudness (in technical terms, this is known as amplitude).
- Its pitch or lack of pitch (in technical terms, this is known as frequency).
- Its quality (in technical terms, this is known as timbre).
Interestingly, all sounds can be described in terms of these three aspects, and these three only. What’s more, all sounds exhibit all three aspects. Think about it: Can there be a sound that has no loudness? (If so, it’s not a sound.) Can there be a sound that has no particular quality? Not possible. And while there can be (and are) plenty of sounds that have no pitch, they can then be described in terms of their lack of pitch.
Let’s take a look at each of these factors in turn.
Amplitude
The amplitude (loudness) of a sound is easily measurable in a number of different ways. There are, for example, hardware devices and software apps called sound pressure level (SPL) meters that measure amplitude in real time. Or you can record a sound into your favorite DAW (Digital Audio Workstation) and see the resulting waveform on your screen afterwards. Such a display might look something like this:
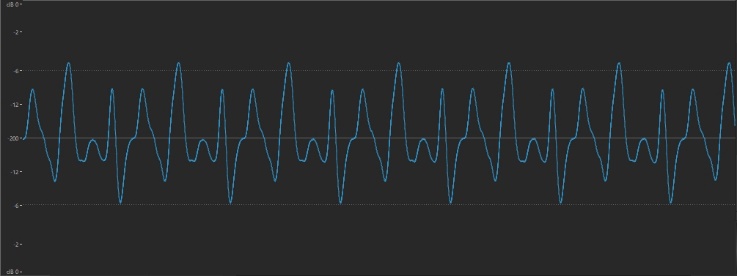
The height of the waveform shows its amplitude: the louder the sound, the higher the wave. (The “dB” at the top and bottom of the vertical scale are units called decibels — dB for short.) This makes perfect sense, since it’s a reflection of the displacement of air (the backwards and forwards vibrations) created when the sound occurred.
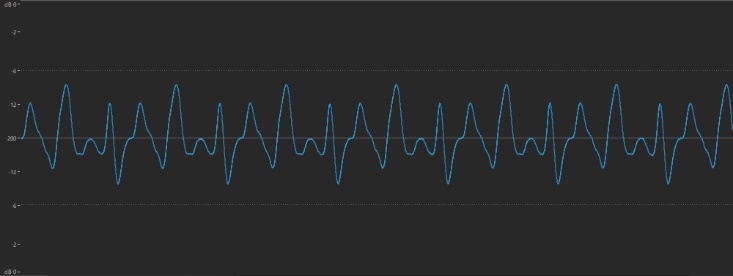
Here’s the same sound a little softer:
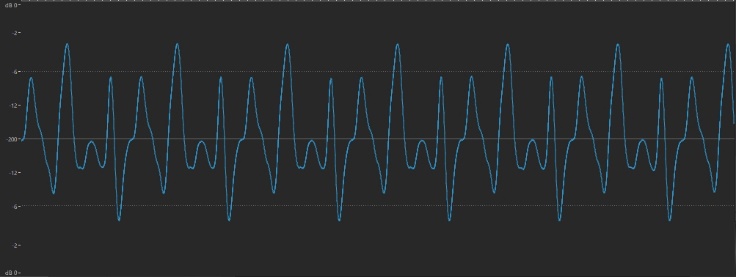
… and a little louder:
Obviously, every sound always changes amplitude during its existence (eventually dropping to and remaining at 0 dB) since there is no such thing as a perpetual sound that lasts forever. We’ll be talking a lot more about amplitude in future installments, but for the purposes of this article, let’s stop here and move on to …
Frequency
Just as you can determine the amplitude of a sound by the height of its wave, so too can you determine its pitch by the number of waves that occur in a given period of time — in other words, how frequently those waves occur (hence the name “frequency”). The lower the pitch, the fewer the number of waves in any given time period; the higher the pitch, the more waves occur.
The unit of measurement for frequency is the Hertz, or Hz for short. (There’s also a unit called the kiloHertz, or kHz, that represents a thousand Hertz.) This describes the number of waves that occur in one second of time, so a sound with a frequency of 1 Hz generates one wave (one backwards and forwards movement of air) per second; a sound with a frequency of 100 Hz generates a hundred waves per second; a sound with a frequency of 1 kHz generates a thousand waves per second, and so on.
We humans can only perceive pitches between roughly 20 Hz and 20 kHz (that is 20,000 Hz), though unfortunately the high end of this range gets reduced somewhat as we get older (and the rate of deterioration is accelerated when you’re exposed to lots of loud sounds, so turn those speakers down!). This is known as the audible range. Sounds do exist both above and below this 20 Hz – 20 kHz range; those below 20 Hz are termed subsonic (they’re the rumbling “feel” frequencies that make your chest pound and the dance floor vibrate), and sounds above 20 kHz are termed supersonic (they’re the invisible sounds that make your dog’s ears perk up!).
Frequency has a lot to do with whether or not we perceive a sound as being musical. For the most part, if you can determine a clear pitch (as, for example, in a violin note), the sound is considered musical. If you can’t (as in a jackhammer), it’s non-musical. But there’s a big gray area in-between. Can you clearly make out the pitch of a bass drum or a snare drum? Most people can’t, but drummers spend a lot of time tuning their drums, so maybe they can perceive something that the rest of us are missing. The same goes for other percussive instruments, like cymbals, shakers and tambourines. Similarly, some individuals are able to perceive pitches in what most of us would consider non-musical sounds like a breeze blowing or the hum of an engine. The bottom line is that it’s somewhat subjective, though most of us can agree that most (but not necessarily all) musical instruments have a clear pitch component.
Every time a musical sound goes up an octave, its frequency doubles. For example, here’s the waveform of the A above middle C played on a piano:
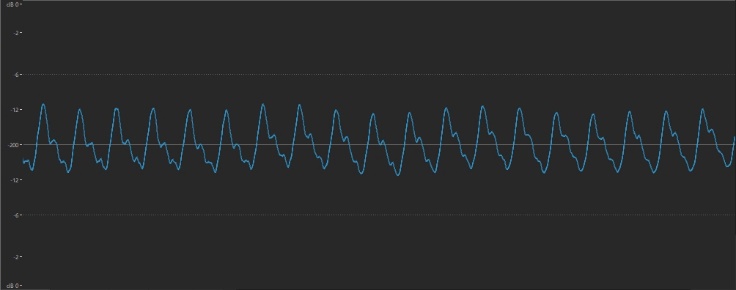
And here it is played an octave higher:
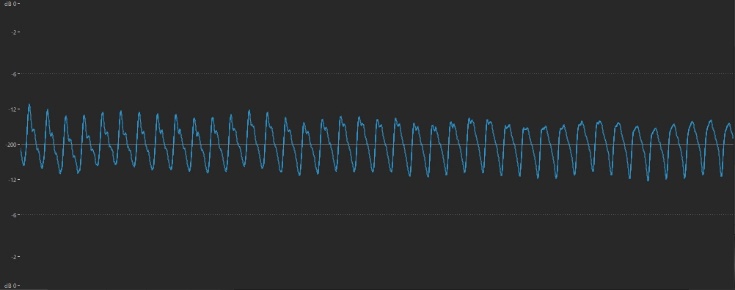
… and an octave lower:
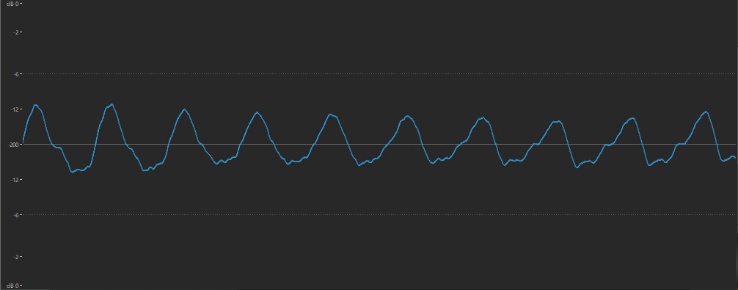
The Western musical system divides each octave into 12 more or less equal components called semitones, and the distance between any two notes is called an interval. The interval known as the fifth (actually seven semitones higher than the starting, or root, note) is the frequency midpoint. In other words, the fifth above the A note (the E) has 1 1/2 times its frequency, which is why it’s so pleasing to our ears. In standard tuning, the frequency of A is 440 Hz, so the E above it has a frequency of roughly 660 Hz (it’s “roughly” and not “exactly” because pianos use an equal temperament tuning system — a subject that’s well beyond the scope of this article, but Google it if you’re curious).
Now let’s move on to …
Timbre
At first glance, timbre may seem to be the toughest concept to grasp. Sure, we can call a sound “soft” or “warm” or “harsh” or “bright,” but those are all such indistinct, subjective terms, no?
Well, it may surprise you to learn that timbre, like every aspect of music, can actually be described in pure mathematical terms — one reason why computers are so good at synthesizing sounds. To understand this, let’s return to our example of an A440 piano note. When you depress that key, what happens is that, via a series of mechanisms, a hammer strikes a string (actually two or more strings, but that’s not especially relevant to this discussion just yet), which begins vibrating at a rate of — you guessed it — 440 times per second.

But that only happens for a split second, because as soon as those vibrations reach the back of the piano’s sounding board, the string begins rebounding back towards the front of the instrument, again at a rate of 440 times per second. Even while that’s happening, the original vibration continues, which means that the two vibrations criss-cross … resulting in a vibration of both 440 times per second and twice that amount (880 times per second):
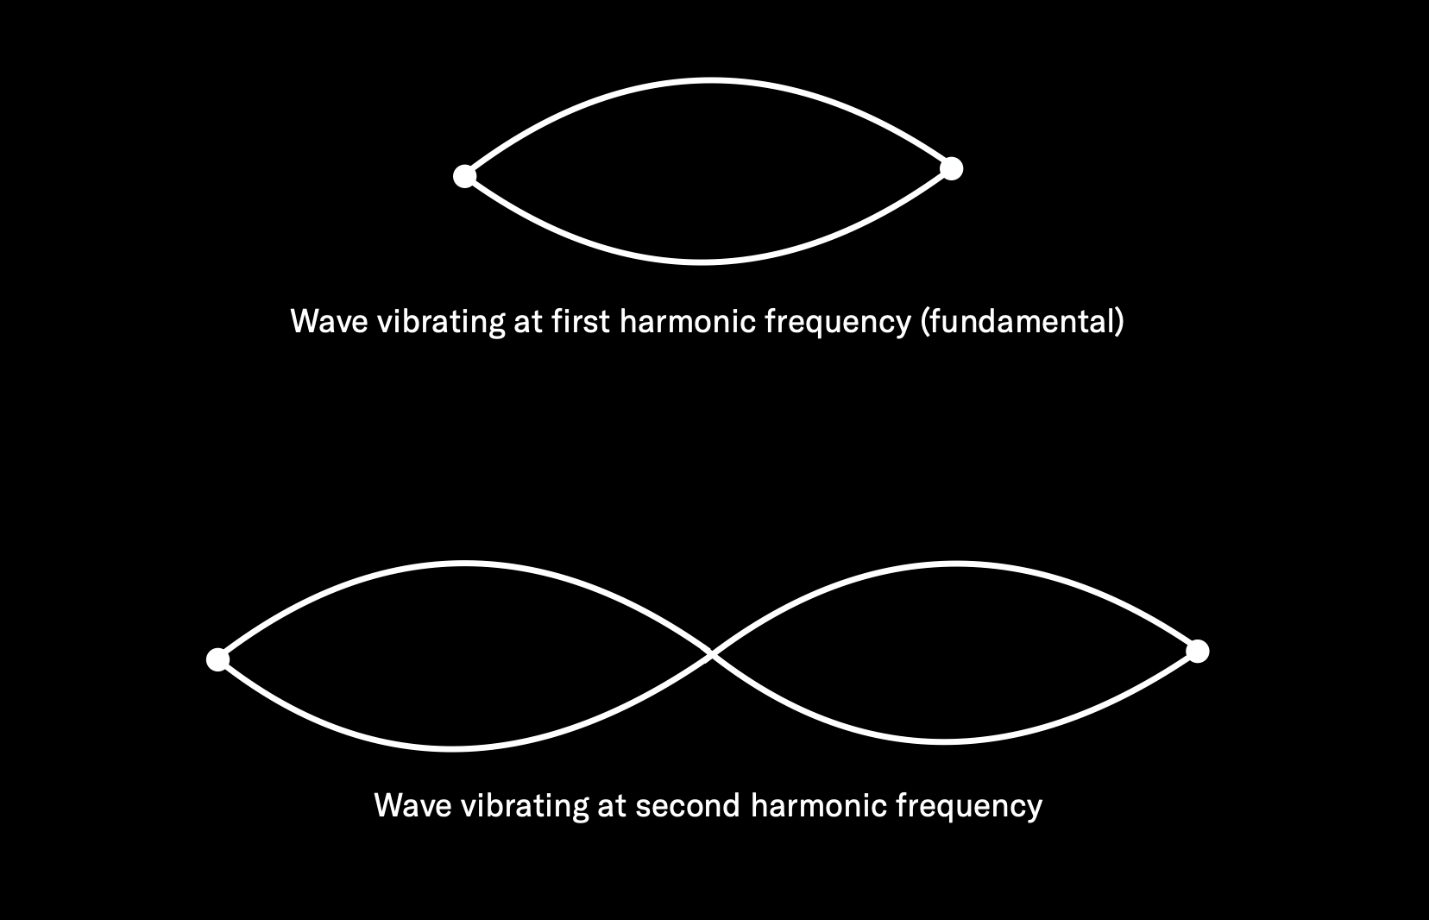
So now our string is vibrating at both 440 Hz and 880 Hz, although the original 440 Hz movement (known as the fundamental frequency) will be stronger and therefore louder. But it doesn’t stop there, because once that 880 Hz vibration reaches the front of the instrument, it begins rebounding back again, causing a third vibration (of 1320 Hz — three times the amount of the original 440 Hz). This process continues over and over again until the string loses energy and the sound dies down to nothingness. In the case of an undamped piano note, this can take 30 seconds or longer, depending upon the length of the string and how hard the hammer strikes it.
What we end up with is a string vibrating at many different rates, all at the same time, with each of these vibrations a mathematical multiple of the starting (fundamental) frequency. These extra vibrations are called harmonic overtones or partials. The overtone that’s twice that of the fundamental is called the second harmonic (the fundamental itself is sometimes called the first harmonic); the one that’s three times the fundamental is called the third harmonic, and so on.
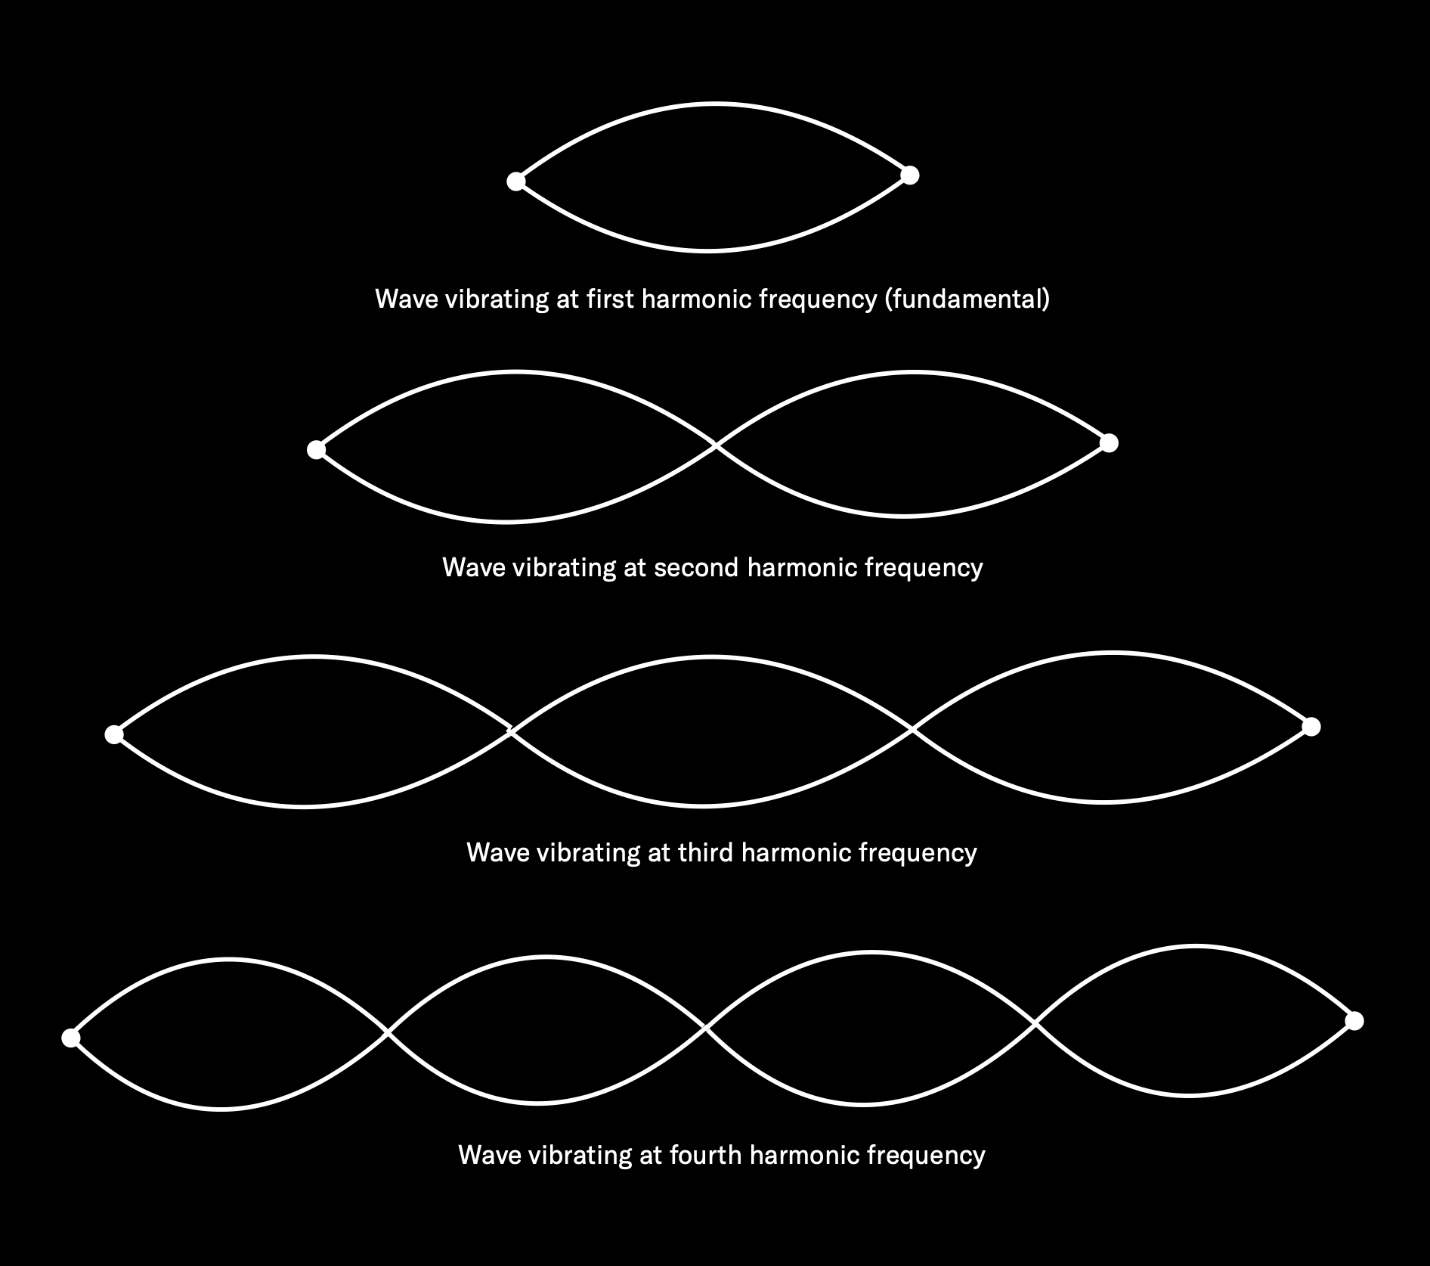
The story doesn’t end there, because no string or musical instrument is perfectly constructed, nor is there any such thing as a perfect acoustic space (don’t forget, the air surrounding the string is set into vibration too, and that in turn affects the string to a small degree). For those reasons, a number of extra vibrations always occur that are not mathematical multiples of the fundamental frequency — say, 441.2 Hz or 967.8 Hz. These “outliers” (which have only random mathematical relationships to the fundamental) are known as inharmonic overtones or inharmonic partials.
This is not specific to piano (which we used here just for the sake of illustration), or to any particular musical instrument, for that matter; it’s actually a feature of all sounds in existence. And it’s the number and type of overtones, and their relative strength to one another, that determines a sound’s timbre. Musical sounds (piano, flute, birdsong, etc.) will tend to have more harmonic than inharmonic overtones, while non-musical ones (cymbal, tambourine, jackhammer) will have the reverse. But all naturally occurring sounds consist of a particular blend of overtones, and that’s why we can tell the difference between a piano and a flute and a cymbal and a tambourine, even if they’re all played at the same loudness level, and even if we’re in a room with all the lights out.
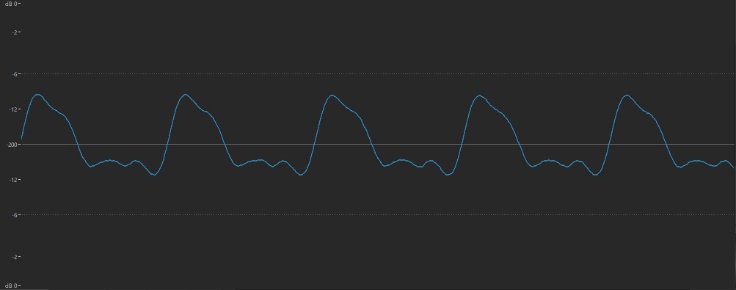
One of the inexplicable wonders of nature is that the timbre of a sound is reflected in its waveform in an almost poetic manner. The smooth sound of a flute, for example, is displayed as a gentle, rounded waveshape that looks like this:
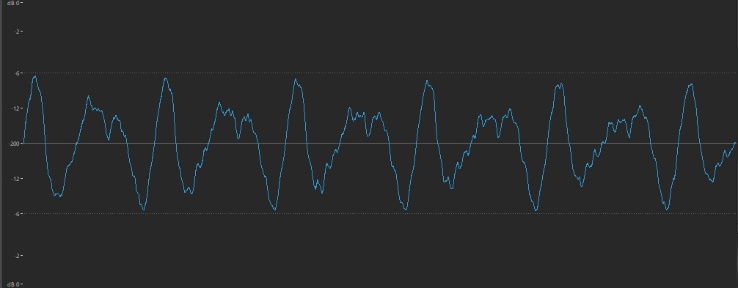
… while the brighter tone of a twanged guitar string has a waveform that’s more jagged:
In contrast, the sizzle of a cymbal is thoroughly spiky and irregular:
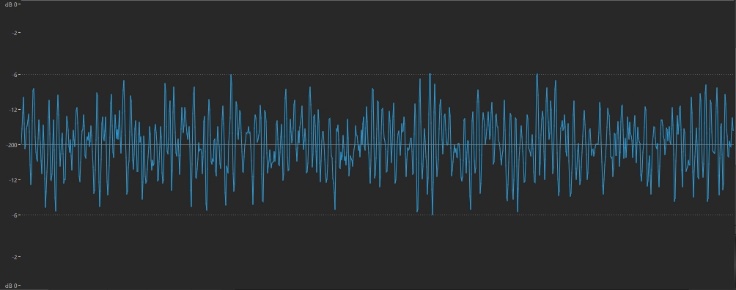
In general, the gentler and smoother the sound (the result of fewer overtones), the more rounded and regular the waveform; the brighter and buzzier the sound (the result of more overtones), the more jagged and irregular the waveform.
If you want to learn more about the relationship between music and mathematics, check out my Yamaha blog “The Numbers Game.” For now, though, let’s start our exploration of subtractive synthesis, which gives you fine control over all three aspects of sound: amplitude, frequency and timbre.
The Three Building Blocks of Subtractive Synthesis
Just as there are three aspects to every sound, there are three corresponding “building blocks” in every subtractive synth. These are the oscillator, the filter, and the amplifier.
In vintage analog synths where fluctuating electrical voltages were being used to both generate and control audio signal, these three components were called a VCO, VCF, and VCA — short for “Voltage-Controlled Oscillator,” “Voltage-Controlled Filter,” and “Voltage-Controlled Amplifier,” respectively — and they were interconnected this way:
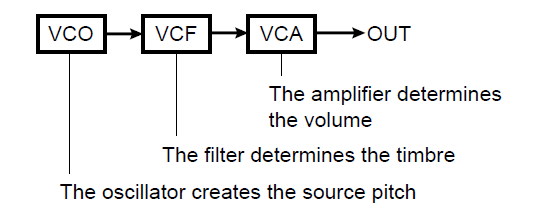
As you can see from the above illustration, each of these components is responsible for a specific aspect of the sound being created, which brings us to three rules that you should always keep in mind whenever you’re creating or tweaking subtractive sounds:
In modern synthesizers, these components are digital rather than analog, which means that they are software-based — in other words, they don’t actually exist physically, just as a series of numbers. Nonetheless, the interconnections remain the same, as you can see from this block diagram of the AWM2 (Advanced Wave Modulation2) subtractive system used in MONTAGE/MODX synths:

Let’s look at each of these in greater detail.
The Oscillator
The place where sound begins in all types of synthesis (including subtractive) is a component called an oscillator. Vintage analog synths usually offered just two or three oscillators, each capable of producing just a handful of different waveforms:
- A sine wave, which contains only the fundamental frequency (i.e., the first harmonic), with no overtones at all.
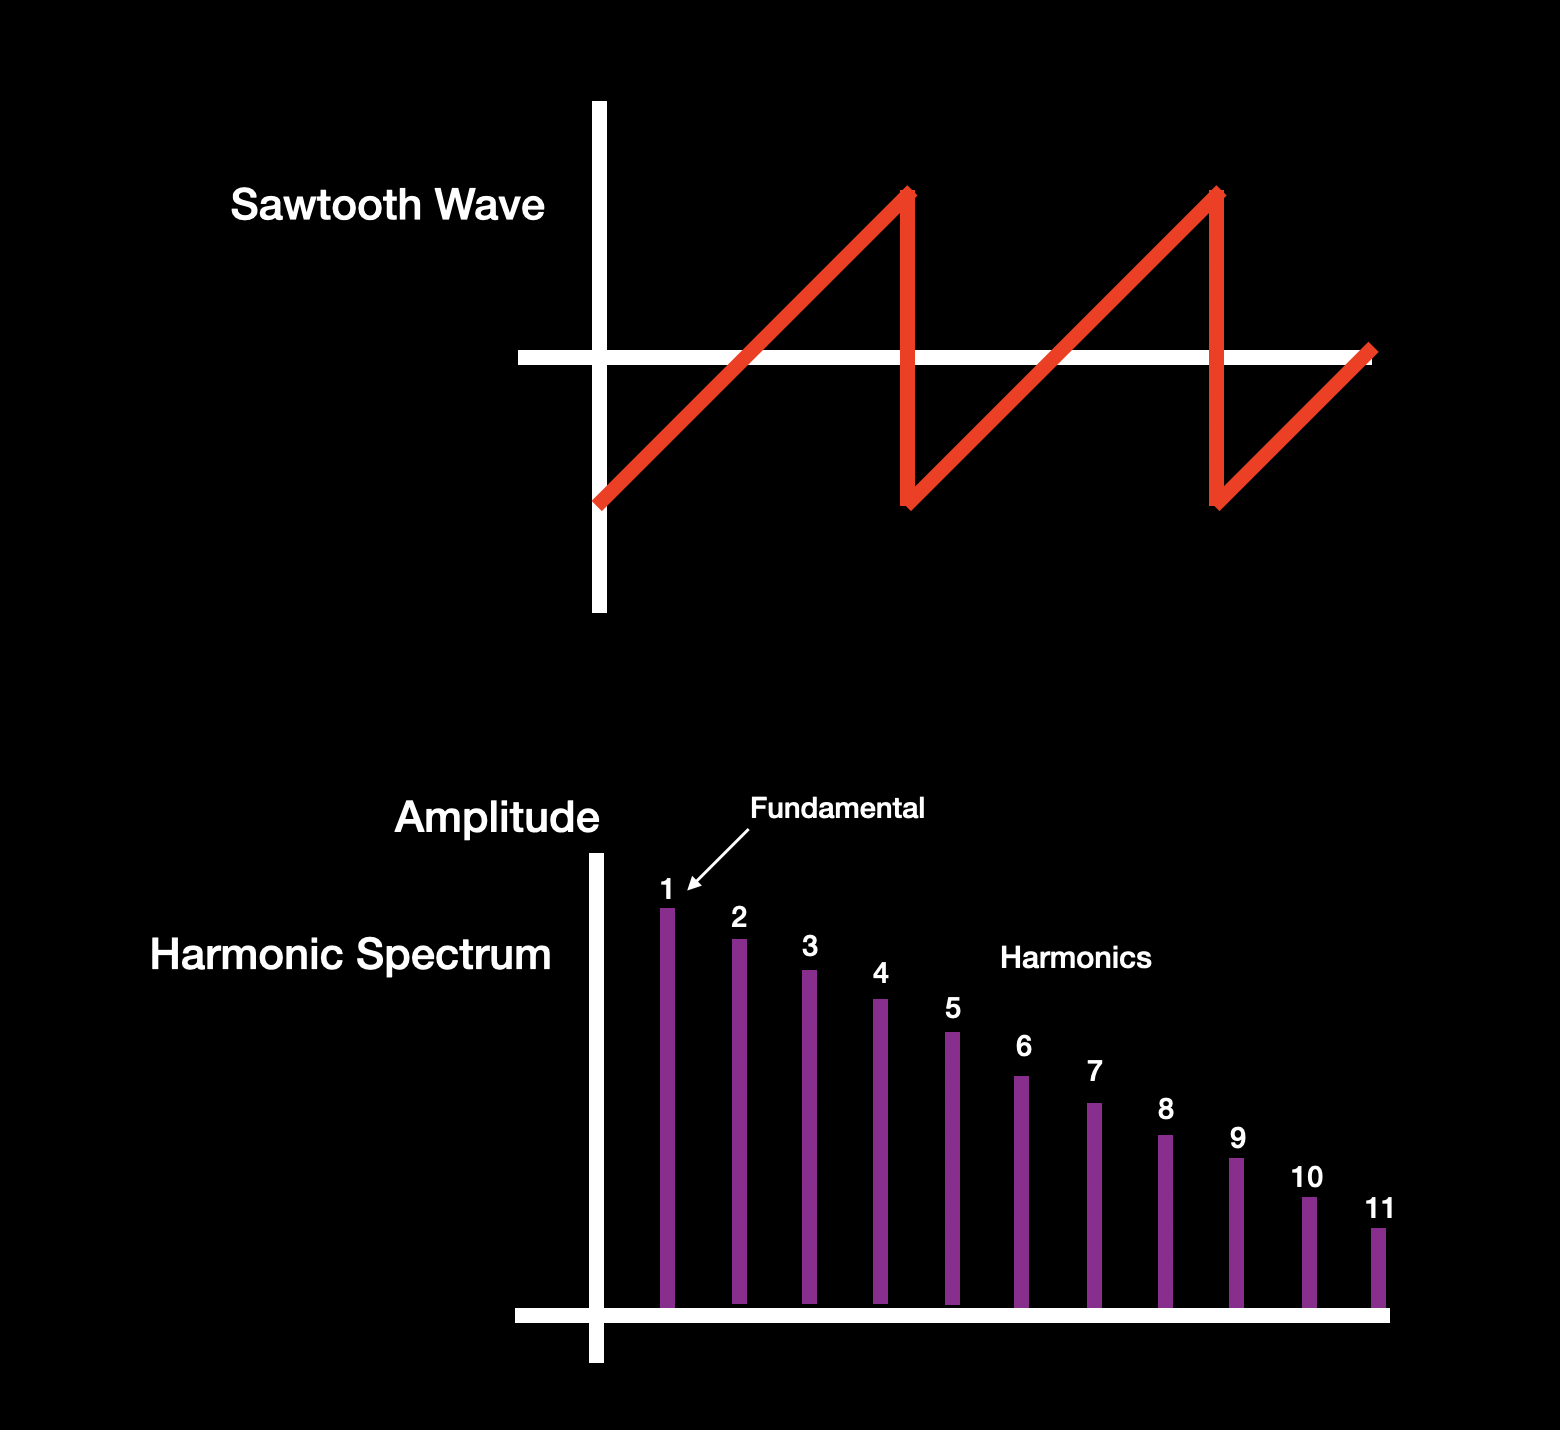
- A sawtooth wave, which contains all harmonic overtones in steadily decreasing amounts, as shown below:
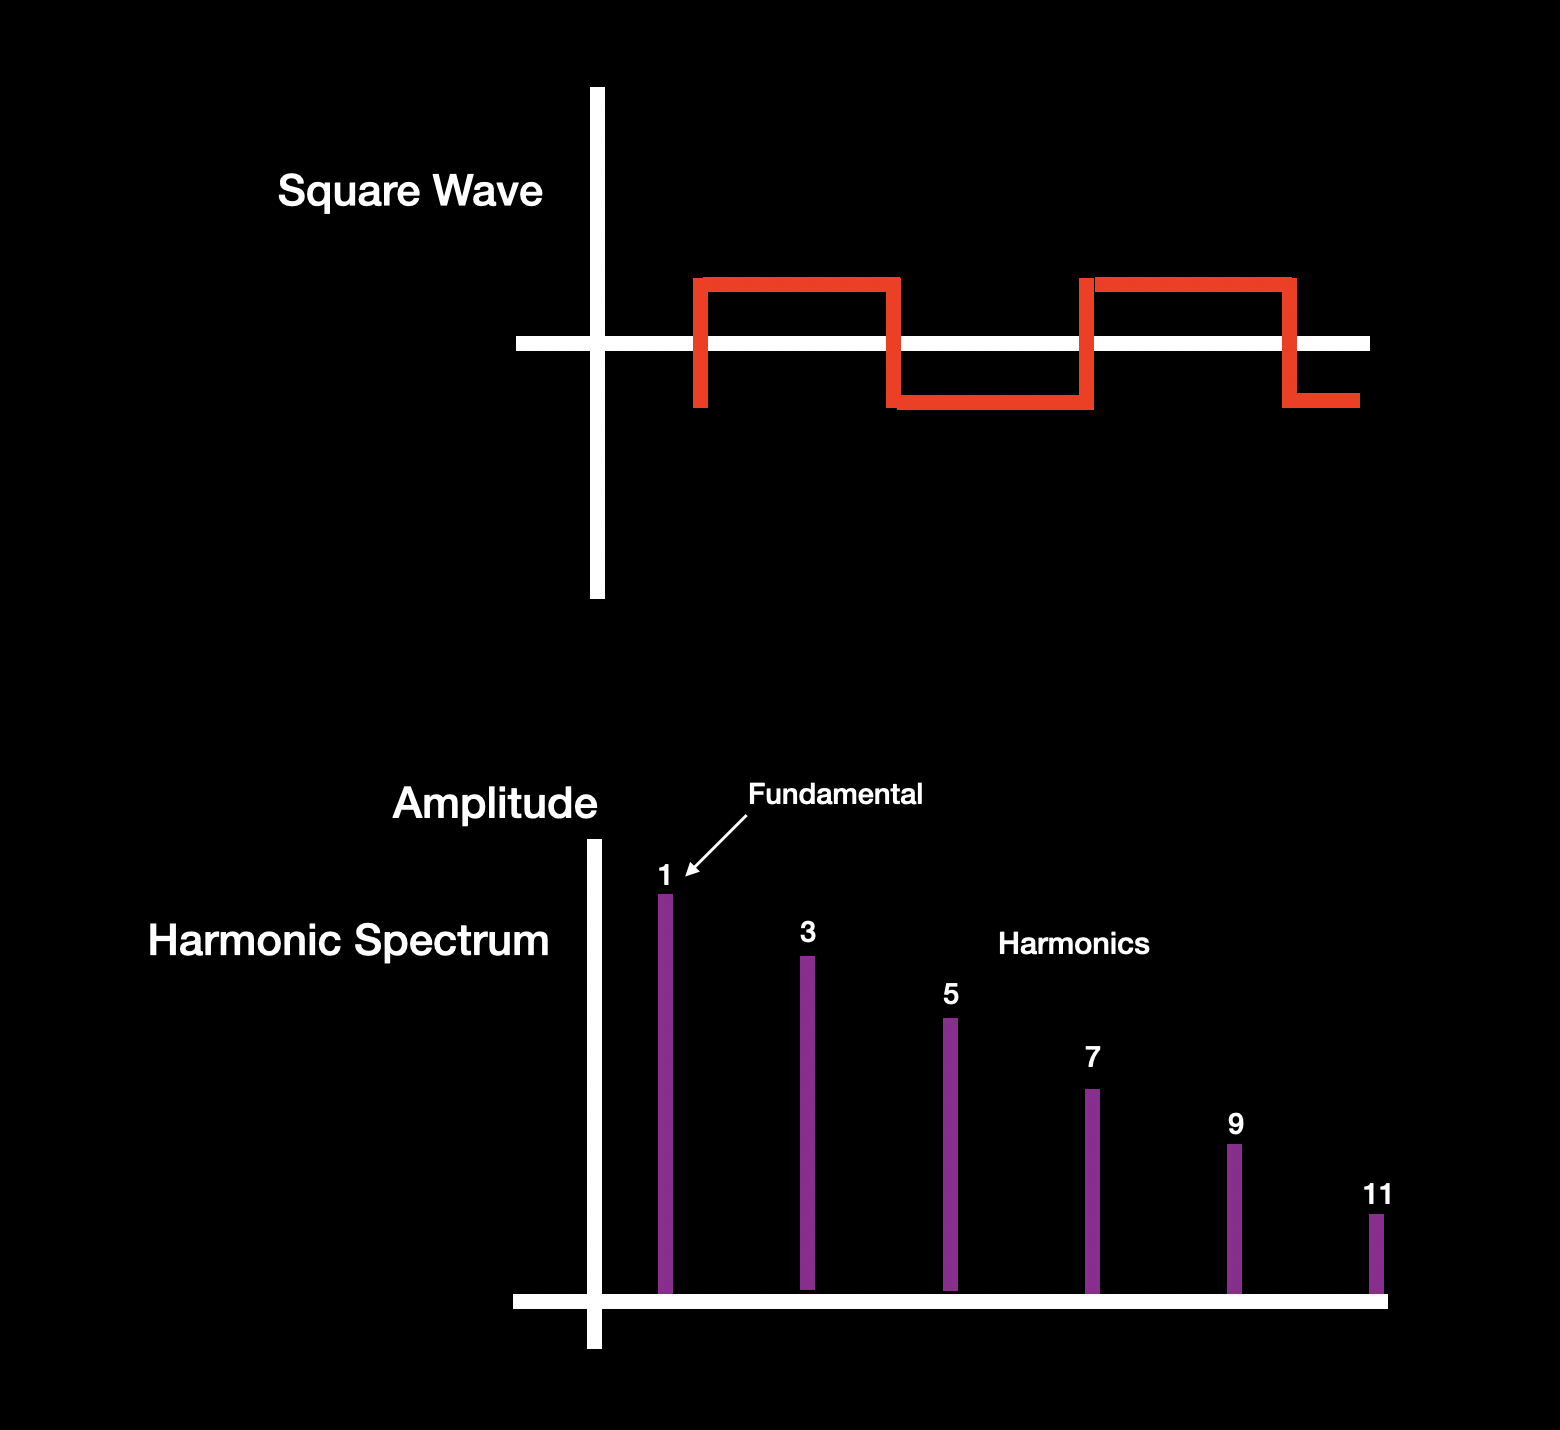
- A square wave, which contains only odd-numbered harmonic overtones (that is, the third harmonic, fifth harmonic, seventh harmonic, etc.) in steadily decreasing amounts, as shown below:
(Note that most analog synths also offered a “pulse width” control that enables the amount of “up” and “down” time in each square wave cycle to be varied; the more this is offset from the 50% “up” / 50% “down” time of a pure square wave, the more nasal the sound.)
- A triangle wave, which is similar to a square wave but with only the first few odd-numbered harmonics in relatively small amounts.
We’ll get to hear what each of these sound like shortly, but for now take note of the fact that none of these four waveforms actually exist in nature. Why then were they provided by analog synths? Simple: They represent approximations of some musical sounds. For example, the waveforms of brass and string instruments have shapes that are often reminiscent of sawtooth waves, while those of woodwind instruments usually approximate square waves; flutes tend to have waveform shapes that are somewhere between a sine and a triangle wave.
As mentioned previously, digital synthesizers utilize digital oscillators, which can easily replicate any of these four basic waveforms, plus a whole lot more. In fact, digital oscillators can produce the precise sounds of actual musical instruments — or any real-world sound, for that matter — by means of something called sampling, whereby short digital recordings of those sounds (called “samples”) are used as the waveforms. This technology, which first became widely available in the 1970s, was a huge advancement for synthesists everywhere! It means that, instead of starting with a sawtooth wave that’s similar to the sound of a trumpet and then manipulating it to closely approximate that of a trumpet, you can start with the actual sound of a real trumpet.
These samples are stored in the synthesizer’s internal memory as a stream of numbers, which can then be further processed in the digital domain by filters and amplifiers (under the control of other sonic tools, which we’ll be discussing in future installments) before finally being outputted as an analog signal that you can hear, via your synth’s main output jacks and/or its headphone output. Early Yamaha synthesizers termed this process AWM, short for “Advanced Wave Modulation.” Modern Yamaha synths like MONTAGE and MODX call it AWM2, reflecting advancements in technology that allow the storage of literally thousands of samples with higher quality, more articulations and greater variations, along with longer, more natural decay.
Here’s an exercise that shows you how to access and audition the AWM2 samples in your MONTAGE or MODX, including the four classic waveforms described above. It’s super-easy, since both instruments offer a simple procedure for calling up basic “initialized” sounds, including one for AWM2. Simply perform the following steps:
- Press [CATEGORY SEARCH]
- Touch Init
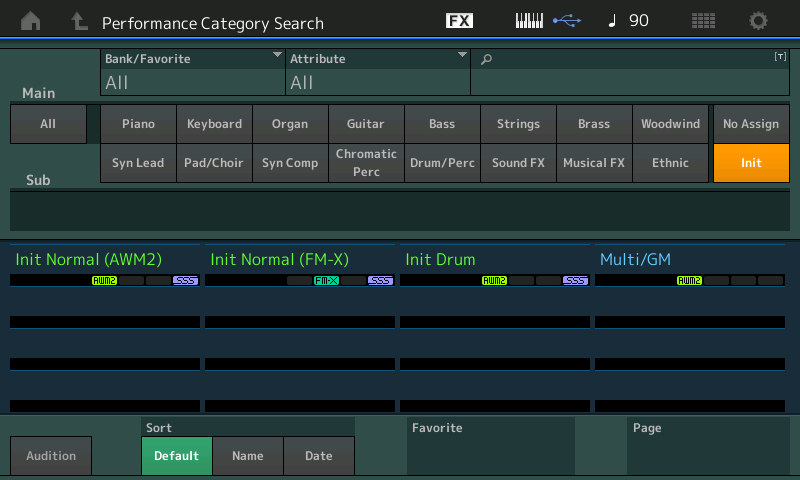
- Select “Init Normal (AWM2)”
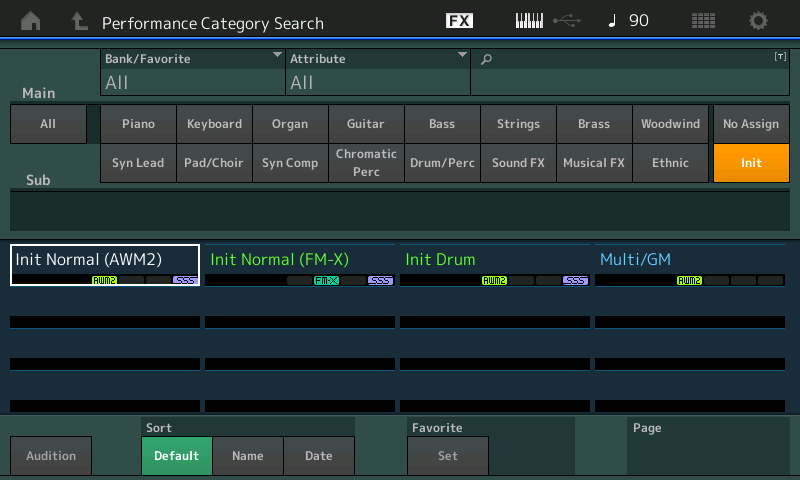
You’re nearly there, but in order to be able to more clearly hear the various exercises we’ll be giving you, you’ll want to turn off the reverb. This is also a very simple process, but if you’d rather skip the button-pushes, just go to Soundmondo (our way-cool social website that allows you to discover new synth sounds, as well as organize and share your own sounds) and click here to download the Performance named “Subtractive Part 1_01.” (This is simply “Init Normal (AWM2),” saved without reverb.) For more information about Soundmondo, check out this blog article.
For you do-it-yourselfers, here’s the step-by-step procedure:
- Press [PERFORMANCE (HOME)]
- Press [EDIT]
- Press [COMMON] or touch the Common tab in the lower left-hand corner of the screen
- Touch the Effect tab (on the left-hand side of the screen)
- Touch ON (green box) next to Rev (circled in red in the illustration below) so that it turns OFF (gray)
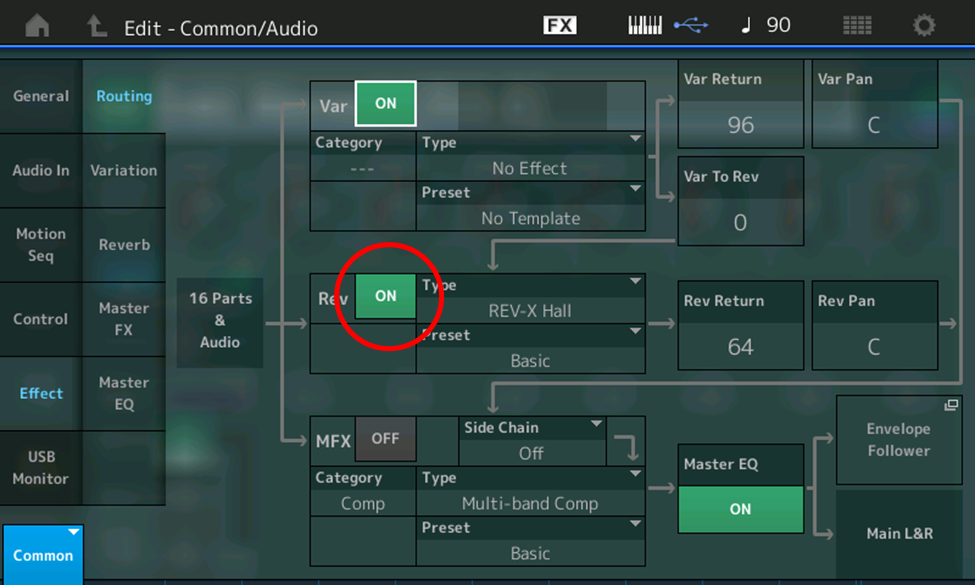
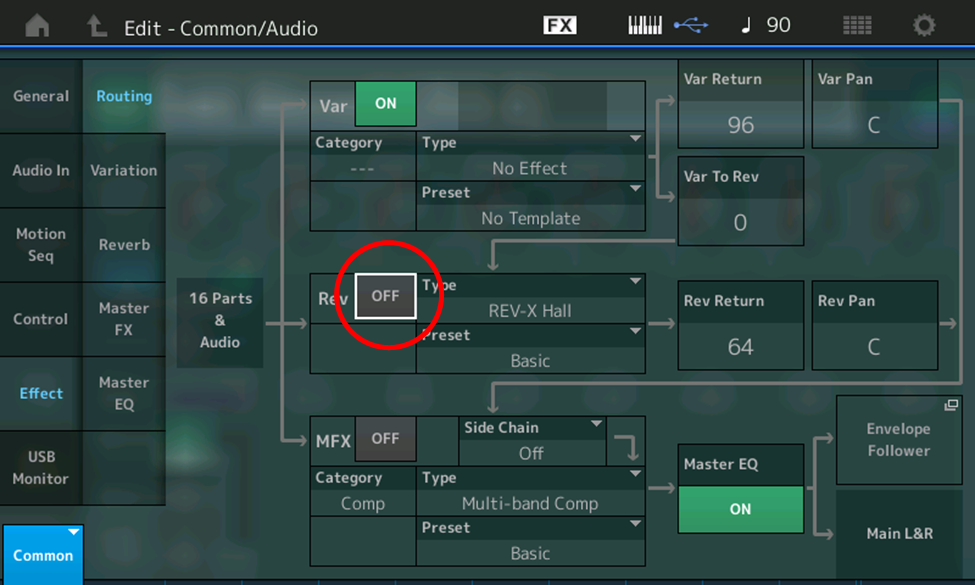
Here’s what it sounds like — the sound of a piano (sort of, anyway, at least when playing staccato notes), without any reverb:
Why piano, and why only “sort of”? We’ll answer the first question in a moment (and the second one in our next installment), but before we do so, be sure to press the STORE button to store this Performance in your MONTAGE/MODX. (If you created it with button-pushes, rename it “Subtractive Pt 1_01” — the name under which it appears in Soundmondo).
To answer the question, “Why piano?” we need to dig a little deeper, going into the screens that display the data for each of the components that make up a MONTAGE/MODX Performance. Accordingly, with “Subtractive Pt 1_01” called up, do the following:
- Press [PERFORMANCE (HOME)]
- Press [EDIT]
- Press [PART SELECT 1/1]
This calls up the Edit – Part 1 – Common screen, which looks like this:
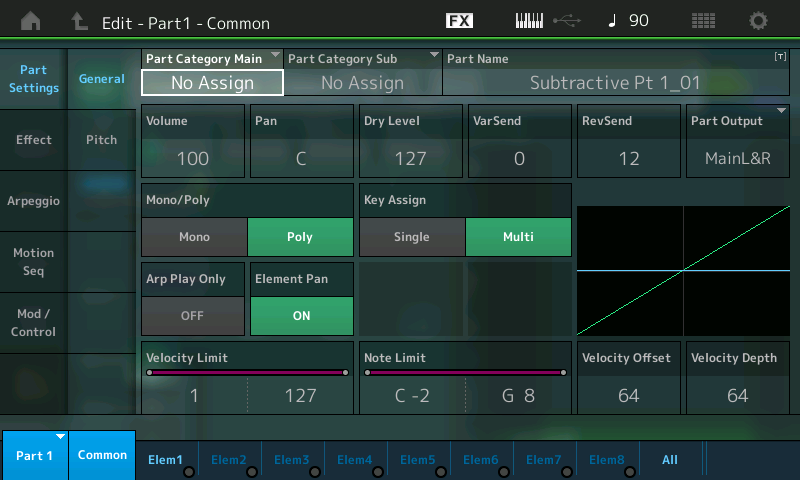
- Next, either touch the Elem1 tab at the bottom of the screen or press the [MOTION SEQ SELECT 1] button (this button calls up Element 1 when working with an AWM2 part).
This will bring up the Edit – Part1 – Element1 screen, which looks like this:
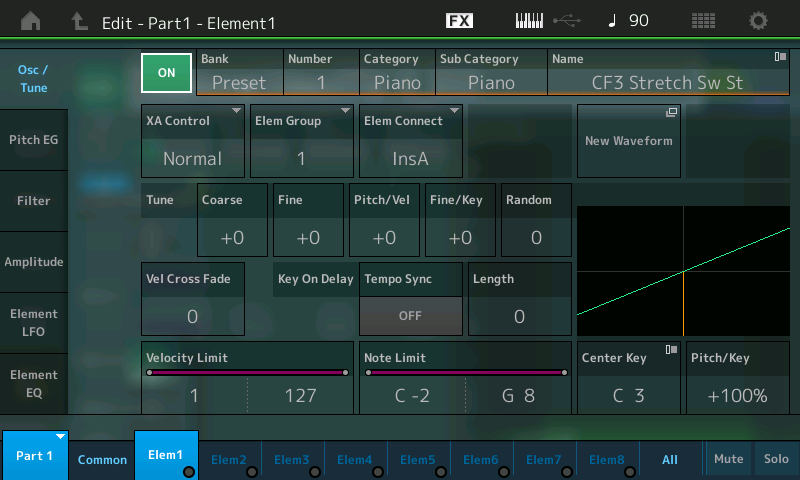
A MONTAGE/MODX Performance can contain up to 16 Parts, and each Part can contain up to eight Elements. The “Init Normal (AWM2)” Performance only utilizes a single Part (Part 1), and only one of the eight Elements in that Part (Element 1), as we’re about to discover. Accordingly:
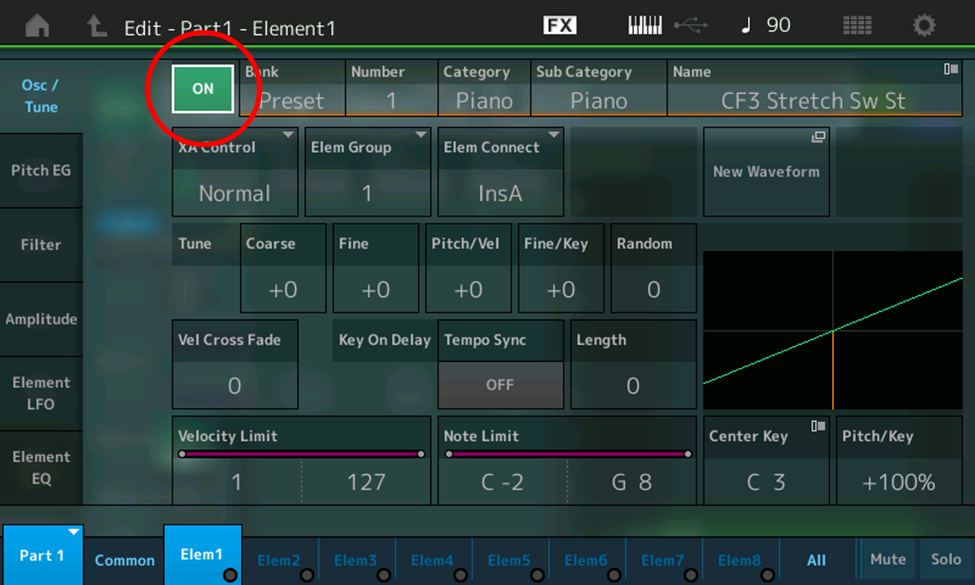
- Touch each of the 8 Element tabs at the bottom of the screen (or press each of the [MOTION SEQ SELECT 1] – [MOTION SEQ SELECT 8] buttons in turn) while viewing the ON-OFF box at the top of the screen (circled in red in the illustration below). You’ll find that only Element 1 is ON, while the other seven Elements are all off; in other words, we’re only hearing Element 1 in this Performance.
So what waveform is being used by the Element 1 oscillator? The answer lies in the five parameters shown at the top of the screen: Bank, Number, Category, Sub Category and Name. Touch any of them and all five are highlighted, as shown in the illustration below:
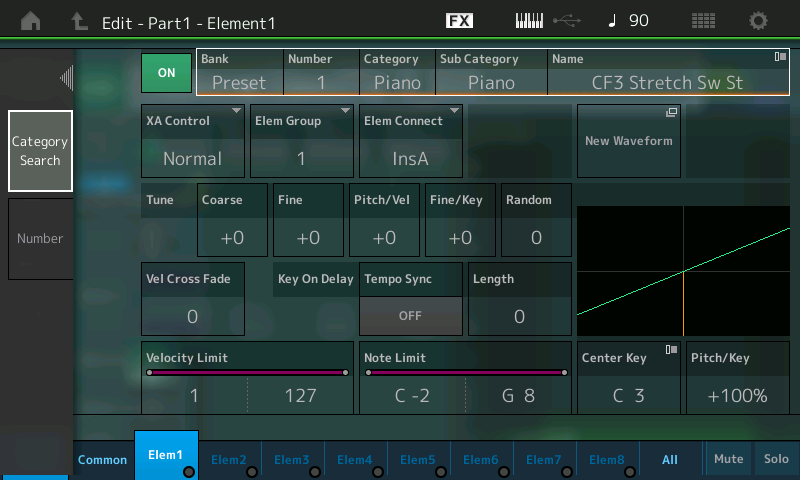
In this case, these values indicate that the sound we’re hearing is waveform Number 1 in the Preset Bank, named “CF3 Stretch Sw St.” In addition, we can see that this waveform is categorized (and sub-categorized) as a piano sound … which explains why we’re hearing what we’re hearing!
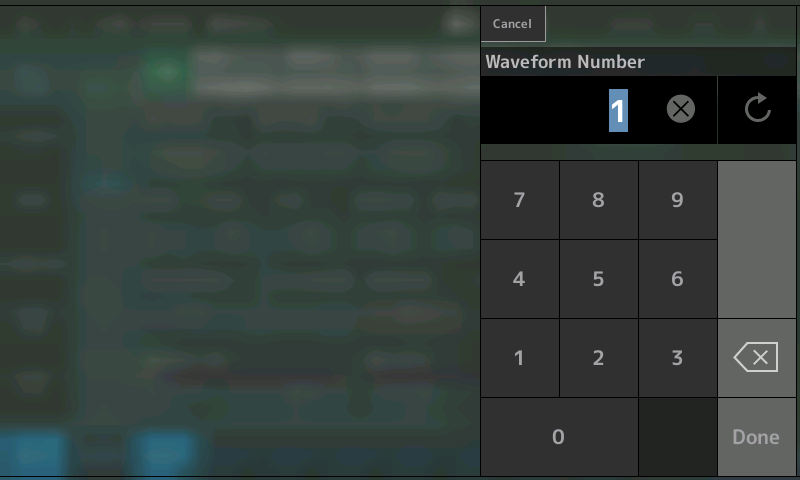
MONTAGE/MODX offers a whopping 6,346 waveforms, all of which can be auditioned simply by touching this display so that it is highlighted and then turning the instrument’s data dial or pressing the INC/YES or DEC/NO buttons. Alternatively, if you know the particular waveform you’re looking for (you can find a complete listing in the MONTAGE/MODX Data List), you can touch the Number tab on the left-hand side of the screen, which will bring up a standard onscreen numeric keypad display, as shown here:
If you’d prefer to browse instead, simply instead touch the Category Search tab on the left-hand side of the Edit – Part1 – Element screen in order to go to a special Waveform Search display, shown below:
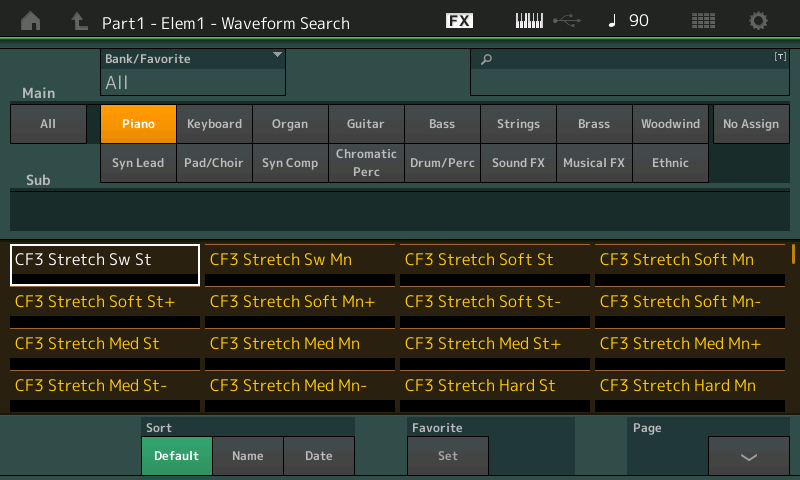
This screen allows you to select a category and subcategory for the type of sound, and from there to audition all the waveforms (simply by touching their names) until you find the one you like, which will automatically be assigned to the selected Element. Try it out! You’ll likely be amazed at the sheer variety of sounds offered by MONTAGE/MODX oscillators.
As you might expect, among these thousands of waveforms are the four basic varieties offered by analog subtractive synthesizers — sine wave, sawtooth wave, square wave and triangle wave. (In fact, there are several varieties of sawtooth and square waves.) These are all categorized as “Syn Lead” and further subcategorized as “Analog.” Ready to hear what they sound like? Start by calling up the “Subtractive Pt 1_01” Performance, then do the following:
- Press [PERFORMANCE (HOME)]
- Press [EDIT]
- Press [PART SELECT 1/1]
- Touch the Elem1 tab at the bottom of the screen or press the [MOTION SEQ SELECT 1] button
- Touch the Bank/Number/Category/Subcategory/Name area in the screen to highlight it
- Touch the Category Search tab on the left-hand side of the screen
- Select the “Syn Lead” category and the “Analog” subcategory:
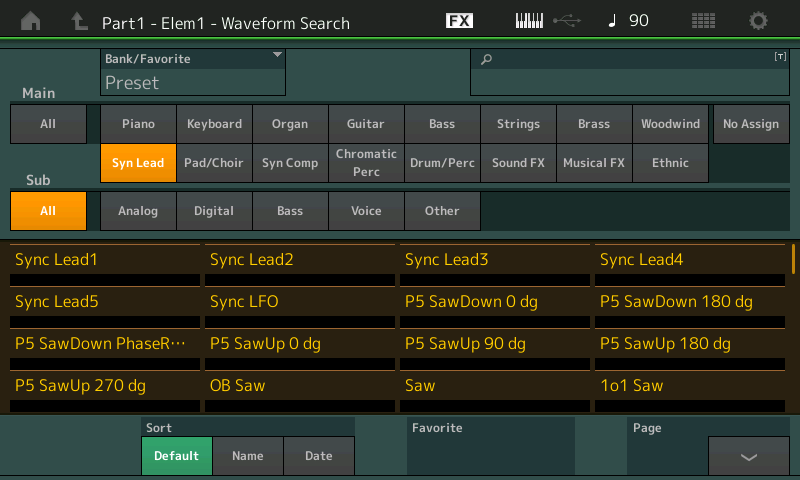
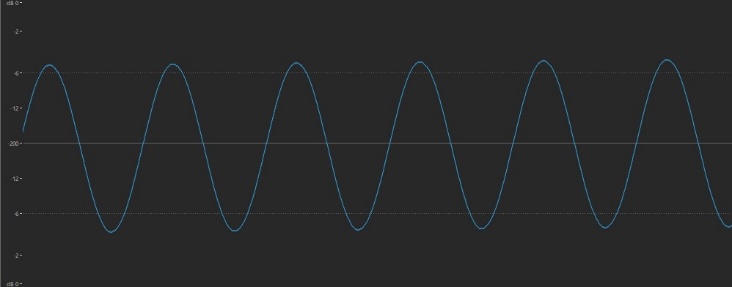
- Let’s start by listening to a sine wave — a sound that has no overtones. Touch the Name tab at the bottom of the screen in order to alphabetize the list of waveforms (this isn’t strictly necessary, but it will make it easier for you to find the waveform you’re looking for) and Page down until you get to “Sine,” then select it.
- Play a few notes on the keyboard. Here’s what it sounds like:
… and here’s what the waveform looks like — completely smooth and round, in reflection of its gentle tonality:
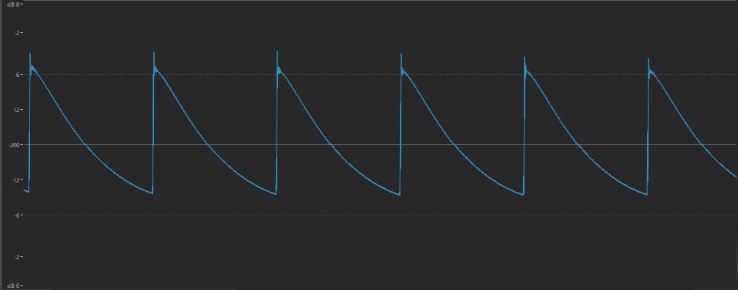
- Next, select the “1o1 Saw” waveform. This is a standard sawtooth wave, which sounds like this:
… and looks like this:
• Next up: a square wave. Select the “P50-1” waveform, which sounds like this:
… and looks like this:
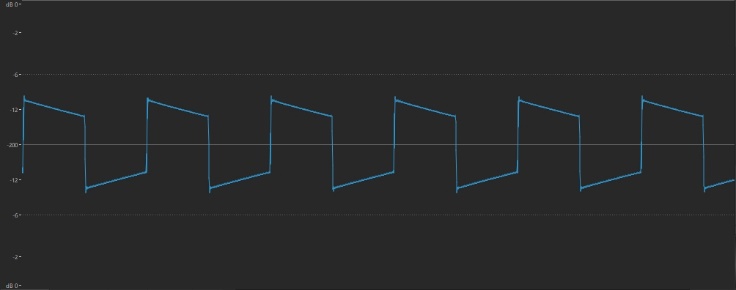
• Finally, let’s check out a triangle wave. Select the “Tri Wave” waveform, which sounds like this:
… and looks like this — pretty much exactly as its name describes:
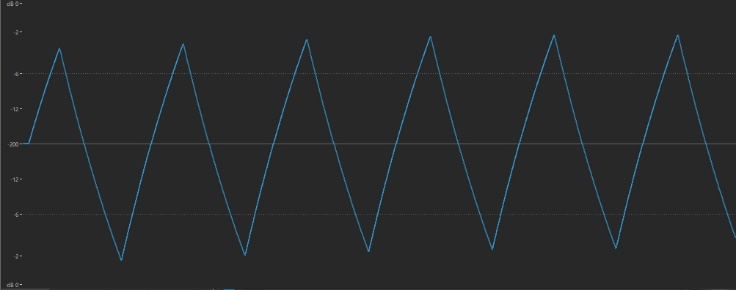
We’ll be working with several different waveforms in the exercises to come, but the one that we’ll be using in the next section is the sawtooth, so before moving on, select the “1o1 Saw” waveform once again and press STORE, then name the Performance “Subtractive Part 1_02.” (You can also find this Performance on Soundmondo by clicking here.)
Now it’s time to explore the “chisel” of subtractive synthesis, which is …
The Filter
Whether you’re talking about an oil filter in a car, an air filter in a home cooling/heating system, or an analog or digital filter in a synthesizer, the purpose of such a device is to remove things. Subtractive synthesizers (including AWM2 synths) typically offer these four different filter types:
- Low Pass Filter (LPF)
- High Pass Filter (HPF)
- Band Pass Filter (BPF)
- Notch Filter (called a “BEF” [Band Elimination Filter] in AWM2 synths such as MONTAGE and MODX).
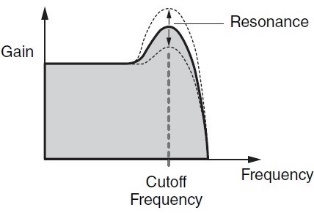
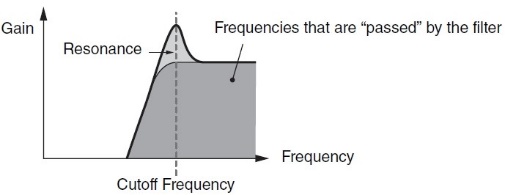
Regardless of filter type, the most important control is something called cutoff frequency, or cutoff for short. This determines the point at which the filter begins to act upon the sound, but the way it acts depends upon the filter type:
- In Low Pass Filters (LPFs), frequencies above the cutoff are affected, while frequencies below it pass through unaffected, as the name implies:
- In High Pass Filters (HPFs), frequencies below the cutoff are affected, while frequencies above it pass through unaffected, again as the name implies:
- In Band Pass Filters (BPFs), a band of frequencies immediately above and below the cutoff (“center frequency”) pass through unaffected, while frequencies further away are affected:
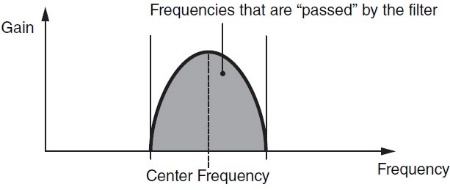
- In Notch Filters (BEFs), the opposite occurs: A band of frequencies immediately above and below the cutoff (“center frequency”) is affected, while frequencies further away pass through unaffected.
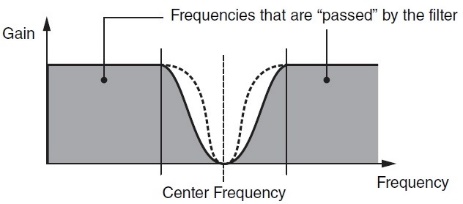
The degree to which a filter affects a sound is determined by a unit of measurement called “dB per octave,” usually written as “dB/oct” for short; the higher this value, the more steep the effect of the filter. (In the case of Bandpass and Notch filters, dB/oct values determine the width of the frequency range being allowed to pass or being removed, respectively; higher values result in wider ranges, and lower values result in narrower ranges.) Subtractive synth filters are sometimes as gentle as -6 dB/oct or -12 dB/oct, but more typically have a steepness of -18 dB/oct or -24 dB/oct. In some analog synths, this is selectable; in AWM2 synths such as MONTAGE and MODX, there are 18 preset filter settings, some of which are dual filters (i.e., two LPFs, HPFs, BPFs and BEFs) or combinations of filters (i.e., an LPF plus an HPF, or an LPF plus a BPF). We’re only going to cover the basics here, but if you feel like digging into the technical details, you can find complete descriptions of each of these presets in the MONTAGE/MODX Reference Manual and Synthesizer Parameter Manual.
As with most synth-related topics, the way filters work is much easier to hear than it is to describe, so let’s jump right in, using the sawtooth wave in our “Subtractive Part 1_02” performance as an example — a good choice here since, as we’ve seen, sawtooth waves are rich in overtones and contain a blend of all harmonics.
Start by calling up the “Subtractive Pt 1_02” Performance (click here to download it from Soundmondo), then do the following:
- Press [PERFORMANCE (HOME)]
- Press [EDIT]
- Press [PART SELECT 1/1]
- Touch the Elem1 tab at the bottom of the screen or press the [MOTION SEQ SELECT 1] button
- Touch the Filter tab on the left-hand side of the screen. You’ll be brought to the filter screen, which looks like this:
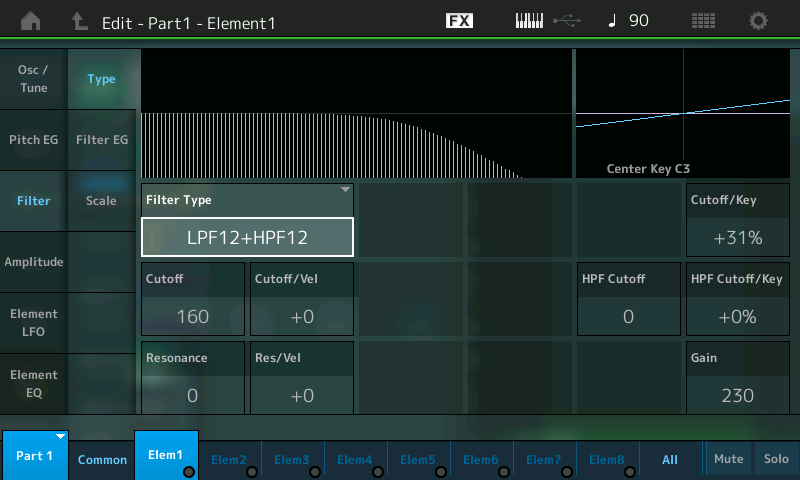
- As shown in the Filter Type parameter box, the preset used for the “Init Normal (AWM2)” Performance (from which “Subtractive Pt 1_02” was derived) is “LPF12+HPF12” — a combination of a -12dB/oct Low Pass Filter and a -12dB/oct High Pass Filter. This is a pretty complex filter to start with, so instead let’s choose a simple Low Pass Filter for now. Accordingly, touch the Filter Type box to select it. This causes a dropdown menu with a list of available options to appear in the left-hand side of the screen:
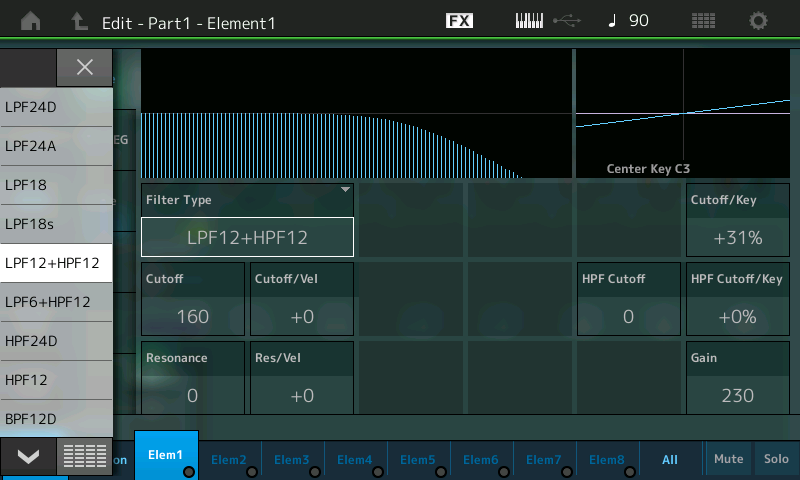
- You can either touch the down arrow button at the bottom left-hand corner of the screen to display more options, or touch the grid display immediately to its right to get a grid showing all options at once:
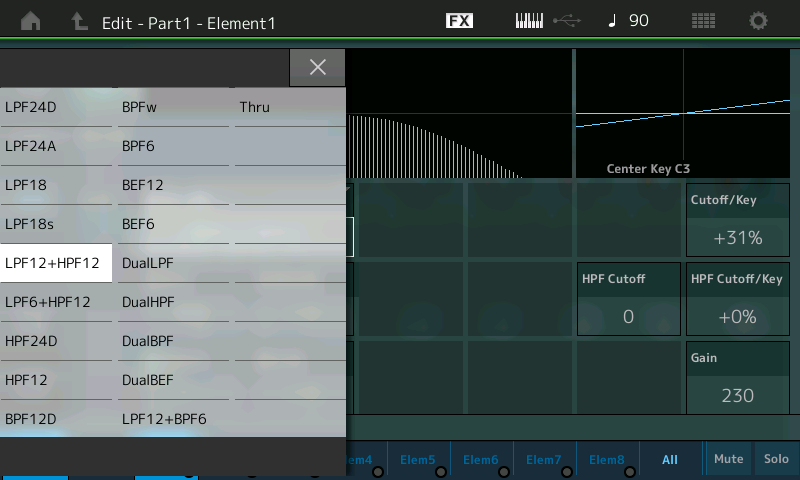
(Note that the “Thru” setting disables the filter altogether.)
- Turn the data dial fully counterclockwise or use the DEC/NO button to select the first option (“LPF24D”). This is a very steep -24dB/octave Low Pass Filter with a characteristic digital sound. Finally, touch the “X” to close out the menu. Note that, as you step through the different filters, the graph above the Filter Type box changes to reflect the way the filter will affect the sound.
- As mentioned previously, when it comes to using filters, the most important parameter is Cutoff, located directly below the Filter Type box (selected and highlighted in the illustration below):
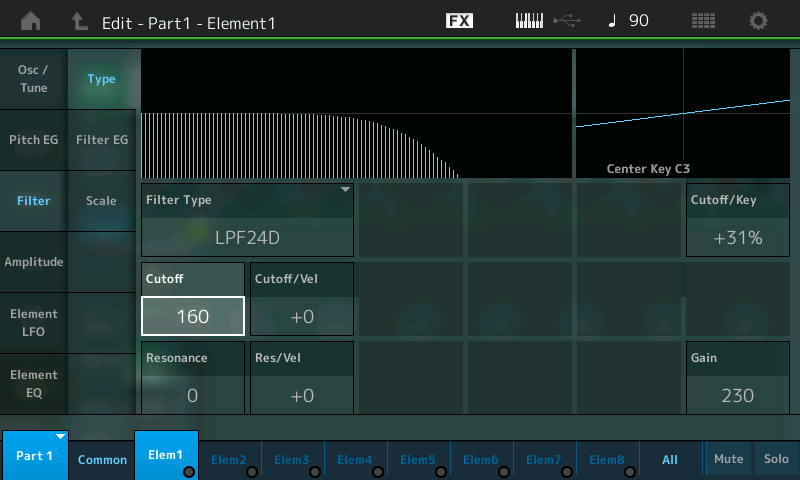
- Begin by holding down a note and slowly lowering the Cutoff from its stored value of 160 all the way down to 0, using the data dial, listening as you do so. Because we’re using a Low Pass Filter, as you lower the cutoff frequency, more and more of the overtones are removed, starting with the highest ones, until all you are left with is the fundamental — in other words, a sine wave. Here’s what it will sound like:
- This kind of “filter sweep” can be even more striking when you add something called resonance. This emphasizes a narrow band of frequencies around the cutoff frequency, making their contribution even more prominent; the higher the resonance amount, the louder that narrow band of frequencies. (Very high resonance values — in the case of AWM2 synths, around 80 or above — will actually result in the filter self-oscillating, even to the point of total distortion. Feel free to experiment with this if you like … but beware of some very loud nastiness!) In MONTAGE/MODX, the Resonance parameter is found directly beneath the Cutoff box (selected and highlighted in the illustration below):
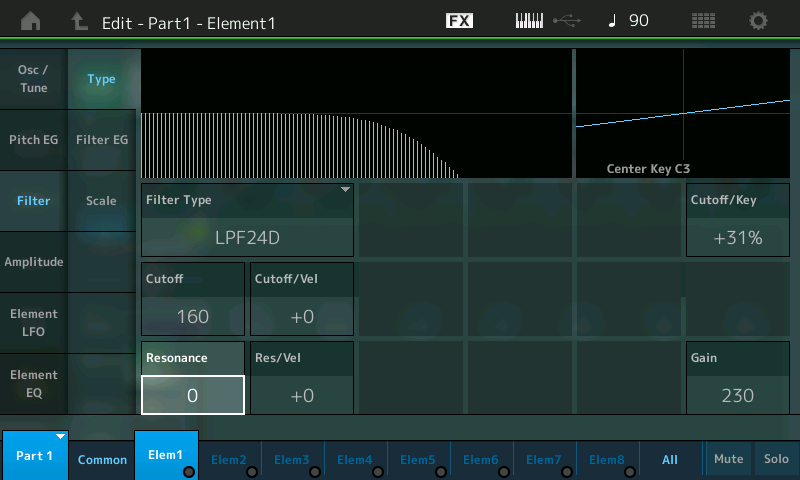
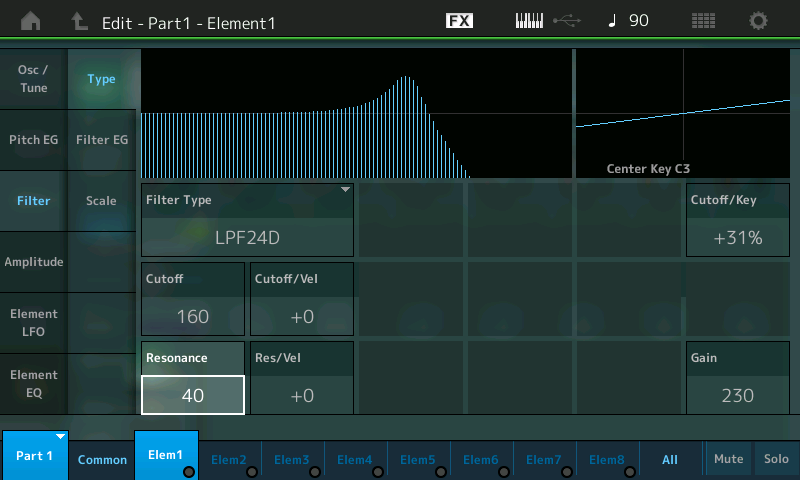
- As you increase the amount of Resonance, the “bump” in the onscreen curve becomes larger and larger. For example, here’s what it looks like when Resonance is set to 40:
- Leave the Resonance value at 40 and do the same “filter sweep” as before, slowly lowering the Cutoff frequency as you hold down a note and listen carefully. This is what you’ll hear:
- Again leaving Resonance at 40, do the reverse, slowly increasing the Cutoff so that the filter “opens up.” As you can hear in this audio clip, this is pretty much the classic sound of analog synthesizers!
Yamaha Synth · Part 1 Audio Clip 11 (Resonant LPF24 Opens)
- Continue experimenting with increasing and decreasing Resonance amounts as you “open” and “close” the filter by varying the Cutoff amounts. As we’ll learn in future installments of this series, the Cutoff can be also be adjusted automatically with the use of control devices such as envelopes and low frequency oscillators (LFOs), as well as with tools like keyboard velocity and scaling.
- As we mentioned previously, lower “dB/oct” values result in less severe filtering. To hear this, restore the Cutoff to its original stored value of 160, leaving the Resonance value at 40. Then change the Filter Type to LPF18 (which has a steepness of -18 dB/octave instead of -24dB/octave) and lower the Cutoff to 0, then raise it back up again to 160. Because this filter is less steep than the LPF24 Type, the aural result will be a less prominent “sweep” of the sound:
- Next, change the Filter Type to HPF24D (a High Pass Filter with a steep -24dB/octave curve and a characteristic digital sound) and once again close, then open the filter. Very different! This time, almost all the overtones are removed at first (only the very highest ones, which can barely be heard, are present); then, as you close the filter down, lower and lower overtones appear until finally the fundamental, along with all the harmonic overtones present in the sawtooth wave) is heard. When you open the filter back up again (by increasing the Cutoff frequency), the opposite occurs: One by one, the overtones are removed, starting with the fundamental, until only the very highest, nearly inaudible ones remain. Here’s what it sounds like:
- Now let’s hear the effect of a Band Pass Filter. Accordingly, change the Filter Type to BPF12D (which has a -12dB/octave steepness and a characteristic digital sound) and once again close, then open the filter. This time, you’ll hear just a narrow band of overtones move down, then up, the audio spectrum. Here’s what it sounds like:
- Finally, change the Filter Type to BEF12 (which again has a -12dB/octave steepness) and once again close, then open the filter. This time, you’ll hear all the overtones in the sawtooth wave, but with a narrow band of overtones removed, or “notched” out — and as you lower and raise the Cutoff, the band of removed frequencies will move down, then up. Here’s what it sounds like:
- Continue your experimentation by applying different Filter Types, different amounts of Resonance, and different Cutoff frequencies to our sawtooth wave. Then move on to selecting different filter types (including the combination ones) as well as different waveforms — and remember, MONTAGE/MODX offers 6,346 waveforms to choose from, so leave yourself plenty of time to explore this expansive sonic playground!
Last but not least, let’s move on to the final building block of subtractive synthesis: the amplifier.
The Amplifier
Just as you can think of an oscillator as being equivalent to the block of stone a sculptor begins with, and a filter as the chisel he or she uses, you can think of the amplifier as the deciding factor as to whether the final sculpture will be a delicate miniature, life-sized, or gargantuan (think Mount Rushmore). In short, the more an amplifier amplifies the signal (try saying that three times fast!), the louder the sound is.
And frankly, that’s about all there is to say about amplifiers, other than the fact that they are always under the complete control of a dedicated envelope generator, or EG for short. We’ll be devoting much of the next article in this series to an in-depth exploration of what envelopes do and how they work, but for now suffice it to say that a subtractive synth amplifier does absolutely nothing — that is to say, it passes no signal whatsoever — unless instructed to do so by an envelope.
With that teaser in mind, are you ready to to tune in for our next installment of Subtractive Synthesis 101, entitled “Going from Static to Dynamic?” Part two available here!
Part three is here.
Have questions/comments? Join the conversation on the Forum here.
Tagged Under
Keep Reading
Keep Reading
© 2025 Yamaha Corporation of America and Yamaha Corporation. All rights reserved. Terms of Use | Privacy Policy | Contact Us


