We take your Privacy very seriously.
Part III
(Links back to Part one here and Part two here)
Throughout the course of this series, we’ve come a very long way in our understanding of subtractive synthesis. Part 1 provided the fundamentals of audio theory, along with an introduction to the basic subtractive building blocks: the oscillator, the filter and the amplifier. In Part 2 we talked about various tools for changing sounds over time, including envelope generators, LFOs and controllers. But up until now, we’ve limited our discussion to a single element. In this wrap-up installment, we’ll show you how you can expand the sounds you create by using multiple elements and a powerful tool called keyboard scaling.
The best way to begin understanding how multiple elements can be combined to make up a complex sound is to examine some of the AWM2 presets in your MONTAGE/MODX, all of which were created by skilled programmers with an advanced knowledge of subtractive synthesis.
Analyzing AWM2 Presets
Before we dive in, let’s do a quick recap of AWM2 structure. As described in Part 1, a MONTAGE/MODX Performance can contain up to 16 Parts, and each Part can contain up to eight Elements. It’s easy to find out how many Parts there are in a Performance: all you have to do is press the [PERFORMANCE (HOME)] button — a simple action that not only displays a wealth of information but puts pretty much all the analytical tools you need at your fingertips.
For example, call up the very first preset Performance (number 1), which is named “CFX + FM EP,” then press the [PERFORMANCE (HOME)] button. Here’s what you’ll see:
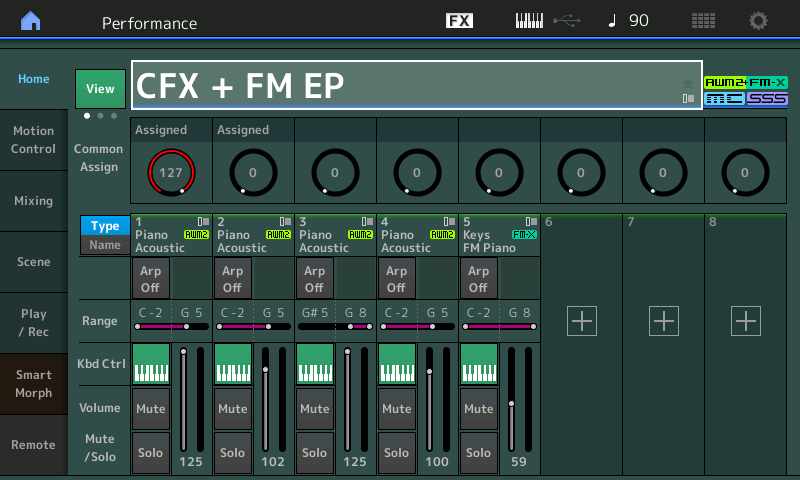
We can see from this that the “CFX + FM EP” Performance uses five Parts. The “Type” boxes show you whether each is an AWM2 or FM-X (Digital FM) Part — that is, whether it was created with subtractive or digital FM synthesis. You can also set the key and/or velocity range of individual parts, mute and/or solo them, and even disconnect your instrument’s keyboard from individual parts — all very powerful stuff! (For more information, refer to your MONTAGE/MODX Reference Manual.)
If you select one of the Parts by touching it and then touch the green View box to the left of the Performance name, this will switch to the Element View screen:
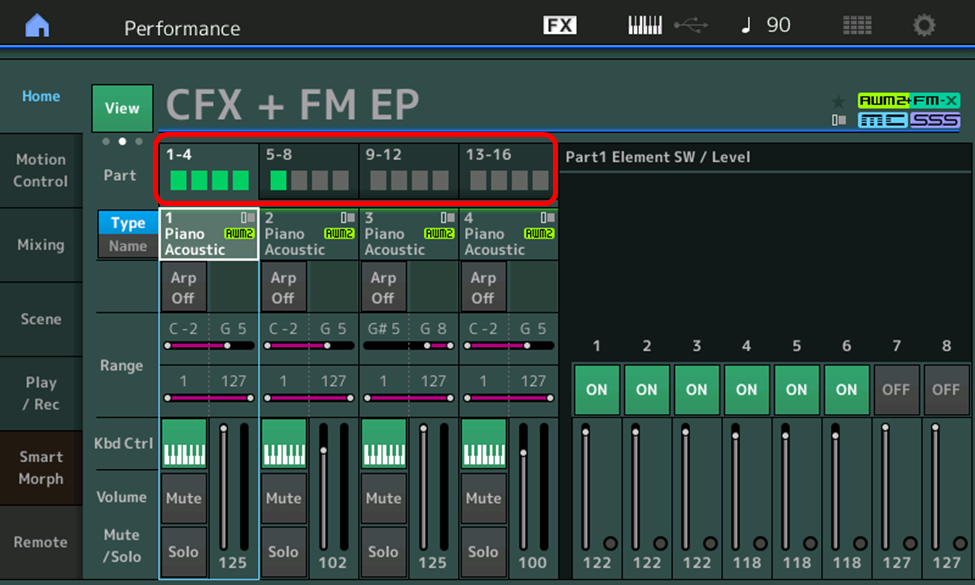
Here, the “Part” boxes (circled in red in the illustration above) show you how many Parts there are; the ones “lit” in green are in use, and the unlit ones (in gray) are unused. On the left-hand side of the screen, four Parts at a time are displayed (that is, Parts 1 – 4, 5 – 8, 9 – 12 and 13 – 16).
If you selected an AWM Part, the right-hand side of the screen also allows you to control individual Elements (if you selected an FM-X Part, it allows you control individual Operators), with dedicated on/off switches and faders. Taken together, this one screen provides you with pretty much everything you need to deconstruct any MONTAGE/MODX Performance … and best of all, any changes you make are saved when you store the modified Performance.
Let’s start with a Performance that consists of just a single AWM2 Part so we can see how this works. Accordingly, call up the “Piano & Strings” preset. (Hint: In the Category Search screen, do a search for the phrase.) Here’s the screen you’ll see when you press the [PERFORMANCE (HOME)] button and select:
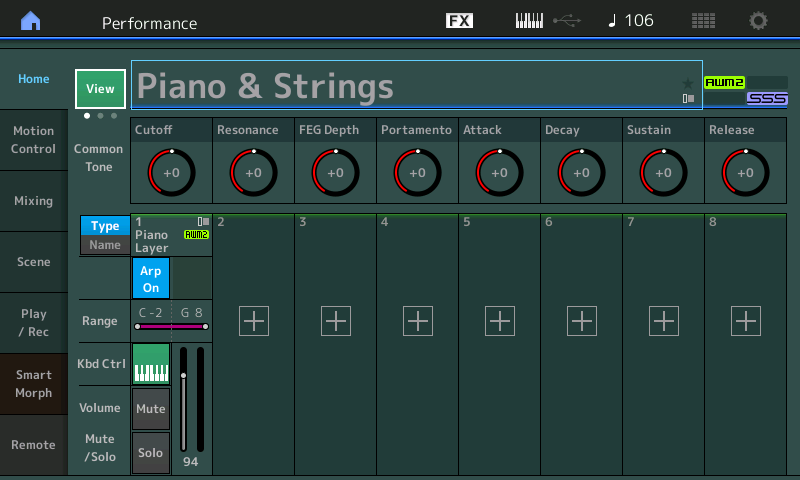
As you can see, there’s only one Part to this Performance — an AWM2 type, and if you select it and then touch the View box, you’ll see that there are eight elements in use:
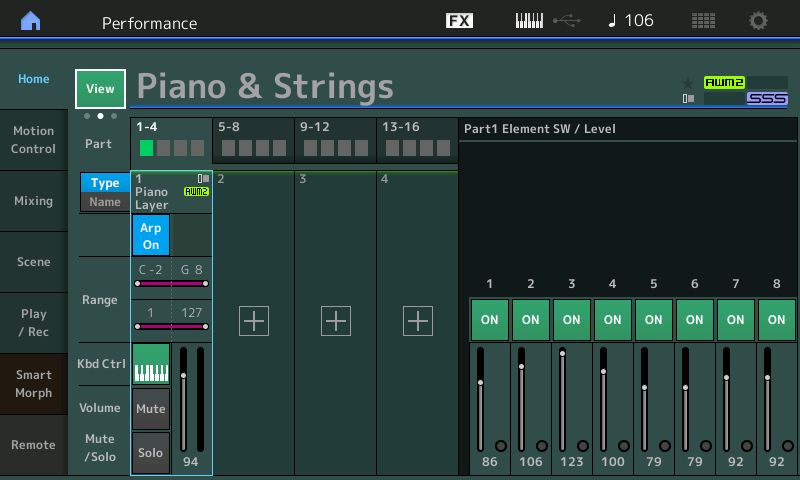
The sound, as you can hear (and as the name implies), is a combination of a piano and a string ensemble layered together, and at first you might think that this is a simple construction, with some elements contributing the piano sound, and others that are contributing the string sound.
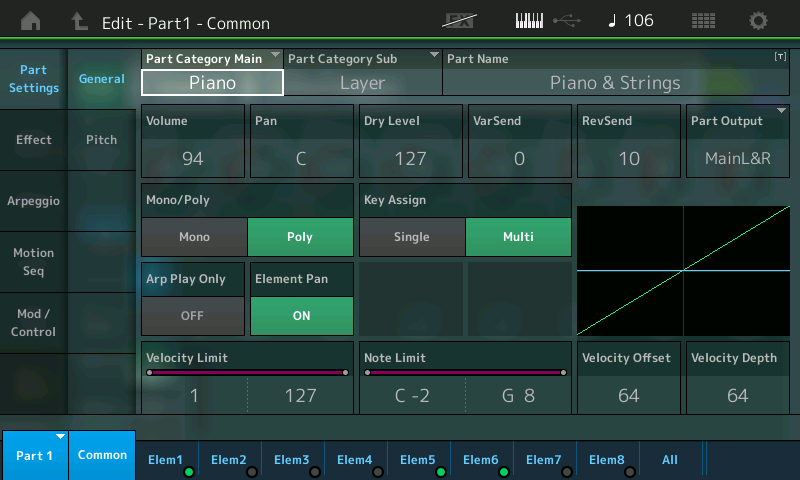
But there’s actually a lot more going on under the hood, as you’ll discover if you press EDIT, followed by [PART SELECT 1/1], which will bring you to the Edit – Part 1 – Common screen shown below. As you play different notes on the keyboard, virtual LEDs in the eight Element tabs at the bottom of the screen will light green, indicating which elements are being sounded. For this particular preset, you’ll find that the Elements 1, 5 and 6 (Elem1, Elem5 and Elem6) LEDs light when most keys are played softly or with moderate force:
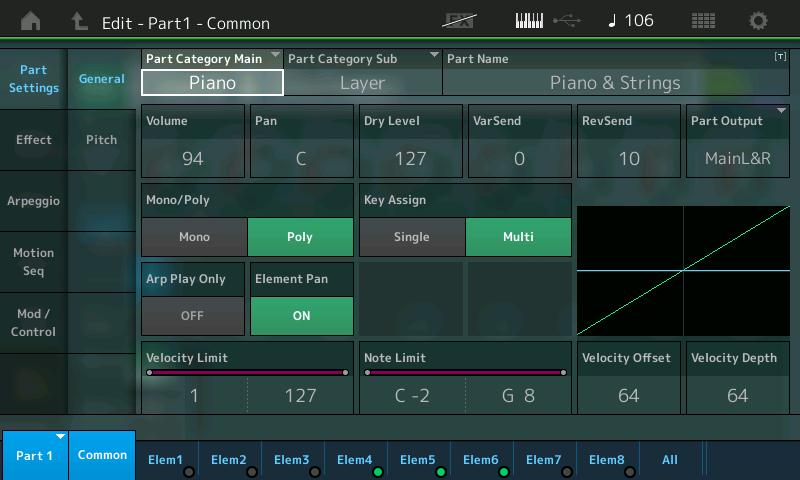
However, when the very highest keys are played — specifically, notes G#5 and higher — the Elem4 tab lights up instead of Elem1 (Elem5 and 6 continue lighting, as before):
The explanation for why this is happening becomes obvious as soon as you touch the Elem1 tab or press the [MOTION SEQ SELECT 1] button, at which time the Edit – Part 1 – Element 1 screen instead appears, with the Elem1 tab highlighted in blue:
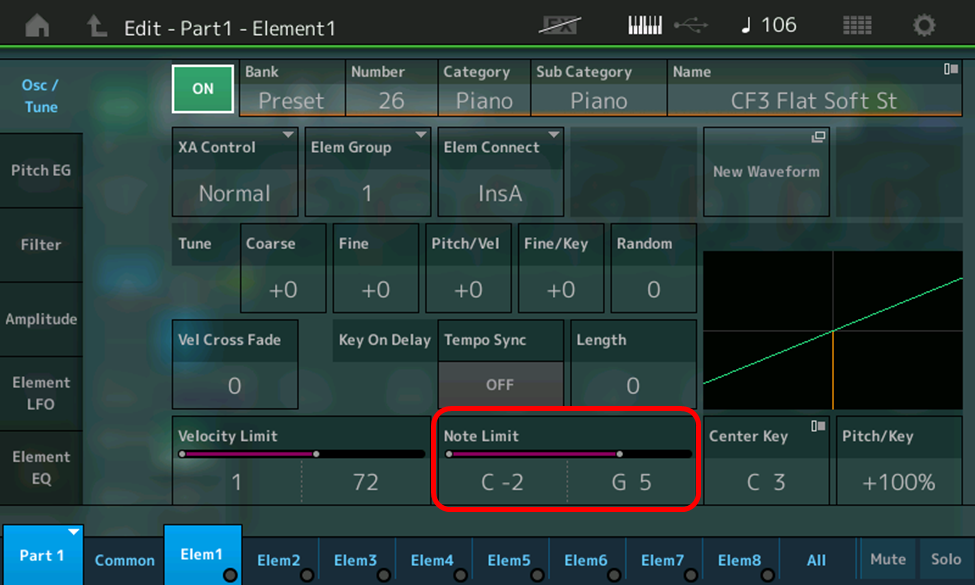
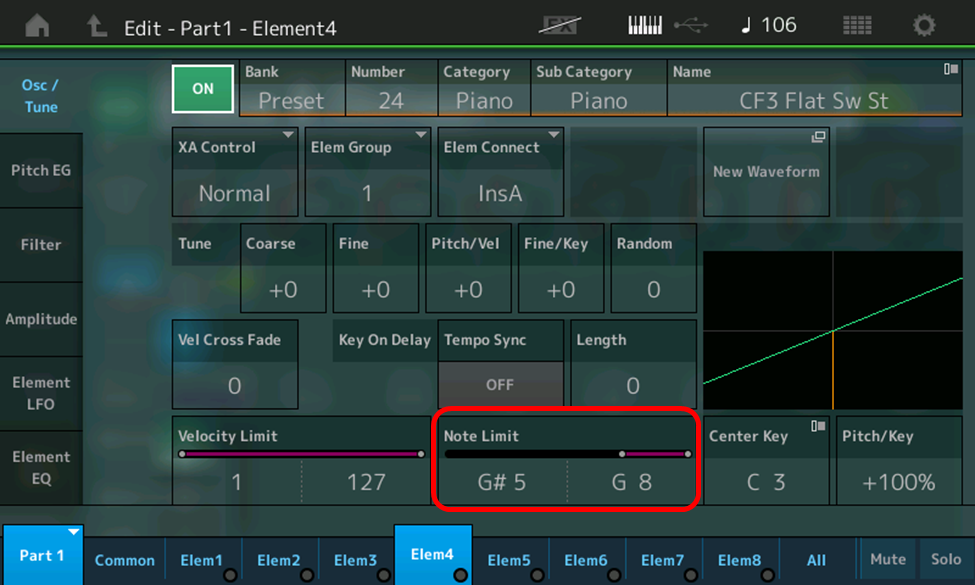
The parameters to focus on here are those in the Note Limit box (circled in red in the illustration above), which determine the note range of the selected element. In this case, you can see that these values for Element 1 are C-2 (the lowest note it will play) and G5 (the highest note it will play). In other words, Element 1 will only sound when keys up to G5 are played, and will not sound when keys higher than G5 are played.
Element 4, on the other hand (easily accessed by touching the Elem4 tab or pressing [MOTION SEQ SELECT 4]), has been assigned low and high Note Limit values of G#5 and G8, meaning that it only sounds when keys G#5 and higher are played:
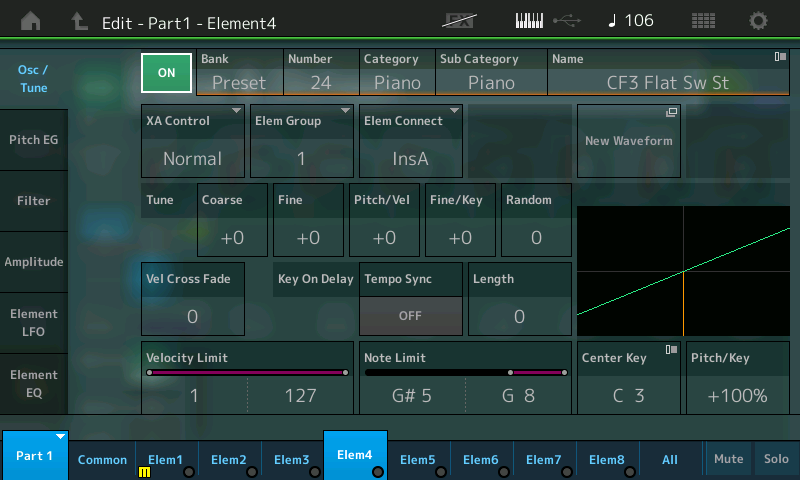
You can easily hear the contribution of each element by touching the Solo tab at the bottom of the screen (an “S” appears in the currently selected Element tab) or by muting each selectively, accomplished by touching the Mute tab at the bottom of the screen or pressing the [ARP SELECT] buttons, which act to mute the corresponding elements when an AWM2 Performance is selected and you’re in edit mode. (As we saw earlier, you can also mute individual elements from the main Performance screen, but that requires exiting edit mode.) When an element is muted, a small yellow “m” (for mute) appears in the corresponding Element tab. For example, here’s what an edit screen looks like when Element 1 is muted:
Another great tool for analyzing Performances is the Oscillator screen, which displays when you touch the All tab at the bottom of the screen:
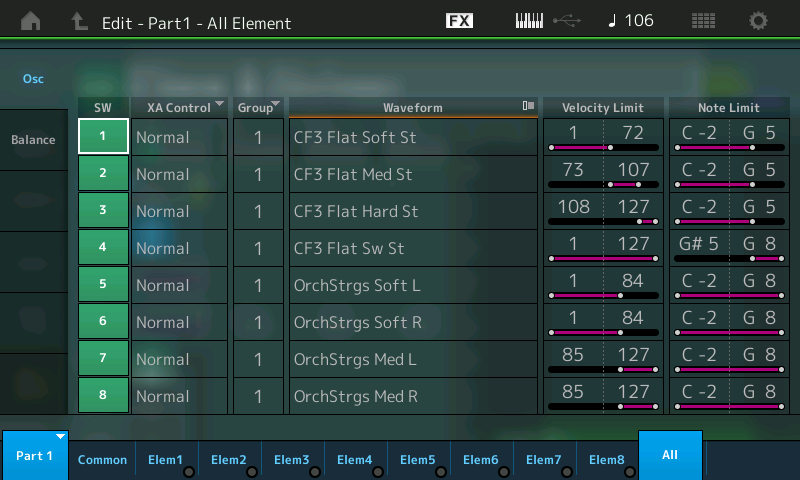
Controls within this screen not only allow you to selectively turn individual elements on and off (simply touch the corresponding “SW” boxes on the left — when an element is on, it’s lit green; when off, it’s unlit gray) and change their velocity and/or note limits, but you can even select different waveforms for each element!
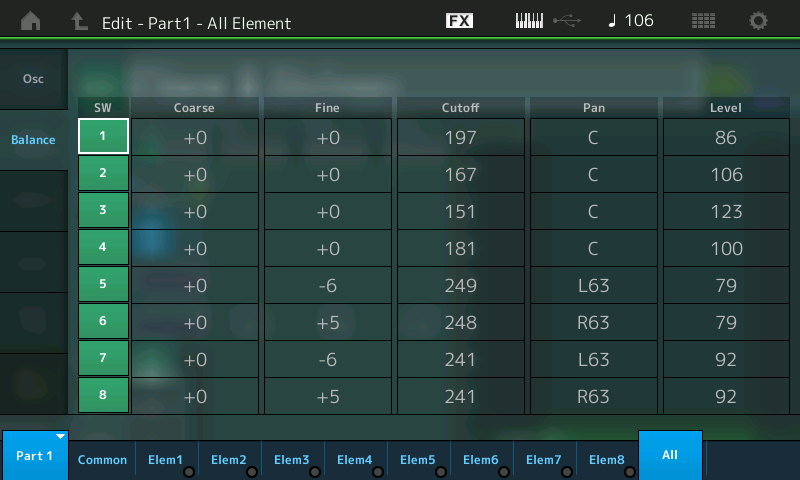
Touching the Balance box on the far left-hand side of the screen gives you yet another set of options that enable you to again quickly turn individual elements on and off (via the green/gray “SW” boxes) as well as to alter their levels, change their cutoff frequency, adjust their tuning or even change their pan position:
Last but not least, in the list of tools for analyzing presets are the MONTAGE/MODX Control Sliders on the left-hand side of the instrument. When the instrument is in Performance mode (that is, when you’re simply playing back a Performance), these sliders allow you to set the levels of the individual Parts within the Performance. This can be incredibly helpful in analyzing presets, since it allows you to hear the contribution of each Part. (When you’re first starting out, I advise you to listen to just one Part at a time, as things can quickly get very complicated if the Performance you’re analyzing is constructed from multiple Parts.)
When you’re in Edit mode, however these same control sliders allow you to set the levels of the elements within the selected Part. This not only enables you to create a custom mix of the elements, but also to quickly hear the contribution of each. This powerful tool, in conjunction with selective element muting (via the [ARP SELECT] buttons) allow you to quickly and easily analyze the construction of any AWM2 preset.
For example, you’ll be able to quickly discover the sonic contribution of Elements 1 and 4 within the “Piano & Strings” preset we’re currently examining: Elements 1 and 4 are responsible for the piano sound (Element 1 contributes it up to the note G5, whereupon Element 4 takes over), while Elements 5 and 6 (panned hard left and right, respectively, as you’ll discover if you select them and touch the Amplitude box on the left-hand side of the screen) are contributing an ensemble string pad in full stereo.
But what of the other four elements? Well, they too have a role to play, as you’ll discover if you strike keys with increasing force while keeping an eye on which element tabs light as you do so. If you mute Elements 3 – 6, you’ll be able to hear that Element 2 is another piano sound, but a little more strident than that of Element 1, and that it only sounds when you strike keys with a moderate amount of force, at which time Element 1 is nowhere to be found (or heard). This is courtesy of their “Level/Vel” settings (a parameter that we discussed in Part 2), along with the selected velocity curve (something we haven’t discussed, but if you’re curious, the details can be found in the MONTAGE/MODX Reference Manuals and Synthesizer Parameter Manual).
Using the same technique of selective element muting and viewing various Edit screens will reveal that Element 3 is yet another piano sound — this one even more strident than the one created by Element 2 — and that it only sounds when you strike keys with a great deal of force/velocity. The explanation as to why Elements 1, 2 and 3 sound different from one another is revealed when you go to the Osc/Tune screen, which shows that their selected waveforms are “CF3 Flat Soft St,” “CF3 Flat Med St” and “CF3 Flat Hard St,” respectively. These are all samples of notes played on a Yamaha CFIII concert grand piano with soft, medium, and hard degrees of force. Similarly, you’ll discover that Elements 7 and 8 are utilized to provide a more strident string sound (courtesy of the waveforms “OrchStrgs Med L” and “OrchStrgs Med R,” respectively) when you strike keys with a moderate amount of force, replacing the gentler sound (courtesy of the waveforms “OrchStrgs Soft L” and “OrchStrgs Soft R,” respectively) of Elements 5 and 6.
These same investigative techniques can be used to analyze any of the thousands of AWM2 presets in your MONTAGE/MODX, easily accessed by pressing the CATEGORY button and selecting the Preset bank, then “AWM2” in the Attribute box, highlighted in the screenshot below:
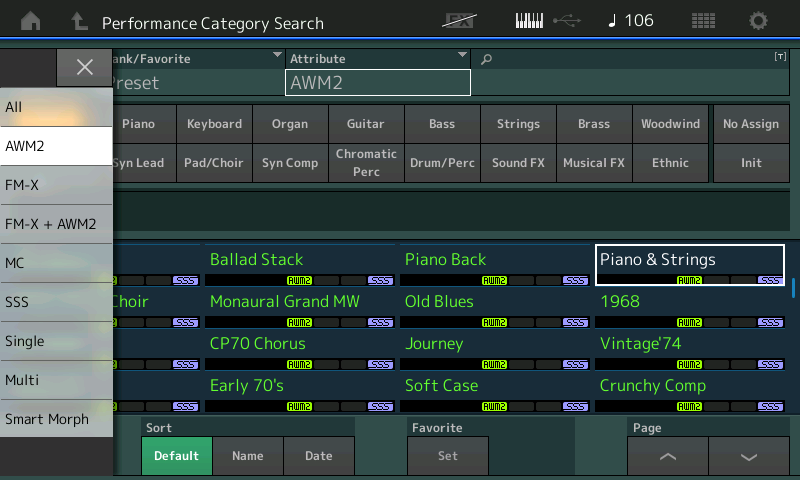
After doing so (and touching the “X” to close out the selection box), you’ll have the option of viewing all AWM2 presets or of selecting the desired Category and Subcategory for the ones you wish to examine. Not only will you discover a veritable treasure trove of inventive and inspiring sounds, you’ll find that analyzing them down to the Element level is an excellent way of learning the ins and outs of subtractive synthesis.
Before we move on to constructing an original AWM2 Performance consisting of multiple elements and applying the principles and tools we’ve learned thus far, there’s one last powerful aspect to subtractive synthesis that we need to discuss, and it’s called …
Keyboard Scaling
In Part 2 of this series, we learned about several different means for controlling operator output levels:
- Envelopes, which cause aperiodic (once-only) change
- LFOs (Low Frequency Oscillators), which cause periodic (repetitive) change
- Key velocity (the Level/Key parameter), which applies the force with which you strike keys on the keyboard
- Real-time physical controllers such as keyboard aftertouch, wheels, ribbons, footpedals and assignable knobs and switches
In addition to these, there’s another important means of causing change to the subtractive synth sounds you create: keyboard scaling, which uses the range of keys you’re playing to affect volume (if applied to amplifiers) and/or timbre (if applied to filters). (If you think about it, keyboard scaling is always applied to oscillators, which is why the pitch always changes when you play different notes on your keyboard.) Especially when emulating musical instruments, this is an extremely powerful tool — after all, even when played with equal force, a low note on a piano is much louder than a high note, due to its string being longer and thicker; similarly, a high note coming from a wind instrument is always much brighter than a low note since its overtones are higher. Important side note: When applied to amplitude, keyboard scaling is the only subtractive synthesis technique that allows you to increase an element’s output beyond its set Level (though in no case can it exceed the maximum value of 127) — a feat that even envelopes can’t accomplish, as stated in Part 2.
Although at first glance this may seem very complicated, it’s actually pretty straightforward. First, you set four break points for each element. A break point is simply any note number from A-1 to C8, where C3 is Middle C on your keyboard. A standard 61-key keyboard like the one on MONTAGE/MODX 6 runs from C1 to C6 (that is, from two octaves below Middle C to three octaves above Middle C). 76-note keyboards, as found on MONTAGE/MODX 7, run from E0 – G6, and 88-note keyboards like the one on MONTAGE/MODX 8, runs from A-1 to C7. (We’ll explain shortly why you might want to set the break point to a note that doesn’t physically exist on your instrument’s keyboard.) The four break points you set will automatically be rearranged in order, from highest note to lowest note, and the first break point (called “Break Point 1”) is used as the starting point (i.e., the starting volume, if applied to the amplifier, or the starting cutoff frequency, if applied to the filter), while the last break point (“Break Point 4”) is used as the ending point.
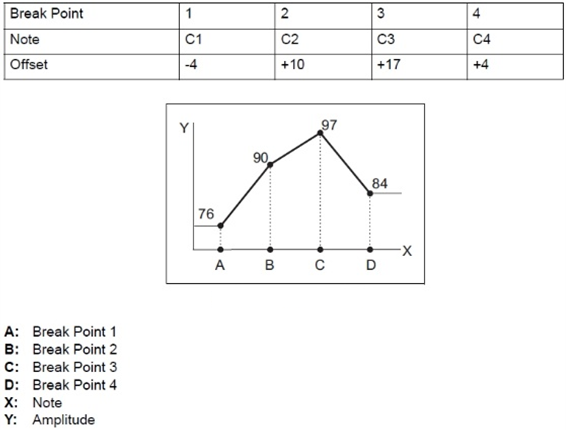
The amplitude (or cutoff frequency, if applied to the filter) of the selected element changes in a linear fashion (more about this shortly) between successive break points — in other words, it varies as you go from Break Point 1 to Break Point 2, then from Break Point 2 to Break Point 3, and so on. Whether this change is steep or gentle is determined by a parameter called offset, which can be set to any value from -128 to +127. Negative values result in the amplitude (or filter cutoff) lowering as you play successive notes between break points, while positive values result in the amplitude (or filter cutoff) increasing as you play successive notes between break points; the further the value is from 0, the steeper the change. If you don’t want any change between break points, simply enter an offset value of 0. The illustration below shows how the amplitude (volume) would change as you went from notes C1 to C4 on your keyboard, assuming that the basic amplitude value for the selected element is 80 and that the break point notes and offsets are as follows:
Let’s run an exercise to construct a similar, though more radical, keyboard scaling so we can hear its effect as well as see it:
- Call up the “Subtractive Pt 1_02” Performance you created in Part 1, or click here to download it from SoundMondo. (As a reminder, this is simply “Init Normal (AWM2)” without reverb, and with a sawtooth waveform selected instead of the default piano waveform.)
- Press [PERFORMANCE (HOME)]
- Press [EDIT]
- Press [PART SELECT 1/1]
- Touch the Elem1 tab at the bottom of the screen or press [MOTION SEQ SELECT 1]
- Touch the Amplitude box at the far left-hand side of the screen
- Touch the Scale box. You’ll be brought to the Amplitude Scale display, which looks like this:
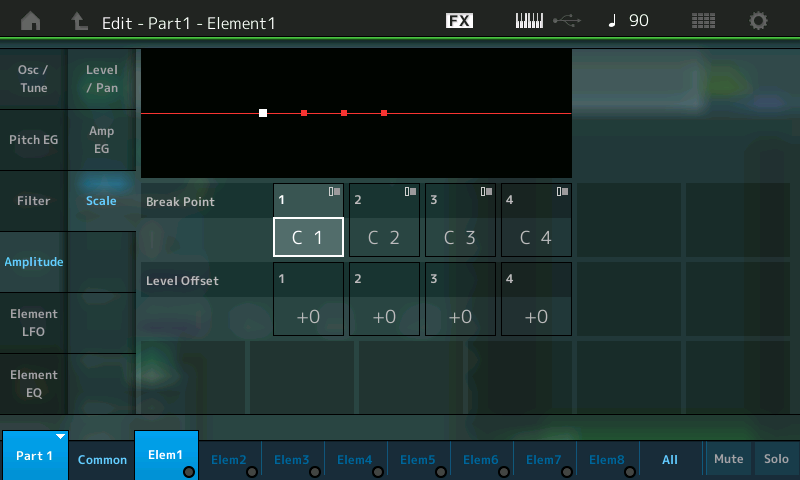
As you can see, the default offset (i.e., Level Offset) values are all +0, which is why you don’t hear any change in amplitude when you play different keys on the keyboard. Let’s shake things up a bit! Accordingly …
- Change the Break Point and Level Offset values as follows:
- Break Point 1 = C1; Level Offset = -63
- Break Point 2 = C3; Level Offset = +0
- Break Point 3 = G3; Level Offset = +100
- Break Point 4 = C6; Level Offset = -100
(Note that you can opt to enter in a Break Point value normally, with the data dial or DEC/NO / INC/YES buttons; alternatively, if you touch the Keyboard box on the far left-hand side of the screen, you can simply play a note on your instrument’s keyboard to enter the value.)
As you alter these parameters, the curve in the display changes to reflect these changes. When all these new values are entered, it will transform from completely flat to this shape:

Play an ascending chromatic scale from the lowest note on your keyboard to the highest. You’ll hear the volume of the sawtooth wave start quite soft (since the value of Level Offset 1 is -63), then rise to normal volume as you get closer to Middle C (C3, which serves as Break Point 1, with a Level Offset of +0). As you play notes higher than Middle C, you might expect to hear a further (and more pronounced) increase in volume since Break Point 3 (G3) is just a fifth higher than Break Point 2 (C3) and Level Offset 3 is +100 … but you won’t.
Why is this the case? Well, as explained earlier, while keyboard scaling is the only subtractive synthesis technique that allows you to increase an element’s output beyond its set Level (as determined by the Level parameter in the Level/Pan display), in no case can it exceed 127 (maximum). If you go to that display (simply touch the Level/Pan box on the left-hand side of the screen), you’ll see that, in this case, Element 1 is already set to 127. So we need to make one final adjustment before we can hear the effect of this keyboard scaling curve:
- Touch the Level/Pan box and reduce the Level of Element 1 to a new value of 90. Now again play an ascending chromatic scale from the lowest note on your keyboard to the highest. This time, you’ll hear the volume of the sawtooth wave start even more softly (since it now has a reduced overall Level), then slowly rise in volume until you reach Middle C (C3), at which point it rises sharply in volume until you reach G3, after which it fades away gently as you play higher and higher notes. This is what it will sound like:
A descending scale will sound like this:
Before we move on, be sure to name this Performance “Subtractive Pt 3_01” and save it. (You can also find it on SoundMondo by clicking here.)
As you just heard (and as we mentioned earlier), the change in volume between each break point is smooth and constant, though the steepness is dependent upon both the distance to the next break point and the offset value. In other words, AWM2 keyboard scaling is linear, which means that in digital synthesizers, the change is calculated by adding or subtracting numbers. For example:
The main things to understand from these simple calculations are:
- The further away you get from the break point, the greater the change.
- This change will be constant from note to note.
- As a corollary to #2, the closer together two consecutive break points are and/or the larger the Level Offset values, the steeper the change.
All of which brings us to an explanation of why you might want to set a break point to a note that doesn’t physically exist on your instrument’s keyboard. The answer is simple: As with the AEG Center Key parameter discussed in Part 2, there may be times when you’ll want to have a change start occurring even before the lowest or highest note on your keyboard.
To hear for yourself how this works, call up the “Subtractive Pt 3_01” Performance you just saved, or download it from SoundMondo by clicking here), then play the lowest note on your keyboard repeatedly while using the DEC/NO button to lower Break Point 1 one semitone at a time, listening carefully (and watching the curve in the display change) each time you play it. With each press of the DEC/NO button, you’ll hear that lowest note increase in volume. This is happening because you’re increasing the space between Break Point 1 and Break Point 2 (which remains set at C3), even though you’re not changing the Level Offset value (which remains at +63). Conversely, try playing the highest note on your keyboard repeatedly while using the INC/YES button to raise Break Point 4 one semitone at a time, again listening carefully (and watching the curve in the display change) as you do so. This time, with each press of the INC/YES button, you’ll hear that highest note increase in volume, again despite the fact that the Level Offset value remains unchanged. The bottom line is that, with the careful adjustment of Break Points and Level Offsets, you can set up pretty much any kind of keyboard scaling, no matter how subtle.
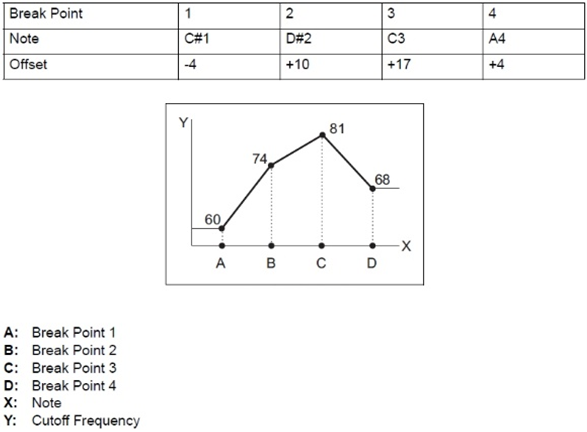
As mentioned above, keyboard scaling can also be applied to an element’s filter — specifically, to its cutoff frequency. The illustration below shows how the cutoff frequency would change as you went from the notes C#1 to A4 on your keyboard, assuming that the basic Cutoff Frequency value is 64 and that the break point notes and offsets are as follows:
As we did with amplitude, let’s run an exercise to construct a similar, though more radical, keyboard scaling, this time applied to the filter:
- Call up the “Subtractive Pt 1_02” Performance you created in Part 1, or click here to download it from SoundMondo. (Again, this is simply “Init Normal (AWM2)” without reverb, and with a sawtooth waveform selected instead of the default piano waveform.)
- Press [PERFORMANCE (HOME)]
- Press [EDIT]
- Press [PART SELECT 1/1]
- Touch the Elem1 tab at the bottom of the screen or press [MOTION SEQ SELECT 1]
- Touch the Filter box at the far left-hand side of the screen
- Touch the Scale box. You’ll be brought to the Filter Scale display, which looks like this:
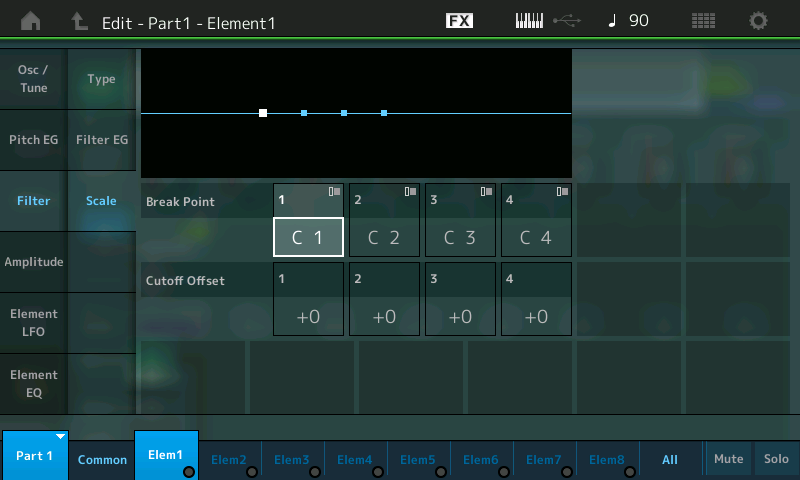
As with amplitude keyboard scaling, the default Level Offset values are all +0, which is why you don’t hear any change in the cutoff frequency when you play different keys on the keyboard. In order to “activate” filter keyboard scaling to where it has an audible effect, you’ll need to change one or more of these parameters. For the purposes of this exercise, do the following:
- Change the Break Point and Level Offset values as follows:
- Break Point 1 = C#2; Level Offset = -64
- Break Point 2 = D#3; Level Offset = +100
- Break Point 3 = C4; Level Offset = -117
- Break Point 4 = A5; Level Offset = +104
As you alter these parameters, the curve in the display changes to reflect these changes. When all these new values are entered, it will transform from completely flat to this shape:

Play an ascending chromatic scale from the lowest note on your keyboard to the highest. Hear any change? At this point, the answer is no, and there are two reasons why, both of which will become apparent as soon as you touch the Type box on the left-hand side of the screen. Because the “Subtractive Pt 1_02” Performance was derived from “Init Normal (AWM2),” its filter parameters are still at their default settings, with a very complex filter Type of “LPF12+HPF12” (a combination of a 12 dB / octave low-pass filter and a 12 dB / octave high-pass filter) and a very high Cutoff of 160. To be able to clearly hear the effect of the filter keyboard scaling curve we’ve just created, we’ll need to select a simpler filter Type and lower the Cutoff value.
Accordingly:
- Change the filter Type to “LFP24D” (this is a very steep -24dB/octave Low Pass Filter with a characteristic digital sound—see Part 1 for more information) and lower the Cutoff value to 80.
- To make the effect of filter keyboard scaling even more apparent, change the Resonance value to 40.
Now when you play an ascending chromatic scale from the lowest note on your keyboard to the highest, the lowest notes will have few overtones (since the value of Level Offset 1 is -64), then start to increase as you play notes higher than C#2 (the C# below Middle C, which serves as Break Point 1). As you then continue to play higher notes, approaching D#3 (Break Point 2, which has a Level Offset of +100), you’ll hear a steadily increasing amount of overtones until you reach D#3, after which the overtones will start to diminish quite rapidly until you reach C4 (Break Point 3, which has a Level Offset of -117). From there until A5 (Break Point 4, which has a Level Offset of +104), the overtones will return, one note at a time … and the timbre you hear will remain the same even when you play higher notes. This is what it sounds like:
A descending scale will sound like this:
As you can hear, there’s one note — specifically, C4 — that has so few overtones, it’s almost inaudible. (It’s also very close to a sine wave — see Part 1 for more information.) The reason why is simple: C4 has been designated Break Point 3, where the Cutoff of this steep lowpass filter is at its lowest point. Remember, Level Offset 3 is -117 — close to bare minimum, which means that the (low-pass) filter will be almost completely closed (that is, passing almost no overtones) when you play this note.
Be sure to name this Performance “Subtractive Pt 3_02” and save it (you can also find it on SoundMondo by clicking here) before experimenting further with different Break Point and Level Offset values, as well as different filter Types and Cutoff values. When you feel you’ve got a good grasp of the concept, try running this exercise, which combines both filter keyboard scaling and amplitude keyboard scaling:
- Call up the “Subtractive Pt 3_02” Performance you just created or click here to download it from SoundMondo
- Press [PERFORMANCE (HOME)]
- Press [EDIT]
- Press [PART SELECT 1/1]
- Touch the Elem1 tab at the bottom of the screen or press [MOTION SEQ SELECT 1]
- Touch the Amplitude box at the far left-hand side of the screen
- Touch the Scale box on the left-hand side of the screen
- Enter the same Break Point and Level Offset values we used when creating the amplitude keyboard scaling earlier (saved as part of the“Subtractive Pt 3_01” Performance):
- Break Point 1 = C1; Level Offset = -63
- Break Point 2 = C3; Level Offset = +0
- Break Point 3 = G3; Level Offset = +100
- Break Point 4 = C6; Level Offset = -100
- We’ve now created a sound that changes in both volume and timbre as you play different notes on the keyboard.
As a visual reminder, the volume changes this way:

… while the overtone content (that is, the timbre) changes this way:

If you play an ascending chromatic scale from the lowest note on your keyboard to the highest, this is what you’ll hear:
…and if you play a descending chromatic scale from the lowest note on your keybaord to the highest, this is what you’ll hear:
Name this Performance “Subtractive Pt 3_03” and save it (you can also find it on SoundMondo by clicking here) before continuing your experimentation by changing various amplitude and filter keyboard scaling values (as well as other AWM2 parameters, such as filter types and waveforms) until you’ve got a good sense of how they interact.
Feeling comfortable with all the concepts described in this and previous installments of Subtractive 101? Excellent! That means it’s time for us to begin …
Putting It All Together
Let’s wrap things up with an exercise (it’s a long one — don’t say you haven’t been warned!) to create a complex eight-element sound that combines many of the concepts we’ve explained in this series, and adds a couple of new twists as well. Ready? Here we go …
- Begin by calling up the “Subtractive Pt 1_01” Performance you created in Part 1, or download it from SoundMondo by clicking here. As a reminder, this is simply “Init Normal (AWM2)” without reverb.
- Press [PERFORMANCE (HOME)]
- Press [EDIT]
- Press [PART SELECT 1/1]
- Touch the Elem1 tab at the bottom of the screen or press [MOTION SEQ SELECT 1]
- Touch the Osc/Tune box at the far left-hand side of the screen and change the waveform for Element 1 to “CF3 Flat Sw Mn” (waveform number 25). This is a mono sample of a Yamaha CF3 grand piano, with a somewhat brighter sound and more prominent attack than the default waveform “CF3 Stretch Sw St.” (Refer to Part 1 for directions on changing waveforms.)
- Play a few notes and listen. The sound is definitely still piano-like, but less so when you hold down notes than when you just play notes staccato. That’s because the AEG (Amplitude Envelope Generator) is causing the sound to sustain, unlike the way a real piano reacts. (See Part 2 for an explanation of sustaining versus non-sustaining sounds). Accordingly …
- Change the AEG Decay2 Level to 0 and the Decay2 Time to 97. (Again refer to Part 2 for directions on how to change envelope values.)
- Play a few notes — holding some of them down or with a connected sustain pedal depressed — and listen again. This time, the sound fades away even if notes are held down, making it much more realistic. But if you play some high notes, you’ll hear that they’re taking just as long as fade away as low ones, which is not what happens in an acoustic piano due to the strings of high notes being much shorter in length than those of low notes.
- This can be rectified with the use of the AEG Time/Key parameter, which, as discussed in Part 2, causes envelope times to speed up as higher notes are played. Change this value to +10, then play and hold down some low notes, followed by some legato high notes. The sound is now much closer to that of a real piano.
- To get it sounding closer still, change the Level/Vel parameter (in the Amplitude Level/Pan display) to a new value of +18. This will ensure that, like a real piano, the force with which you strike a key causes the sound to be louder.
- Finally, let’s use a filter to roll off some of those high overtones and mellow the sound a bit. Change the Filter Type to LPF18 (a low-pass filter with a gentle rolloff) and reduce the Cutoff value to 109. Then raise the Cutoff/Vel to +6 so that notes played with greater force will be somewhat brighter, as occurs in a real piano. (See Part 1 for more information.) Finally, increase the Cutoff/Key value to +63%. This is a parameter we haven’t discussed previously, but it incrementally raises the cutoff frequency for notes above Middle C and decrementally reduces it for notes below Middle C, so that higher notes are somewhat brighter and lower notes somewhat darker. (For more information, see the MONTAGE/MODX Reference Manual.)
- Play a few notes and listen. This is what you’ll hear:
Name this Performance “Subtractive Pt 3_04” and save it (you can also find it on SoundMondo by clicking here).
Next, for the purposes of this exercise, we’re going to create a “hole” in the center of the keyboard for some different sounds that will be contributed by other elements. Accordingly:
- Touch the Osc/Tune box at the far left-hand side of the screen and enter in the following keyboard scaling values:
- Break Point 1 = A1; Level Offset = +0
- Break Point 2 = G#2; Level Offset = -68
- Break Point 3 = E4; Level Offset = -128
- Break Point 4 = C5; Level Offset = +0
- Play an ascending chromatic scale from the lowest key to the highest key. This is what you’ll hear:
Name this Performance “Subtractive Pt 3_05” and save it (you can also find it on SoundMondo by clicking here). Now let’s add a couple more elements to overlay a stereo string ensemble on the lower and upper octaves:
- With “Subtractive Pt 3_05” called up in your MONTAGE/MODX (you can download it from SoundMondo by clicking here), press [PERFORMANCE (HOME)], then press [EDIT], followed by [PART SELECT 1/1]
- Press [ARP SELECT 1] to temporarily mute Element 1
- Touch the Elem2 tab at the bottom of the screen or press [MOTION SEQ SELECT 2]
- Touch the Osc/Tune box at the far left-hand side of the screen
- Since the default for “Init Normal (AWM2)” (from which this Performance was derived) is to have all elements except Element 1 off, touch the ON/OFF box (circled in red in the illustration below) so that it lights green (ON):
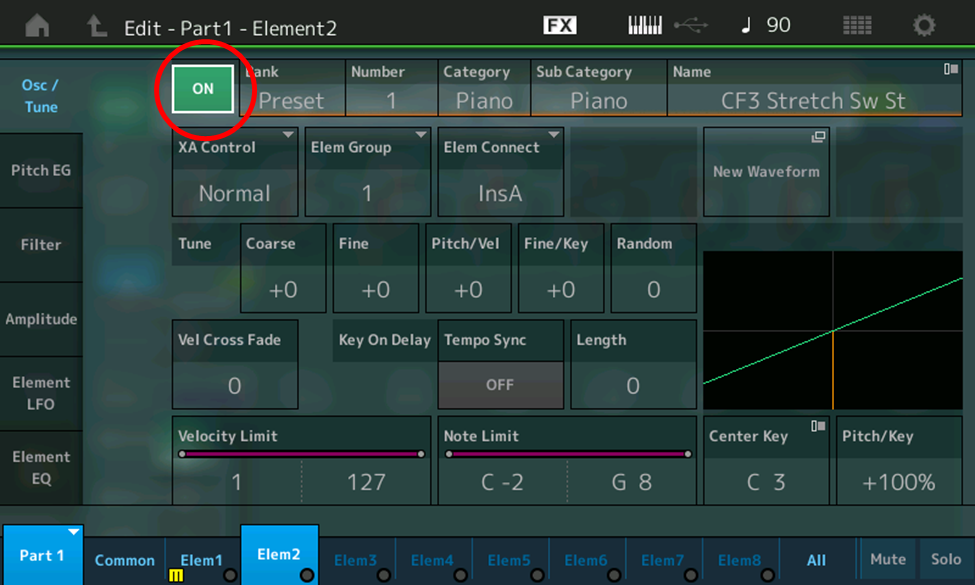
- Change the waveform for Element 2 to “OrchStrgs Med L” (waveform number 1025). This is the left half of a stereo pair of orchestral strings with a medium attack.
- Touch the Amplitude box on the far left-hand side of the screen
- Set the Pan parameter value to L63 (hard left)
- Touch the Amp EG box on the left-hand side of the screen and enter the following values, leaving all other AEG values at their defaults:
- Attack Time = 66; Release Time = 91
- Play a few notes and listen. What you’ll hear is a pretty convincing string ensemble sound, with a gentle attack and release … but you’ll only hear it coming out of the left speaker or left side of your headphones, due to the hard left panning.
Now let’s add in the right half of the sound — the role of Element 3, which will be given the same AEG settings. We could enter in those values again manually, but MONTAGE/MODX provides a quicker way, with the use of its Copy function. Here’s how it works:
- With Element 2 still displayed, press and hold down the SHIFT button, then while it’s still being held down, press the EDIT button. You’ll be brought to the Copy screen, which looks like this:
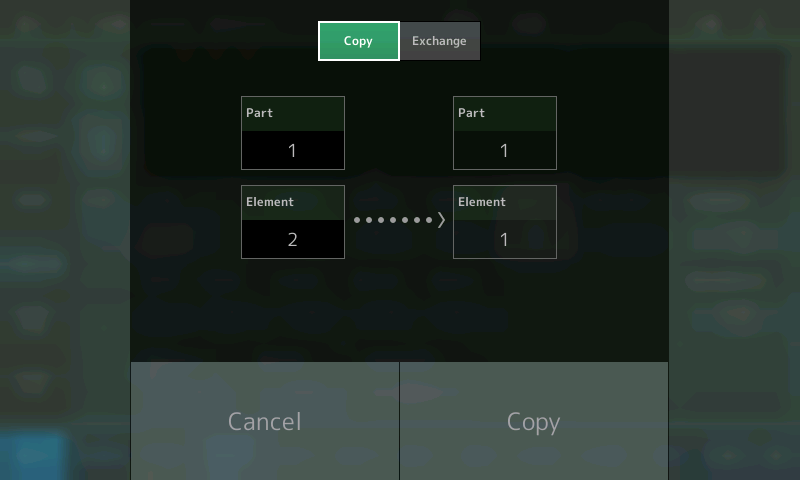
This screen allows you to either copy or exchange (swap) the currently displayed part or element with any other part or element. The two boxes on the left are the sources, which can’t be changed (they automatically show the currently selected Part and Element); the two boxes on the right are the destinations, which can be changed. So to copy Element 2 (which is currently displayed) to Element 3, simply select the destination element box (highlighted in the illustration below), then use the DEC/INC buttons or data dial to change its value from Element 1 (the default) to Element 3, then touch Copy. (“Copy” is the default function; if you instead wish to swap part or element data, you’d first select Exchange in the top of the screen.)
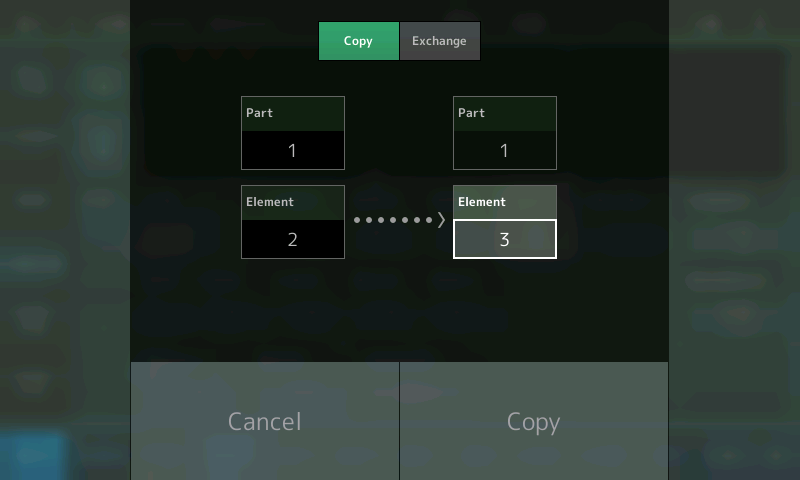
- To confirm that this process has been completed successfully, touch the Element 3 tab at the bottom of the screen or press [MOTION SEQ SELECT 3], then touch the Amplitude box at the far left-hand side of the screen, followed by the Amp EG box on the left-hand side of the screen. You’ll see that Element 3 now has the same exact values for the Attack Time (66) and Release Time (91) as Element 2. What’s more, if you touch the Osc/Tune box at the far left-hand side of the screen, you’ll see that Element 3 has been turned ON (just like Element 2) and that it’s been assigned the same waveform as Element 2 (“OrchStrgs Med L”).
- Change that waveform to the right half of the stereo pair (“OrchStrgs Med R,” waveform number 1028)
- Finally, let’s set the panning of Element 3 to hard right: Touch the Amplitude box at the far left-hand side of the screen, followed by the Level/Pan box on the left-hand side of the screen, then enter in a Pan value of R63.
- Play a few notes and listen: a beautiful string ensemble sound in glorious stereo! To get it even a tad richer, change the Fine tuning value for Element 2 to +1, then change its value for Element 3 to -1. Even this very slightest pitch offset has a significant effect on helping animate the sound, as you can hear in this audio clip:
- Touch the Elem2 tab at the bottom of the screen or press [MOTION SEQ SELECT 2] to select Element 2
- Touch the Osc/Tune box at the far left-hand side of the screen and enter in the following keyboard scaling values (these are very similar to the values we entered for Element 1, but not quite the same, making for a subtle overlap):
- Break Point 1 = G1; Level Offset = +0
- Break Point 2 = G2; Level Offset = -60
- Break Point 3 = B3; Level Offset = -128
- Break Point 4 = C5; Level Offset = +0
- Touch the Elem3 tab at the bottom of the screen or press [MOTION SEQ SELECT 3] to select Element 3, then enter the same keyboard scaling values.
- With Element 1 still muted, play an ascending chromatic scale from the lowest key to the highest key. You’ll hear the string ensemble at full volume up until the note G1 (Break Point 1), after which it gently fades out for an octave (until G2, which is Break Point 2), then steeply dies away over the middle of the keyboard to where it quickly becomes inaudible. It then begins appearing again at around D4, rising to full level at C5 (Break Point 4), where it remains for all higher notes.
- To offset this slightly and have Element 3 act slightly differently, lower its Break Point 3 and Break Point 4 by a tone (to F2 and A3, respectively). Play a few notes in the middle range of the keyboard to hear the subtlety of this change, as Element 3 fades in and out slightly before Element 2.
- Finally, press [ARP SELECT 1] to unmute Element 1, then play an ascending chromatic scale from the lowest key to the highest key. This is what you’ll hear:
Be sure to save this Performance as “Subtractive Pt 3_06” before moving on (you can also find it on SoundMondo by clicking here). Now let’s create a cool sound to fill the “hole” in the center of the keyboard.
First, though, a quick recap: In Part 2 of this series, we discussed the fact that the attack portion of a sound (which occurs in the first few milliseconds of its existence) is often timbrally much more complex than the remainder (the “body”) of the sound. AWM2 instruments like MONTAGE/MODX offer a number of waveforms that capture just that portion of a sound. Let’s use a pair of elements to graft the attack of one sound onto the body of another, creating a kind of sonic Frankenstein. Here’s how:
- With “Subtractive Pt 3_06” called up in your MONTAGE/MODX (you can download it from SoundMondo by clicking here), press [PERFORMANCE (HOME)], then press [EDIT], followed by [PART SELECT 1/1]
- Press [ARP SELECT 1], followed by [ARP SELECT 2] and [ARP SELECT 3] to temporarily mute Elements 1, 2 and 3
- Touch the Elem4 tab at the bottom of the screen or press [MOTION SEQ SELECT 4]
- Touch the Osc/Tune box at the far left-hand side of the screen, then touch the top left-hand button to turn Element 4 ON (the box will light green and will read “ON” instead of “OFF” — see above for instructions).
- Change the waveform for Element 4 to “Hah Soft Split” (waveform number 2021), then play a few notes and listen. Here’s what it sounds like:
- As you can hear, this is a choir sound with female voices singing the phoneme “Hah.” As the previous audio clip demonstrates, if you play in the middle of your keyboard, you’ll hear a turnaround (the “Split” in the waveform name) at G3 (G above Middle C), where the pitch drops an octave before climbing again. Since this is right in the middle of the “hole” we’ve created, let’s shift the pitch of this element down by twelve semitones — this way, the “split” will occur an octave higher on the keyboard, by which point the string ensemble and piano sound will begin fading back in. Accordingly, touch the Coarse parameter and enter in a new value of -12.
- Now let’s “graft” this onto another sound that will serve as the “body.” Touch the Elem6 tab at the bottom of the screen or press [MOTION SEQ SELECT 6], then touch the Osc/Tune box and turn Element 6 ON (don’t worry — we haven’t forgotten about Element 5, which we’ll be getting to shortly).
- Press [ARP SELECT 4] to temporarily mute Element 4
- Change the waveform for Element 6 to “Pitchomat St” (waveform number 2354), then play a few notes and listen. Here’s what it sounds like:
- This sound is plenty cool to begin with, but we can get it even more interesting by employing a high-pass filter and using its FEG to “sweep” the overtones. Accordingly, touch the Filter box at the far left-hand side of the screen and change the Filter Type to HPF24D (this is a high-pass filter with a steep rolloff and a digital characteristic) and change the Cutoff to 0 so that initially all overtones are allowed to pass. Then set the Resonance value to 25.
- Make the following changes to the Filter EG:
- Times: Hold = 103; Attack = 0; Decay1 = 87; Decay2 = 105; Release = 80
- Levels: Hold = +0; Attack = +127; Decay1 = -119; Decay2 = +127; Release = +0
- Change the FEG Depth parameter to +10.
- Play a few notes, making sure to hold some of them down, and listen. As you can hear, this filter sweep only occurs after a second or two, thanks to the extended FEG Hold Time:
- Press [ARP SELECT 4] again to unmute Element 4, then again play a few notes and listen. As you can hear, these two sounds go pretty well together, with Element 4 providing a distinctive attack to the more nebulous sustained sound being provided by Element 6:
- Now let’s tweak their AEGs so that the blended sound continues even after notes are released, with Element 6 lingering a little longer than Element 4. Start by changing the Element 6 AEG Release Time to a new value of 105 and set its Time/Vel parameter to +11 so that the envelope speeds up slightly as keys are struck with greater force, then change the Element 4 AEG Release Time to 93, and its Decay1 and Decay2 values to 64.
- To get the blend even better, change the Level of Element 6 to 122, and that of Element 4 to 91, then play a few notes and listen. Positively esoteric!
As we mentioned earlier, we’ve been saving Element 5 for something special. How about if, instead of grafting one kind of attack on to the body of Element 6, we graft on a different attack, with a different velocity range so that you hear it only when notes are struck hard? (This is similar to the way certain elements reacted in the “Piano & Strings” preset we examined earlier.) Ready to dive in and make this happen? Here’s how:
- Touch the Elem5 tab at the bottom of the screen or press [MOTION SEQ SELECT 5], then touch the Osc/Tune box and turn Element 5 ON.
- Press [ARP SELECT 4] and [ARP SELECT 6] to temporarily mute Elements 4 and 6
- Change the waveform for Element 5 to “F Dooh Soft -12” (waveform number 2011), then play a few notes and listen. Here’s what it sounds like:
- Press [ARP SELECT 6] again to unmute Element 6
- Play a few notes and listen. The blend of the two elements is pretty good, but we can improve it with a couple of easy tweaks: First, change Element 5’s AEG Decay2 Time to 127, then change its Level to 104. Play a few notes again — getting better!
- Next, let’s set up the velocity switching. This is accomplished with the Velocity Limit parameter in the Osc/Tune screen, circled in red in the illustration below:
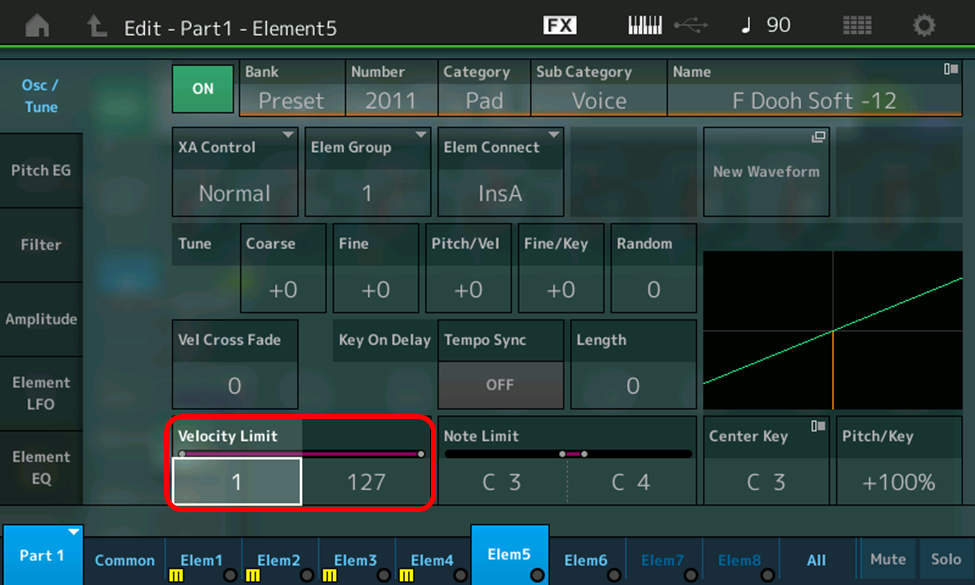
The value to the left in this box is the lower velocity limit for the selected element, while the box to the right is the higher velocity limit. These can be set manually (using the DEC / INC buttons or data dial, or via a standard number pad), or you can opt to simply tap in a note on your keyboard and its velocity will automatically be entered.
- Let’s set things up so that Element 5 only sounds when keys are played with velocities of 85 or higher, and Element 4 sounds when keys are played with velocities below 85. Accordingly, set the velocity limits of Element 5 as follows:
- Low Limit = 85; High Limit = 127
- Then touch the Elem4 tab at the bottom of the screen or press [MOTION SEQ SELECT 4] and set the velocity limits of Element 4 as follows:
- Low Limit = 1; High Limit = 84
- Press [ARP SELECT 4] to unmute Element 4, then play a few notes of varying velocity, listening carefully as you do so. When you strike notes gently, you should hear the “Hah” sound (and you’ll see the Elem4 tab light up), but when you strike them with some force, you’ll instead hear the “Dooh” sound, and the Elem5 tab will light up.
We’re nearly done shaping the composite sound intended to fill the “hole” in the center of the keyboard, but let’s add one more element to it to help sharpen the focus and animate it further still.
- Touch the Elem7 tab at the bottom of the screen or press [MOTION SEQ SELECT 7], then touch the Osc/Tune box and turn Element 7 ON
- Mute all other elements
- Change the waveform for Element 7 to “Tenor Sax2 Growl” (waveform number 1520), then play a few notes and listen. Here’s what it sounds like:
- Let’s use a filter to change the sound radically. Accordingly, change the Filter Type to LPF24D (a low-pass filter with a steep rolloff and a digital characteristic) and lower the Cutoff frequency almost all the way down, to a new value of 9, then enter a Resonance value of 20. Play a few notes and listen. Here’s what the filtered waveform sounds like:
- In order to give the composite sound in the middle of the keyboard more definition and “edge,” we’ll to have this sound pitched much higher than that of the other “body” component (Element 6), so in the Osc/Tune screen, change the Coarse tuning value to +24 (two octaves higher).
- We also want to add some pitch instability to this sound, so go to the Pitch EG and change the Hold Level to -128 and the Attack Time to 37, causing the sound to start a semitone flat before swooping up to correct pitch.
- Next, we’ll tweak the Amplitude EG to get a slight fade-in and a slow release. Accordingly, change the Attack Time to 88 and the Release Time to 113.
- Now we’ll add some movement to Element 7. Start by going to the Filter EG screen and change the Hold Time to 23 and the Release Time to 101, then change the Depth parameter to +46.
- Let’s also add some periodic change in addition to the periodic change being caused by the three envelope generators. To do so, touch the Element LFO box on the far left-hand side of the screen. You’ll be brought to the LFO display for the selected element (in this case, Element 7):
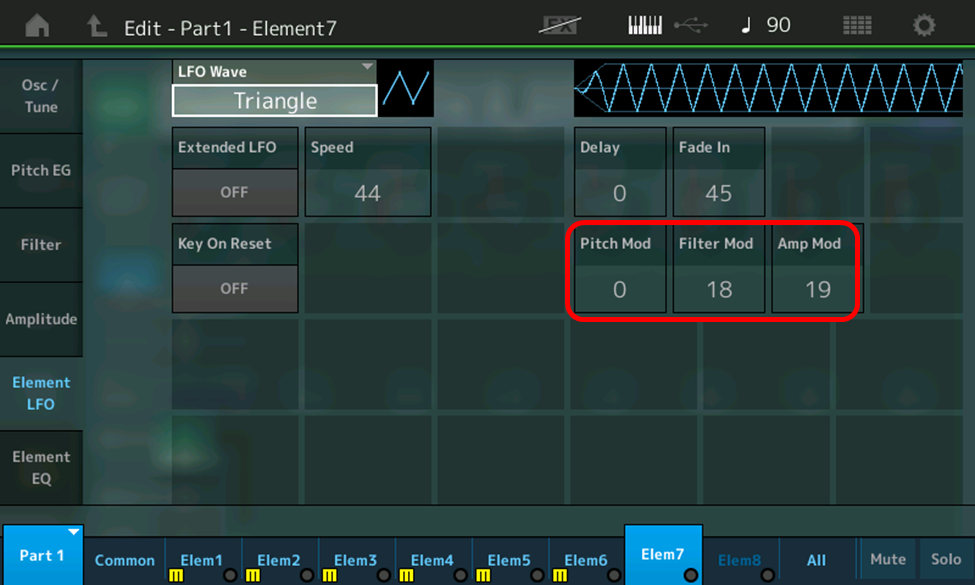
- Leaving the LFO waveshape at its default Triangle shape, change its Speed from the default of 38 to a new value of 44 and touch the Key On Reset box so that it changes to OFF (it will change color, from green to gray, when you do so). When ON, the LFO wave will reset every time a new key is played, but our goal to introduce some randomness into the sound, which is why it should be turned OFF here.
- For the same reason, set the Fade In value to 45 (this will cause the effect of the LFO to delay somewhat, so that it only kicks in when notes are held down for more than a second or so.
- The obvious question is, how do we want the LFO to affect the sound? This is determined by the Pitch Mod, Filter Mod and Amp Mod parameters (circled in red in the illustration above). When applied to oscillator pitch (Pitch Mod), vibrato will occur; when applied to the filter (Filter Mod), a wah-wah effect will occur, and when applied to the amplifier (Amp Mod), tremolo will occur. For the purposes of this sound, we’ll go for the latter two, so leave Pitch Mod at 0 but change Filter Mod to a new value of 18, and Amp Mod to a new value of 19. Play a few notes and listen. This is what you’ll hear:
- As you may recall, all the elements in this sound are panned to the center, except for Elements 1 and 2, which are panned hard left and right respectively, since together they are being used to contribute a stereo string ensemble. To increase the “wild card” factor of Element 7 even further, let’s allow it to be randomly panned every time a new note is played. This is precisely the function of the Random Pan parameter in the Amplitude – Level/Pan display, circled in red in the illustration below:
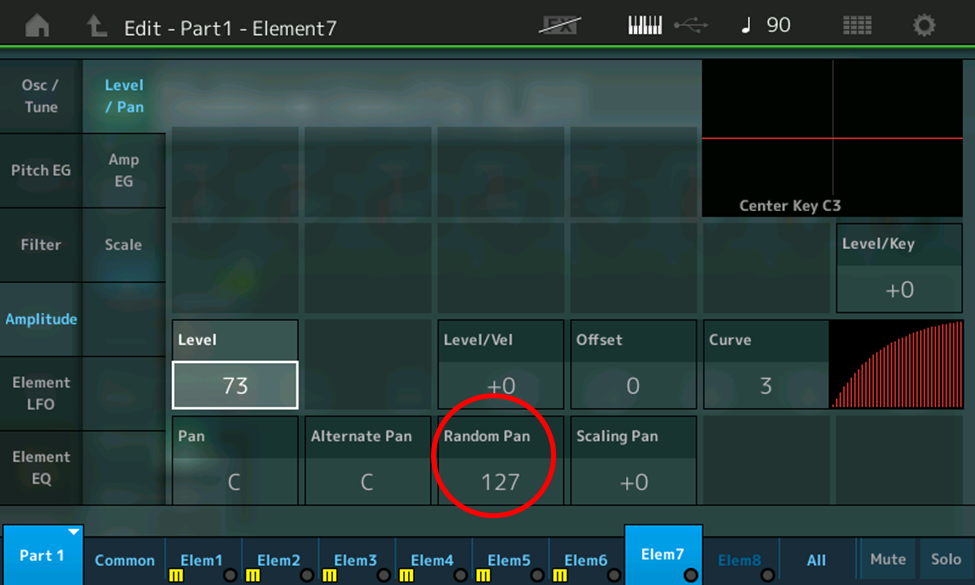
- Change the Random Pan to a new value of 127 (maximum), then unmute Elements 4, 5 and 6 so you can hear the effect of this added sound. To get a better blend, lower the Level of Element 7 to 73.
- Play a few notes and listen. This is what you’ll hear:
- Finally, let’s restrict the congolomerate sound created by Elements 4, 5, 6 and 7 to the center “hole” of the keyboard we created when applying keyboard scaling to Elements 1, 2 and 3 earlier in this exercise. Accordingly, touch the Osc/Tune box on the far left-hand side of the screen and change the Note Limit parameter (covered earlier in this installment, in the “Analyzing AWM2 Presets” section) for Elements 4 and 5 to a low value of C3 and a high value of C4. This will limit them strictly to just the center octave of the keyboard.
- We’re also going to want to restrict the range of Elements 6 and 7, but not quite so severely, and in the case of Element 6, we’ll also use some keyboard scaling so that it fades out gradually in the upper octaves of the keyboard instead of just not sounding altogether. Start by changing the low Note Limit of Element 6 to A2 and the high Note Limit to C6, then go to the Amplitude Scaling display for Element 6 and change Break Point 4 to C6 as well, but with a Level Offset value of -100.
- Finally, set the low Note Limit for Element 7 to C3 and the high Note Limit value to C5, so that it plays in the two octaves above Middle C (unlike Elements 4 and 5, which play only in the one octave above Middle C).
- Unmute Elements 1, 2 and 3, then play some notes over the full range of the keyboard. This is what you’ll hear:
Name this Performance “Subtractive Pt 3_07” and save it (you can also find it on SoundMondo by clicking here).
Our sound is nearly complete, but there’s one final touch that can really help round it out, and, perhaps poetically, it requires that we finish where we started: with the humble sine wave.
If you play some low notes on your keyboard, you’ll hear a powerful bottom end coming from the combination of the piano and string ensemble, but there’s an old trick utilized by recording engineers that can help fortify it even further: simply add some extra fundamental frequency. And there’s no better way to do that than with a sine wave, which, as you’ll recall from Part 1, contains only fundamental frequency, with no overtones whatsoever. Here’s how:
- With “Subtractive Pt 3_07” called up in your MONTAGE/MODX (you can download it from SoundMondo by clicking here), press [PERFORMANCE (HOME)], then press [EDIT], followed by [PART SELECT 1/1]
- Touch the Elem8 tab at the bottom of the screen or press [MOTION SEQ SELECT 8], then touch the Osc/Tune box at the far left-hand side of the screen, followed by the top left-hand button in the resulting display in order to turn Element 8 ON
- Temporarily mute all the other elements (this can be accomplished by pressing their corresponding [ARP SELECT], buttons, or by touching the Elem8 tab, followed by the Solo tab at the bottom right-hand corner of the screen).
- Change the waveform for Element 8 to “Sine” (waveform number 2139), then play a few notes and listen. If you’ve done the exercises in Part 1, this should be a familiar sound to you!
- Next, change the Amplitude EG (AEG) to make the sound somewhat percussive in nature. Accordingly, change the Decay2 Level to 32 and the Release Time to 77. Play a few notes and listen. The sound has changed quite dramatically, as you can hear:
- Since we’ll only want this bass reinforcement in the very lowest notes, go to the Osc/Tune display and change the high Note Limit value to C2.
- To make the change a little less abrupt and more subtle, let’s use keyboard scaling to fade out the contribution of Element 8 as it approaches this upper note limit of C2. Accordingly, go to the Amplitude Scale display and set Level Offset 2 to a new value of -27.
- Unmute all the other elements (if you’ve used the Solo function to do this, simply touch the Solo tab again), then play some low notes and have a listen. At the default Level value of 127, the contribution of Element 8 can be a bit overwhelming, making for a boomy sound. Accordingly, set its Level to a new value of 106, then play those notes again. Much better!
Last but not least, unmute Elements 4, 5, 6 and 7 so you can hear the end result: a powerful, complex sound with many different layers of complexity as you play in different areas of the keyboard with varying key velocities. Here’s the final sound:
Name this Performance “Subtractive Pt 3_08” and save it (you can also find it on SoundMondo by clicking here) … and with this, we conclude our Subtractive 101 series. Happy tweaking!
Need to catch up? Check out Part 1 here. And Part 2 here.
Tagged Under
Keep Reading
© 2025 Yamaha Corporation of America and Yamaha Corporation. All rights reserved. Terms of Use | Privacy Policy | Contact Us
