Check out the previous articles in this series:
Blake’s Take: Level of Your Drums 1—Basic Concepts of Rhythm
Blake’s Take: Level up Your Drums 2—Active Listening
Blake’s Take: Level up Your Drums 3 – Drum Programming in MONTAGE and MODX
NOTE: The current MONTAGE/MODX OS features useful drum programming tools. If you haven’t already done so, download and update your instrument to the latest OS version before checking out this article.
MONTAGE OS v3.51
MODX OS v2.52
MONTAGE and MODX also have integrated USB MIDI and audio connectivity. The Yamaha Steinberg USB driver lets you take advantage of multi-channel audio. Get it here:
Yamaha Steinberg USB Driver
Getting Started
It starts with one of my favorite drum kits, “Oak Custom Kit”. I used this single Part Performance to record a 16-measure drum Pattern with the onboard Performance Pattern Sequencer. Check it out:
My goal is to record each drum (kick, snare, hi hats, cymbals, toms and percussion) on separate audio tracks into Cubase.
Note: You don’t have to use Cubase to do this. Most everything I’ll show you can be done with any DAW. If you are not a Cubase user, you’ll still find some important MONTAGE/MODX routing information in this article.
I created a Performance called “Oak Custom Kit BA DV” for this article and saved it both as a MONTAGE Connect file and on Soundmondo here. I added bass, keys, guitar, pad and synth lead for additional backing instruments. You can download this Cubase Project along with the MONTAGE Connect (.X7B) file here.
Sometimes I’ll just record a drum Part as a stereo audio track. However, there are important benefits to recording individual drum tracks. The biggest benefit is dry, reverb-less audio of isolated drums. Once recorded to the DAW you can mix each drum individually, add effects where you want them and pan them in the stereo field. You just have more flexibility and can better tailor the drums to the music.
In MONTAGE and MODX, when you select a USB Stereo or Mono output other than the Main L&R output, you bypass the System Reverb and Variation effects entirely. You then use the tools in the DAW for EQ, dynamics processing, reverb, panning and any other effect appropriate for your music.
Quick note about terminology: When discussing the Performance Pattern Sequencer, I’ll use both the words “Track” and “Part. The main difference is Track refers to the place where data is recorded, i.e., “a drum track” or “a bass track”, while a Part is the musical instrument sound within a Performance. “Check out the electric piano with the auto pan in Part 3.” Part 3 is always Track 3 in the Performance Pattern Sequencer, so you can see how these words are almost interchangeable. Keep this in mind as this unfolds.
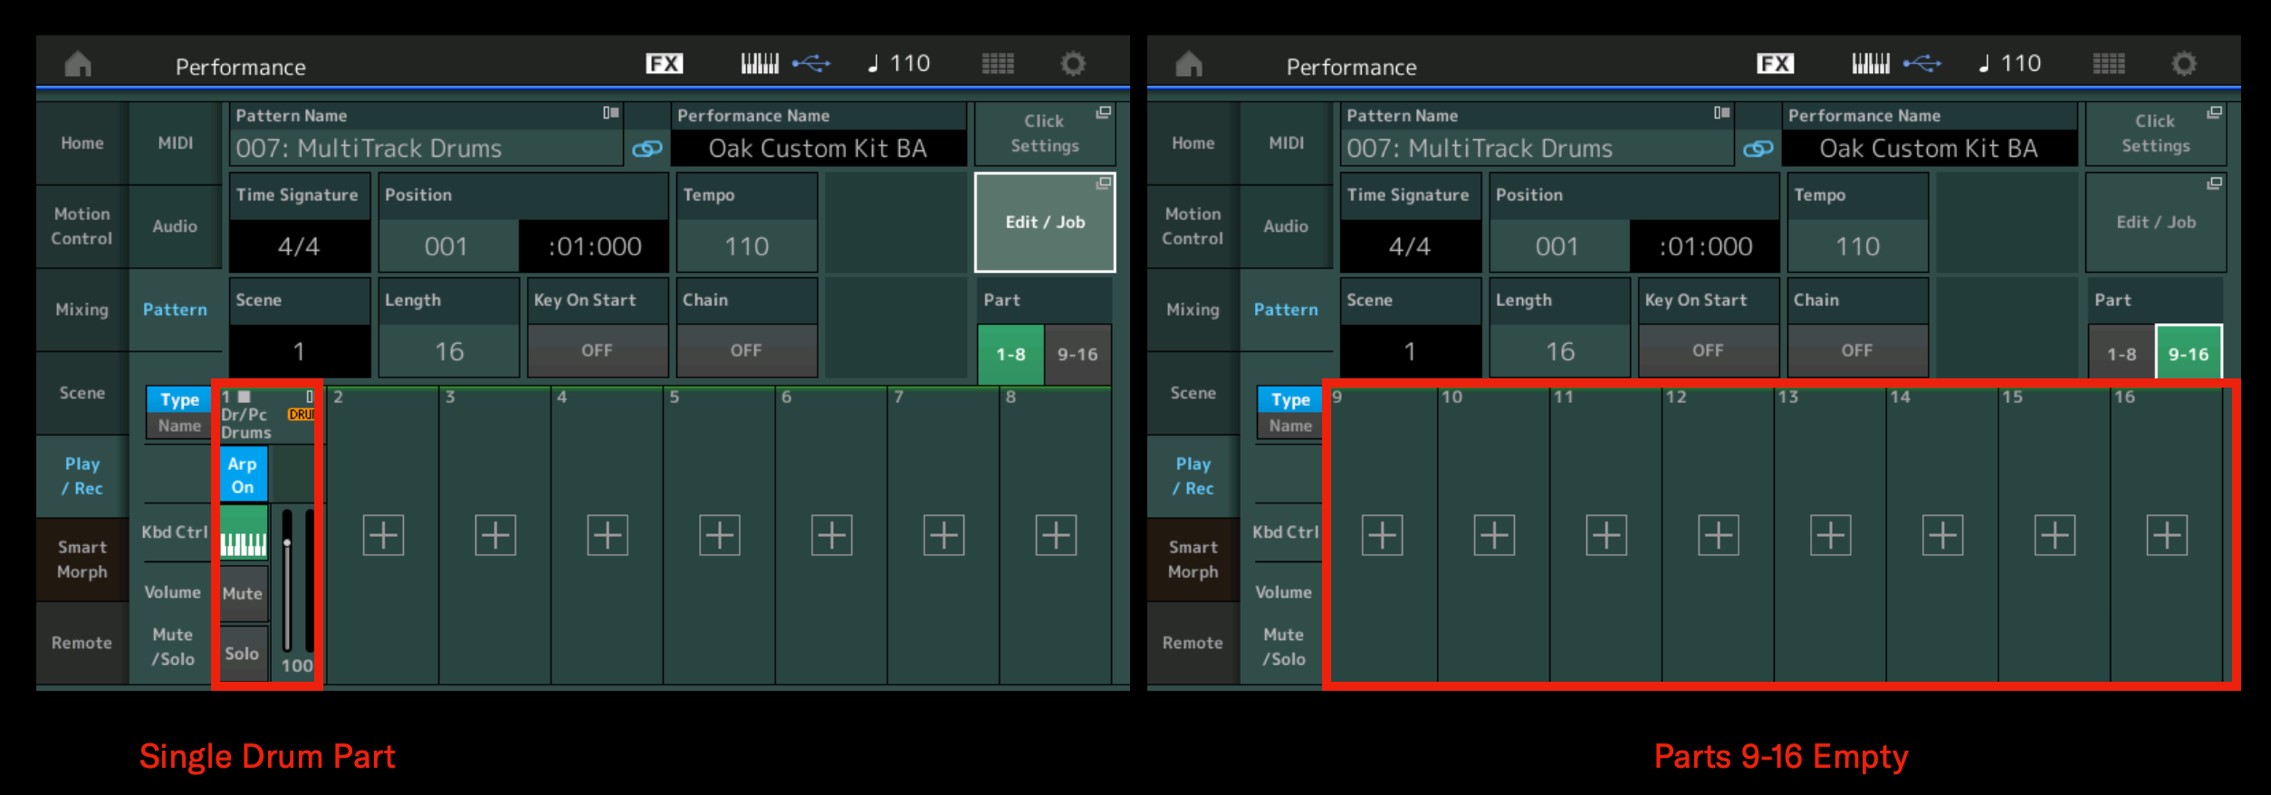
The MONTAGE/MODX Performance Pattern Sequencer has great drum programming tools. I’ll take you through a few of these tools in this section. One of the cooler tools is the Divide Drum Track Job. This Job divides a single drum track and places each drum on Parts 9-16. A new Performance is created when you use this Job because it creates additional Parts for each drum track. Below is my Pattern with a view of Tracks 1-8 and 9-16 before dividing the drum track:
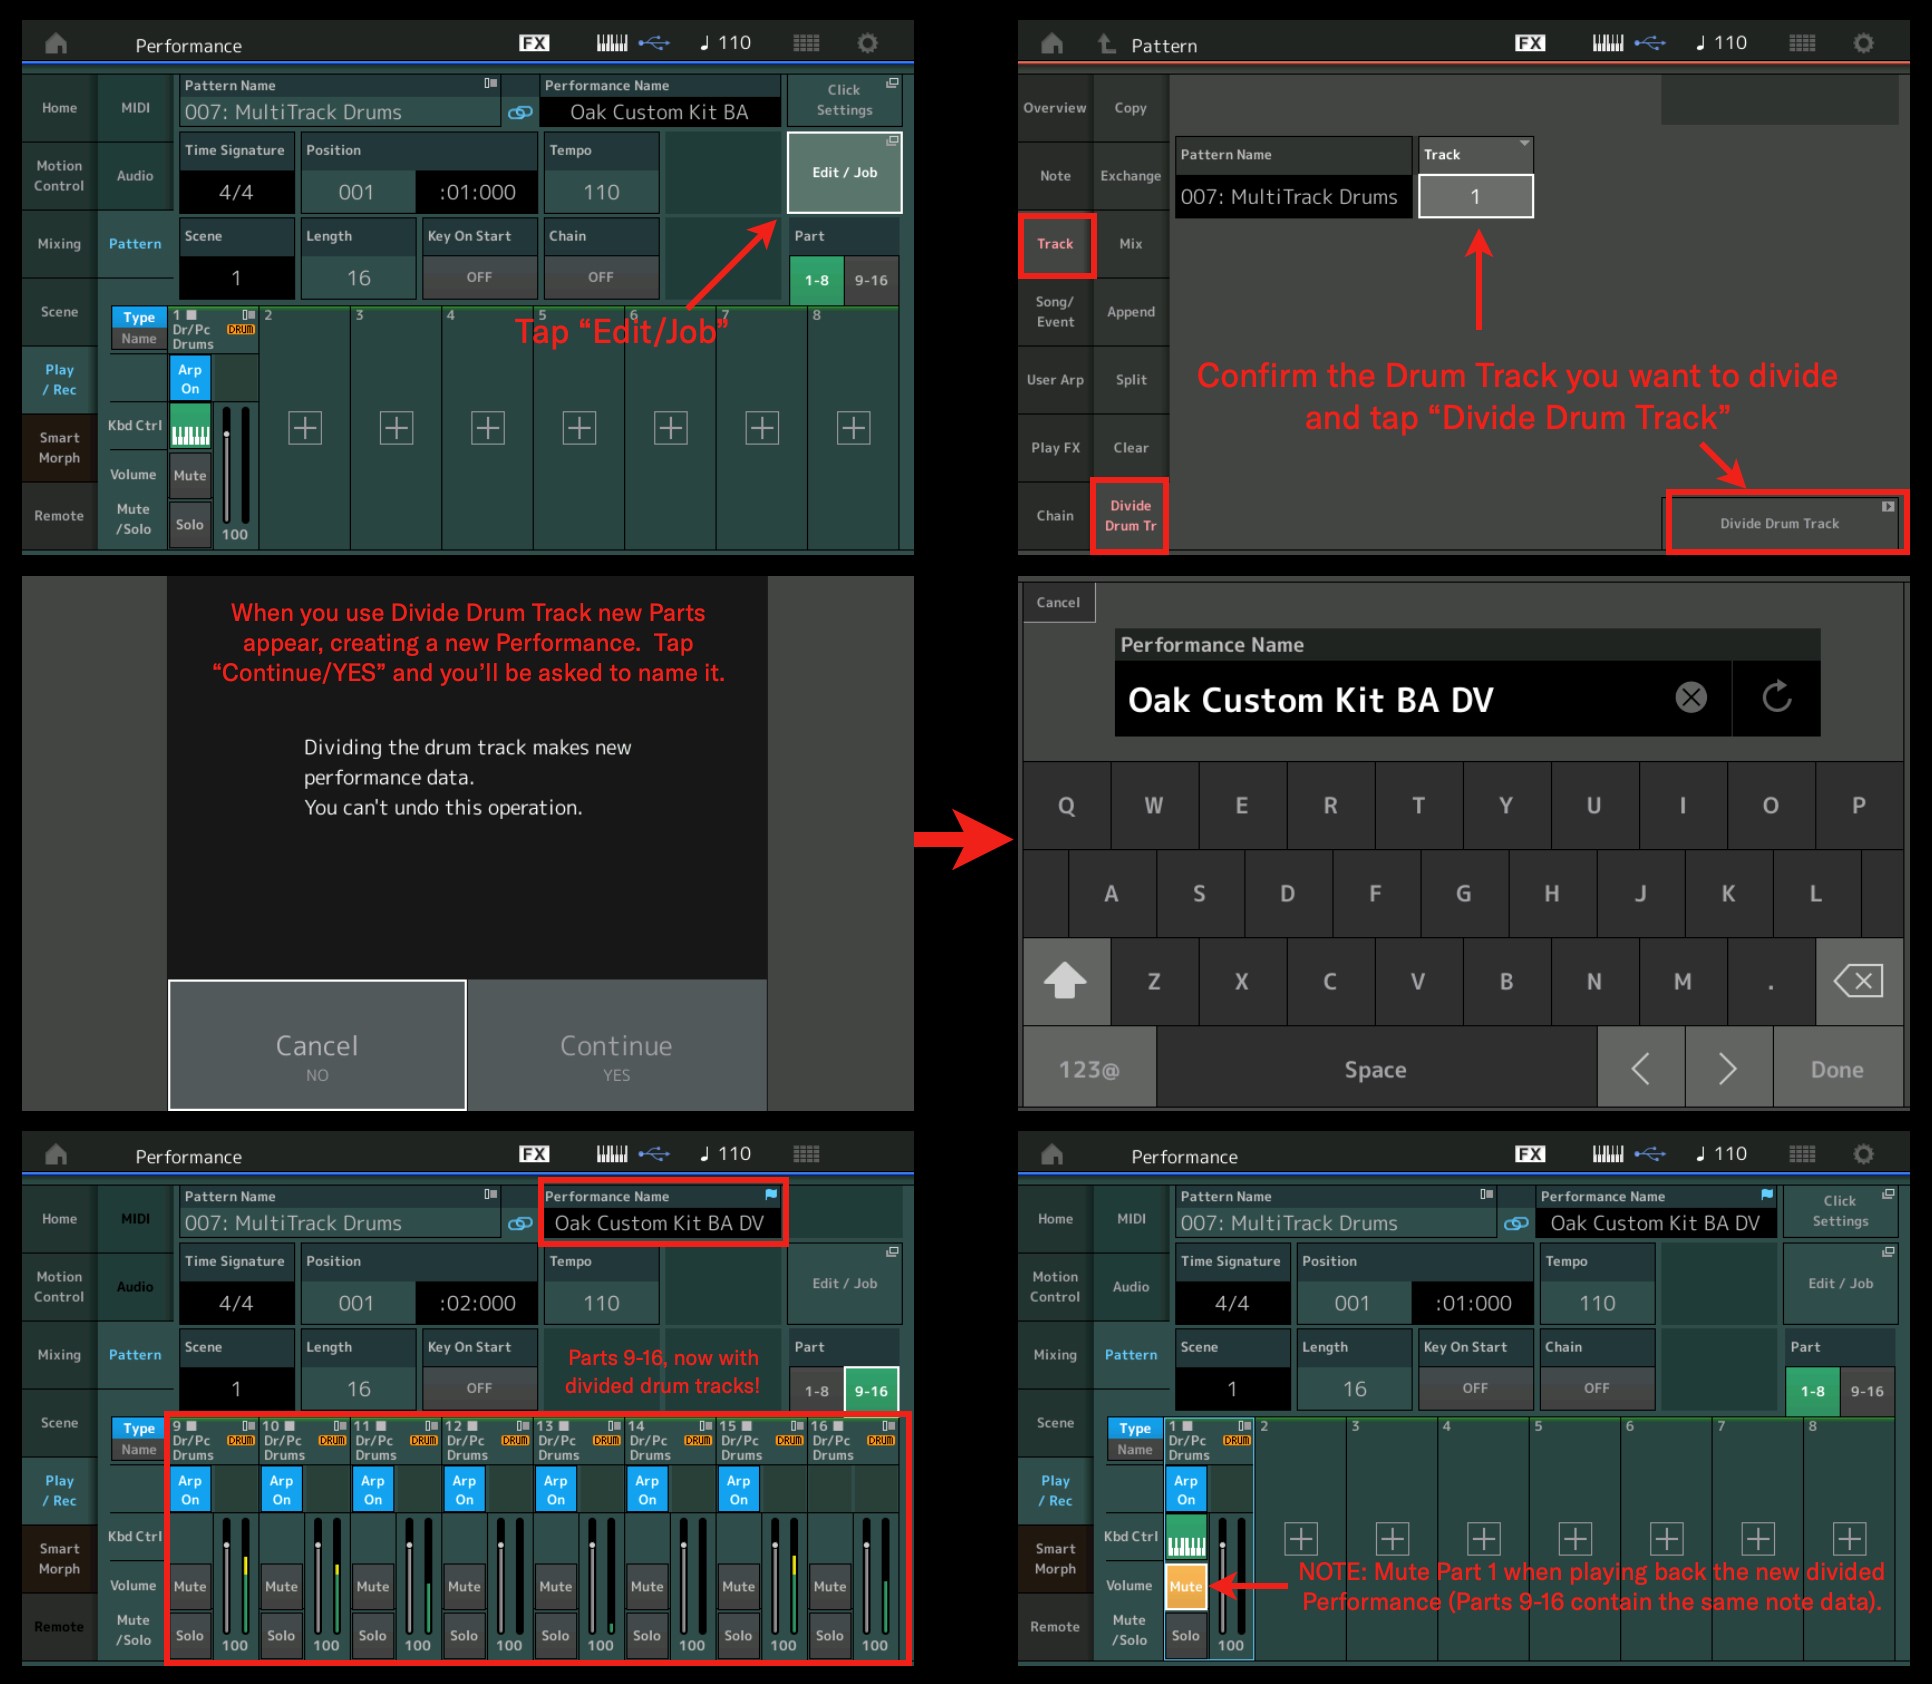
Now I’ll go to the Divide Drum Track Job. This is found by touching “Edit/Job” on the right, choosing “Track” on the left and selecting “Divide Drum Tr”:
Pretty cool! I mentioned this in the graphic above and I’ll mention it here: Part 1 should be muted when playing back the divided drum track or you’ll hear the phasing of the duplicate notes triggering at the same time.
I like to keep this Part in case I need to reference the original track. Additionally, sometimes it’s interesting to copy the sequence data it to a different Part (under Edit/Job-Track-Copy). In this case, I might copy Track 1 to Track 8, add a different drum kit, mute all the other tracks and see how this drum pattern sounds with this different kit. If you just want to delete Track 1 you can clear the track (under Edit/Job-Track-Clear).
All the data in Part 1 has now been divided across Parts 9-16 as follows:
- Part 9: Kick Drum
- Part 10: Congas
- Part 11: Snare Drum
- Part 12: Snare Drum Roll
- Part 13: Hi Hats
- Part 14: Open
- Part 15: Toms and Cymbals
- Part 16: Shakers
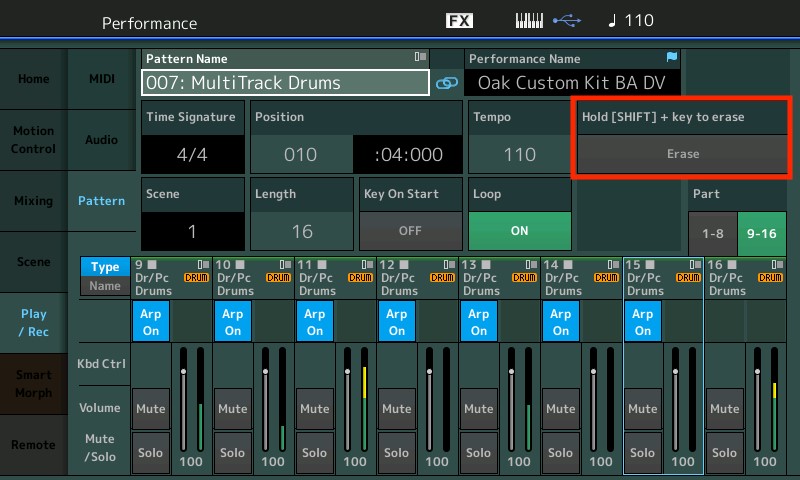
The Divide Drum Track Job separated everything out on to individual tracks except Part 15, which combined Toms and Cymbals. If you want to move the Cymbals over to Part 14, copy Part 15 to Part 14 under “Edit/Job->Track->Copy”, then use Overdub record to erase the Toms from Part 14 and the Cymbals from Part 15:
The Divide Drum Track Job placed the snare drum roll on Track 12 and the main open snare on Track 11. I want to combine data are Parts 11&12 to keep all snare drums on the same track and streamline production. You may have noticed in the divide drum track screen shot that one of the other edit jobs is “Mix”. I’ll mix Track 11 with Track 12, then clear Track 11:
I now have drums and cymbals assigned to the following parts:
- Part 1: Original drum track (muted)
- Part 9: Kick Drum
- Part 10: Congas
- Part 11: (Empty—Merged to Track 12)
- Part 12: Mixed Snare and Snare Drum Roll
- Part 13: Hi Hats
- Part 14: Cymbals
- Part 15: Toms
- Part 16: Shakers
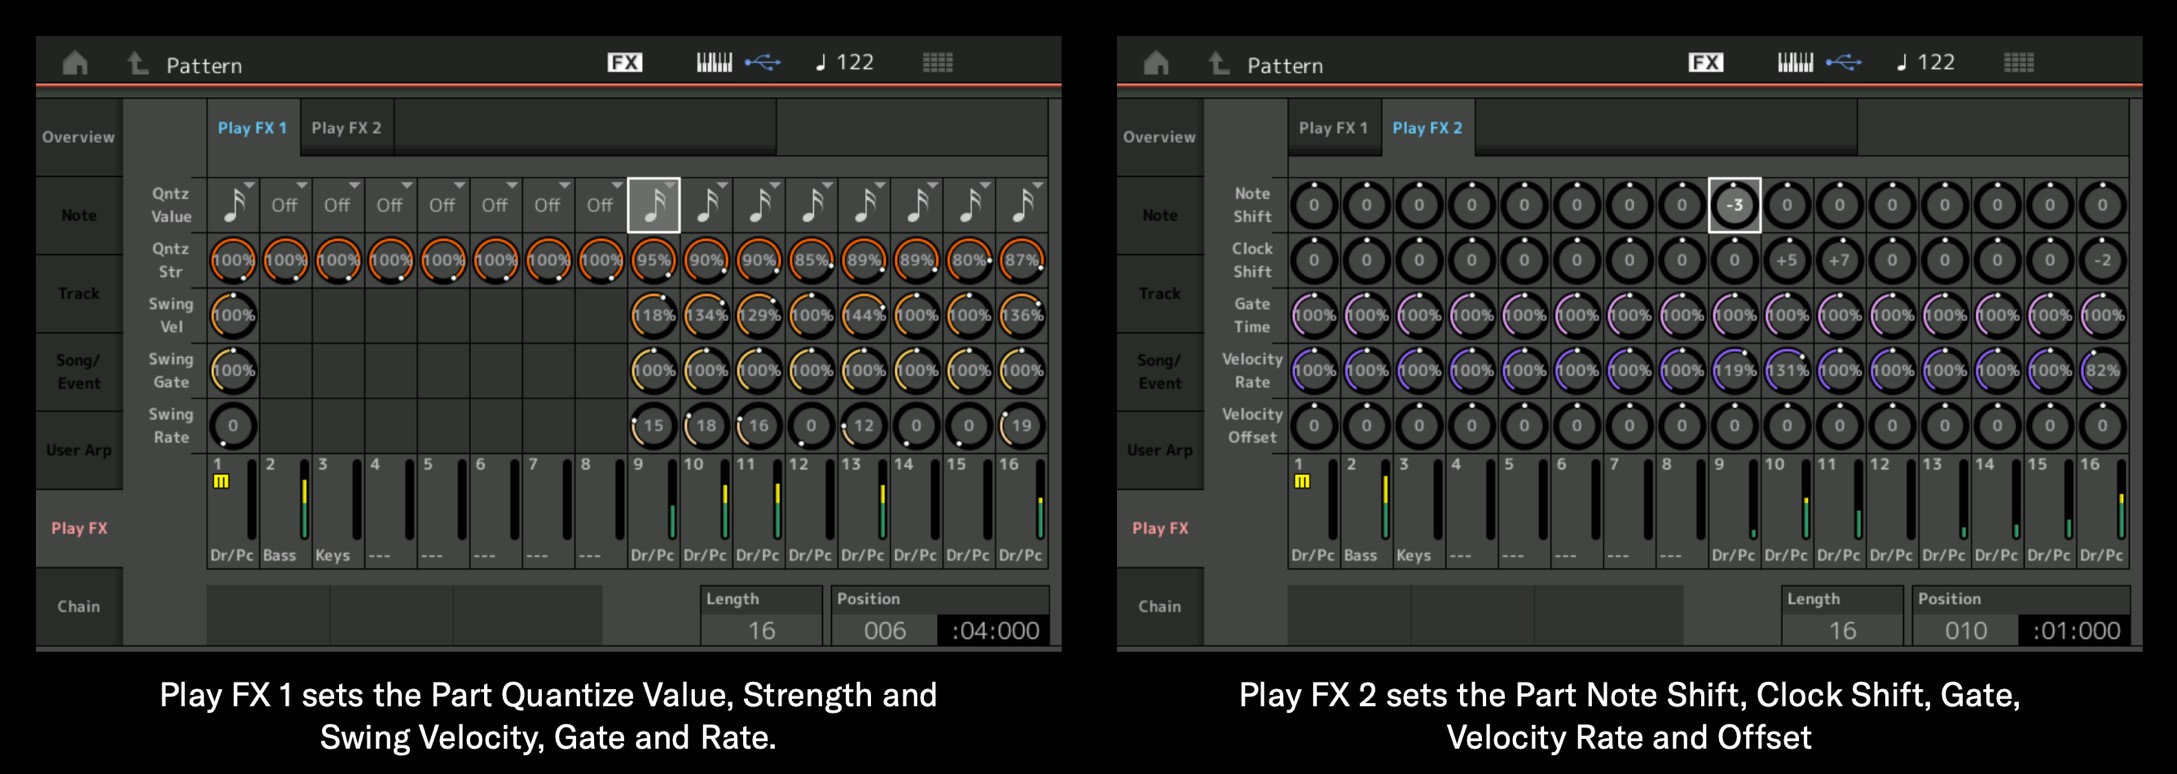
Now that everything is divided out let’s explore the Play FX section. This is a great creative feature in the Performance Pattern Sequencer. You can adjust the timing and feel of each drum Part during playback in real time. For this groove, every Part is set to a sixteenth note quantize value and the percentage is pulled back from 100% to keep it “human”. I adjusted the swing rate a little on important parts as well. Specific parameters to notice to check out:
- Kick Drum (Part 9): I applied Note Shift to drop the kick drum from the larger, resonant one assigned to C1 to the tighter one assigned to A0.
- Congas (Part 10): Clock shift of +5 in Play FX 2 places the Conga groove slightly behind the beat and gives the groove a bit of a lilting vibe. Velocity Rate increased.
- Open Part (Mixed to Part 12)
- Snare Drum Roll (Part 12): The snare drum is clock shifted to +7. It’s a bit behind the beat, too and I increased velocity rate for a stronger back beat.
- Hi hats (Part 13): Quantized with a swing velocity of 144%. The “swung” note is accented and gives the groove a nice attitude.
- Cymbals (Part 14): The cymbals are all crash. They are quantized so they fit in with the other drums.
- Toms (Part 15): Quantized to fit in with the other drums.
- Shakers (Part 16): Quantized with a swing velocity of 136% and clock shifted -2. This puts the shakers slightly in front of the beat.
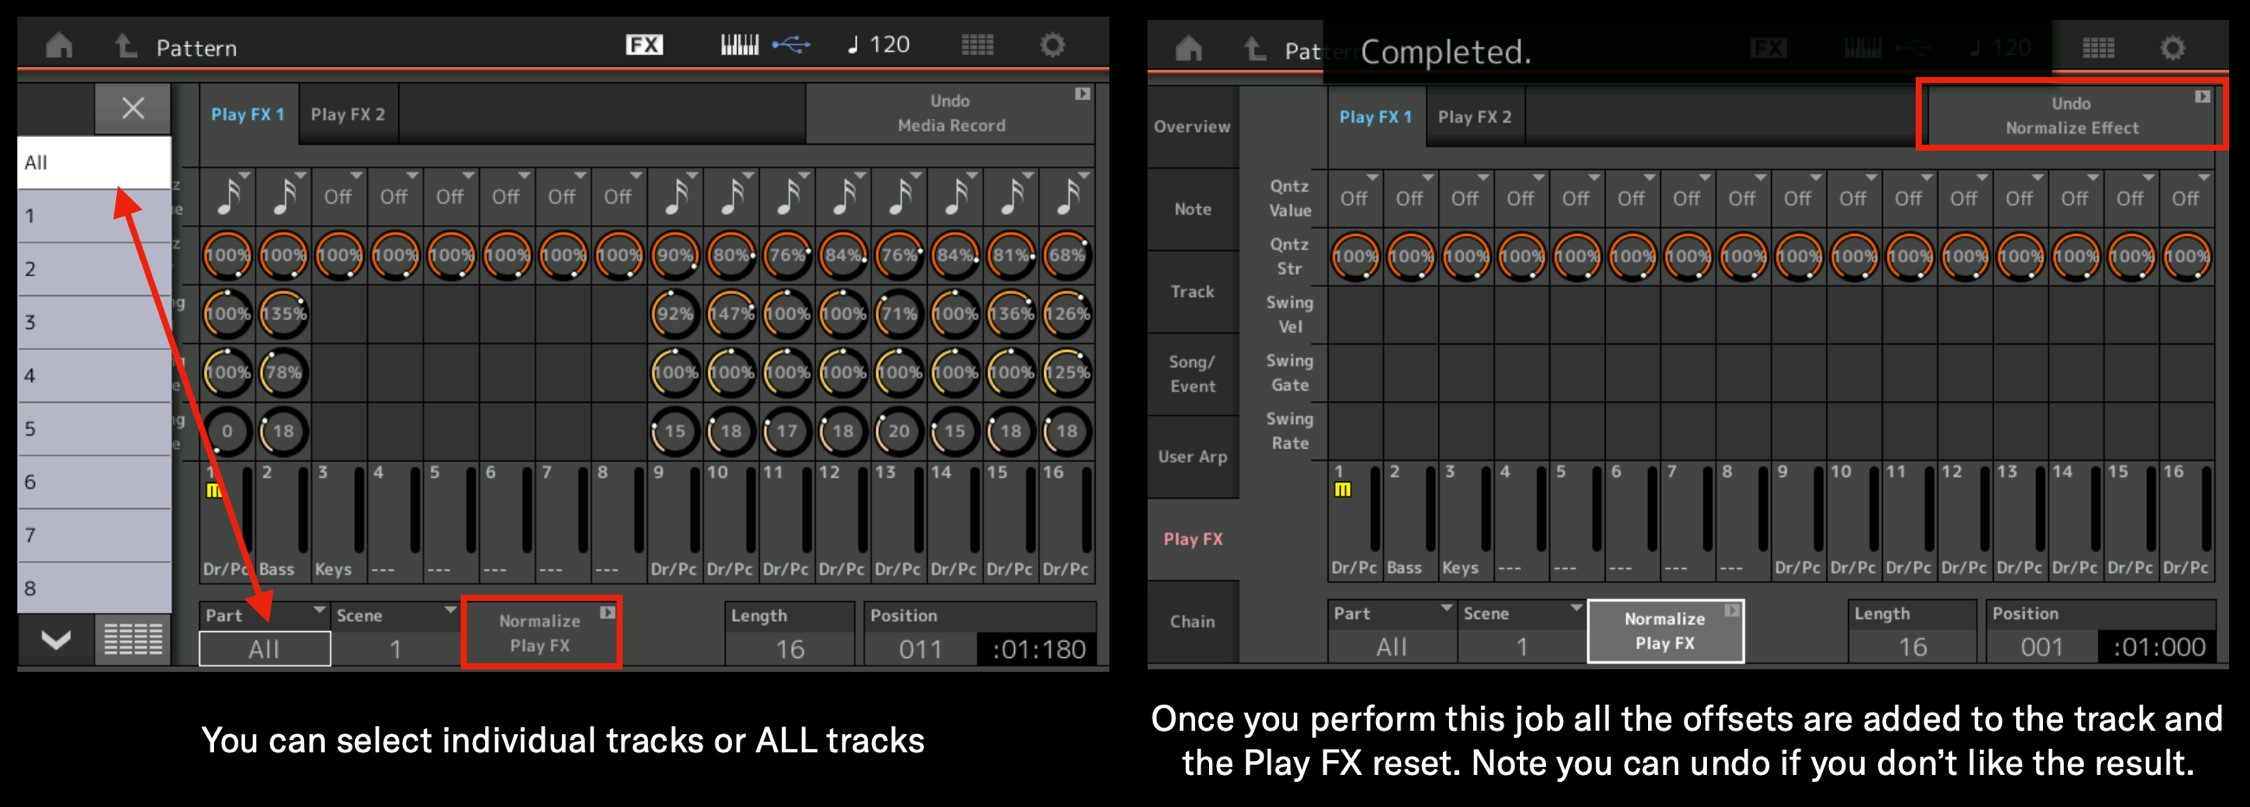
A perfect rule of thumb when using Play FX is summarized in one of my favorite quotes: “If it sounds good, it sounds good.” I like to experiment with different swing rates, swing velocities, clock shift, velocity rates/offsets…I can potentially use all the parameters in Play FX 1 and 2. It’s all non-destructive to your tracks until you execute the “Normalize Play FX” Job. This “prints” the Play FX offset to the track and zeros out all the parameters. Check it out below:
If you want to know more about Play FX, check out the Tech Talk we did here and article here. Again, you can quantize, swing, adjust the velocity and gate of the entire part or just the “swung” note, move a drum a little before or behind the beat, all in real-time during playback! And until you apply the Play FX with the Normalize function, the data remains unchanged. It works like a groove effect processor!
So, the drum tracks are recorded, my tracks are normalized…It’s time to route the audio for each drum Part and prepare this groove for recording in Cubase.
Part Output Audio Routing
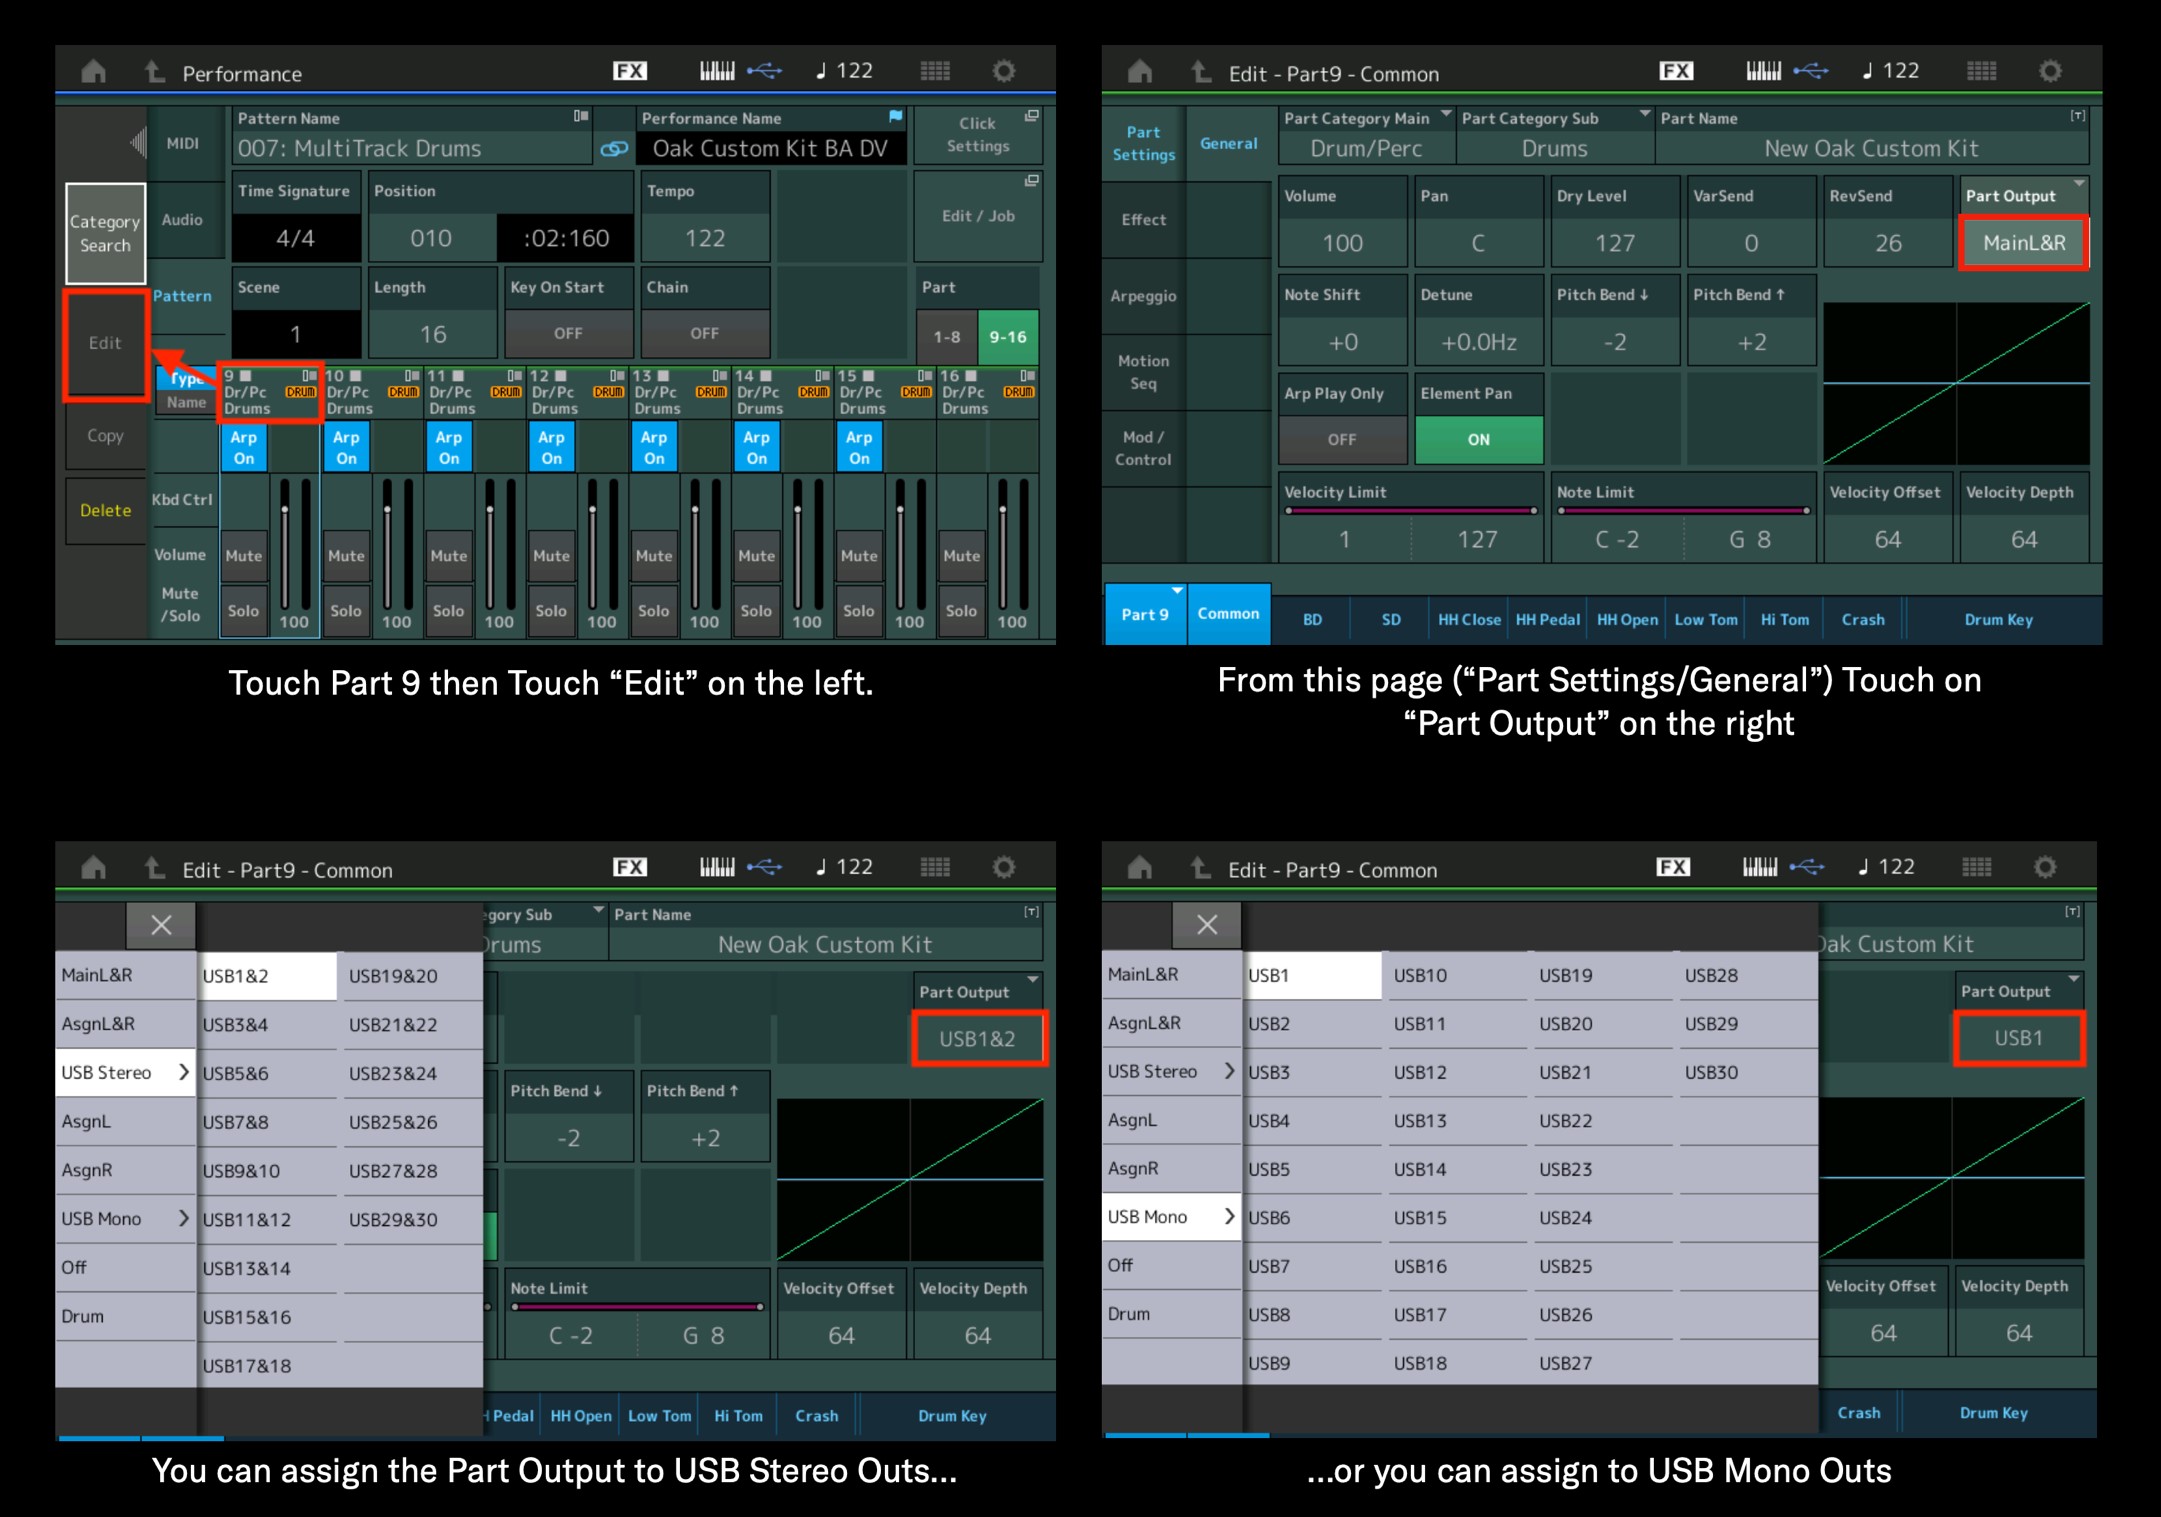
The graphic below shows how to select a Part and route its output:
If I wanted to retain the panning programmed at the Part level, I’d select a USB Stereo Part output. However, for individual drums I like to use USB Mono outputs. This allows me to record the audio of each drum, mix them accordingly in the DAW and bypasses any panning set at the Part. So, the final audio routing for the drum Parts are as follows:
- Kick Drum (Part 9): USB1
- Congas (Part 10): USB2
- Open (Part 11): Assigned to MainL&R
- Snare Drum (Part 12): USB3
- Hi hats (Part 13): USB4
- Cymbals (Part 14): USB5
- Toms (Part 15): USB6
- Shakers (Part 16): USB7
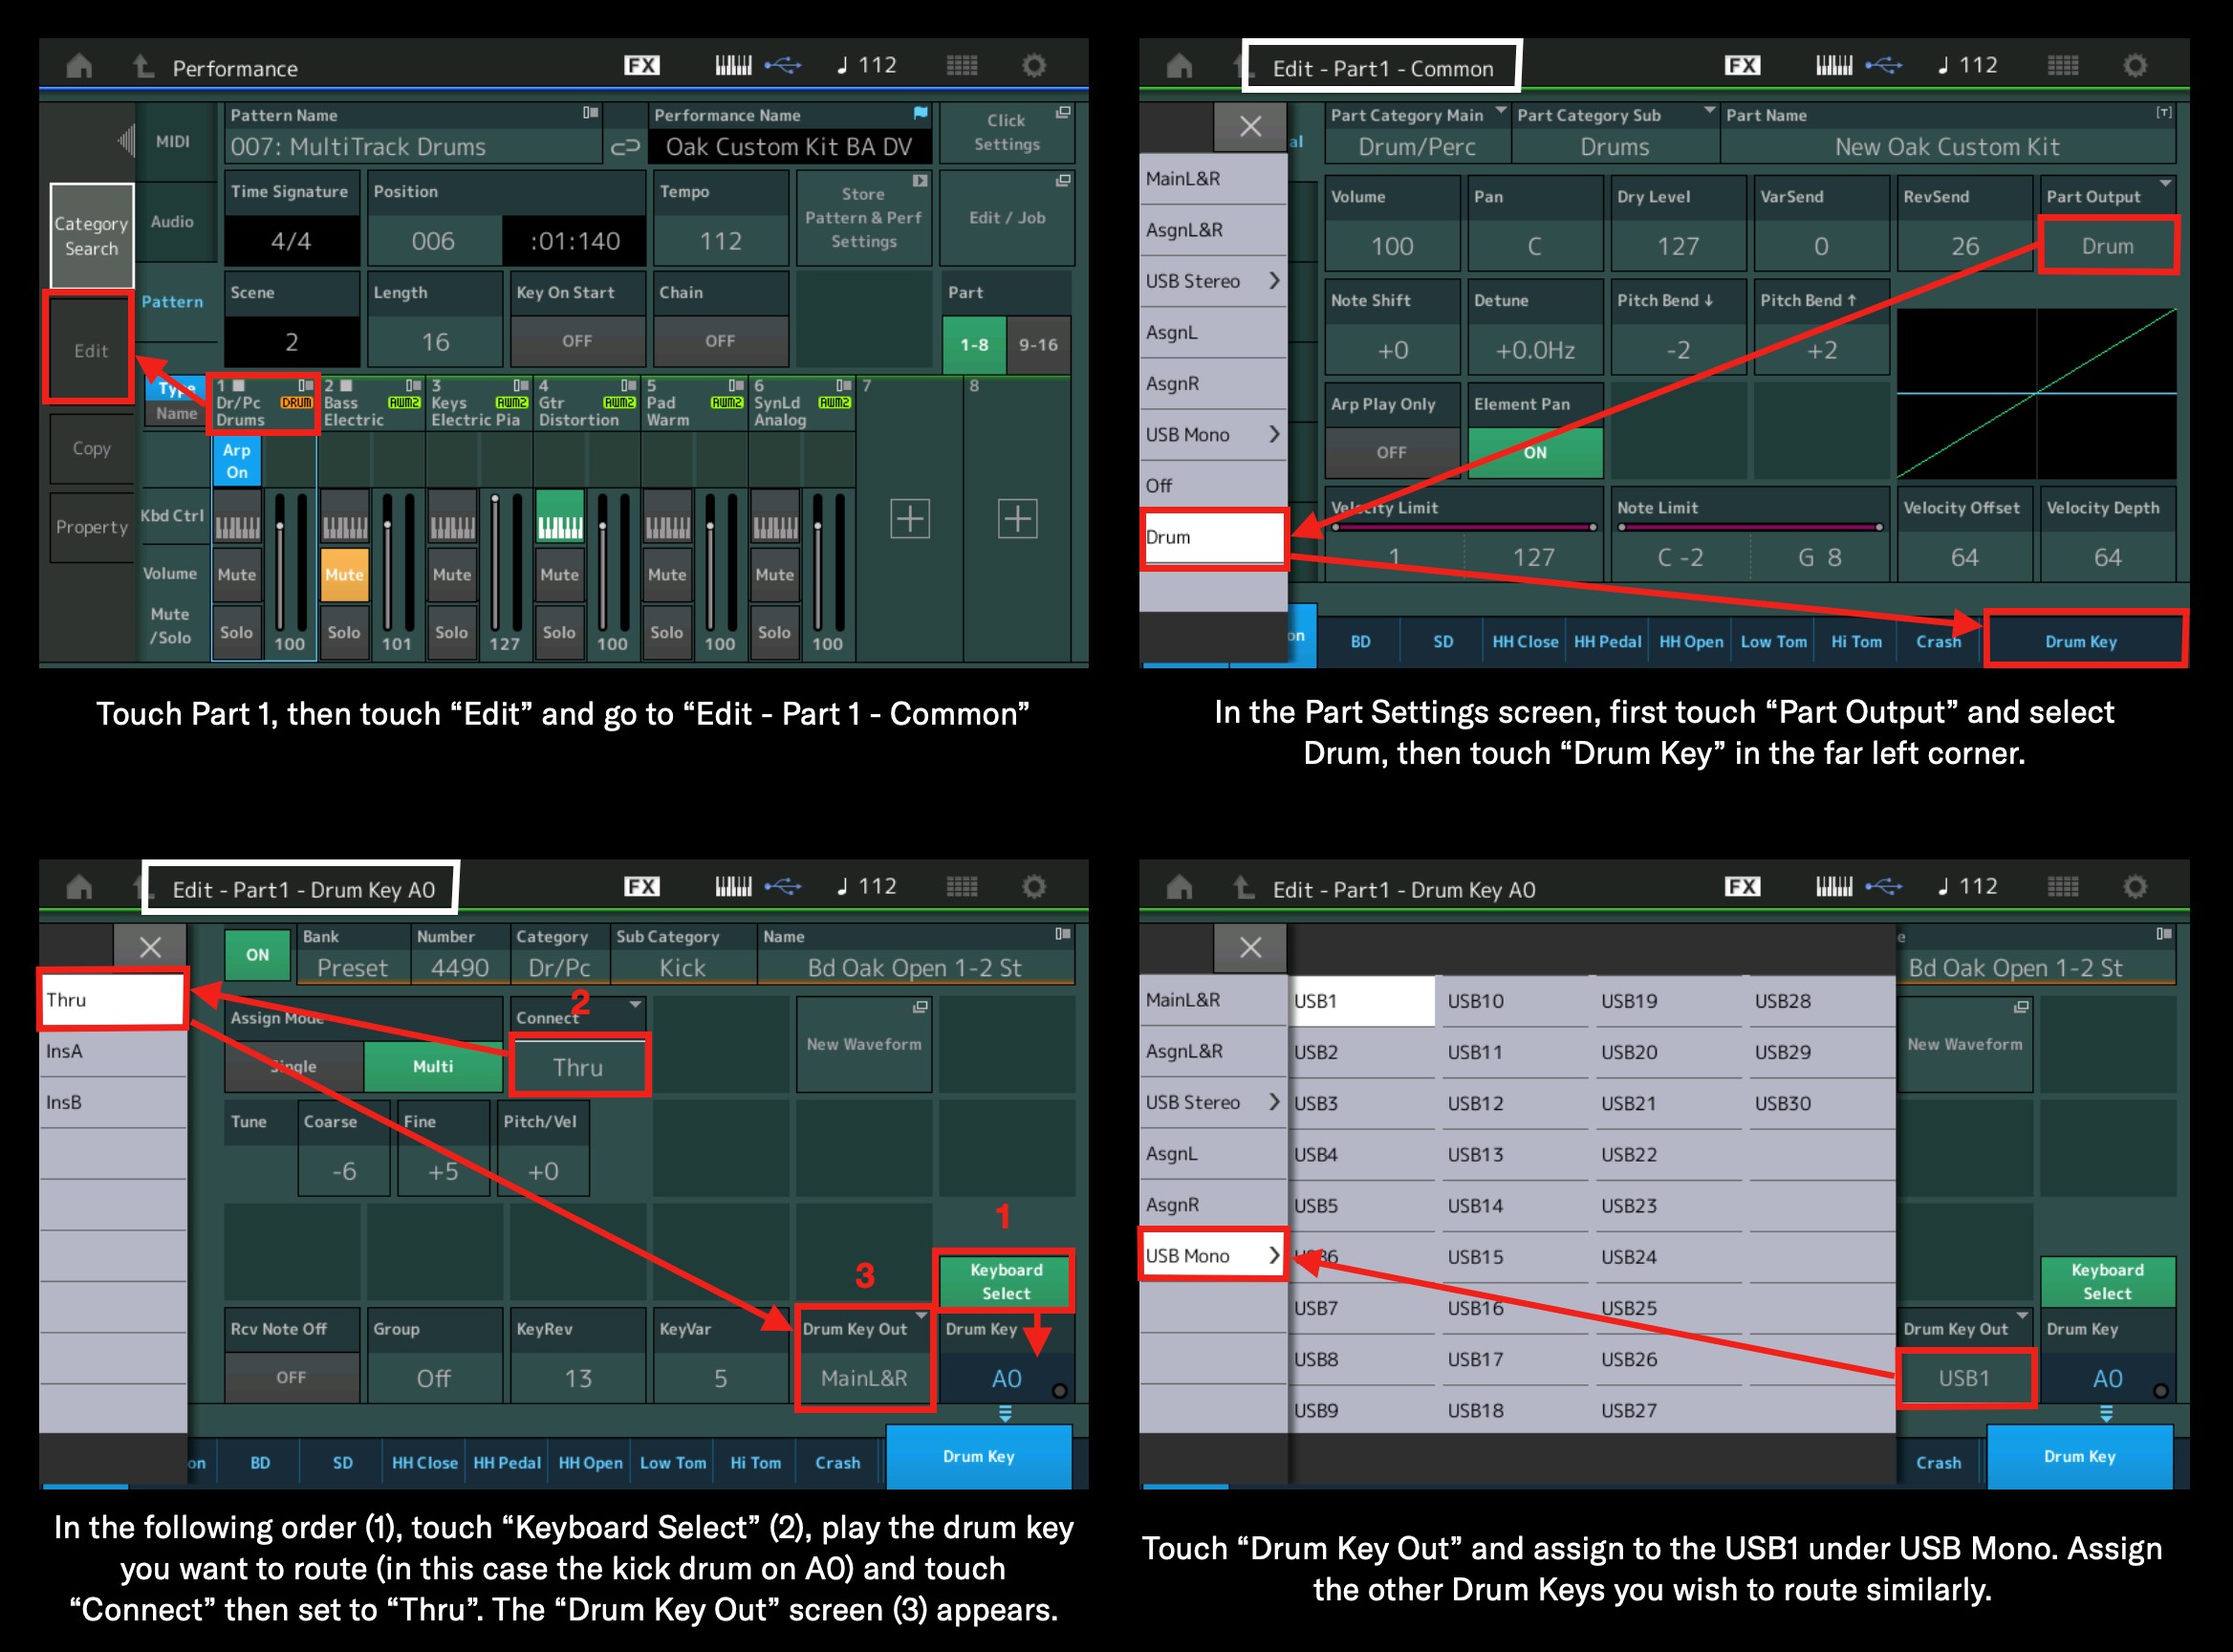
You may notice something in the routing options above. Look on the bottom left in the Part Output options and you’ll see “Drum” as an option. This setting allows you to route individual drums to separate outputs within a single Part. Let’s explore…
Part Drum Key Output Routing
You can route individual drums to USB outputs within a single Part using the “Drum” Part Output option. I have my original drum Part on Track 1. Below are all the drums used in this 16-measure phrase:
- A0, Kick
- E1, Snare
- D#1, Snare roll
- F#1, Hi hat closed
- G#1, Hi hat half-open
- A#1, Hi hat open
- D2, High tom
- C2, High-mid high tom
- B2, High-mid low tom
- A1, Low-mid high tom
- G1, Low-mid tom
- F1, Low tom
- A2, Dark crash cymbal
- G2, Splash cymbal
- E2, China cymbal
- C#2. Bright crash cymbal
- A5, Conga low
- F5, Conga slap
- G5, Conga high
- A#4, Shaker
That’s 20 different drum keys. On a MONTAGE, with the default audio sample rate of 44.1kHz, I could put every key on its own mono USB out if I wanted since I have 30 total individual outs (MODX allows for 8 individual outs) but in this case I’ll just group drum types as follows:
- A0, Kick: USB1
- E1, Snare: USB2
- D#1, Snare roll: USB2
- F#1, Hi hat closed: USB3
- G#1, Hi hat half-open: USB3
- A#1, Hi hat open: USB3
- D2, High tom: USB4
- C2, High-mid high tom: USB4
- B2, High-mid low tom: USB4
- A1, Low-mid high tom: USB4
- G1, Low-mid tom: USB4
- F1, Low tom: USB4
- A2, Dark crash cymbal: USB5
- G2, Splash cymbal: USB5
- E2, China cymbal: USB5
- C#2. Bright crash cymbal: USB5
- A5, Conga low: USB6
- F5, Conga slap: USB6
- G5, Conga high: USB6
- A#4, Shaker: USB7
Here’s how this is done:
I like to use Drum Key Outs when I am using Cubase to record both the drum MIDI and audio. But I love using the Pattern Sequencer to flesh out ideas or record rhythm and bass tracks for songs I’m trying to learn. And the immediacy of hardware is a great thing, but what makes it even cooler is the connectivity to the DAW.
If I want to record to the DAW for further production I’ll break out drums with Divide Drum Track, use the Play FX to tighten up and expand on the groove, save the Performance along with the accompanying Pattern. Then I’ll open Cubase and use MONTAGE (or MODX) Connect to save the Performance and import the Pattern to Cubase and set up for multitrack drum recording. Here’s how to use the Part Output with this approach.
Multitrack Drum Recording in Cubase
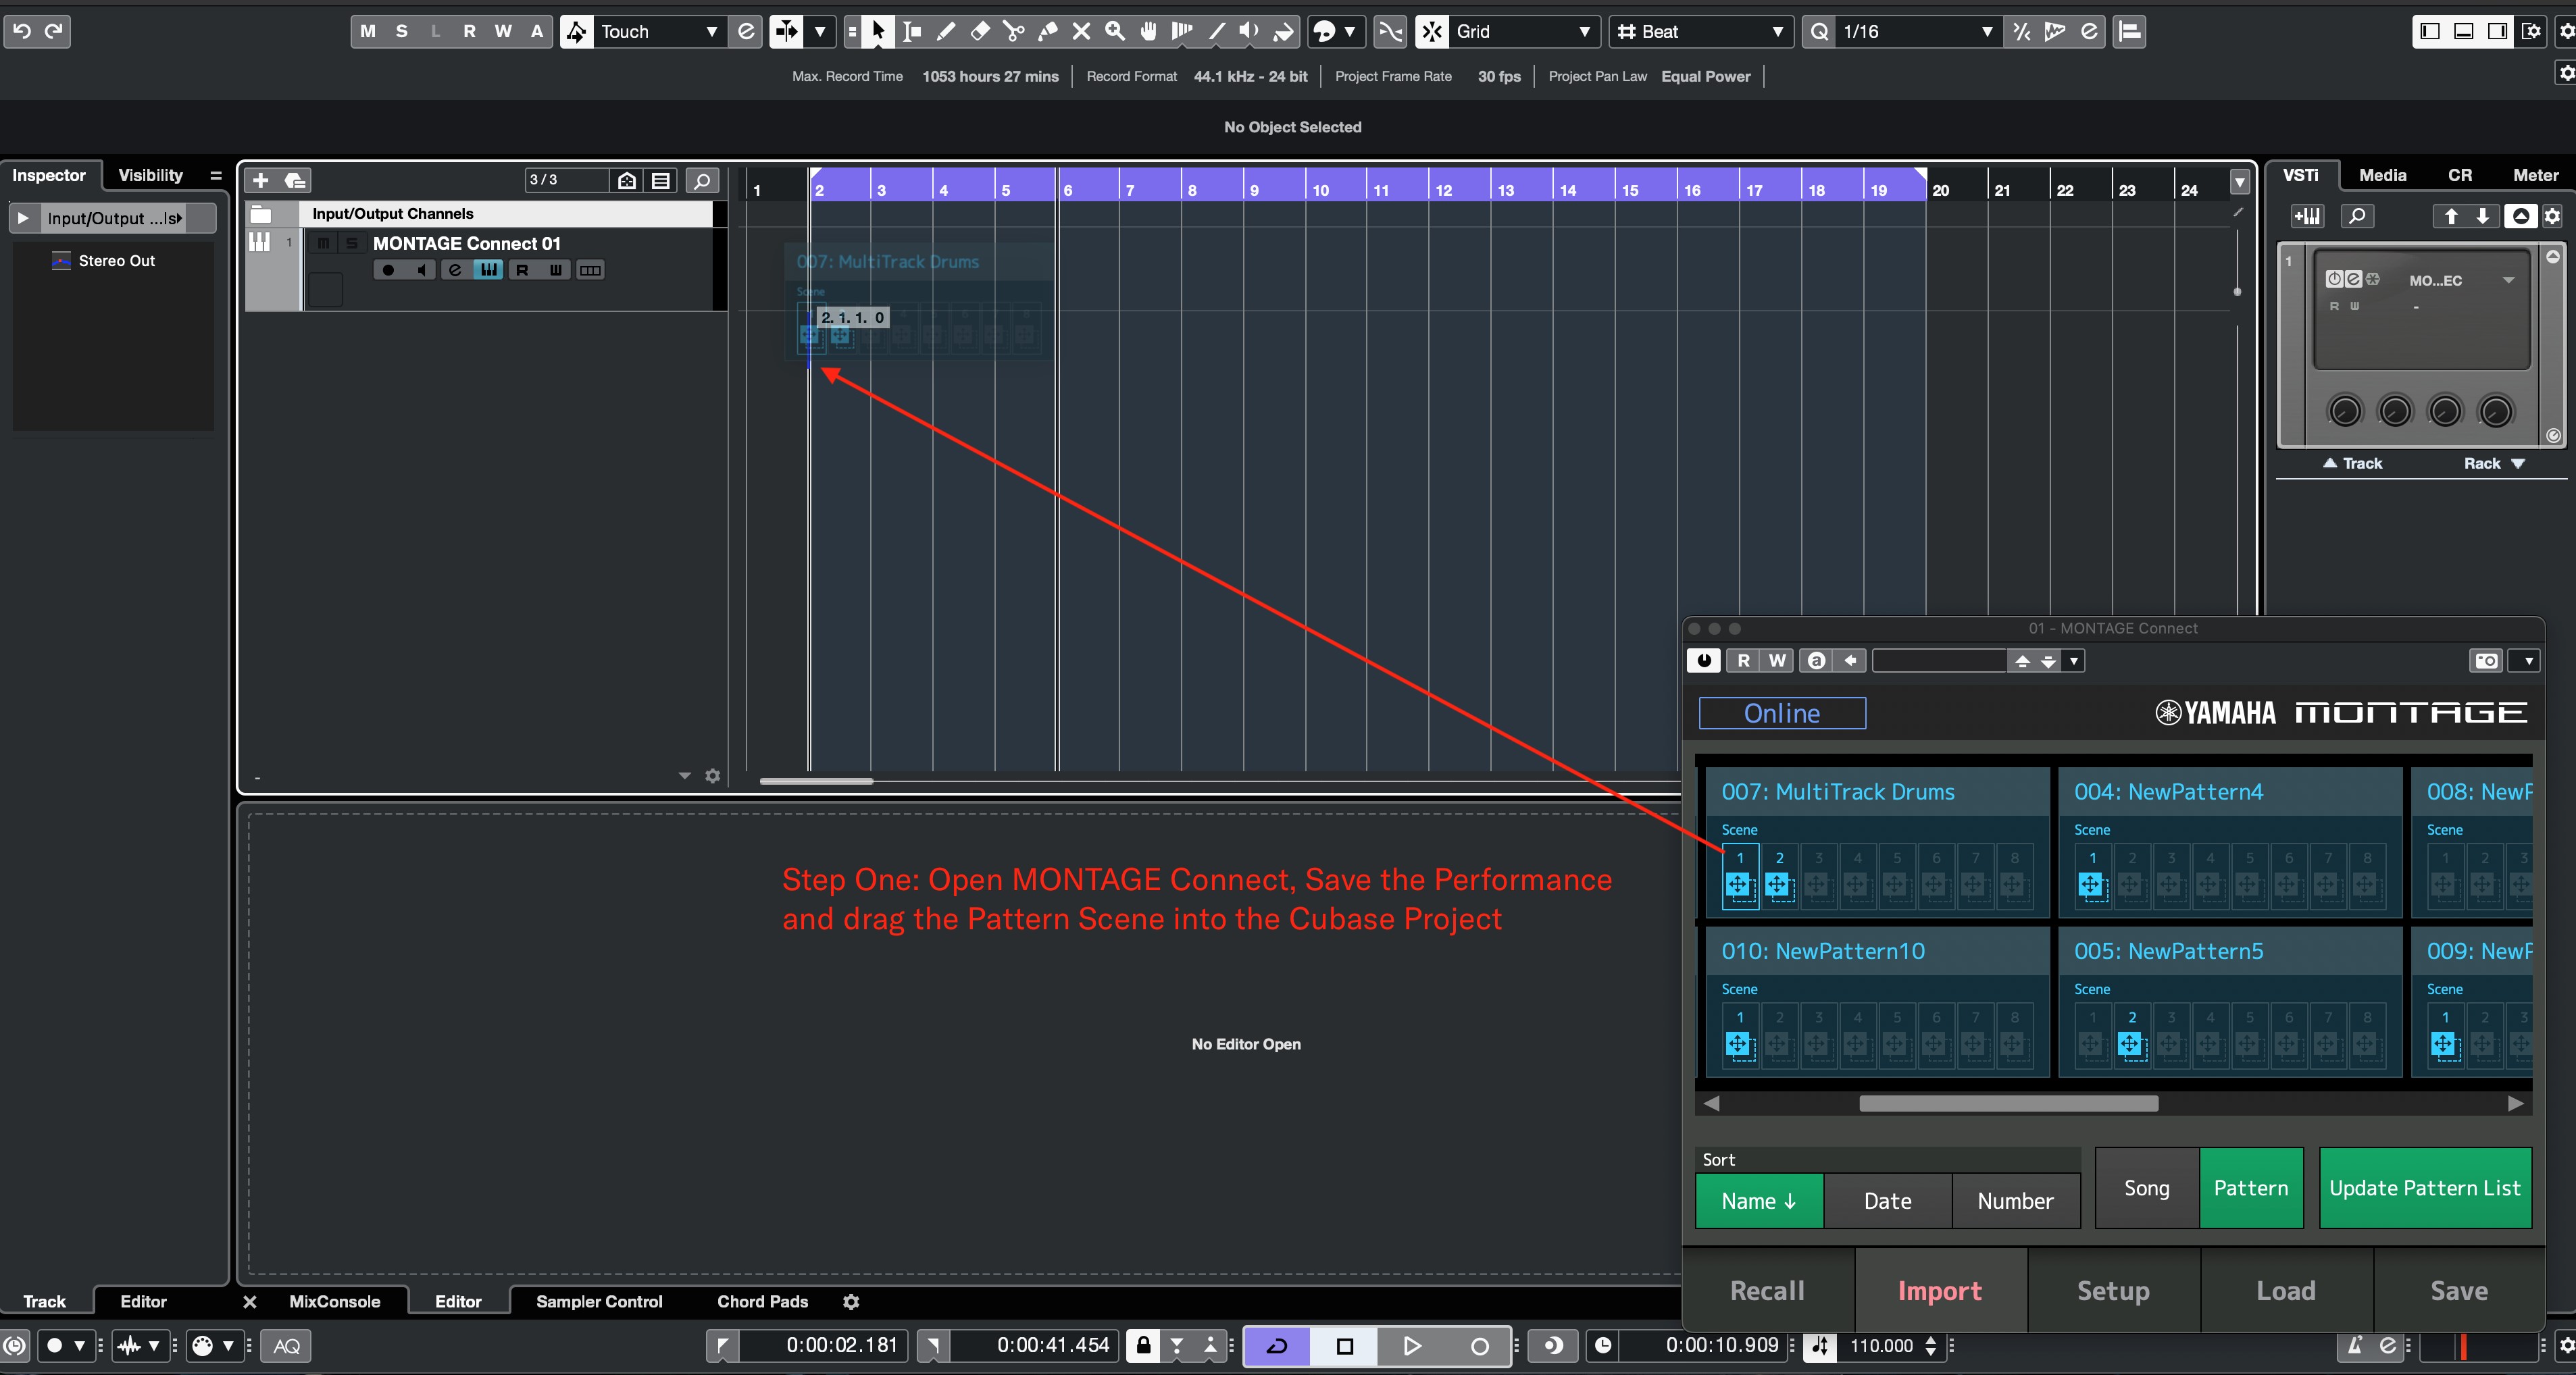
After creating my project in Cubase, the first thing I’ll do is open MONTAGE Connect to save my Performance in the DAW. Now whenever I open this project Connect will send the Performance I’m using to the instrument. For more on MONTAGE/MODX Connect check out the article here and the Tech Talk here. Here’s the basic workflow:
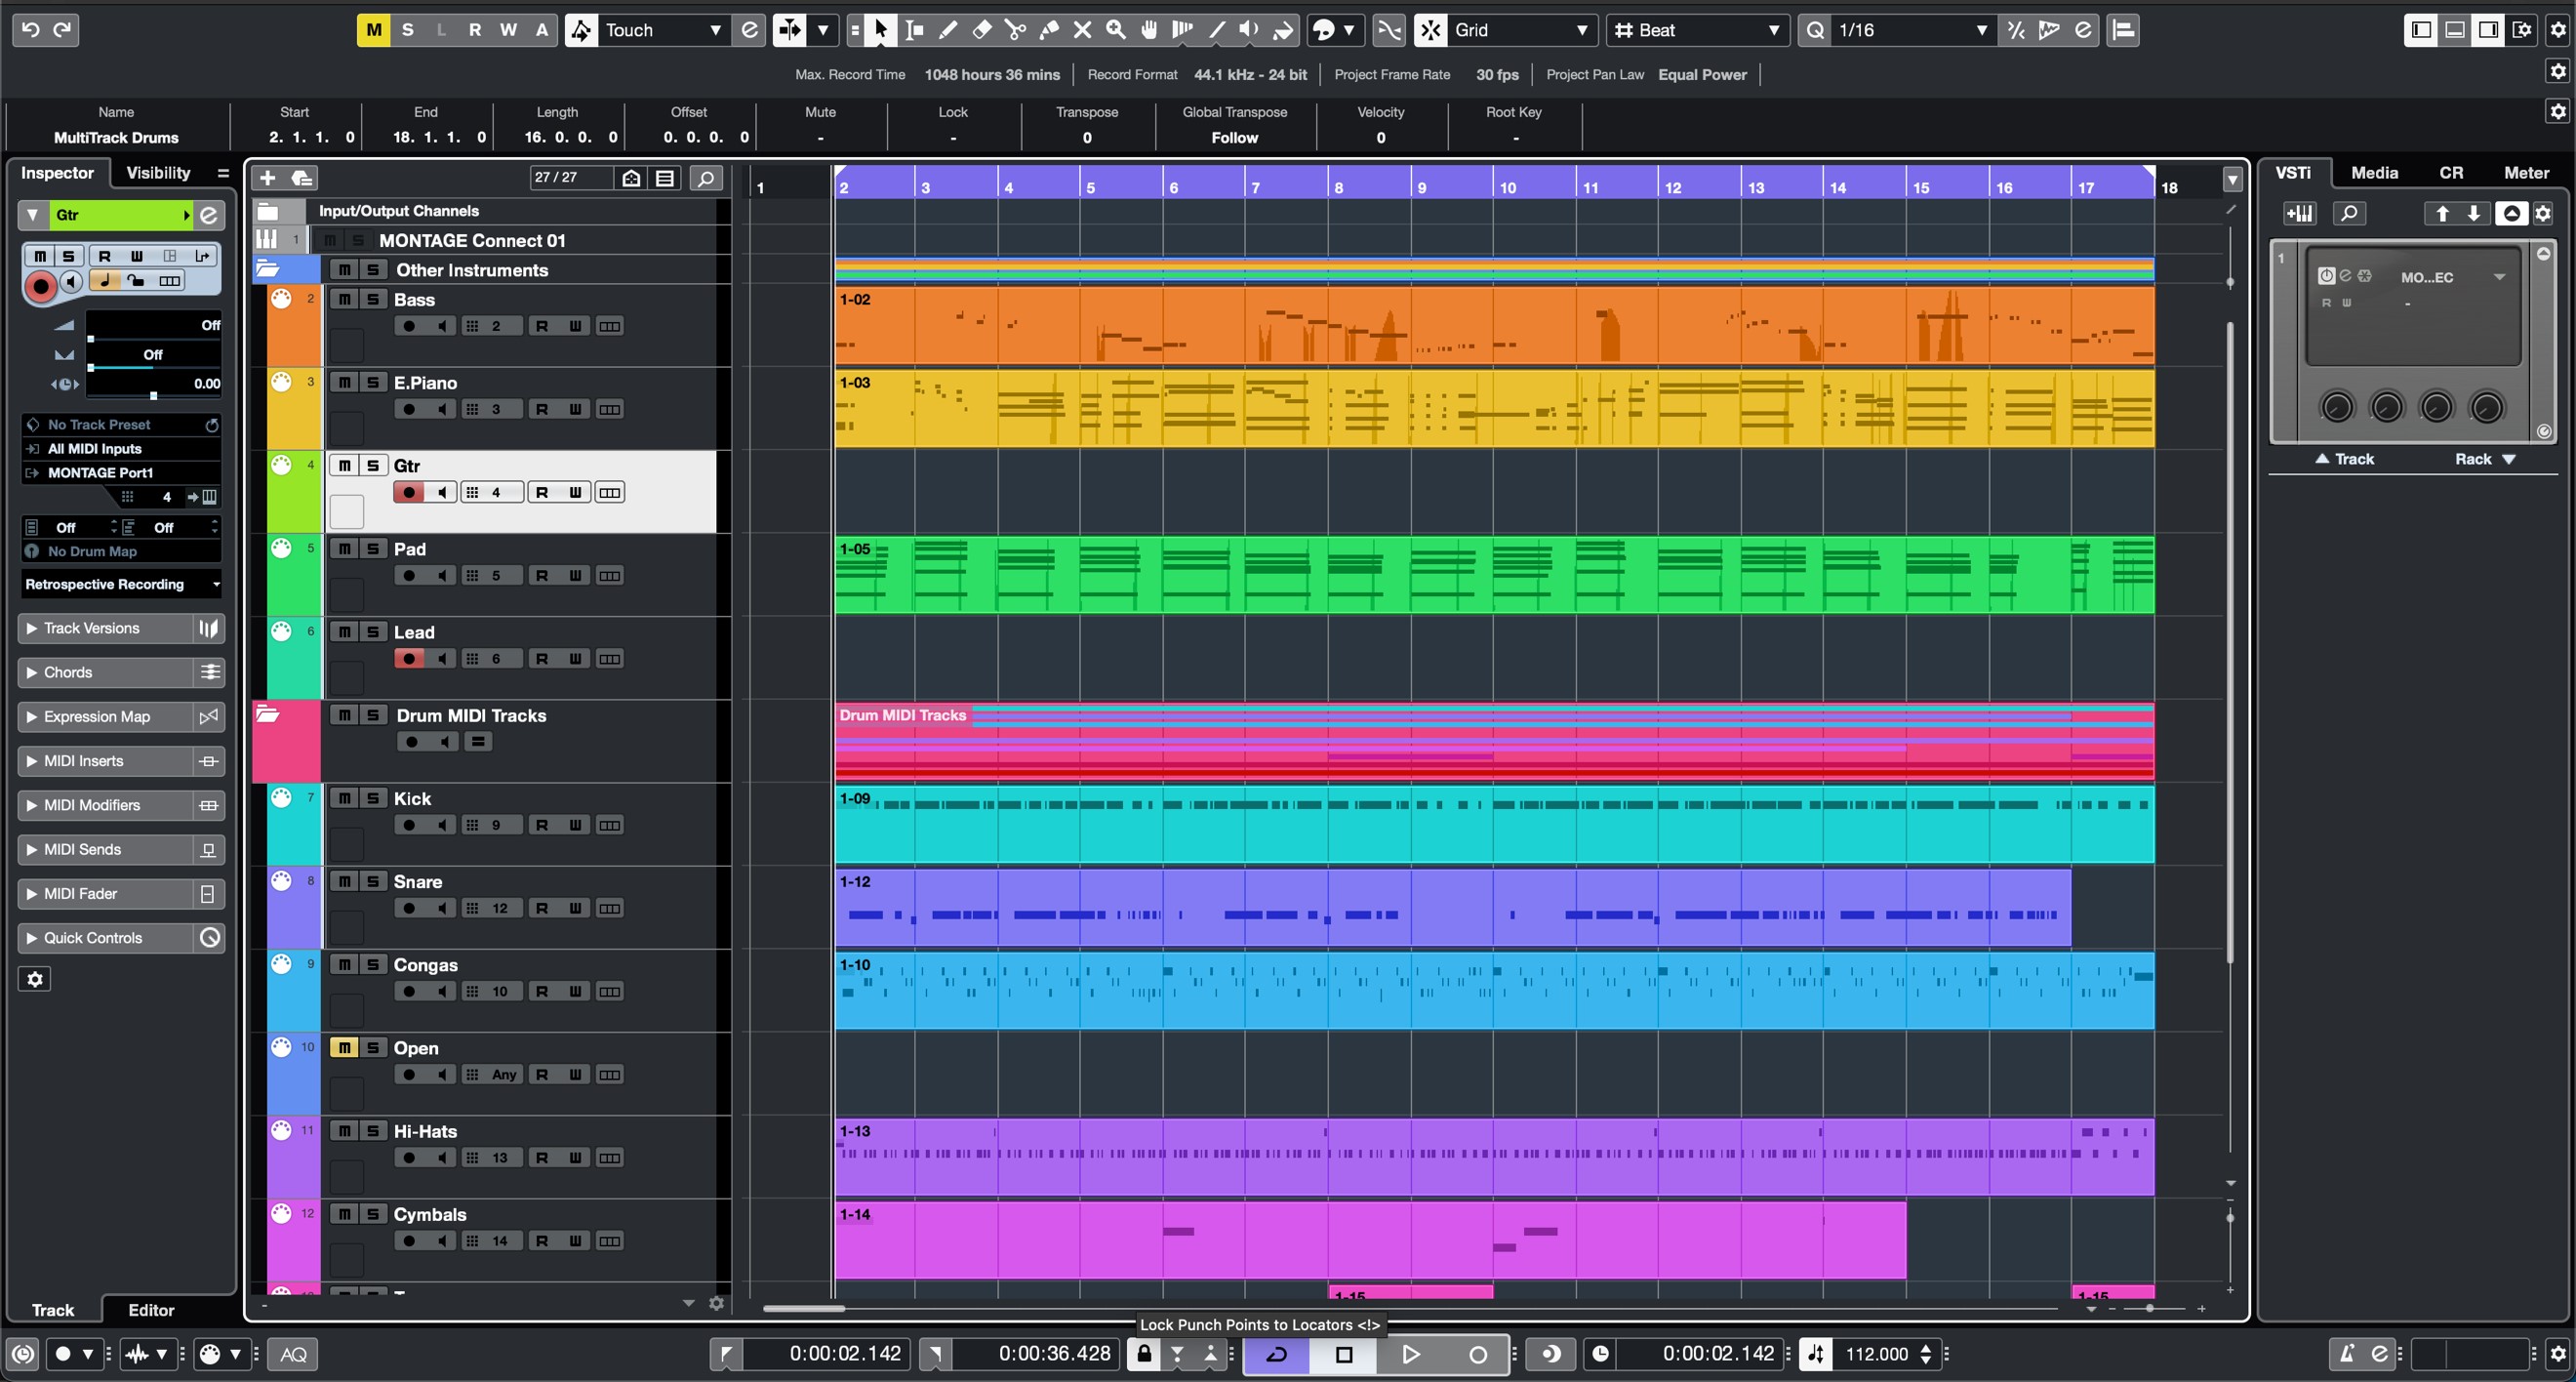
Here are those tracks after some quick renaming, reorganizing and coloring:
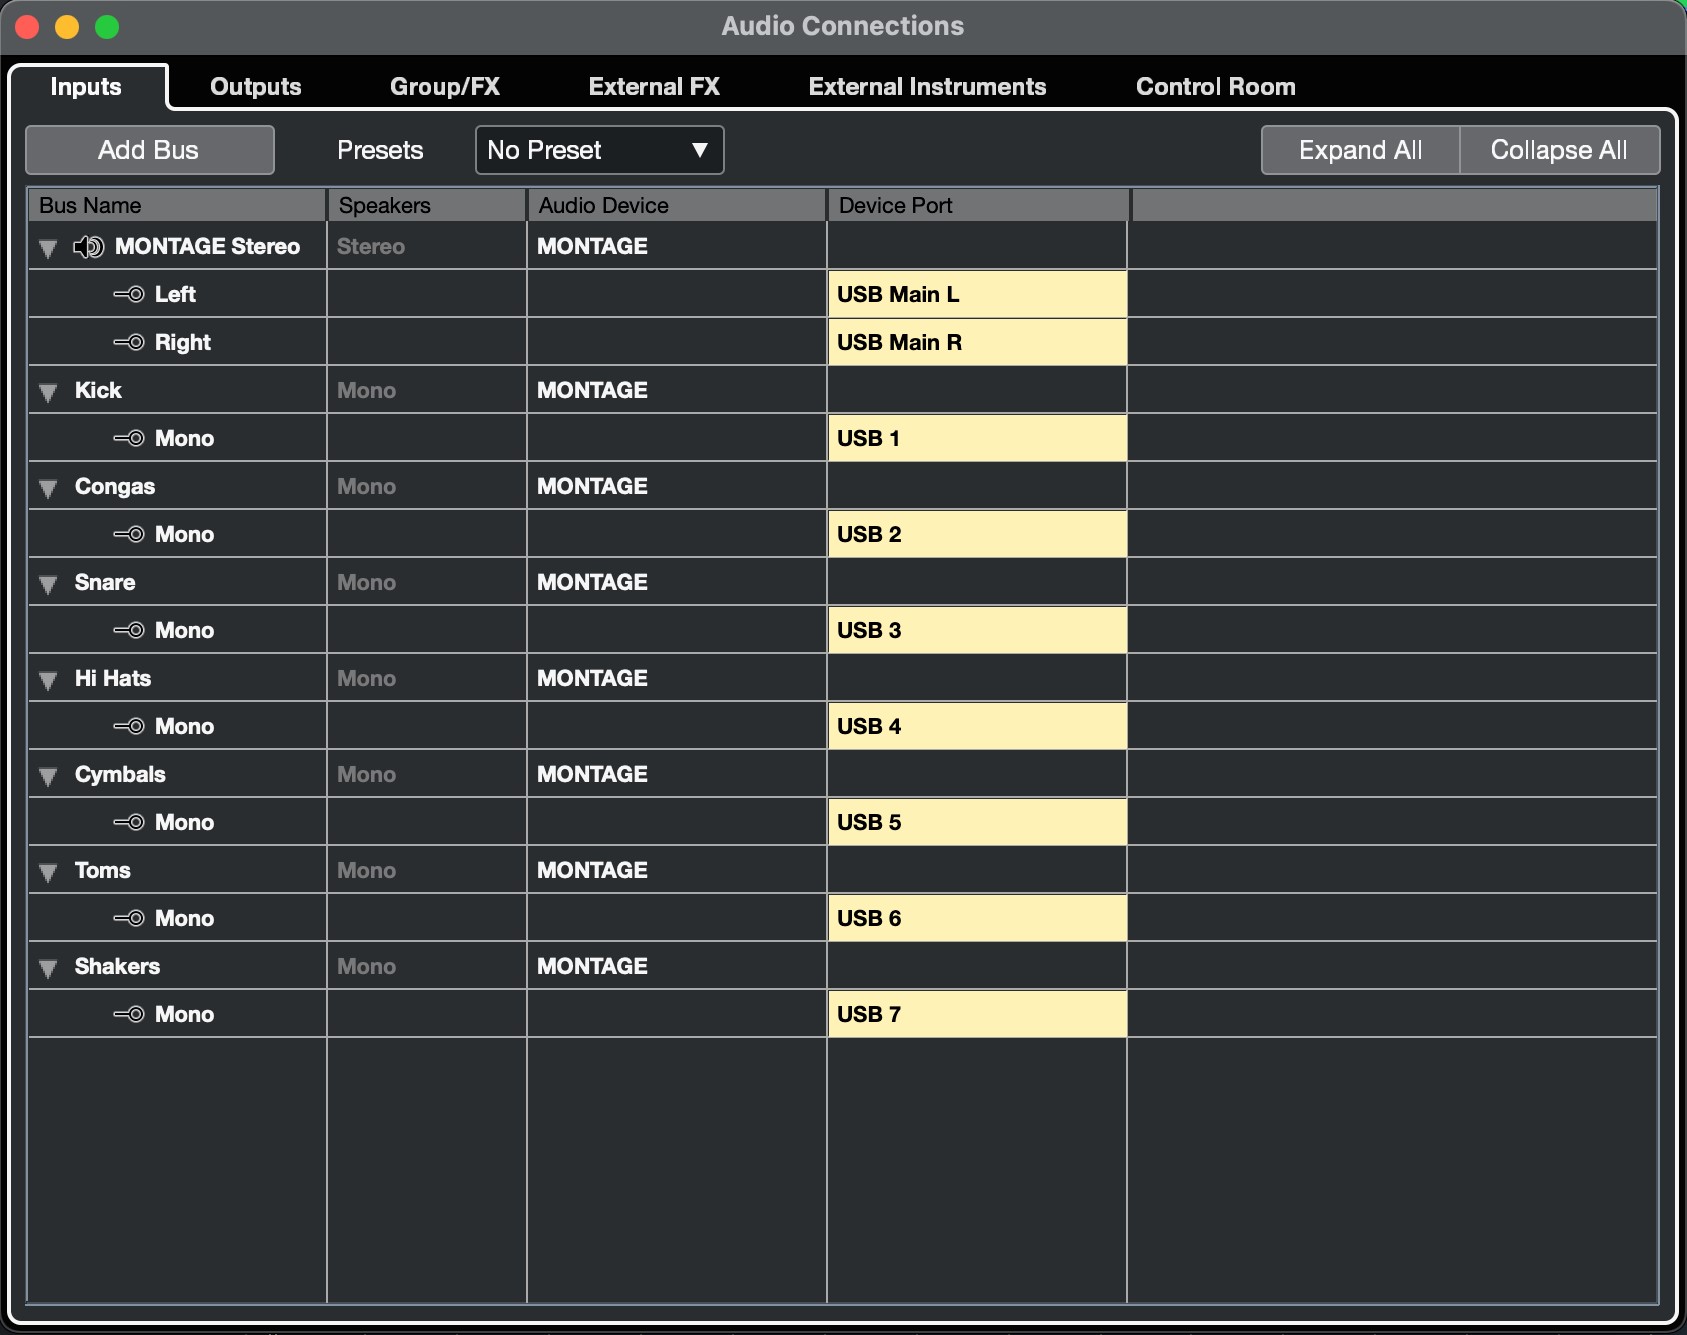
In addition to the MIDI Drum tracks I added bass, electric piano and pad tracks. To keep it organized, I placed the drum tracks in a separate folder. Now that I have my MIDI tracks in Cubase, I’ll create audio connections corresponding to the MONTAGE audio outputs I set up. This is found under Studio/Audio Connections in Cubase:
The Stereo Input is automatically created when opening a new Project using the MONTAGE or MODX as audio interface. I added additional mono inputs by right-clicking in the window above, selecting “Add Bus/Mono” and creating seven additional inputs. After that I named them to correspond with my MIDI tracks. As a reminder, I have routed the parts in MONTAGE thusly:
- Kick Drum (Part 9): USB1
- Congas (Part 10): USB2
- Open (Part 11): Assigned to MainL&R
- Snare Drum (Part 12): USB3
- Hi hats (Part 13): USB4
- Cymbals (Part 14): USB5
- Toms (Part 15): USB6
- Shakers (Part 16): USB7
The routings in MONTAGE and the Inputs I set up in Cubase match. Let’s multitrack some drums! A
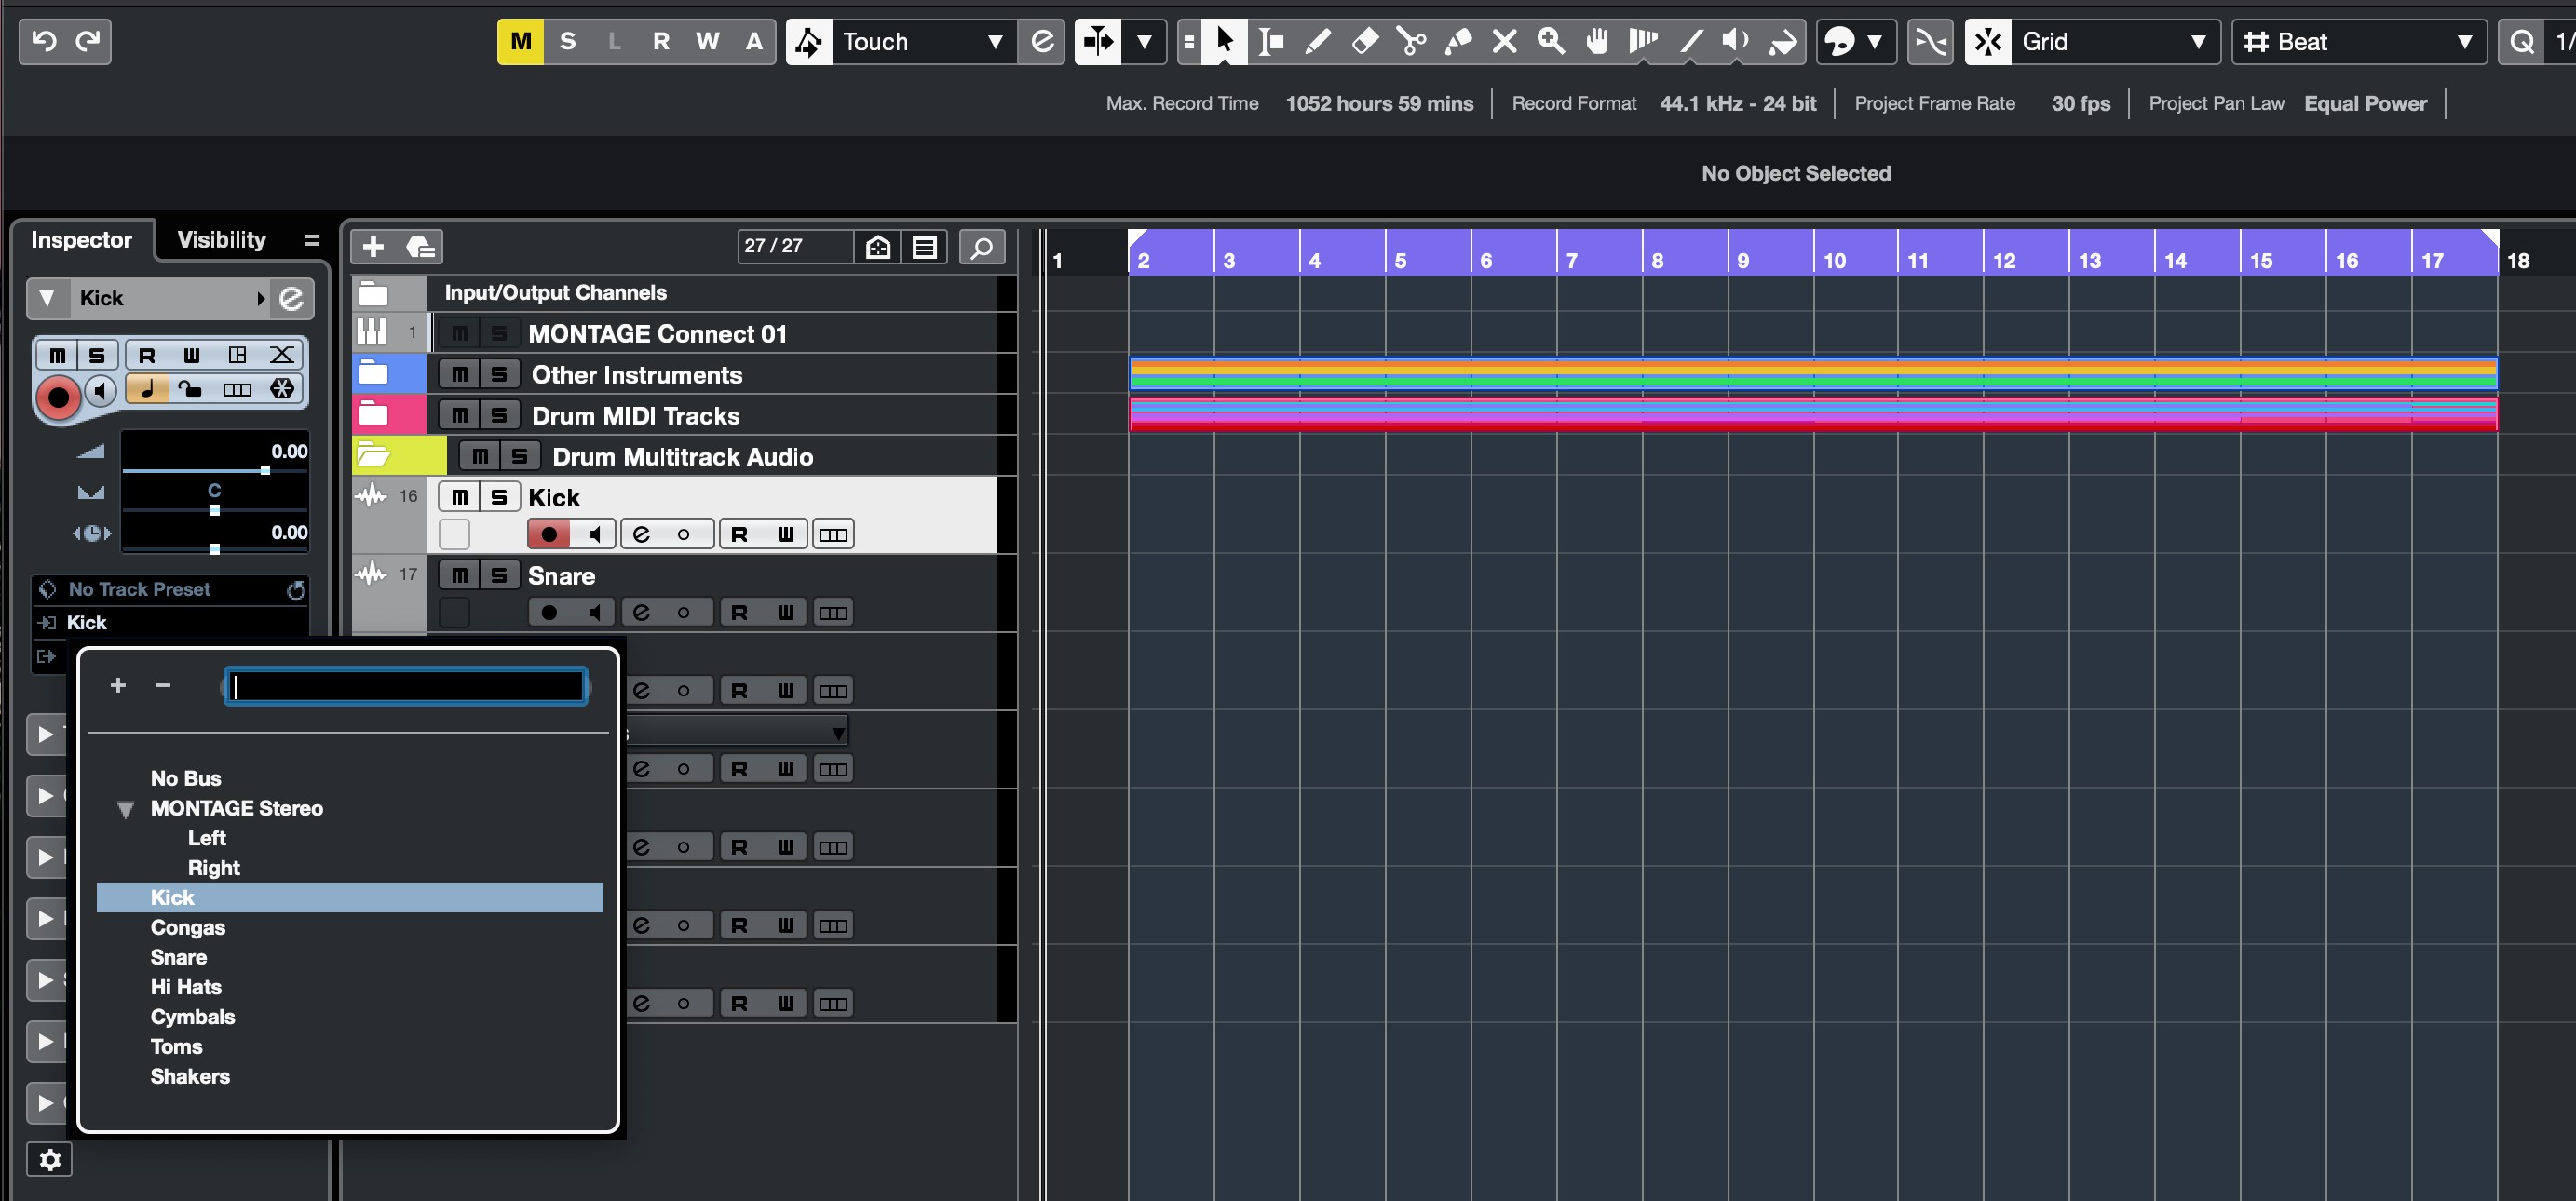
With the routing set up it’s a matter of creating seven audio tracks corresponding to the Parts I want to record. Since you can name your inputs when creating each mono bus, you can quickly set up the audio tracks:
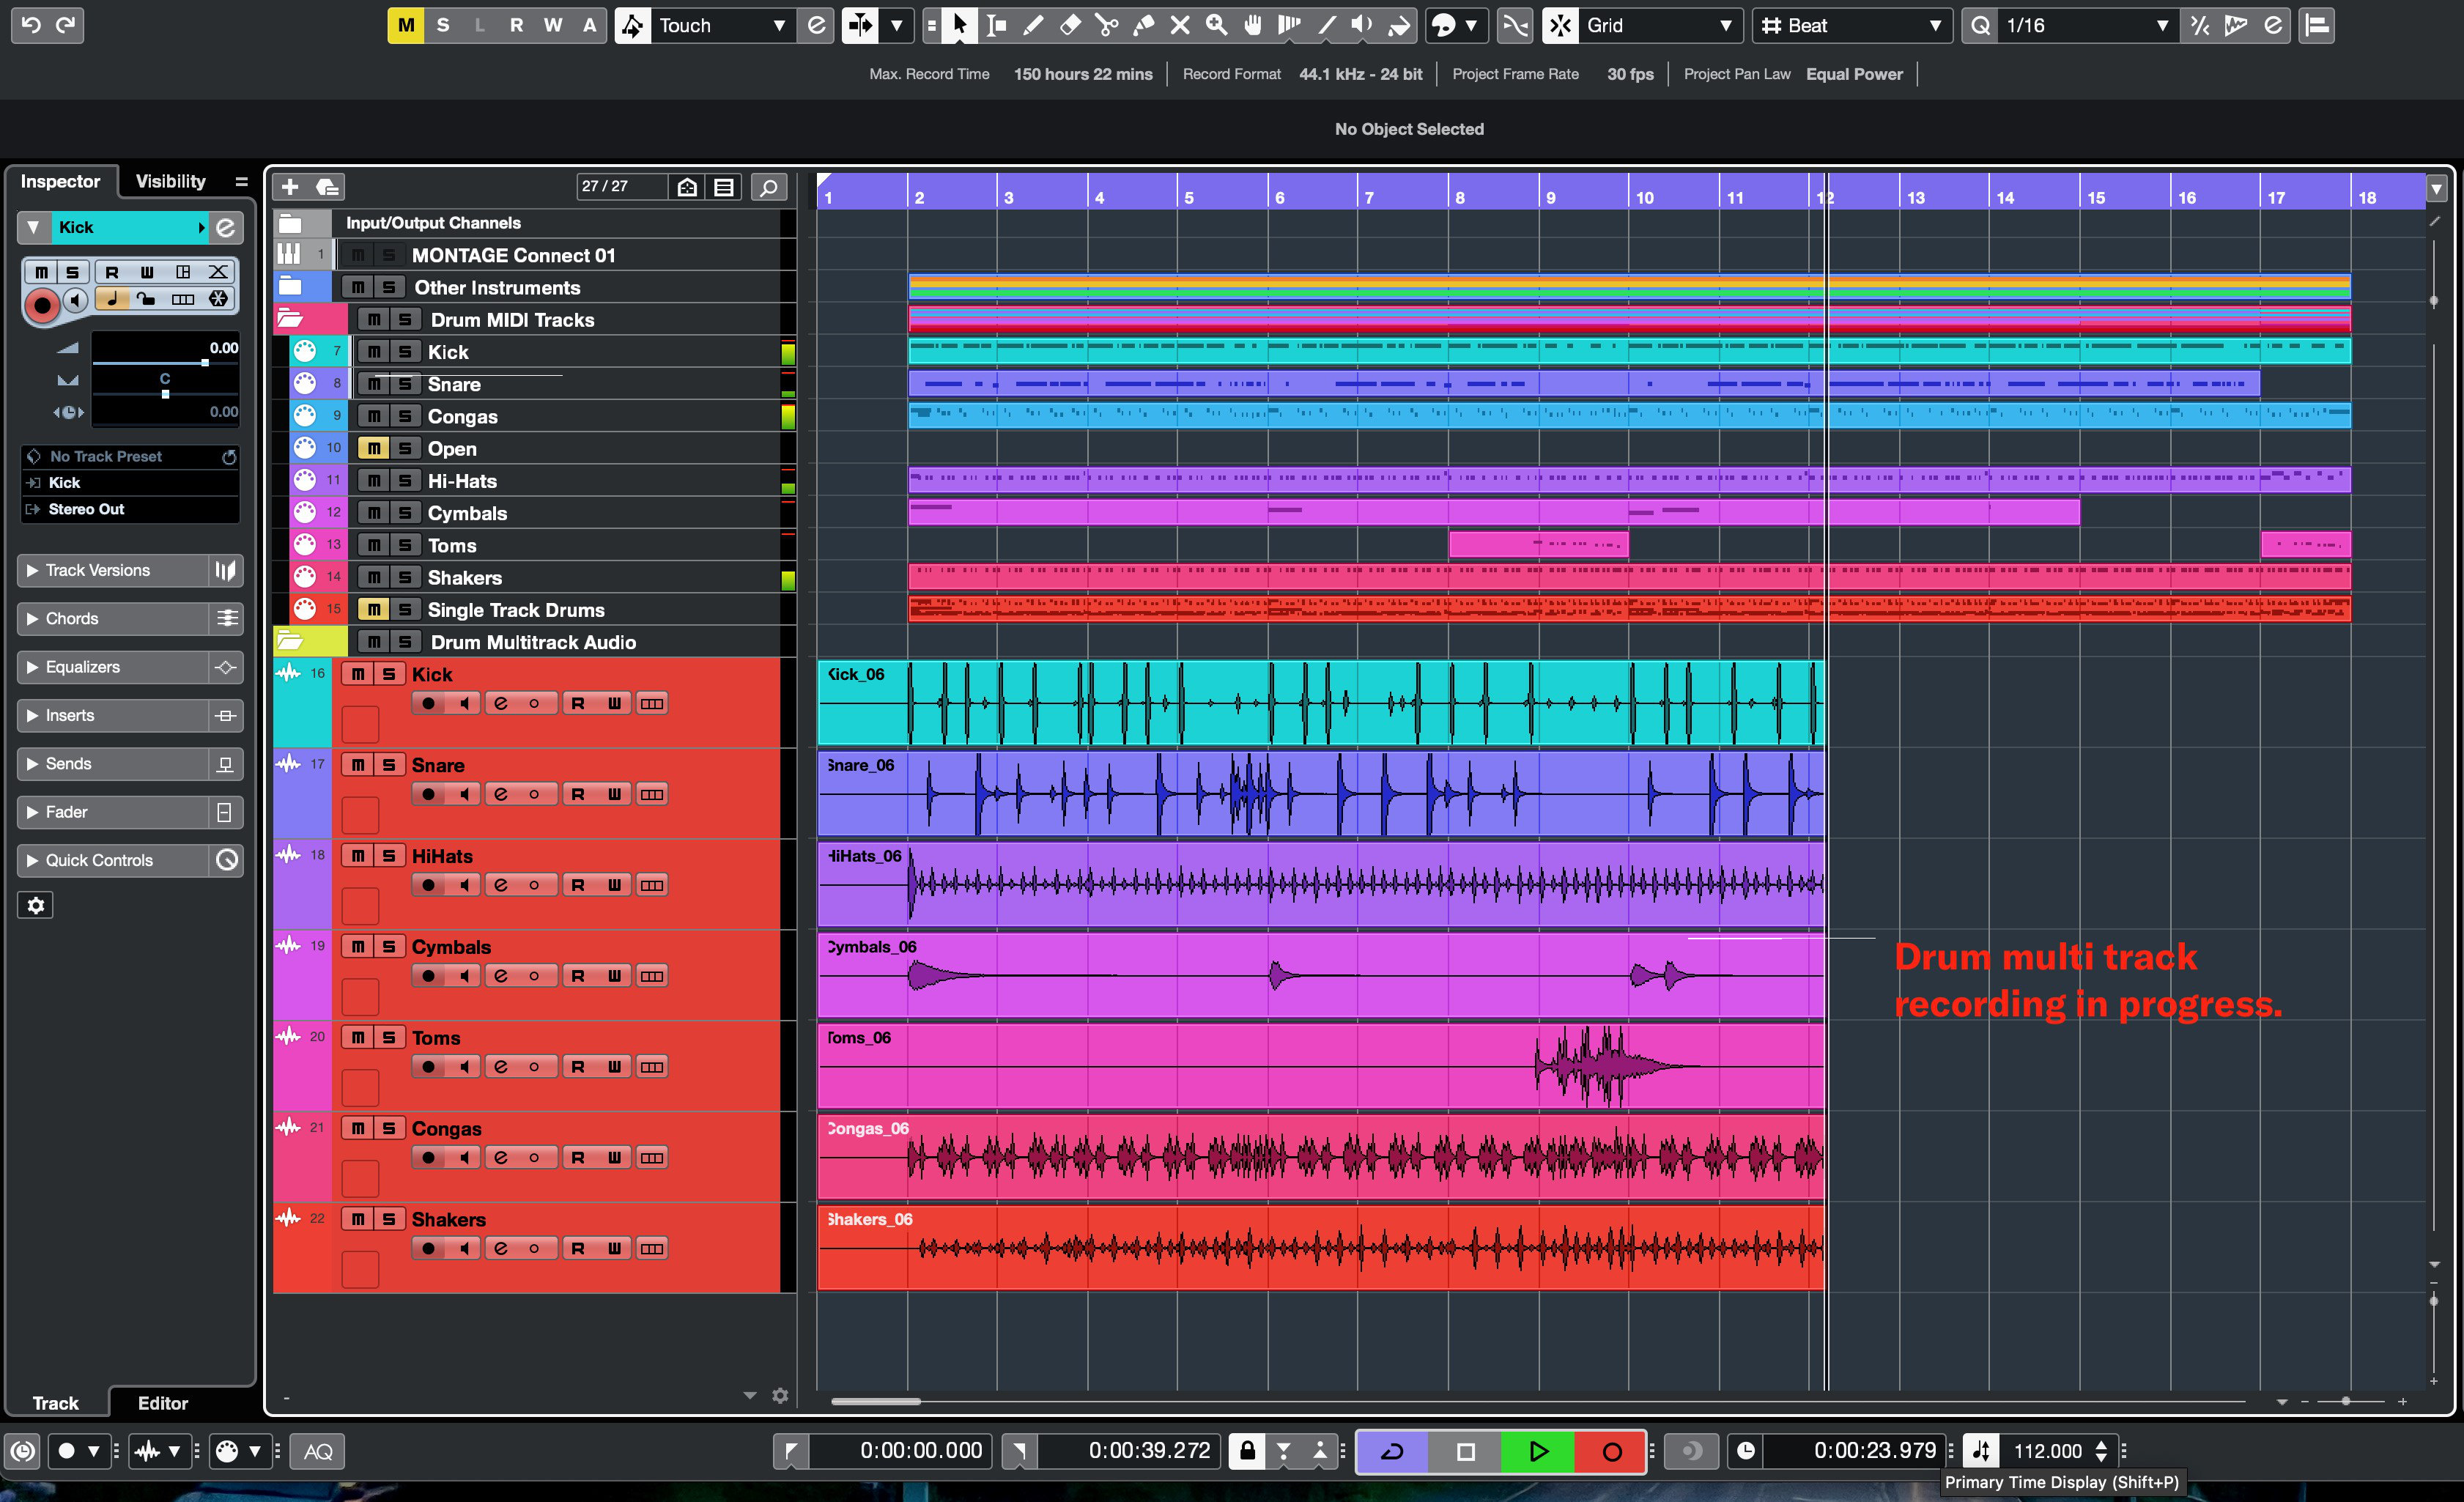
After everything is assigned it’s a matter of arming tracks to record, check my levels and proceed:
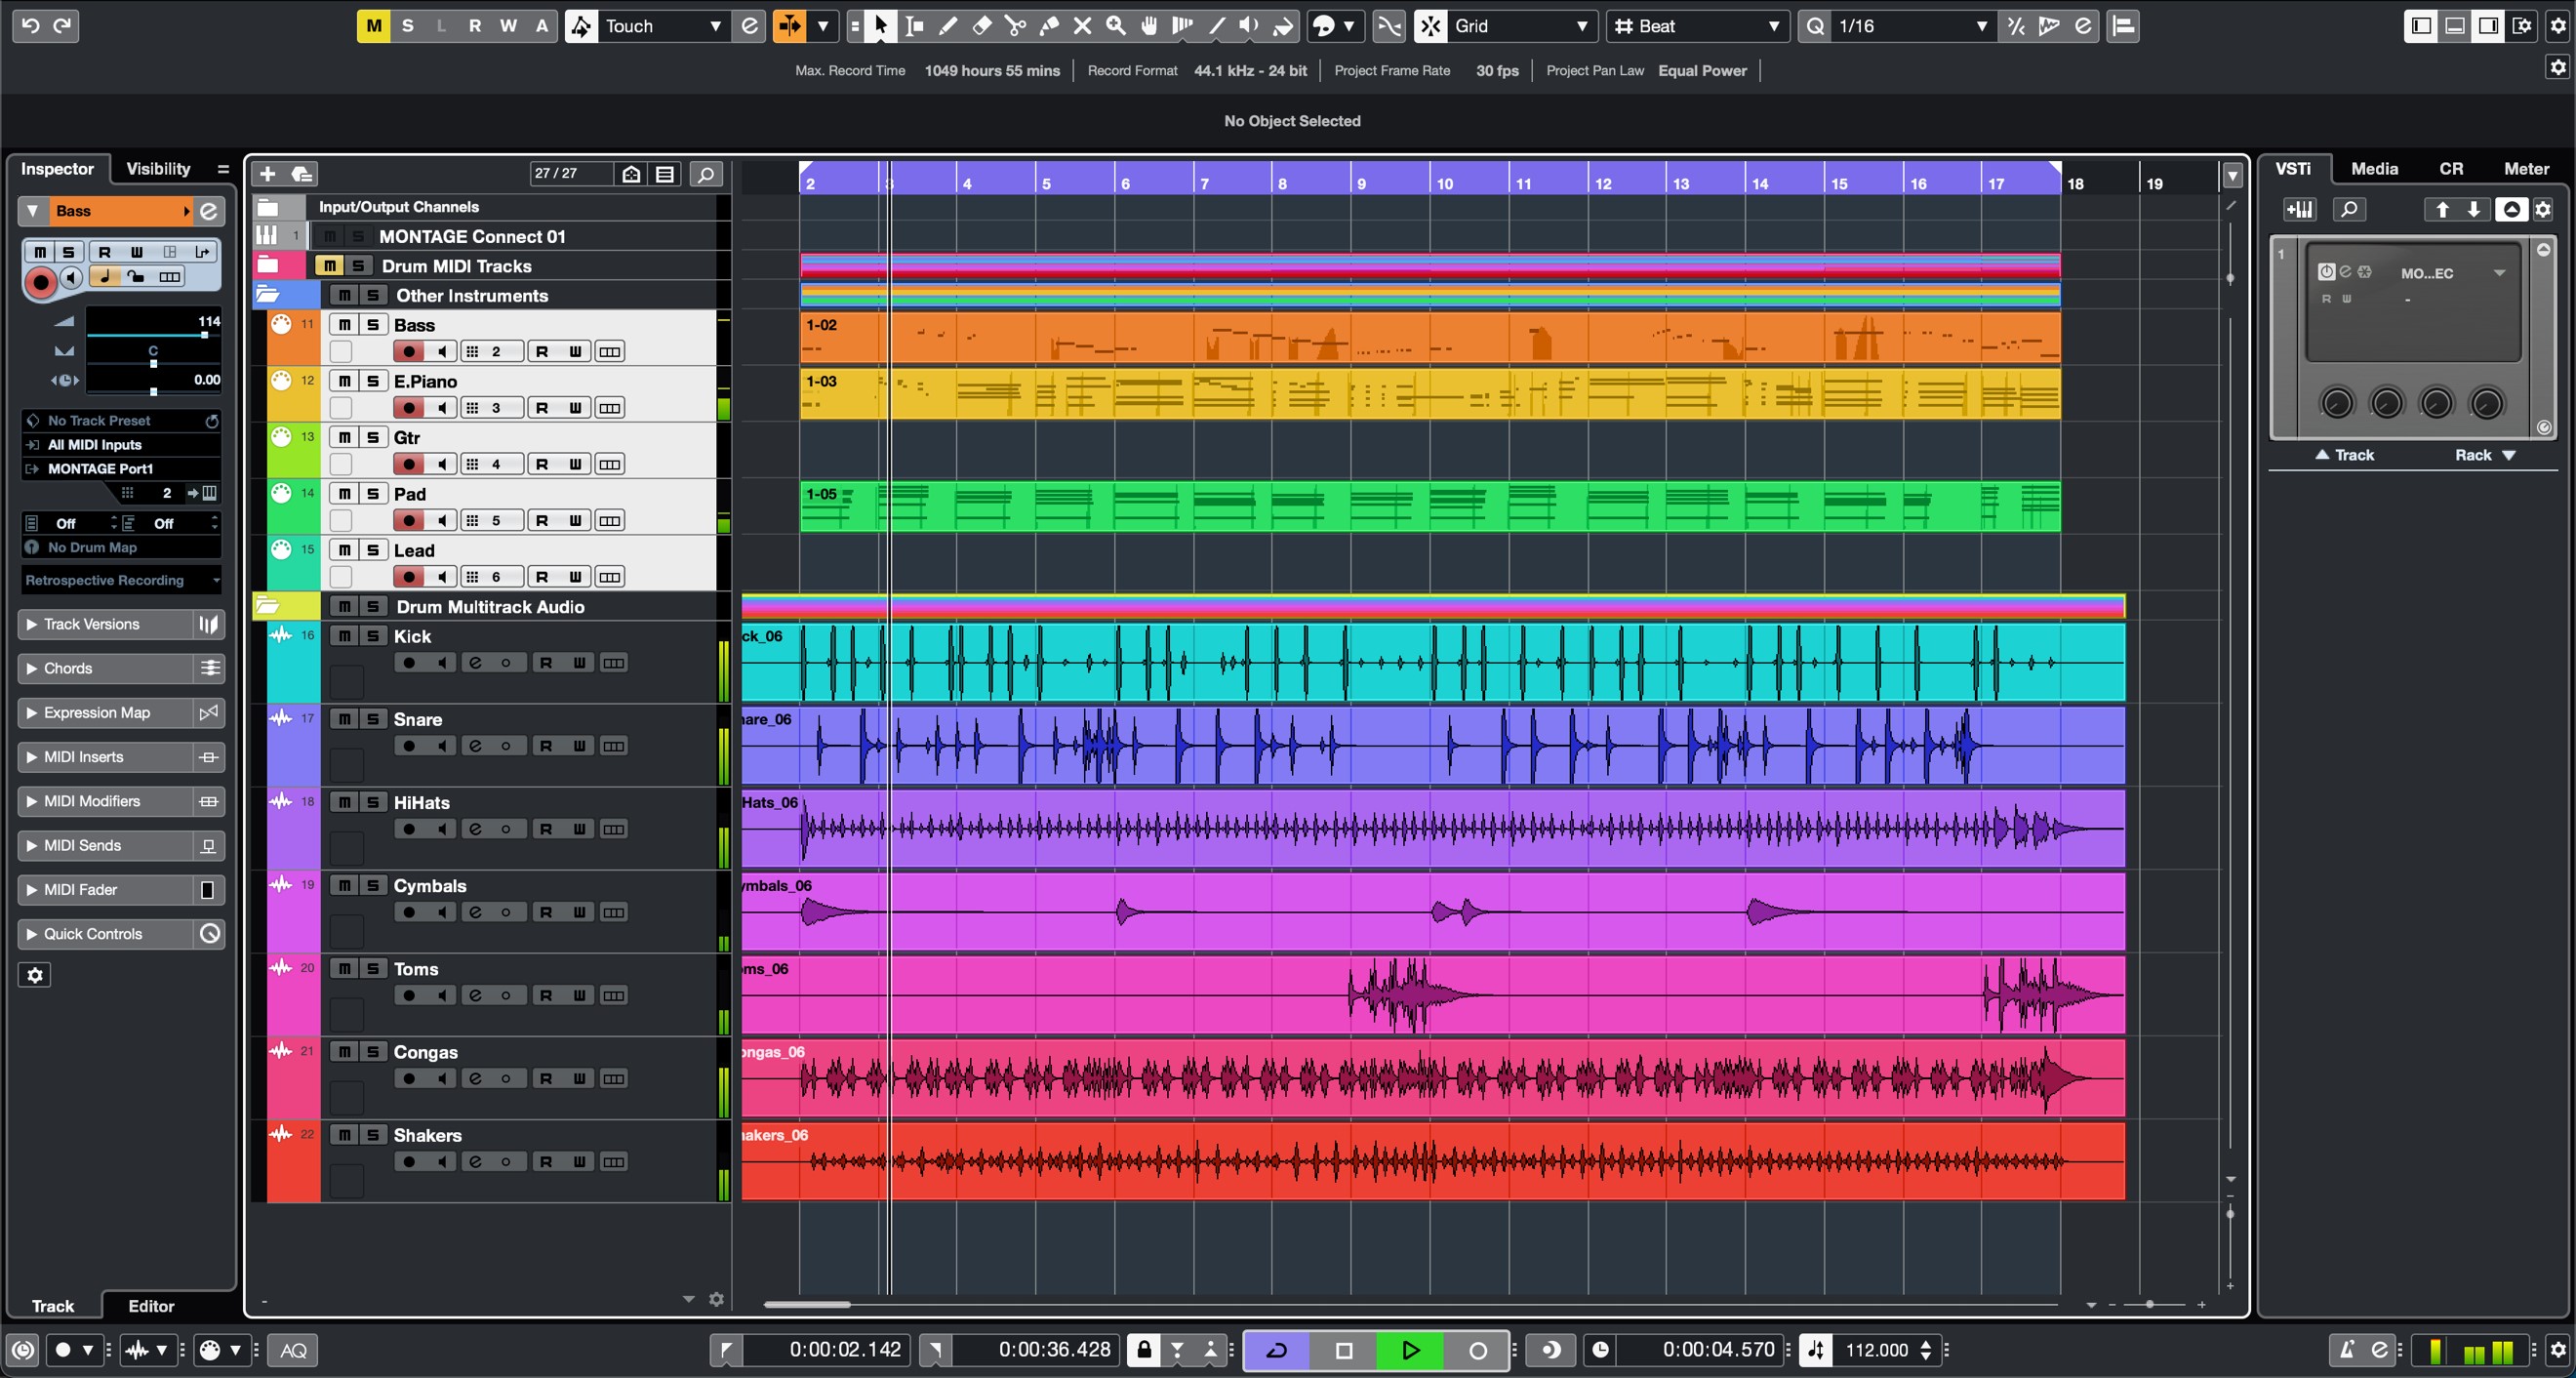
That’s it! Here is a screen shot of the recorded tracks playing back with MIDI tracks.
The Drum tracks are completely dry and ready for processing. Now I can choose to record other instruments as audio, add new MIDI tracks in Cubase, add a few more Parts in the Performance (horn section maybe?) and SAVE. Since I have MONTAGE Connect set up in this project, I will always have the correct Performance ready to go in MONTAGE.
I must admit, I’m always amazed by the integrated USB multichannel audio and MIDI connectivity in MONTAGE or MODX. The ability to simultaneously record multiple tracks with a single physical connection still impresses me! And the quality is always superb.
Below are download links to each of the files mentioned in this article:
Full Cubase project – MONTAGE Drum Recording
MONTAGE Connect file only
Performance on SoundMondo
Soundcloud audio
Have questions/comments? Join the conversation on the Forum here.
