We take your Privacy very seriously.
Part V
Throughout the course of this series, we’ve come a very long way in our understanding of Digital FM. Part 1 offered an overview of the history of the technology, and Part 2 provided the basics of audio theory, along with an introduction to the operator—the basic building block of digital FM synthesis. In Part 3, we learned about modulation and the various ways that it allows you to create complex timbres, and in Part 4 we talked about various tools for changing sounds over time, including envelope generators and controllers. But up until now, we’ve limited our discussion to a single modulator-carrier “system.” In this wrap-up installment, we’ll show you how you can expand the sounds you create by using multiple operators and a powerful tool called amplitude scaling.
Using Multiple Operators
In this exercise, we’re going to use Operators 1 – 6 to recreate the classic E.PIANO1 “tine” piano sound first made famous in the original DX7 and used in countless recordings for decades. Then we’ll use Operators 7 and 8 to create a simple bass sound to accompany it.
Fire up your MONTAGE or MODX and let’s get started!
- Begin by calling up the “Part 3_01” Performance created in Part 3 of this series. (You can also download this Performance from the Soundmondo website by clicking here.) As you may recall, this is the same as the preset “Init Normal (FM-X)” Performance but without reverb, and with Algorithm 67 selected and the levels of Operators 1 and 2 set to 0 and 99, respectively. As a reminder, here’s what Algorithm 67 looks like:

- Press [PERFORMANCE]
- Press [EDIT]
- Press [PART SELECT 1/1]
- Touch the OP1/OP2 tabs at the bottom of the screen (or press the [MOTION SEQ SELECT 1] and [MOTION SEQ SELECT 2] buttons) and enter the following envelope data for Operators 1 and 2 (the first modulator/carrier “system” in this algorithm):
- Operator 1 (modulator)
- Times: Hold = 0; Attack = 0; Decay1 = 56; Decay2 = 66; Release = 40
- Levels: Attack = 99; Decay1 = 95; Decay2 = 0; Release (Hold) = 0
- Operator 2 (carrier):
- Times: Hold = 0; Attack = 0; Decay1 = 70; Decay2 = 70; Release = 40
- Levels: Attack = 99; Decay1 = 95; Decay2 = 0; Release (Hold) = 0
- Operator 1 (modulator)
- Now set the Level of Operator 1 to 81, and set the Level/Vel parameter to a value of +6
- Set the Time/Key parameter for both Operators 1 and 2 to a value of 3
- Store this as “Part 5_01” (you can also find this Performance on Soundmondo by clicking here) and play a few notes on your keyboard. This is what you’ll hear:
As you can hear, this is already a pretty fair approximation of an electric piano, thanks to the tweaked envelopes, along with the Time/Key settings (which cause the envelopes to speed up slightly as you play higher notes; see Part 4 for more information) and the high degree of velocity sensitivity (Level/Vel) for the modulator (Operator 1), which means that the harder you strike the key, the brighter the timbre (again, refer to Part 4 for more information).
But we can certainly improve on this sound by adding more modulator/carrier pairs. Let’s start by duplicating the Operator 1/2 system in Operators 3 and 4, then making a couple of small adjustments to offset one pair against the other. Here’s how:
- Begin by calling up the “Part 5_01” Performance you just created (or download it from the Soundmondo website by clicking here).
- Press [PERFORMANCE]
- Press [EDIT]
- Press [PART SELECT 1/1]
- Touch the OP1 tab at the bottom of the screen or press the [MOTION SEQ SELECT 1] button
- We’ll use the Copy function (covered in detail in Part 4) to copy all the parameters from Operator 1 into Operator 3 (remember, in this algorithm, these are both modulators). Accordingly, press and hold down [SHIFT], then press [EDIT].
- Select Operator 3 as the destination (on the right-hand side of the screen) and touch Copy to complete the procedure.
- Touch the OP3 tab on the bottom of the screen or press the [MOTION SEQ SELECT 3] button and confirm that Operator 3 now has the same exact settings as Operator 1.
- Touch the OP2 tab on the bottom of the screen or press the [MOTION SEQ SELECT 2] button and use the same procedure to copy all the parameters from Operator 2 into Operator 4 (remember, in this algorithm, these are both carriers), then confirm that Operator 4 now has the same exact settings as Operator 2.
- Change the Operator 3 Level to 91.
- Change the Decay1 and Decay2 times for Operator 3 to 58 and 68, respectively.
- Other than Operator 3 having a slightly different Level and Decay1/Decay2 times, both of these two-operator “systems” are now identical, and if you play a few notes on your keyboard, what you’ll hear won’t be especially different—basically, it will be the same sound as before, but with a little more body (caused by the addition of a second carrier—Operator 4) and high overtones (caused by Operator 3’s increased level). But as we learned in Part 2 of this series, a little detuning goes a long way in adding a touch of “fairy dust” to an ordinary sound. Accordingly, change the Operator 1 Detuning value to +7 and the Operator 2 Detuning value to -7, then play a few notes. This is what you’ll hear:
The beating resulting from the detuning of one system relative to the other is obvious, improving the overall sound, which has now filled out quite nicely. After storing this as “Part 5_02” (you can also find this Performance on Soundmondo by clicking here), let’s take this sound to completion with the addition of a third modulator/carrier system (Operators 5 and 6).
- Begin by calling up the “Part 5_02” Performance you just created (or download it from the Soundmondo website by clicking here).
- Press [PERFORMANCE]
- Press [EDIT]
- Press [PART SELECT 1/1]
- We’re going to use the Operator 5 / 6 system to add extra “bite” to the sound in the form of higher overtones, but Operator 6 (which is a carrier) will essentially have the same settings as Operators 2 and 4 (the other two carriers). Accordingly, touch the OP4 tab at the bottom of the screen or press the [MOTION SEQ SELECT 4] button and use the Copy function detailed above to copy all the parameters from Operator 4 into Operator 6.
- Let’s spread the sound out a little by changing the Operator 6 Detune value to +3; this will offset it nicely against Operator 4 (which is not detuned at all) and Operator 2 (which is detuned to a value of -7).
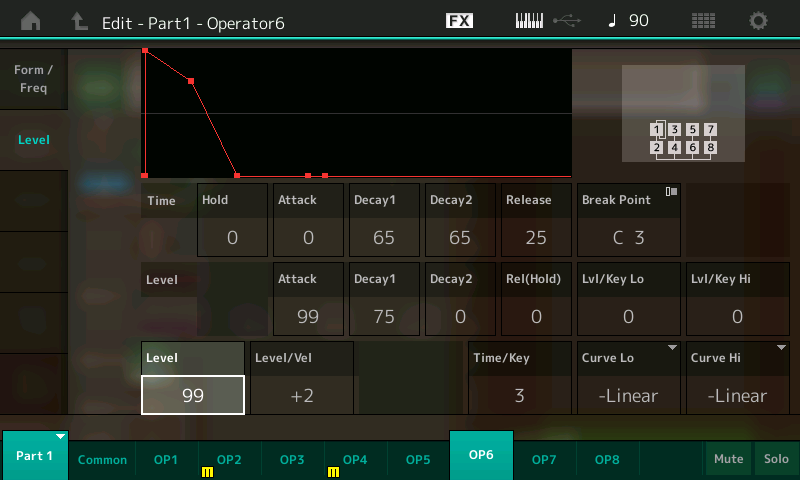
- Set the following envelope values for Operator 6:
- Times: Hold = 0; Attack = 0; Decay1 = 65; Decay2 = 65; Release = 25
- Levels: Attack = 99; Decay1 = 75; Decay2 = 0; Release (Hold) = 0
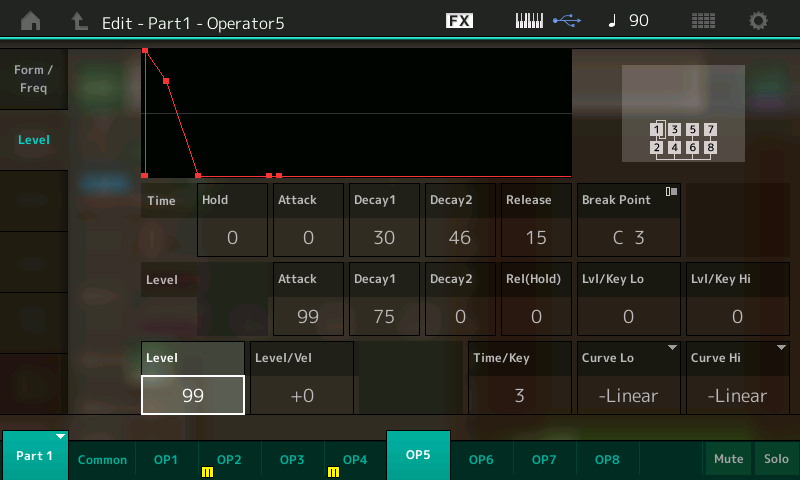
- Finally, let’s add in Operator 5, which is modulating Operator 6. Set its Ratio to 14.00, which will yield a lot of very high overtones, and enter the following envelope values:
- Times: Hold = 0; Attack = 0; Decay1 = 30; Decay2 = 46; Release = 15
- Levels: Attack = 99; Decay1 = 75; Decay2 = 0; Release (Hold) = 0
- Set Operator 5’s and Operator 6’s Time/Key parameters to a value of 3
- Temporarily mute Operators 2 and 4 (the carriers) by pressing the [ARP SELECT 2] and [ARP SELECT 4] buttons (small yellow squares will appear in the OP2 and OP4 tabs to indicate that they are muted) and use the INC/YES button or data dial to slowly raise the Level of Operator 5 so you can hear its effect on Operator 6, listening carefully as you do so. Due its very short envelope (much shorter than that of Operator 6, as shown in the illustrations below), the high overtones that begin appearing sound like a fast metallic “attack” at the very beginning of the note—in other words, very much like the metal tine of a mechanical electric piano.
- Reduce the Level of Operator 5 to a value of 60, and then set its Level/Vel parameter to +7
- Set Operator 6’s Level/Val parameter to a value of +2
- Unmute Operators 2 and 4 (by pressing the [ARP SELECT 2] and [ARP SELECT 4] buttons again (the small yellow squares in the OP2 and OP4 tabs will disappear) and play a few notes so that you can hear the sound of all six operators.
- We’re nearly there, but the sound isn’t quite the classic “E PIANO 1” just yet—it’s a little bit too mellow. This can be addressed by increasing the amount of feedback in the loop feeding the output of Operator 1 (our first modulator) into its own input. (See Part 2 for more information.) This will add just the right amount of “edge” (as Dr. Chowning calls it in Part 1 of this series) to the sound. Accordingly, use the INC/YES button to increase the Feedback parameter to a value of 6, playing some notes on the keyboard as you listen carefully.
Voila! With one notable exception—which we’ll be discussing shortly—we have pretty much recreated the classic DX7 tine piano sound, as you can hear from this audio clip:
Be sure to save this Performance as “Part 5_03” (you can find it on Soundmondo by clicking here) before moving on to our exploration of an important FM feature called …
Amplitude Scaling
In Part 4 of this series, we learned about several different means for controlling operator output levels:
- Envelopes, which cause aperiodic (once-only) change
- The LFO (Low Frequency Oscillator), which cause periodic (repetitive) change
- Key velocity (the Level/Key parameter), which applies the force with which you strike keys on the keyboard
- Real-time physical controllers such as keyboard aftertouch, wheels, ribbons, footpedals and assignable knobs and switches
In addition to these, there’s another important means: amplitude scaling, which uses the range of keys you’re playing to alter individual operator output levels, allowing you to increase or decrease volume (if applied to carriers) or change timbre (if applied to modulators). Especially when emulating musical instruments, this is an extremely powerful tool—after all, even when played with equal force, a low note on a piano is much louder than a high note, due to its string being longer and thicker; similarly, a high note coming from a wind instrument is always much brighter than a low note. Amplitude scaling is also the only digital FM technique for changing output level that allows you to increase an operator’s output beyond its set Level (though in no case can it exceed 99).
Although at first glance this may seem very complicated, it’s actually pretty straightforward. First, you set a “break point” for the operator. This can be any note number from A-1 to C8, where C3 is Middle C on your keyboard. A standard 61-key keyboard like the one on MONTAGE/MODX 6 runs from C1 to C6 (that is, from two octaves below Middle C to three octaves above Middle C). 76-note keyboards, as found on MONTAGE/MODX 7, run from E0 – G6, and 88-note keyboards like the one on MONTAGE/MODX 8, runs from A-1 to C7. (We’ll explain shortly why you might want to set the break point to a note that doesn’t physically exist on your instrument’s keyboard.)
Next, you set the curves you want applied to the right and left of that break point (these parameters are called Curve Hi and Curve Lo, respectively). These can be either positive or negative, allowing you to either increase or decrease output level, and there are two types of curve to choose from (linear or exponential) so you have four options: +Linear, +Exponential, -Linear and –Exponential. The difference between a linear and an exponential curve can best be explained this way: A linear curve is constructed by adding or subtracting numbers, while an exponential curve is constructed by multiplying or dividing numbers.
For example, adding numbers results in a smooth increase that remains constant:
2 + 2 = 4
4 + 2 = 6
6 + 2 = 8
8 + 2 = 10
10 + 2 = 12, etc.
Plotted out on a graph, this would be a positive linear curve.
Subtracting numbers results in a smooth decrease that again remains constant:
2 – 2 = 0
0 – 2 = -2
-2 – -2 = -4
-4 – -2 = -6
-6 – -2 = -8, etc.
Plotted out on a graph, this would be a negative linear curve.
In contrast, multiplying results in increasingly large numbers, with a change that’s relatively slight at first, but then rapidly starts accelerating:
2 x 2 = 4
4 x 2 = 8
8 x 2 = 16
16 x 2 = 32
32 x 2 = 64, etc.
Plotted out on a graph, this would be a positive exponential curve.
The same occurs when dividing, only this time you end up numbers that are slightly reduced at first, then rapidly get very small:
2 / 2 = 1
1 / 2 = 0.5
0.5 / 2 = 0.25
0.25 / 2 = 0.125
0.125 / 2 = 0.0625, etc.
Plotted out on a graph, this would be a negative exponential curve.
Here’s an illustration that shows the four curves, and the way they work when used for amplitude scaling. Remember, you can choose different curves to change an operator’s output level both to the right of the break point (that is, as you play higher notes) and to the left of the break point (as you play lower notes):
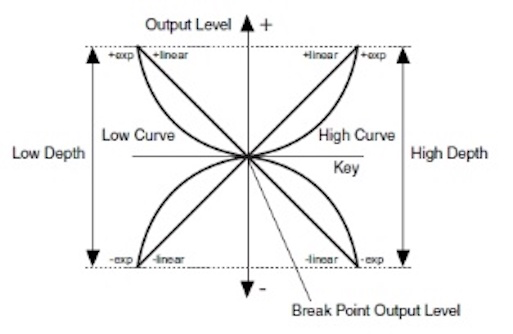
As you can see, whichever curve you choose, the further away you get from the break point, the greater the change. In practice, when choosing an exponential curve, you can expect little or no change for about an octave and a half on the keyboard, then an increasingly drastic change as you play higher (or lower) notes. Linear curves, on the other hand, will yield constant change from note to note.
Finally, there are two depth controls (called Lvl/Key Hi and Lvl/Key Lo) that allow you to specify the degree to which your selected curve affects output level. The higher this value, the steeper the curve, and the greater the change to the sound.
If you’re wondering what kind of change will result from applying amplitude scaling, the answer is that, like every other kind of control that affects output level, when applied to a carrier, you will hear volume change; when applied to a modulator, you will hear timbral change.
Like many other digital FM concepts, this is easier to understand when you actually hear it, so let’s run an exercise to explore how amplitude scaling works.
- Begin by calling up the “Part 3_01” Performance created in Part 3 of this series. (You can also download this Performance from Soundmondo by clicking here.) Again, this is the same as the preset “Init Normal (FM-X)” Performance but without reverb, and with Algorithm 67 selected and the levels of Operators 1 (the modulator) and 2 (the carrier) set to 0 and 99, respectively.
- Press [PERFORMANCE]
- Press [EDIT]
- Press [PART SELECT 1/1]
- Touch the OP2 tab at the bottom of the screen or press the [MOTION SEQ SELECT 2] button
- Touch the Level tab at the left of the screen. You’ll find the Break Point parameter on this screen, circled in red in the illustration below.
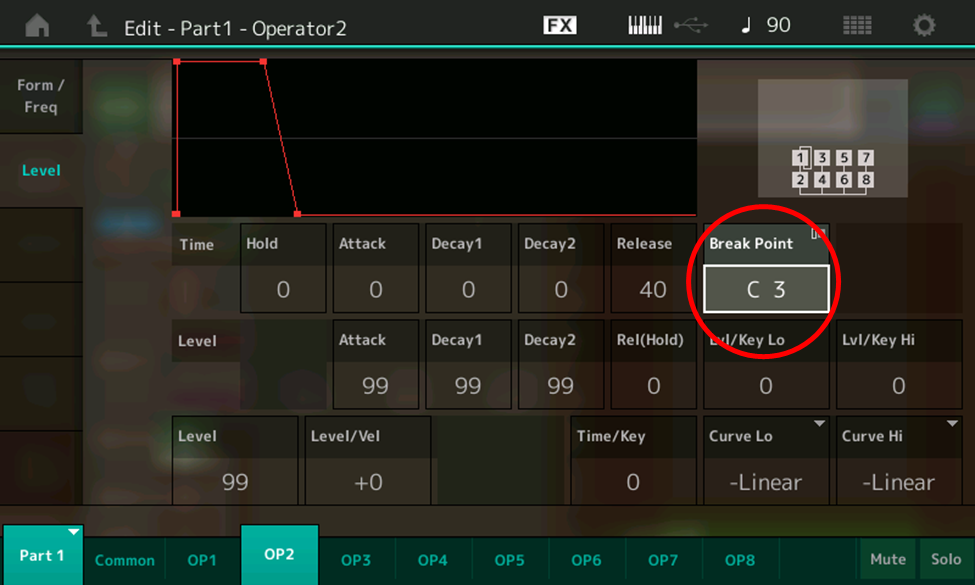
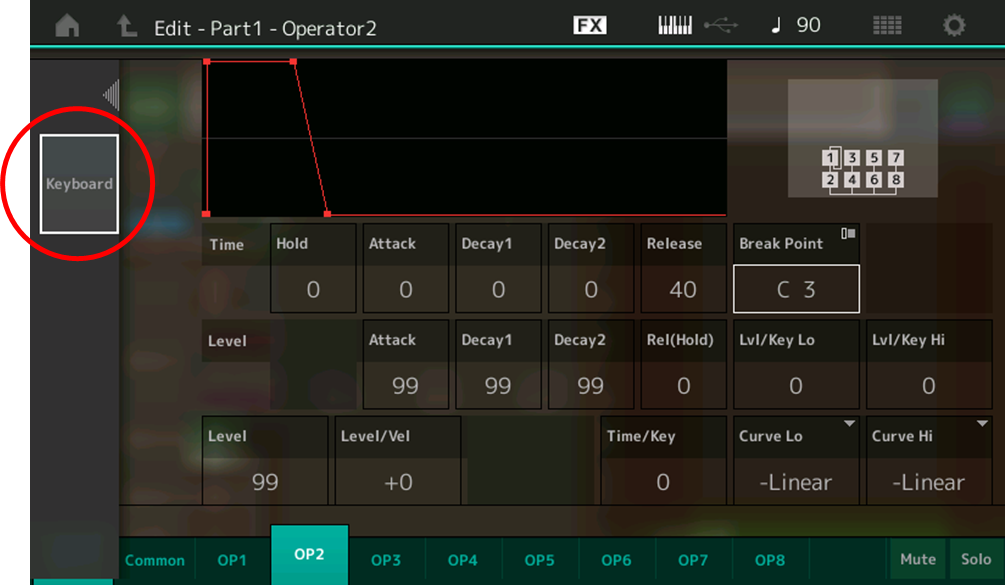
- As mentioned previously, the break point can be any note number from A-1 to C8, where C3 is Middle C on your keyboard. You can enter the note you want in the standard way, using the INC/YES and DEC/NO buttons or the data dial, but MONTAGE/MODX also allows you to enter the break point by simply playing the note you want on your instrument’s keyboard. To use this latter method, simply touch the Break Point parameter box a second time. A Keyboard entry box will appear on the left side of the sceen, circled in red in the illustration below:
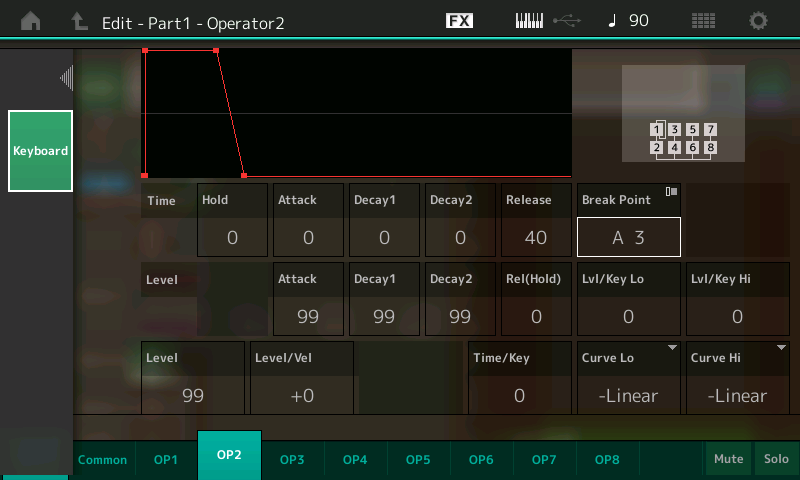
- Touch the Keyboard box so that it lights green (as shown in the illustration below), then play the A above Middle C on your keyboard. The note A3 will appear in the Break Point parameter box. Then touch the Keyboard box a second time to disable it (it will be shown in gray again).
The remaining Amplitude Scaling parameters are found in the section circled in red in the illustration below:
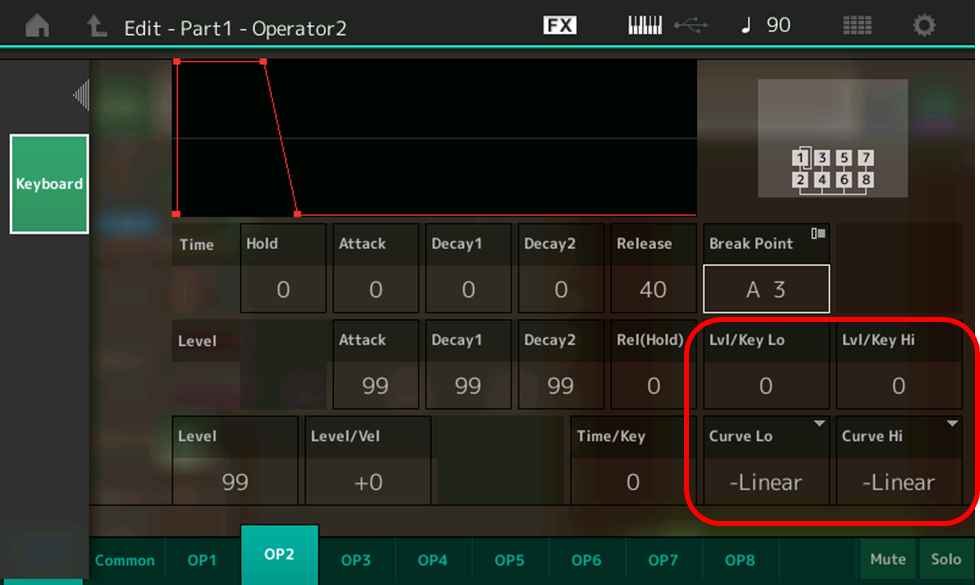
This section offers the following four parameters: Lvl/Key Lo (Level/Key Low), Lvl/Key Hi (Level/Key High), Curve Lo and Curve Hi. Let’s see how they work.
- Touch the Lvl/Key Lo parameter box (the Keyboard box in the left-hand side of the screen will disappear and the usual Form/Freq and Level boxes will reappear) and set a value of 99 (maximum effect), then do the same for the Lvl/Key Hi parameter. (Leave the Curve Lo and Curve Hi parameters at their –Linear defaults.) Play an ascending chromatic scale on your keyboard starting at A above Middle C (note number A3), then play a descending chromatic scale on your keyboard from A3. You’ll hear the sine wave (remember, the Level of the modulator in this system—Operator 1—is still set to 0) get softer and softer as you move further and further away from A3, in either direction.
- Change the Curve Lo and Curve Hi parameters to –Exponential, then play the same two chromatic scales. This time, you’ll hear the level of the sine wave stay pretty constant for about an octave and a half on either side of the break point (A3), before beginning to rapidly die off as you move further up or down the keyboard.
- Now select +Linear for the Curve Lo and Curve Hi parameters, then play the same chromatic scales. This time, you’ll hear … no change whatsoever. That’s because the Level of Operator 2 is already 99, and, as we mentioned previously, neither amplitude scaling nor any other means of changing an operator’s output level can ever increase that level value beyond the maximum of 99. Selecting the +Exponential curve will have the same non-effect on the sound—check it out for yourself!
- Restore the Lvl/Key Lo and Lvl/Key Hi parameters to 0 (thus removing all amplitude scaling from Operator 2) and touch the OP1 tab at the bottom of the screen or press the [MOTION SEQ SELECT 1] button so that you can hear the effect of amplitude scaling on the modulator in this system.
- Using the INC/YES and DEC/NO buttons, the data dial, or the Keyboard entry box to change the break point for Operator 1 to A3.
- Leave the Curve Lo and Curve Hi parameters at their –Linear defaults but set the Lvl/Key Lo and Lvl/Key Hi parameters to a value of 99 (maximum effect). Starting at A3, play an ascending chromatic scale on your keyboard, followed by a descending chromatic scale from A3. Again, you’ll hear no change whatsoever—not surprising, since Operator 1’s output level is set to 0 and cannot be reduced any further.
- Now change the Curve Lo and Curve Hi parameters to +Linear and play both ascending and descending chromatic scales starting at A3. This time you’ll hear a timbral change—an increase in overtones—that becomes more and more apparent as you move further and further away from A3, in either direction … despite the fact that Operator 1’s Level is still set to 0! That’s because, as we mentioned earlier, amplitude scaling actually allows you to increase an operator’s output beyond its set Level—the only means of changing output level that has this ability. (If you’re having trouble hearing this timbral change, try changing Operator 1’s output level to 50 and change its Ratio to 4.00.)
- Last but not least, change the Operator 1 Curve Lo and Curve Hi parameters to +Exponential and again play both ascending and descending chromatic scales starting at A3. This time, you’ll hear a pure sine wave for about an octave and a half on either side of the break point (A3), before the sound begins to rapidly increase in harmonic content as you move further up or down the keyboard.
Now that you understand how amplitude scaling works, let’s apply it as the finishing touch to our nearly complete DX7 tine piano sound:
- Call up the “Part 5_03” Performance created earlier in this installment or download it from Soundmondo by clicking here.
- Press [PERFORMANCE]
- Press [EDIT]
- Press [PART SELECT 1/1]
- Touch the OP1 tab at the bottom of the screen or press the [MOTION SEQ SELECT 1] button
- In the algorithm being used for this Performance (algorithm 67), Operator 1 is a modulator (affecting Operator 2, which is a carrier), and it’s also the only operator with a feedback loop. We’re not using the Operator 7/8 system just yet, so we don’t need to worry about them, but let’s temporarily mute the other carriers being used by pressing the [ARP SELECT 4] and [ARP SELECT 6] buttons (small yellow squares will appear in the OP4 and OP6 tabs to indicate that they are muted), then set the break point for Operator 1 to D3.
- Leave the Curve Lo and Curve Hi parameters at their default of –Linear, but change the Lvl/Key parameter for Operator 1 to a new value of 19. This will cause the effect of Operator 1 to diminish as you play notes higher than D3 (the D above Middle C), thus preventing overload in the sound when playing high notes. This is a subtle but important tweak since the Feedback value is set to a near-maximum of 6.
- Unmute operators 4 and 6 and play a few notes on the keyboard. As this audio clip demonstrates, what you’ll hear is an exact duplication of “E PIANO 1”—the classic DX7 tine piano sound made famous on a million recordings:
Before moving on to our next exercise, be sure to save this Performance as “Part 5_04” (you can find it on Soundmondo by clicking here).
In addition to using amplitude scaling to bring in different elements of a complete sound (as we just did), you can also use it to create crossfades to add in different sounds over various areas of the keyboard. For example, let’s add in Operators 7 and 8 (the fourth modulator/carrier system in this algorithm, so far unused) to create a string pad that we’ll then crossfade under the upper two octaves of the tine piano using amplitude scaling. Here’s how:
- Call up the “Part 5_04” Performance (or download it from Soundmondo by clicking here)
- Press [PERFORMANCE]
- Press [EDIT]
- Press [PART SELECT 1/1]
- Touch the OP8 tab at the bottom of the screen or press the [MOTION SEQ SELECT 8] button to access Operator 8 (the carrier in this system).
- Set its Level to a value of 99, then set the Level/Vel parameter to +2
- Enter the following envelope times for Operator 8 (leave the envelope levels at their default values):
- Times: Hold = 0; Attack = 57; Decay1 = 62; Decay2 = 88; Release = 59
- Touch the OP7 tab at the bottom of the screen or press the [MOTION SEQ SELECT 7] button to access Operator 7 (the modulator in this system).
- Set its Level to a value of 79
- Enter the following envelope times for Operator 7 (leave the envelope levels at their default values):
- Times: Hold = 0; Attack = 47; Decay1 = 57; Decay2 = 84; Release = 89
- Finally, set the Ratio for Operator 7 to 2.00 and set Detune to +3 for a nice chorusing effect.
- In order to hear the sound of this system on its own, temporarily mute Operators 2, 4 and 6 (the other three carriers in this algorithm) by pressing the [ARP SELECT 2], [ARP SELECT 4] and [ARP SELECT 6] buttons (small yellow squares will appear in the OP2, OP3 and OP6 tabs to indicate that they are muted). Remember, since we only ever hear carriers, there’s no need to mute their modulators too.
- Play a few notes, starting at Middle C and working your way up the keyboard. This is what you’ll hear:
- Now turn Operators 2, 4 and 6 back on by pressing the [ARP SELECT 2], [ARP SELECT 4] and [ARP SELECT 6] buttons (the small yellow squares in the OP2, OP3 and OP6 tabs will disappear. Play the same few notes on your keyboard, starting at Middle C and working your way up, then play a melody (use a sustain pedal if you have one to best hear the effect). This time, you’ll hear the string pad combined with the tine piano sound, present on every note you play:
Especially when pedaling, the overhang from the string pad is quite distracting. Wouldn’t it be better if we could just have it come in on the highest notes? That’s exactly what we can do, with the help of amplitude scaling. Before moving on, however, save this Performance as “Part 5_05” (you can also find it on Soundmondo by clicking here). Now let’s apply that amplitude scaling to rein in the contribution of the pad:
- The goal here is to have the string pad gently fade in over the highest two octaves of the keyboard, with it sounding most prominent in the very highest notes. Accordingly, load “Part 5_05” (or download it from Soundmondo by clicking here). Start by temporarily muting Operators 2, 4 and 6 so you can hear the string pad sound (coming from the Operator 7/8 system) on its own.
- Next, set the Lvl/Key Lo depth for Operator 8 (the carrier in the system responsible for the string pad) to 99 (maximum), but leave both CurveLo and CurveHi at their default negative linear curves and the Lvl/Key Hi depth at its default of 0 (minimum).
- Play A above Middle C (A3) repeatedly on the keyboard while using the INC/YES button to slowly raise the Break Point. Keep raising it until the string pad completely disappears; you’ll find that this happens when the Break Point is set to F5.
- You can now expect the level of the string pad to remain the same for notes F5 and higher, but to decrease smoothly as you play notes lower than F5 due to the extreme effect of the negative linear curve to the left of the break point. Listen for yourself: Unmute Operators 2, 4 and 6 so you can hear the tine piano sound (coming from Operators 1 – 6) along with the string pad (coming from Operators 7 and 8) and play the same few notes on your keyboard as did previously, starting at Middle C and working your way up, then play a melody (again, use a sustain pedal if you have one). This time, you’ll hear the string pad only on the highest sustained notes (since it has a much slower attack than the tine piano sound), making for a much cleaner sound overall
Before moving on, be sure to save this Performance as “Part 5_06” (you can find it on Soundmondo by clicking here).
There’s one more thing to discuss before we leave the topic of amplitude scaling. Earlier in this article, we learned that an operator’s break point is not limited to the physical notes on your instrument’s keyboard, but that it can be extended beyond those notes, from A-1 to C8—3 1/2 octaves below Middle C to a full 5 octaves above Middle C. The question is, why would you ever want to do this?
The answer lies in the two different kinds of curves available for amplitude scaling: linear and exponential. As we’ve seen (and heard), linear curves provide a smooth transition in output level from one note to the next note higher or lower, while exponential curves provide little change for about an octave and a half, after which they begin to drop off more sharply the further you get from the break point. There are times when you’ll simply want to start the curve working even before the lowest or highest note on your keyboard—for example, when you want to create a keyboard split between different FM tonalities being generated by separate modulator/carrier systems, allowing you to play one sound with your left hand and a different one with your right hand.
In this exercise, instead of gently crossfading in a string pad over the highest octaves of the keyboard, we’ll use the Operator 7/8 system to create a bass sound that can be used to add a left-hand accompaniment (with little or no tine piano sound) over the lowest two octaves. Since exponential curves cause a much more drastic change in output level than linear curves, we’ll apply a negative exponential curve to the right of the carrier of the bass sound (Operator 8) to remove it from the upper part of the keyboard. We’ll then do the opposite to the tine piano sound by applying a negative exponential curve to the left of its carriers (Operators 2, 4 and 6) in order to remove them from the lower part of the keyboard. Here’s how to do it:
- Once again, call up the “Part 5_04” Performance we created earlier, which perfectly emulated the classic DX7 “E PIANO 1” sound. (You can download it from Soundmondo by clicking here.)
- Press [PERFORMANCE]
- Press [EDIT]
- Press [PART SELECT 1/1]
- Touch the OP8 tab at the bottom of the screen or press the [MOTION SEQ SELECT 8] button to access Operator 8 (the carrier in this system)
- Set its Level to a value of 99, then set the Level/Vel parameter to +2
- Enter the following envelope values for Operator 8:
- Times: Hold = 0; Attack = 13; Decay1 = 52; Decay2 = 96; Release = 46
- Levels: Attack = 99; Decay1 = 70; Decay2 = 55; Release (Hold) = 0
- Set the Time/Key value to 3
- Touch the OP7 tab at the bottom of the screen or press the [MOTION SEQ SELECT 7] button to access Operator 7 (the modulator in this system).
- Set its Level to a value of 76, then set the Level/Vel parameter to +1
- Enter the following envelope values for Operator 7:
- Times: Hold = 0; Attack = 0; Decay1 = 59; Decay2 = 51; Release = 95
- Levels: Attack = 97; Decay1 = 78; Decay2 = 38; Release (Hold) = 0
- In order to hear the sound of this system on its own, temporarily mute Operators 2, 4 and 6 (the other three carriers in this algorithm) by pressing the [ARP SELECT 2], [ARP SELECT 4] and [ARP SELECT 6] buttons (small yellow squares will appear in the OP2, OP3 and OP6 tabs to indicate that they are muted). Again, since we only ever hear carriers, there’s no need to mute their modulators too.
- Play a few notes. This is what you’ll hear:
Now turn Operators 2, 4 and 6 back on by pressing the [ARP SELECT 2], [ARP SELECT 4] and [ARP SELECT 6] buttons (the small yellow squares in the OP2, OP3 and OP6 tabs will disappear. Play the same few notes on your keyboard. This time, you’ll hear the bass sound combined with the tine piano sound, present on every note you play:
- Next, we’ll use amplitude scaling to remove the sound of the bass from the upper part of the keyboard and isolate it to the lowest two octaves or so. Start by temporarily muting Operators 2, 4 and 6 so you can hear the bass sound (coming from the Operator 7/8 system) on its own. Then set the Lvl/Key Hi depth for Operator 8 (the carrier) to 99 (maximum) and set Curve Hi to negative exponential (-Exp). Leave both CurveLo and Lvl/Key Lo at their defaults of 0 and negative linear, respectively.
- Play Middle C (C3) repeatedly on the keyboard while using the DEC/NO button to slowly lower the Break Point. Keep lowering it until the bass sound completely disappears; you’ll find that this happens when the Break Point is set to B0—a note number outside the range of all but 88-note keyboards.
- Next, we’ll use amplitude scaling to remove the sound of the tine piano from the lower part of the keyboard and isolate it in the higher notes. Start by temporarily muting Operator 8 and unmute Operator 2 (one of the carriers responsible for the tine piano sound). Then set Operator 2’s Lvl/Key Lo depth to 99 (maximum) and set Curve Lo to negative exponential (-Exp). Leave both CurveHi and Lvl/Key Hi at their defaults of 0 and negative linear, respectively.
- Play Middle C (C3) repeatedly on the keyboard while using the INC/YES button to slowly raise the Break Point. Keep raising it until the tine piano sound completely disappears; you’ll find that this happens when the Break Point is set to D4.
- Unmute Operator 4 and give it the same amplitude scaling parameters as Operator 2: Lvl/Key Lo depth 99 (maximum); Curve Lo negative exponential (-Exp); CurveHi and Lvl/Key Hi left at their defaults of 0 and negative linear, respectively; Break Point at D4.
- Unmute Operator 6 and start by giving it the same amplitude scaling parameters as Operator 4. However, because the Operator 5/6 system is contributing the very highest overtones (by virtue of the modulator—Operator 5—having a frequency ratio of 14.00), you may find that, with a Break Point of D4, its sound is a somewhat intrusive presence when playing bass notes toward the middle of the keyboard. To remove it entirely, simply raise the Break Point for Operator 6 to its highest value: C8.
- Unmute all operators and play some notes on the keyboard—preferably some chords and licks with your right hand and a bass accompaniment with your left hand. This is what you’ll hear:
When you’re done experimenting and exploring, be sure to save this Performance as “Part 5_07” (you can find it on Soundmondo by clicking here).
Is this a perfect keyboard split? Admittedly, no. That’s because, steep as an exponential curve can be at its farthest limits, there’s no escaping the fact that notes approaching those furthest limits will still result in some sound being heard. That’s why, even if you precisely follow all the steps of the exercise above, there’s a kind of “no-man’s land” in the middle of the keyboard—from roughly A2 to D4—where there’s a blend of bass and tine piano, with more bass / less tine piano in the lower notes of that range and less bass / more tine piano in the higher notes. But, as long as you adjust your playing to avoid that zone as much as possible, amplitude scaling provides an effective, if imperfect way of breaking up two or more sounds within a single digital FM Performance.
Of course, today’s synths offer much more memory and computing power than early digital FM instruments, allowing you to easily create precise keyboard splits by simply layering multiple voices and then setting the range of notes over which each voice will sound. In MONTAGE/MODX, this is the function of a Part Note Limit parameter, which not only allows you to specify a range for each Part (and there can be up to 8 Parts per Performance), but to create a gap in the keyboard where the Part will not sound at all. This is the kind of highly advanced programming that developers of the DX7 and its ilk could only dream of back in the day!
Even with all the advanced concepts explored in this article, we’ve still limited ourselves thus far to “simple” operator systems containing a single modulator and a single carrier. But many digital FM algorithms provide for more complex systems—some with multiple carriers receiving signal from a single modulator, others with a single carrier receiving signal from multiple modulators, and others still that have modulators modulating modulators!
What’s their purpose, and how are they used? In the next article we’ll take a closer look.
If you missed any of the other articles in the series click on the links below:
FM 101, Part 1: Discovering Digital FM…John Chowning Remembers
FM 101, Part 2: The Basics
FM 101, Part 3: The Magic of Modulation
FM 101, Part 4: Going from Static to Dynamic
Want to share your thoughts/comments? Join the conversation on the Forum here
Tagged Under
Keep Reading
© 2025 Yamaha Corporation of America and Yamaha Corporation. All rights reserved. Terms of Use | Privacy Policy | Contact Us