We take your Privacy very seriously.
Part VI
Complex Systems (Parallel Modulators and Parallel Carriers)
If you’ve been reading this far in our FM 101 series, you should be pretty comfortable by now with the way a single modulator / single carrier system works, and the variables within such a system that shape the three aspects of sound:
- Pitch (frequency) is determined by the oscillator inside the carrier
- Volume (amplitude) is determined by the output level of the carrier; and
- Overtone content (timbre) is determined by the output level of the modulator, and its frequency relationship to the carrier
We’ve also learned about the various tools that can be used to shape those aspects over time, such as envelopes, key velocity, LFOs, real-time controllers, and amplitude scaling.
But what happens when a carrier receives signal from not just one, but several modulators, or when several carriers receive signal from a single modulator? The first type of configuration (a carrier receiving signal from multiple modulators) is called “parallel modulators,” while the second type (a modulator sending signal to multiple carriers) is called “parallel carriers.”
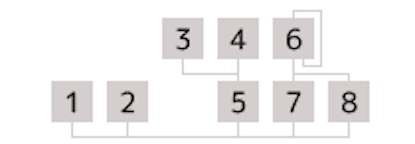
Both the original DX7 and modern digital FM instruments such as MONTAGE/MODX provide algorithms with each type of configuration. There are even some algorithms, such as Algorithm 28, that offer both parallel modulators (in this case Operators 3 and 4, acting upon Operator 5) and parallel carriers (Operators 7 and 8, both of which are being modulated by Operator 6):
What will be the sonic result of using such complex systems? The answer can be summed up as follows:
- In the case of parallel modulator systems, you’ll hear the arithmetic sum of the two predicted waveforms. Using the example of Algorithm 28 shown above, if Operator 3 acting upon Operator 5 would produce, say, a sawtooth waveform (because all harmonic overtones are present), and Operator 4 acting upon Operator 5 would produce a square waveform (because it contains only odd-numbered harmonic overtones), the output would have both kinds of overtones (though with a predominance of odd-numbered harmonics) and the waveform would look like a sawtooth wave and a square wave mixed together … with the relative strength of each set of overtones determined by the outputs of the modulators (in this case, Operators 3 and 4).
- In the case of parallel carrier systems, the modulator acts independently on each carrier the same way it would if it were modulating only one of them. Again using the example of Algorithm 28, if Operator 6 would cause Operator 7 to output a sawtooth wave, but it would cause Operator 8 to output a square wave, what you’ll hear is a sawtooth wave and a square wave … but with the relative levels of each determined by the outputs of the carriers (in this case, Operators 7 and 8).
Obviously, if each of the modulators or carriers in a complex system has a different Ratio and/or Detuning value (or if any of them are set to Fixed Frequency mode), you can expect extremely complex timbres to result (and, especially if you use Detuning, there will be lots of movement in the sound too—see Part 2 in this series for more information). Or, if you’re using amplitude scaling or key velocity to control each operator’s output level, you can expect to hear different timbres as you play different notes on the keyboard and/or strike the keys with varying force.
And, of course, if each operator in a complex system has different envelope settings, the volume and/or timbre can change over time too. However, there will be one overriding restriction: In the case of multiple modulators feeding a single carrier, there can only be one “master” envelope controlling overall volume change; in the case of a single modulator feeding multiple carriers, there can only be one “master” envelope controlling overall timbral change.
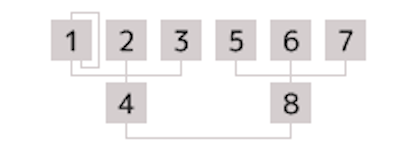
There are many types of complex systems offered by MONTAGE/MODX algorithms. Take, for example, Algorithm 77, which provides a pair of carriers (Operators 4 and 8), each receiving signal from three parallel modulators:
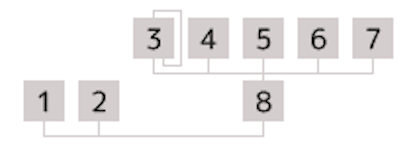
Algorithm 54 offers a carrier (Operator 8) that’s getting signal from five parallel modulators:
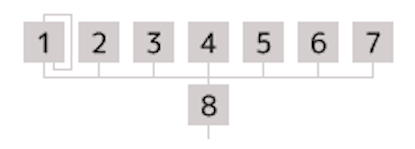
And then there’s the mondo-Algorithm 68, which has only one carrier (again, Operator 8), getting signal from seven modulators!
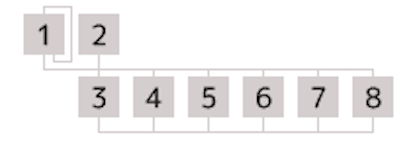
The near-polar opposite to this is Algorithm 80, where two modulators (Operators 1 and 2) are modulating six carriers (Operators 3 – 8):
As usual, these concepts are easier to hear than to explain in words, so let’s run an exercise to construct the famed DX7 “BASS 2” sound, which, like the classic “E PIANO 1” sound we recreated earlier, has graced hundreds of hit recordings since the 1980s. Fire up your MONTAGE/MODX and let’s begin!
- Start by loading in the “Part 2_01” Performance created in Part 2 of this series, or download it from Soundmondo by clicking here. As you may recall if you did the exercises in Part 2, this is simply a copy of the Init Normal (FM-X) performance with the reverb turned off.
- Press [PERFORMANCE]
- Press [EDIT]
- Press [PART SELECT 1/1]
- In the Edit – Part 1 – Common screen, select Algorithm 25, which looks like this:
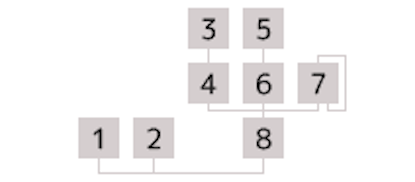
- As you can see, Operators 1 and 2 are carriers without modulators. Operator 8 is another carrier, but it is being modulated by Operators 4, 6 and 7 … which in turn are being modulated by Operator 3 (which is affecting Operator 4) and Operator 5 (which is affecting Operator 6). These are called “stacked,” or “cascading” modulators—a topic we’ll be discussing shortly. For now, though, let’s focus on working with Operators 4, 6, 7 and 8.
- We’ll come back to Operators 1 and 2 later, but for now turn off the contribution of Operator 1 (which, having no modulator, is a simple sine wave) by touching the OP1 tab at the bottom of the screen or pressing the [MOTION SEQ SELECT 1] button, then set Operator 1’s Level to 0
- Since Operator 8 is the carrier in this complex system, let’s tweak it first. To do so, touch the OP8 tab at the bottom of the screen or press the [MOTION SEQ SELECT 8] button, then set Operator 8’s Level to 99 (maximum) and enter a Level/Vel value of +2
- Enter the following envelope values for Operator 8:
- Times: Hold = 0; Attack = 10; Decay1 = 52; Decay2 = 72; Release = 29
- Levels: Attack = 99; Decay1 = 70; Decay2 = 0; Release (Hold) = 0
- Set Operator 8’s Time/Key value to 3
- Let’s move on now to the three modulators directly affecting this carrier, starting with Operator 4. Accordingly, touch the OP4 tab at the bottom of the screen or press the [MOTION SEQ SELECT 4] button, then set Operator 4’s Level to 77 and enter a Level/Vel value of +2.
- Enter the following envelope values for Operator 4:
- Times: Hold = 0; Attack = 10; Decay1 = 31; Decay2 = 83; Release = 90
- Levels: Attack = 99; Decay1 = 74; Decay2 = 0; Release (Hold) = 0
- Set Operator 4’s Time/Key value to 4, and set its Ratio slightly sharp, to a new value of 1.01. This will add an interesting animation to the sound—not quite audible beating, but a slight pitch ambiguity characteristic of synth bass.
- Next, let’s work with the second modulator affecting the carrier. Touch the OP6 tab at the bottom of the screen or press the [MOTION SEQ SELECT 6] button, then set Operator 6’s Level to 70 and enter a Level/Vel value of +3.
- Enter the following envelope values for Operator 6:
- Times: Hold = 0; Attack = 0; Decay1 = 59; Decay2 = 51; Release = 61
- Levels: Attack = 99; Decay1 = 78; Decay2 = 0; Release (Hold) = 0
- Set Operator 6’s Time/Key value to 3
- Leave Operator 6’s Ratio at the default of 1.00, but enter a Detune value of +7. Since Operator is a modulator, this will add some subtle inharmonic content to the overall sound.
- Now, on to the third modulator affecting the carrier. Touch the OP7 tab at the bottom of the screen or press the [MOTION SEQ SELECT 7] button, then set Operator 7’s Level to 82 and enter a Level/Vel value of +2.
- Enter the following envelope values for Operator 7:
- Times: Hold = 0; Attack = 58; Decay1 = 54; Decay2 = 50; Release = 44
- Levels: Attack = 99; Decay1 = 0; Decay2 = 0; Release (Hold) = 0
- Set Operator 7’s Time/Key value to 1
- While we’re at it—and since this is a bass sound we’re constructing, after all—let’s halve the Frequency Ratio of the carrier (Operator 8) so that we can use the middle of the keyboard to play bass licks instead of restricting ourselves to the lower octaves. Accordingly, touch the OP8 tab at the bottom of the screen or press the [MOTION SEQ SELECT 8] button and touch the Coarse parameter box to select it, then press the DEC/NO button once to change the Ratio to 0.50. Then touch the Fine parameter box to select it and press the INC/YES button once to change the Ratio to 0.51. As we did with Operator 4 (one of the parallel modulators), this will add a slight pitch ambiguity characteristic of synth bass.
- Let’s halve the Frequency Ratio of Operator 7 as well, but just a little sharp so as to add some very slight inharmonic overtones to make the sound even more interesting. Accordingly, change it to 0.52 (touch the Coarse parameter box and press the DEC/NO button once, then touch the Fine parameter box and press the INC/YES button three times).
Play a few notes on the keyboard and have a listen. This is starting to sound a little like the classic DX7 synth bass we’re looking to reconstruct, but we’re not quite there yet—we still have to add in the “stacked” modulators (Operators 3 and 5) that are affecting Operators 4 and 6, respectively. But even before we do that, it’s time to pay a return visit to Operator 7—the third “parallel” modulator, because in this algorithm, it’s the operator that has a feedback loop. Employing this will add a necessary bit of “bite” to the sound, especially when playing keys forcefully, due to Operator 7’s Level/Vel setting of +2. Accordingly…
- Touch the Common tab on the bottom of the screen to return to the Edit – Part 1 – Common screen, then, play a single note on the keyboard repeatedly as you slowly raise the Feedback level to its maximum value of 7, listening carefully as you do so. It’s a subtle effect, but one that definitely adds to the definition of the sound.
- Now that Operator 7’s feedback loop has been set to maximum, we’ll need to rein in its effect a little when playing notes in the upper range of the keyboard—something which, as we’ve just learned, is easily accomplished with amplitude scaling. Accordingly, set Operator 7’s Break Point to D3 and, leaving the default Curve Hi at negative linear, slowly raise the Lvl/Key Hi parameter to 35, playing some high notes as you do so. Again, this is a subtle effect but one that helps round out the sound, as this audio clip demonstrates.
Before moving on, be sure to save this Performance as “Part 5_08” (you can also find it on Soundmondo by clicking here).
It’s nearly time to complete “BASS 2” by adding in the contribution of Operators 3 and 5, but first, let’s discuss one last important weapon in the digital FM arsenal called …
Modulator Cascades
In addition to simple two-operator systems (where a modulator’s output is routed to a carrier’s input) and complex parallel systems, there’s one more type of operator configuration, where a modulator’s output is routed to another modulator’s input.
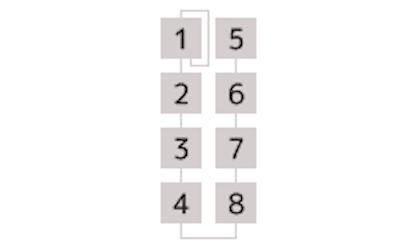
We’ve already encountered this kind of configuration, called modulator cascades, in Algorithm 25, which we’ve been using to reconstruct the classic DX7 “BASS 2” sound, but there are plenty of other MONTAGE/MODX algorithms that also “stack” modulators on top of one another. For example, Algorithm 69 provides a pair of carriers (Operators 4 and 8), each being modulated by a stack of three modulators:
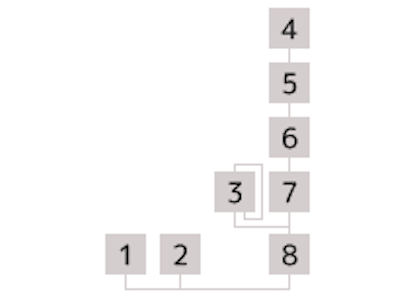
Algorithm 41, shown below, provides a stack of four modulators (Operators 4 – 7) affecting a single carrier (Operator 8), which is simultaneously being modulated by Operator 3 in a parallel configuration:
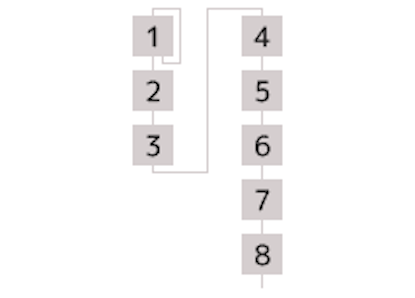
 And then there’s the totally insane Algorithm 66, with its cascade of seven (count ‘em, seven) modulators stacked above a single carrier … an algorithm for which I have to confess I cannot begin to imagine any practical use:
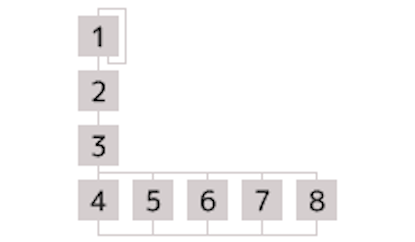
There are also numerous algorithms that creatively combine complex systems, such as the way-cool Algorithm 88, which uses a stack of three modulators to modulate five parallel carriers:
When a modulator is modulated by another modulator (try saying that three times fast!), it outputs a complex wave instead of a simple sine wave. For example, in Algorithm 25 (shown below), if the ratio between Operators 3 and 4 is 1:1 (see Part 3 for more information about frequency ratio) and you raise Operator 3’s output level to maximum, Operator 4 will generate the full range of harmonic overtones (both even-numbered and odd-numbered) and the waveform will look somewhat like a sawtooth wave. If the ratio between Operators 5 and 6 is 2:1 and Operator 5’s output level is raised to maximum, Operator 6 will generate odd-numbered harmonic overtones and its waveform will look more like a square wave.
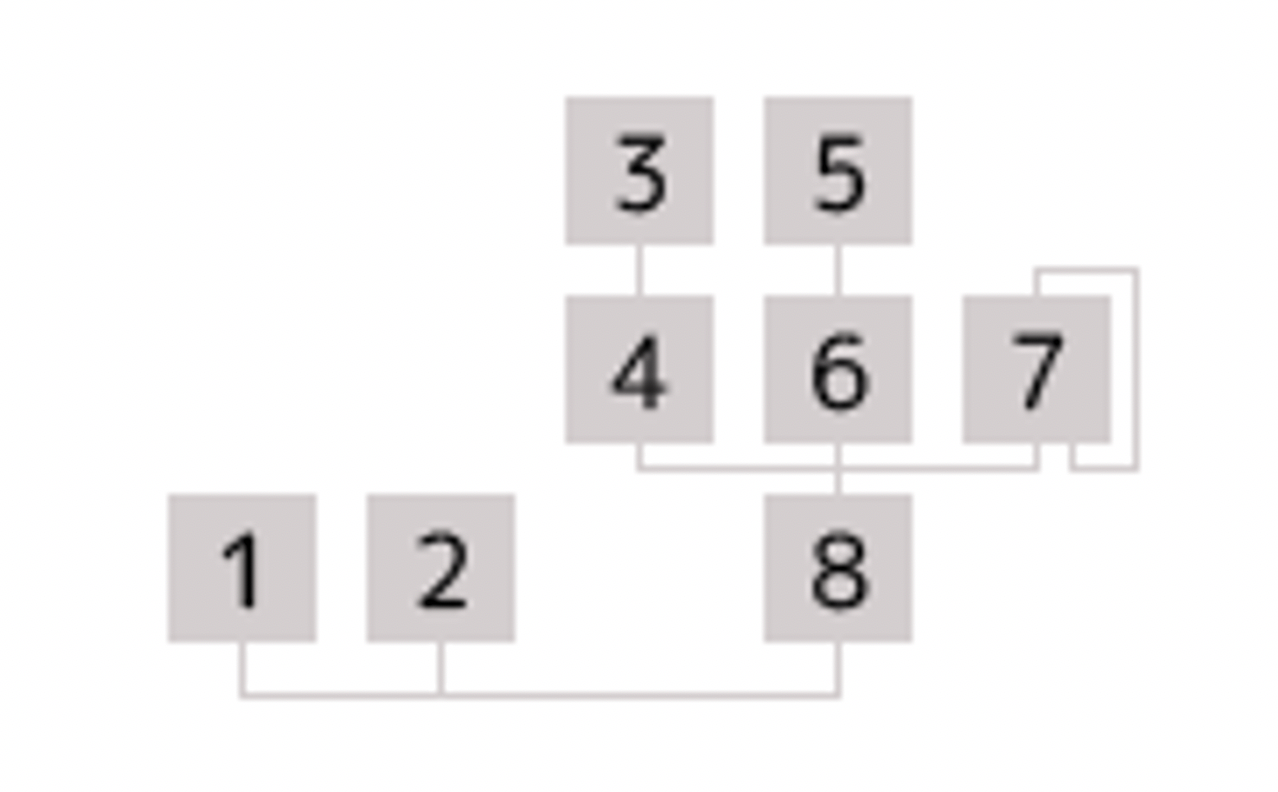
In this scenario, you’d be modulating Operator 8 (the carrier) with both a sawtooth wave and a square wave and a sine wave (from Operator 7, assuming its feedback loop was not being used), all at the same time. The end result is that the carrier will generate an extremely complex timbre, rife with overtones—so overtone-rich, in fact, that these kinds of sounds are often more like noise than something musically useful.
If all this sounds somewhat pointless, consider the deep harmonic complexity of the initial attack of most naturally occurring sounds—a phenomenon we explored in Part 4 of this series. Remember, for example, the timbral complexity in the first few milliseconds (thousandths of a second) of a guitar string being plucked …
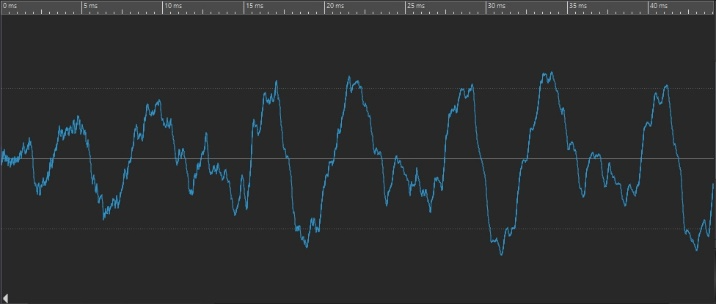
… especially as compared with the much simpler waveform of that same plucked guitar string just a second later:
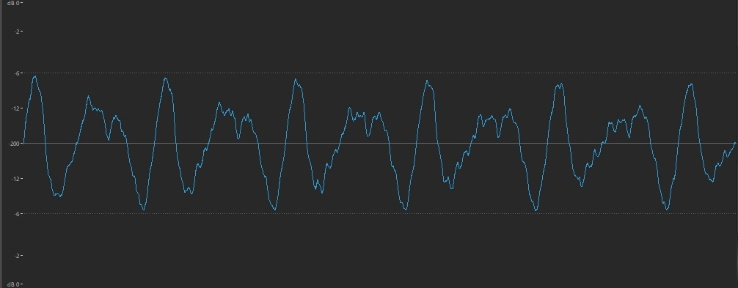
The main purpose, then, of cascading modulators is to replicate the timbral complexity in the initial attack of most naturally occurring sounds. In fact, it is nearly impossible to create realistic emulations of most naturally occurring sounds—and those of stringed instruments in particular—without the use of such stacked modulators, set to very short envelopes, and with velocity usually applied so that their contributions are more prominent when keys are struck harder.
Armed with this information, let’s complete our reconstruction of “BASS 2.”
- Start by calling up the “Part 5_08” Performance created earlier, or download it from Soundmondo by clicking here
- Press [PERFORMANCE]
- Press [EDIT]
- Press [PART SELECT 1/1]
- Touch the OP3 tab at the bottom of the screen or press the [MOTION SEQ SELECT 3] button, then set Operator 3’s Level to 89 and enter a Level/Vel value of +7 (maximum).
- Enter the following envelope values for Operator 3:
- Times: Hold = 0; Attack = 57; Decay1 = 35; Decay2 = 63; Release = 36
- Levels: Attack = 99; Decay1 = 97; Decay2 = 0; Release (Hold) = 0
- Set Operator 3’s Time/Key value to 3
- Set Operator 3’s Ratio to 0.50, and set a Detune value of +1
- In order to best hear the effect of the Operator 3/4 modulator cascade on Operator 8 (the carrier), temporarily mute Operators 6 and 7 (the other modulators affecting Operator 8) by pressing the [ARP SELECT 6] and [ARP SELECT 7] buttons. (Small yellow squares will appear in the OP6 and OP7 tabs to indicate that they are muted.) Play a few notes at varying velocities; since the Level/Val value for Operator 3 has been set to (+7), you’ll only hear its effect when keys are struck with a good deal of force.
- Temporarily mute Operator 4 and unmute Operator 6 so we can hear the effect of the Operator 5/6 modulator cascade on its own, then touch the OP5 tab at the bottom of the screen or press the [MOTION SEQ SELECT 5] button.
- Set Operator 5’s Level to 99 (maximum) and enter a Level/Vel value of +2
- Enter the following envelope values for Operator 5:
- Times: Hold = 0; Attack = 5; Decay1 = 50; Decay2 = 61; Release = 39
- Levels: Attack = 93; Decay1 = 57; Decay2 = 0; Release (Hold) = 0
- Set Operator 5’s Time/Key value to 3
- Set Operator 5’s Ratio to 0.50 (leave Detune at its default of +0—in other words, no detuning)
- Play a few notes at varying velocities, then experiment by muting and unmuting Operators 3, 4, 5, 6 and 7 in turn so you can hear each of their effects on the overall sound. When you’re done exploring, unmute all operators and save the Performance as “Part 5_09” (You can also find this Performance on Soundmondo by clicking here.)
Our reconstruction of “BASS 2” is nearly complete, but there’s one last critical step that needs to be implemented. As you experimented with muting and unmuting various operators, you may have noticed that the sound is quite effective in the middle and lower ranges of the keyboard, but that it’s a little too strident and overbright in the upper registers. This is easily addressed by employing amplitude scaling for the Operator 3/4 stack. Here’s how:
- Touch the OP4 tab at the bottom of the screen or press the [MOTION SEQ SELECT 4] button, then set the Lvl/Key Hi value to 32, leaving the Curve Hi at its default–Linear. This will serve to reduce the influence of the Operator 3/4 “stack” to the right of the Break Point. Play several notes in the upper register of the keyboard while pressing the DEC/NO button to lower the Break Point one semitone at a time. You’ll find that entering a Break Point value of G2 (G below middle C) will serve to balance out the sound nicely so that it isn’t overly strident in the high notes.
- Save the Performance as “Part 5_10” (You can also find this on Soundmondo by clicking here) and play some bass lines on your keyboard. As the audio clip below demonstrates, you’ve now created an exact duplicate of the classic DX7 “BASS 2” sound.
Compare and contrast this audio clip with the previous one—recorded before the stacked modulators (Operators 3 and 5) were added—and you can clearly hear the way that cascading modulators can add a great deal of timbral complexity to a sound, making it much more lifelike and interesting.
That said, as we’re about to discover, with the subtle addition of Operators 1 and 2—both carriers producing pure sine waves (ideal for adding extra bottom end when played in low registers, and both unused up until now—we can actually improve upon the sound even further. Here’s how: Load the “Part 5_10” Performance we just created (you can also find it on Soundmondo by clicking here) and follow these steps:
- Press [PERFORMANCE]
- Press [EDIT]
- Press [PART SELECT 1/1]
- Touch the OP1 tab at the bottom of the screen or press the [MOTION SEQ SELECT 1] button, then set Operator 1’s Ratio to 0.50
- Set Operator 1’s Level to 89 and enter a Level/Vel value of +2
- All the envelope values for Operator 1 can be left at their defaults, and there’s no need to enter in a Time/Key value. However, we really only want the sine wave it’s contributing to be audible when higher register notes are played, so, leaving the Break Point at its default of C3 and the Curve Hi at its default –Linear setting, enter a Lvl/Key Hi value of 99.
- Save the Performance as “Part 5_11” (you can also find this on Soundmondo by clicking here), then play a bass line, listening carefully as you do so. As this audio clip demonstrates, the addition of Operator 1’s pure sine wave makes for a nice low end “oomph” that will give your subwoofer a workout and get your windows rattling when played at stage or dance floor volumes.
- Want to get things even tubbier? Use the MONTAGE/MODX Copy function (press the SHIFT and EDIT buttons simultaneously) to copy Operator 1’s settings to Operator 2 (the other unused carrier) and make the following subtle tweaks to Operator 2: Change the Level/Vel parameter to +7 (maximum), and then change its Ratio to 0.51 (touch the Fine parameter box, then press the INC/YES button twice to change it to a new value of 2) to add a subtle chorusing effect.
- Save the Performance as “Part 5_12” (You can also find this on Soundmondo by clicking here), then play the same bass line as before. As this audio clip demonstrates, the addition of Operator 2 is quite subtle—thanks to its high Level/Vel value, you only hear its contribution when notes are played with a good deal of force—but, depending upon genre, and especially if you have a subwoofer, you may find the extra extra bottom end to your liking. Compare and contrast this audio clip with the two preceding ones to hear the way a low end sine wave (or two) can help augment even a solid bass sound like “BASS 2.”
Let’s wrap up our discussion of modulator cascades by reconstructing one last classic DX7 sound: “HARP 1,” where one stack of modulators is used for just the attack portion and another for the body of the sound.
- Start once again by loading in the “Part 2_01” Performance created in Part 2 of this series, or download it from Soundmondo by clicking here. Again, this is simply a copy of the Init Normal (FM-X) performance with the reverb turned off.
- Press [PERFORMANCE]
- Press [EDIT]
- Press [PART SELECT 1/1]
- Since Operators 1 and 2 will be unused in this sound, touch the OP1 tab at the bottom of the screen or press the [MOTION SEQ SELECT 1] button, then change Operator 1’s Level from its default of 99 (maximum) to a new value of 0. (You won’t need to do this to Operator 2 since its default Level is already 0.)
- Touch the COMMON tab in the bottom of the screen. In the resulting Edit – Part 1 – Common screen, select Algorithm 11, which looks like this:
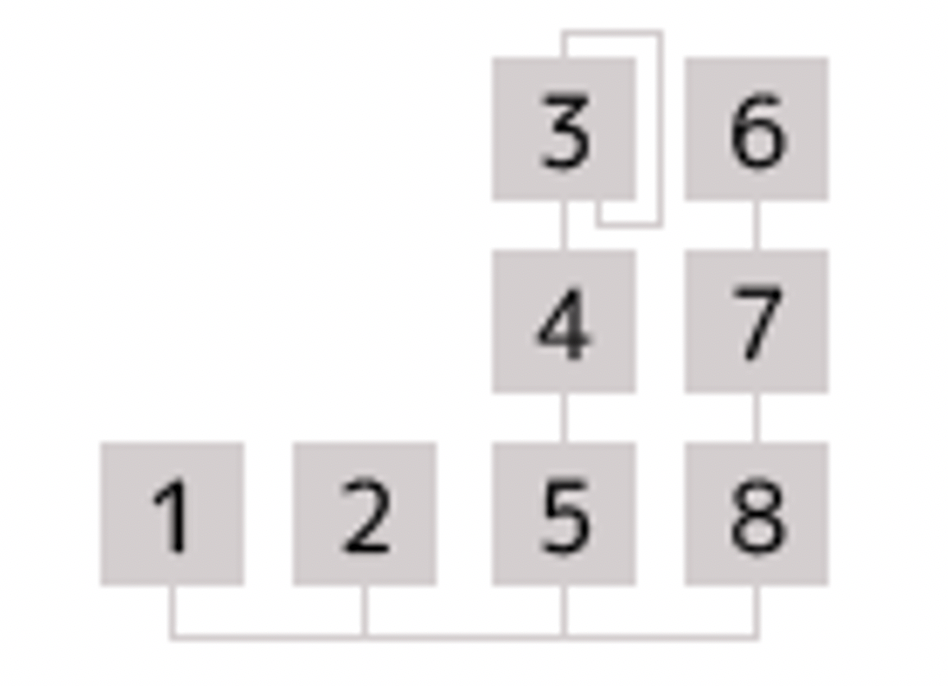
As you can see, this algorithm consists of two modulator stacks (Operators 3/4/5 and Operators 6/7/8), plus two unmodulated carriers (Operators 1 and 2). Since this sound was originally created for the six-operator DX7, Operators 1 and 2 are completely unused, so we’ll be working with Operators 3 – 6 only.
As mentioned previously, modulator cascades are often used to create the complex overtone structures associated with a sound’s initial attack, and that’s precisely how we’ll use the first stack of Operators 3/4/5.
- Let’s start by entering in data for the carrier in this stack: Operator 5. Accordingly, touch the OP5 tab at the bottom of the screen or press the [MOTION SEQ SELECT 5] button, then set Operator 5’s Level to 99 (maximum).
- Enter the following envelope values for Operator 5:
- Times: Hold = 0; Attack = 0; Decay1 = 60; Decay2 = 41; Release = 61
- Levels: Attack = 99; Decay1 = 70; Decay2 = 0; Release (Hold) = 0
- Set Operator 5’s Time/Key value to 3 and play a few notes on the keyboard so you can hear the effect of this very short envelope on the sine wave you’re hearing.
- Now let’s move on to the first modulator in this stack: Operator 4. Touch the OP4 tab at the bottom of the screen or press the [MOTION SEQ SELECT 4] button, then set Operator 4’s Level to 57, and set its Level/Vel parameter to +4.
- Enter the following envelope values for Operator 4:
- Times: Hold = 0; Attack = 0; Decay1 = 42; Decay2 = 0; Release = 75
- Levels: Attack = 99; Decay1 = 70; Decay2 = 0; Release (Hold) = 0
- Set Operator 4’s Time/Key value to 3 and play a few notes on the keyboard at varying velocities so you can hear Operator 4’s effect on the carrier (Operator 5).
- Finally, let’s enter data for Operator 3—the top modulator in this stack and the one that’s modulating Operator 4. Touch the OP3 tab at the bottom of the screen or press the [MOTION SEQ SELECT 3] button, then set Operator 3’s Level to 88 and its Level/Vel parameter to +1.
- Enter the following envelope values for Operator 3:
- Times: Hold = 0; Attack = 0; Decay1 = 33; Decay2 = 50; Release = 63
- Levels: Attack = 94; Decay1 = 79; Decay2 = 0; Release (Hold) = 0
- Set Operator 3’s Time/Key value to 6
- Set Operator 3’s Ratio to 2.00
- In this algorithm, Operator 3 has a feedback loop. Touch the Common tab on the bottom of the screen and set the Feedback value to 7 (maximum), then play a few notes on the keyboard at varying velocities so you can hear the effect of the Operator 3/4 modulator cascade on the carrier (Operator 5). This is what you’ll hear:
Save this Performance as “Part 5_13” before moving on. (You can also find this Performance on Soundmondo by clicking here.) Now let’s move on to the second stack of Operators 6/7/8, which we’ll use to create the body of the harp sound. Again, we’ll start with the carrier (Operator 8).
- Make sure the “Part 5_13” Performance is loaded (or download it from Soundmondo by clicking here)
- Press [PERFORMANCE]
- Press [EDIT]
- Press [PART SELECT 1/1]
- In order to be able to hear this stack on its own, touch the OP5 tab at the bottom of the screen or press the [MOTION SEQ SELECT 5] button, then set Operator 5’s Level to 0 (Don’t worry, we’ll reinstate it to its original setting of 99 later.)
- Touch the OP8 tab at the bottom of the screen or press the [MOTION SEQ SELECT 8] button, then set Operator 8’s Level to 99 and enter a Level/Vel value of +7 (maximum).
- Enter the following envelope values for Operator 8:
- Times: Hold = 0; Attack = 0; Decay1 = 62; Decay2 = 45; Release = 60
- Levels: Attack = 99; Decay1 = 70; Decay2 = 0; Release (Hold) = 0
- Set Operator 8’s Time/Key value to 3
- Play a few notes on the keyboard with varying degrees of velocity so you can hear the effect of this short envelope on the sine wave you’re hearing.
- Now let’s move on to the first modulator in this stack: Operator 7. Touch the OP7 tab at the bottom of the screen or press the [MOTION SEQ SELECT 7] button, then set Operator 7’s Level to 77 and enter a Level/Vel value of +3.
- Enter the following envelope values for Operator 7:
- Times: Hold = 0; Attack = 0; Decay1 = 54; Decay2 = 0; Release = 61
- Levels: Attack = 99; Decay1 = 70; Decay2 = 0; Release (Hold) = 0
- Set Operator 7’s Time/Key value to 3
- Set Operator 7’s Break Point to C#4 and select a +Linear cuve as the Curve Lo, then enter a Lvl/Key Lo value of 8. This will serve to slightly increase the effect of Operator 7 (and Operator 6, stacked above it) as notes in the very highest register of the keyboard are played.
- Play a few notes on the keyboard with varying degrees of velocity so you can hear the sound of the Operator 7/8 system.
- Finally, let’s enter data for Operator 6—the top modulator in this stack and the one that’s modulating Operator 7. Touch the OP6 tab at the bottom of the screen or press the [MOTION SEQ SELECT 6] button, then set Operator 6’s Level to 89. (Leave the Level/Vel parameter at its default of +0 so that the contribution of this modulator remains constant regardless of the force with which keys are struck.)
- Enter the following envelope values for Operator 6:
- Times: Hold = 0; Attack = 0; Decay1 = 46; Decay2 = 44; Release = 56
- Levels: Attack = 99; Decay1 = 70; Decay2 = 0; Release (Hold) = 0
- Set Operator 6’s Time/Key value to 3
- Set Operator 6’s Break Point to G4 and enter a Lvl/Key Hi value of 37. (Leave Curve Hi at its default –Linear setting.) This will serve to decrease the effect of Operator 6 (the modulator at the top of the stack) as notes in the very highest register of the keyboard are played.
- Save this Performance as “Part 5_14” (you can also find this Performance on Soundmondo by clicking here), then play a few notes on the keyboard at varying velocities. This is what you’ll hear:
Clearly, even though the Operator 6/7/8 stack is basically responsible just for the body of the sound, it actually provides a pretty good rendition of a harp on its own. Let’s see just what happens when we bring the Operator 3/4/5 stack back into the sound:
- Make sure the “Part 5_14” Performance is loaded (or download it from Soundmondo by clicking here)
- Press [PERFORMANCE]
- Press [EDIT]
- Press [PART SELECT 1/1]
- Touch the OP5 tab at the bottom of the screen or press the [MOTION SEQ SELECT 5] button, then restore Operator 5’s Level to 99 so we can hear the effect of both stacks on the sound.
- Save this Performance as “Part 5_15” (you can also find this Performance on Soundmondo by clicking here), then play a few notes on the keyboard at varying velocities. This is what you’ll hear:
We’re nearly there, but you’ll probably agree that the sound is just a little too strident, lacking the gentleness of a real acoustic harp being plucked. That’s because we need to make one more change to complete our perfect “HARP 1” emulation:
- Make sure the “Part 5_15” Performance is loaded (or download it from Soundmondo by clicking here)
- Pess [PERFORMANCE]
- Press [EDIT]
- Press [PART SELECT 1/1]
- Touch the OP5 tab at the bottom of the screen or press the [MOTION SEQ SELECT 5] button, then change the Level/Vel setting for Operator 5 to +7 (maximum). This ensures that you’ll only hear the contribution of the Operator 3/4/5 stack—which, remember, is designed only to provide the attack portion of the sound—when keys are struck with some degree of force. Conversely, when you play keys gently, you hear pretty much only the body portion of the sound coming from the Operator 6/7/8 stack—similar sonically to what happens when you pluck a harp string (or any string, for that matter) gently; the timbrally complex attack portion that’s present when plucking forcefully is almost entirely missing, as this audio clip demonstrates.
This critical final adjustment adds just the right touch of acoustic reality to our now-complete “HARP 1” Performance, which I suggest you save as “Part 5_16” (you can also find it on Soundmondo by clicking here). Of course, you should feel free to continue to experiment by altering various parameters—as we’ve learned, significant sonic changes often occur when even seemingly minor adjustments are made.
This concludes our FM 101 series … a long journey, to be sure, but one that I hope has been a fruitful one. Happy tweaking!
If you missed any of the other articles in the series click on the links below:
FM 101, Part 1: Discovering Digital FM…John Chowning Remembers
FM 101, Part 2: The Basics
FM 101, Part 3: The Magic of Modulation
FM 101, Part 4: Going from Static to Dynamic
FM 101, Part 5: Expanding Your Sound
Have questions/comments? Join the conversation on the Forum here.
Tagged Under
Keep Reading
© 2025 Yamaha Corporation of America and Yamaha Corporation. All rights reserved. Terms of Use | Privacy Policy | Contact Us


